background image

6-1

6 Document Box

This chapter explains the typical procedure for utilizing Document Box.

Printing Documents Stored in USB Memory ................ 6-2

Saving Documents to USB Memory (Scan to USB)..... 6-5

Removing USB Memory............................................... 6-7

Printing from a Job Box ................................................ 6-8

Содержание d-COPIA3003MF

Страница 1: ...K OBSLUZE GUIDA ALLE FUNZIONI OPERATION GUIDE BETJENINGSVEJLEDNING BEDIENUNGSANLEITUNG H H GU A DE USO MANUEL D UTILISATION HASZN LATI TMUTAT GEBRUIKERSHANDLEIDING PODR CZNIK OBS UGI GUIA DE USO GHID...

Страница 2: ...which could compromise the conformity attested to above as well as the characteristics of the product incorrect electrical power supply incorrect installation incorrect or improper use or use not in...

Страница 3: ...escribes frequently used operations convenient operations routine maintenance and troubleshooting action Safety Guide Provides safety and cautionary information for the installation and use of the mac...

Страница 4: ...required action are indicated inside the symbol Please contact your service representative to order a replacement if the safety warnings in this Operation Guide are illegible or if the guide itself i...

Страница 5: ...Setup LAN Cable Connection 2 13 Installing Software 2 15 Embedded Web Server Settings for E mail 2 26 Sending E mail 2 27 Preparation for sending a document to a PC 2 29 Loading Paper 2 39 Loading Or...

Страница 6: ...hecking Job History 7 8 Sending the Job Log History 7 13 Pause and Resumption of Jobs 7 18 Canceling of Jobs 7 18 Device Communication 7 19 8 Default Setting System Menu Common Settings 8 2 Copy Setti...

Страница 7: ...15 Checking the Counter 11 37 Appendix Optional Equipment Appendix 2 Character Entry Method Appendix 5 Paper Appendix 9 Specifications Appendix 18 EN ISO 7779 Appendix 22 EK1 ITB 2000 Appendix 22 Glos...

Страница 8: ...before using this machine Administrator tasks It copies It prints Copying with specific settings Printing Documents Stored in Removable USB Memory Print via a network Print over the USB connection Con...

Страница 9: ...the platen Plug the USB memory 1 If the destination is not stored in the address book you can send by entering the address directly Setup Send as E mail Send to Folder SMB Send to PC Saving Documents...

Страница 10: ...machine Selection of Telephone Line Inch version only Network Setup LAN Cable Connection Install the Network FAX Driver on your computer 1 1 For more information refer to the Network FAX Driver Opera...

Страница 11: ...ntinued on next page Function Menu key Continued on next page Color Selection page 5 13 Original Size page 5 2 Original Image page 5 10 Scan Resolution page 5 12 Sending Size page 5 3 Zoom page 5 5 Or...

Страница 12: ...ion Menu key Collate page 3 15 Paper Selection page 4 3 Duplex page 3 12 File Name Entry page 5 15 JobFinish Notice page 4 14 Print Override page 4 17 Encrypted PDF TIFF Print page 6 3 XPS FitTo Page...

Страница 13: ...page Report Report Print Menu Map page 8 93 Status Page page 8 93 Font List page 8 93 Admin Rpt Set Outgoing FAX Rpt Refer to the FAX Operation Guide Incoming FAX Rpt Refer to the FAX Operation Guide...

Страница 14: ...face page 8 116 I F Block Set page 8 145 Security Level page 8 149 Restart page 8 115 Op Functions page 8 149 User Job Account User Login Set User Login page 11 2 Local User List page 11 6 IC Card Set...

Страница 15: ...om PaperSize page 8 10 Cassette 1 Set page 8 12 Cassette 2 Set page 8 12 Cassette 3 Set page 8 12 MP Tray Set page 8 14 Media Type Set page 8 16 Media for Auto page 8 20 Def PaperSource page 8 21 Spci...

Страница 16: ...rint page 8 50 File Name Entry page 8 51 Subject Body page 8 52 Continuous Scan page 8 53 File Format page 8 54 File Separation page 8 55 TIFF Print page 8 56 XPS FitTo Page page 8 57 Detail Setting 2...

Страница 17: ...ent Box Sub Address Box Refer to the FAX Operation Guide Job Box page 8 89 Polling Box Refer to the FAX Operation Guide Select Key Set page 8 91 Edit Destination Address Book page 8 102 Print List pag...

Страница 18: ...sant To maintain the appropriate environment for copy work it is suggested that the room be properly ventilated Cautions when handling consumables CAUTION Do not attempt to incinerate the toner contai...

Страница 19: ...e avoiding exposure to direct sunlight Store the machine in a place where the temperature stays below 40 C while avoiding sharp changes of temperature and humidity If the machine will not be used for...

Страница 20: ...iation exposure These labels are attached to the laser scanner unit inside the machine and are not in a user access area The label shown below is attached on the right side of the machine Legal Restri...

Страница 21: ...xviii...

Страница 22: ...chapter provides information on the following topics Legal Information xx Regarding Trade Names xx Energy Saving Control Function xxiv Automatic 2 Sided Copy Function xxiv Paper Recycling xxiv Energy...

Страница 23: ...rks of Novell Inc IBM and IBM PC AT are trademarks of International Business Machines Corporation AppleTalk Bonjour Macintosh and Mac OS are trademarks of Apple Inc registered in the U S and other cou...

Страница 24: ...oolkit and OpenSSL Project must not be used to endorse or promote products derived from this software without prior written permission For written permission please contact openssl core openssl org 5...

Страница 25: ...following disclaimer in the documentation and or other materials provided with the distribution 3 All advertising materials mentioning features or use of this software must display the following ackn...

Страница 26: ...all copies of the Software and Typefaces and documentation as requested 6 You agree that you will not modify alter disassemble decrypt reverse engineer or decompile the Software 7 Monotype Imaging wa...

Страница 27: ...e 2 7 Automatic 2 Sided Copy Function This device includes 2 sided copying as a standard function For example by copying two 1 sided originals onto a single sheet of paper as a 2 sided copy it is poss...

Страница 28: ...uide to using document boxes Chapter 7 Status Job Cancel Explains how to check the job status and job history and how to pause or resume jobs being printed or waiting to print Also explains how to che...

Страница 29: ...em Italic Indicates a message displayed on the Message Display Ready to copy is displayed Used to emphasize a key word phrase or references to additional information For more information refer to Slee...

Страница 30: ...1 1 1 Part Names This chapter identifies the machine parts and operation panel keys Operation Panel 1 2 Machine 1 4...

Страница 31: ...n edit and delete destinations Calls the previous destination Also used to enter a pause when entering a FAX number Displays the Address Book screen where you can add edit and delete destinations Used...

Страница 32: ...ions and processing for setting operations Clears entered numbers and characters Numeric keys Enter numbers and symbols Displays the function menu for copy print transmission and document box Used to...

Страница 33: ...e 1 Document Processor 2 Platen 3 Power Switch 4 Slit Glass 5 Operation Panel 6 Top Cover 7 Front Cover 8 Duplex Front Cover 9 Drum Unit 10 Main Charger Cleaner 11 Lock Lever 12 Toner Container 9 2 1...

Страница 34: ...ength Adjusting Tab 15 Paper Length Guide 16 Paper Width Guides 17 Cassette 1 18 Paper Width Adjusting Tab 19 Paper Width Guides MP Tray 20 MP Multi Purpose Tray 21 Support Tray Section of the Multi P...

Страница 35: ...tor 25 Fuser Cover 26 Handholds 27 Rear Cover 28 Power Cord Connector Document Processor 29 Document Processor Cover 30 Original Width Guides 31 Original Table 32 Original Eject Table 33 Original Stop...

Страница 36: ...termining the Connection Method and Preparing Cables 2 3 Connecting Cables 2 5 Power On Off 2 6 Sleep 2 7 Switching the Language for Display Language 2 8 Setting Date and Time 2 10 Network Setup LAN C...

Страница 37: ...y Documents Contained in the Included DVD The following documents are contained in the included DVD Product Library Refer to them as necessary Documents Operation Guide This Guide FAX Operation Guide...

Страница 38: ...nned image as a data file on the FTP Send E mail Sends the image data of scanned originals to the desired recipient as a file attached to an E mail message Send SMB Saves the scanned image as a data f...

Страница 39: ...vailable Standard Interfaces Function Interface Necessary Cable Printer Scanner Network FAX Network FAX and FAX functions available only in the machine with fax For details on Network FAX refer to the...

Страница 40: ...twork device When using the network interface remove the cap When connecting the network cable configure the network For details refer to Network Setup LAN Cable Connection on page 2 13 2 Connect one...

Страница 41: ...IMPORTANT When turning off the power switch do not turn on the power switch again immediately Wait more than 5 seconds and then turn on the power switch Power Off Make sure that the memory indicator...

Страница 42: ...sion and reception CAUTION Remove paper from the cassettes and seal it in the paper storage bag to protect it from humidity Sleep When the set time factory setting is 1 minute elapses after the machin...

Страница 43: ...n NOTE The following administrator is registered in the machine at the factory Login User Name 30 ppm model 3000 35 ppm model 3500 Login Password 30 ppm model 3000 35 ppm model 3500 Refer to Character...

Страница 44: ...Press the OK key Language appears 7 Press the U or V key to select the desired language and then press the OK key Completed is displayed and the screen returns to the Common Settings menu Language a b...

Страница 45: ...Common Settings 3 Press the OK key The Common Settings menu appears 4 Press the U or V key to select Date Setting and press the OK key 5 A login screen will appear Then enter the user ID and password...

Страница 46: ...e OK key Completed is displayed and the screen returns to the Date Setting menu 13 Press the U or V key to select Date Time 14 Press the OK key Date Time appears 15 Press the Y or Z key to move the cu...

Страница 47: ...7 Press the U or V key to select Date Format 18 Press the OK key Date Format appears 19 Press the U or V key to select the desired display format and then press the OK key Completed is displayed and t...

Страница 48: ...e 8 116 or Network Security on page 8 135 NOTE When Embedded Web Server is used network parameters and security settings can be conveniently changed and checked from your PC For more information refer...

Страница 49: ...e Type AppleTalk On Off WSD SCAN On Off WSD PRINT On Off IPSec IPSec On Off Rule Setting On Off Secure Protocol SSL On Off IPP Security IPP IPP over SSL IPPoverSSL only HTTP Security HTTP HTTPS HTTPS...

Страница 50: ...oftware Express Mode automatically detects connected printers and installs the required software Use Custom Mode if you want to specify the printer port and select the software to be installed 1 Turn...

Страница 51: ...is turned on Use Express Mode for standard connection methods 1 In the installation method selection window select Express Mode The print system detection window appears and the installer detects the...

Страница 52: ...ia a USB at the time of the first installation 4 A window appears in which you can check the settings Check the settings carefully and then click Install NOTE If the Windows security window appears cl...

Страница 53: ...y tab 1 Select Custom Mode 2 Following the instructions in the install wizard window select the software packages to be installed and the specify the port etc For details refer to Custom Installation...

Страница 54: ...ore Use 2 19 4 Double click either OS X 10 2 and 10 3 Only OS X 10 4 Only or OS X 10 5 or higher depending on your Mac OS version 5 Double click Brand name OS X x x 6 The printer driver installation p...

Страница 55: ...lows you to specify the components to be installed IMPORTANT In the Authenticate screen enter the name and password used to log in to the operating system This completes the printer driver installatio...

Страница 56: ...er name When you click the AppleTalk icon for an AppleTalk connection enter the printer name NOTE AppleTalk icon is not displayed on Mac OS X 10 6 For a Bonjour connection click the default icon and s...

Страница 57: ...mputers because the printer settings are specified using a PPD PostScript Printer Description file the software cannot be uninstalled using the DVD Product Library 1 Exit all active software applicati...

Страница 58: ...rs click Finish 7 If Restart Your System screen appears select whether you restart your computer or not and click Finish NOTE The software can be uninstalled from the Start menu Start the uninstaller...

Страница 59: ...alid go to Step 7 6 Select the checkbox beside Authentication enter Login User Name up to 64 characters and Password up to 64 characters and then click OK 7 Click OK 8 The machine is registered to the...

Страница 60: ...s and then click Scanners and Cameras 2 Select the same name as this machine from WIA Drivers and press Properties NOTE If Windows Security and User Account Control are displayed no trouble should be...

Страница 61: ...the machine with fax The procedure for accessing Embedded Web Server is explained below 1 Launch your Web browser 2 In the Address or Location bar enter the machine s IP address E g http 192 168 48 2...

Страница 62: ...chine as E mail attachments check the following The network environment used to connect this machine to the mail server A full time connection via a LAN is recommended SMTP Settings Use Embedded Web S...

Страница 63: ...sword is 64 characters SMTP Security Enables or disables the SMTP Security When this protocol is enabled either SSL TLS or STARTTLS must be selected To enable SMTP security the SMTP port may have to b...

Страница 64: ...roperties The System Properties dialog box appears Click the Computer Name tab in the window that appears and check the computer name If there is a workgroup All characters appearing in Full computer...

Страница 65: ...he settings below to limit folder access to a specific user or group 1 From the Start menu select Control Panel Appearance and Personalization and then Folder Options Windows XP click My Computer and...

Страница 66: ...vanced sharing Click the Advanced Sharing button The scannerdata Properties dialog box appears In Windows XP right click the scannerdata folder and select Sharing and Security or Sharing 3 Select the...

Страница 67: ...6 Select the entered user select the Change and Read permissions and click the OK button In Windows XP go to step 8 NOTE Everyone gives sharing permission to everyone on the network To strengthen sec...

Страница 68: ...lick the Edit button In Windows XP click the Security tab and then click the Add button 9 Proceed in the same way as in step 5 to add a user to Group or user names 10 Select the added user select the...

Страница 69: ...t you checked pc4050 and then click Search 2 Click pc4050 scannerdata that appears in the search results In Windows XP double click the computer pc4050 that appears in the search results 3 Check the f...

Страница 70: ...Checking file and printer sharing 1 From the Start menu select Control Panel System and Security and Allow a program through Windows Firewall NOTE If the User Account Control dialog box appears click...

Страница 71: ...Preparation before Use 2 36 2 Click Advanced settings 3 Click Inbound Rules 4 Click New Rule 5 Select Port and click Next 6 Select TCP select Specific local ports enter 139 and click Next...

Страница 72: ...2 Preparation before Use 2 37 7 Select Allow the connection and click Next 8 Make sure all checkboxes are selected and click Next 9 Enter Scan to SMB in Name and click Finish...

Страница 73: ...then Check Firewall Status or Windows Firewall If the User Account Control dialog box appears click the Continue button 2 Click the Exceptions tab and then the Add port button 3 Specify Add a Port set...

Страница 74: ...d or folded straighten it before loading Paper that is curled or folded may cause a jam CAUTION If you copy onto used paper paper already used for copying do not use paper that is stapled or clipped t...

Страница 75: ...may cause paper jams or other faults When using media types other than plain paper such as recycled or colored paper always specify the media type setting Refer to Specifying Paper Size and Media Type...

Страница 76: ...djusting tab on the left guide and slide the guides to the paper size required NOTE Paper sizes are marked on the cassette 4 Adjust the paper length guide to the paper size required If you are going t...

Страница 77: ...per without adjusting these guides may cause skewed feeding and paper jams Be sure that the paper length and width guides rest securely against the paper If there is a gap readjust the guides to fit t...

Страница 78: ...2 49 If you are using a paper weight of 106 g m2 or more set the media type to Thick The capacity of the multi purpose tray is as follows A4 or smaller plain paper 80 g m2 recycled paper or color pap...

Страница 79: ...per left over in the tray from a previous job before loading the paper If there is just a small amount of paper left over in the multi purpose tray and you want to add more first remove the left over...

Страница 80: ...ut the subtray 3 Adjust the position of the paper guides on the MP tray Standard paper sizes are marked on the MP tray or Manual Feed tray For standard paper sizes slide the paper guides to the corres...

Страница 81: ...lopes orientation and facing will differ depending on the type of envelope Be sure to load it in correctly otherwise printing may be done in the wrong direction or on the wrong face NOTE When you load...

Страница 82: ...media types for printing received faxes are as shown below Plain Recycled Bond Color High Quality and Rough 1 Press the System Menu Counter key on the main unit operation panel When you are performin...

Страница 83: ...e in a similar fashion when you select an optional cassette Cassette 2 and 3 7 Press the OK key The Cassette 1 Set menu appears 8 Press the U or V key to select Cassette 1 Size 9 Press the OK key Cass...

Страница 84: ...ectable paper sizes are as follows Inch size Letter Legal Statement Executive and Oficio II Metric size A4 A5 A6 B5 B6 Folio 216 340mm 16K ISO B5 Envelope 10 Commercial 10 Envelope 9 Commercial 9 Enve...

Страница 85: ...haracters When you are not performing user management go to step 2 2 In the Sys Menu Count menu press the U or V key to select Common Settings 3 Press the OK key The Common Settings menu appears 4 Pre...

Страница 86: ...MP Tray Set menu 11 Press the U or V key to select MP Tray Type 12 Press the OK key MP Tray Type appears 13 Press the U or V key to select the desired paper type and then press the OK key Completed is...

Страница 87: ...ll off when the document processor is opened Keep the document processor open if the original is 25 mm or thicker 2 Place the original Put the scanning side facedown and align it flush against the ori...

Страница 88: ...rectangular originals Originals with cut out sections Crumpled paper Originals with folds Straighten the folds before loading Failure to do so may cause the originals to jam Originals bound with clips...

Страница 89: ...he original width guides exactly fit the originals If there is a gap readjust the original width guides The gap may cause the originals to jam Ensure that loaded originals do not exceed the level indi...

Страница 90: ...following operations Login Logout 3 2 One Touch Keys and Program Keys 3 3 Message Display 3 6 Copying 3 7 Printing Printing from Applications 3 16 Sending 3 18 Specifying Destination 3 25 Canceling Jo...

Страница 91: ...f the screen shown appears during operations enter the login user name 2 Press the V key The input cursor moves to Login Password 3 Enter the login password Press the U key to move the input cursor to...

Страница 92: ...ered 2 The destination registered to the one touch key is recalled and automatically entered on the screen IMPORTANT Any destination already entered is overwritten Program Keys Settings of various fun...

Страница 93: ...3 seconds Menu appears 2 To replace the registered settings with the current settings press the U or V key to select Overwrite and then press the OK key A confirmation screen appears Press Yes the Lef...

Страница 94: ...warm up 2 Place the original on the platen Put the scanning side facedown in the center of Statement or A5 size scanning area NOTE For loading instructions refer to Loading Originals on page 2 52 3 Pr...

Страница 95: ...nal paper feeder is currently selected When this icon is displayed as or there is no paper is the cassette F The MP Tray is currently selected When this icon is displayed as L there is no paper is the...

Страница 96: ...ng Originals on page 2 52 3 The paper source for copying is the location displayed on the panel When you need to change the paper source use the Paper Selection menu If Auto is selected the most suita...

Страница 97: ...key Density appears 4 Press the U or V key to select Auto or Manual 5 Press the OK key When Manual is selected Manual appears Press the U or V key to select your desired density and then press the OK...

Страница 98: ...OK key Original Image appears 4 Press the U or V key to select the image quality suited to the type of original 5 Press the OK key Completed is displayed and the screen returns to the basic screen 6 P...

Страница 99: ...magnifications are available Letter R 129 Statement R 141 A5 A4 64 70 25 400 Model Zoom Level OriginalCopy Inch Models Standard 100 400 Max 200 129 Statement Letter 78 Legal Letter 64 Letter Statemen...

Страница 100: ...OK key Standard Zoom appears Press the U or V key to select the desired magnification If you select Other and press the OK key you can select from additional magnifications To enter a magnification se...

Страница 101: ...g Top Images on the second sides are rotated 180 Copies can be bound on the top edge facing the same orientation when turning the pages Two sided to One sided Copies each side of a two sided original...

Страница 102: ...he binding edge of the finished copies and the original setting orientation If you select 2 sided 1 sided press Detail the Right Select key and you can select the binding edge of the original and the...

Страница 103: ...played and the screen returns to the basic screen 6 Press the Start key Copying begins If the original is placed on the platen replace it with the next one before pressing the Start key If there is no...

Страница 104: ...ying is explained below 1 Press the Function Menu key Function Menu appears 2 Press the U or V key to select Collate 3 Press the OK key Collate appears 4 Press the U or V key to select Off or On 5 Pre...

Страница 105: ...box appears 3 Click the T button next to the Name field and select this machine from the list 4 Enter the desired print quantity in the Number of copies box Enter any number up to 999 When there is m...

Страница 106: ...e multi purpose tray and select MP Tray 8 Select paper orientation either Portrait or Landscape to match the orientation of the document Selecting Rotated will print the document rotated 180 9 Click O...

Страница 107: ...f the SMTP server and the recipient Register the destination in the Address Book or One touch keys When the PC Folder SMB FTP is selected it is necessary to share the destination folder For setting up...

Страница 108: ...b Server Settings for E mail on page 2 26 Refer to Character Entry Method on Appendix 5 for details on entering characters 1 Press the Send key Displays the screen for sending 2 Place the originals on...

Страница 109: ...tions Up to 100 destinations can be specified 8 Press the Confirm Destination key to confirm the registered destinations Press the U or V key to select a destination and press the OK key Then you can...

Страница 110: ...x 5 for details on entering characters 1 Press the Send key Displays the screen for sending 2 Place the originals on the platen or in the document processor NOTE For loading instructions refer to Load...

Страница 111: ...ion screen appears NOTE If the screen for confirming the entry of a new destination page 8 89 is set to On screens to confirm the entered host name and path name appear Enter the same host name and pa...

Страница 112: ...Login Password Password to access the PC Up to 64 characters To specify a port number different from the default 139 enter using the format host name port number e g SMBhostname 140 Item Data to be en...

Страница 113: ...elect key The screen shown in step 3 reappears Check and re enter the destination 14 Press the Confirm Destination key to confirm the registered destinations Press Exit the Right Select key to return...

Страница 114: ...registered Select Addr Book is not displayed 3 Press the U or V key to select the desired user or group and then press the OK key If you select a user the list of destinations registered to the user a...

Страница 115: ...r that starts with the entered character string at the top Search in External Address Book 1 In Ext Address Book press Menu the Right Select key Menu appears 2 Press the U or V key to select Search an...

Страница 116: ...ing a Destination on One touch Key on page 8 113 for more information on adding one touch keys Sending to Different Types of Destinations Multi Sending You can specify destinations that combine e mail...

Страница 117: ...is displayed 3 Press the U or V key to select the job you want to stop and then press Menu the Right Select key Menu appears 4 Press the U or V key to select Cancel Job and then press the OK key A con...

Страница 118: ...one of 10 levels Checking Remaining Paper 1 Press the Status Job Cancel key The Status menu appears 2 Press the U or V key to select Paper Status 3 Press the OK key Paper Status appears Press the Y o...

Страница 119: ...3 30 Basic Operation...

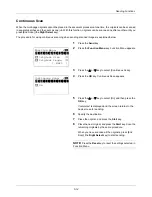
Страница 120: ...hapter explains the functions available for copying Original Size 4 2 Paper Selection 4 3 Original Orientation 4 6 EcoPrint 4 8 Combine Mode 4 9 Continuous Scan 4 13 Job Finish Notice 4 14 File Name E...

Страница 121: ...e and then press the OK key Completed is displayed and the screen returns to the basic screen for copying 7 Press the Start key to start copying NOTE Press the Reset key to reset the settings selected...

Страница 122: ...n Menu appears 4 Press the U or V key to select Paper Selection 5 Press the OK key Paper Selection appears 6 Press the U or V key to select the desired paper size If Auto is selected the paper matchin...

Страница 123: ...h Envelope DL Envelope C5 Hagaki Oufuku Hagaki Youkei 4 Youkei 2 and Custom For instructions on how to specify the custom paper size Custom refer to Adding a Custom Size and Media Type for Paper to Pr...

Страница 124: ...ey 9 Press the U or V key to select the desired paper type and then press the OK key Completed is displayed and the screen returns to the basic screen for copying 10 Place paper in the multi purpose t...

Страница 125: ...following functions Duplex Combine mode When placing originals on the platen When placing originals on the document processor NOTE To change the default setting for the original orientation refer to...

Страница 126: ...rientation 5 Press the OK key Orig Orientation appears 6 Press the U or V key to select Top Edge Top or Top Edge Left 7 Press the OK key Completed is displayed and the screen returns to the basic scre...

Страница 127: ...l 3 Press the Function Menu key Function Menu appears 4 Press the U or V key to select EcoPrint 5 Press the OK key EcoPrint appears 6 Press the U or V key to select On and then press the OK key Comple...

Страница 128: ...per sizes of Folio A4 A5 B5 Legal Oficio II Letter Statement 16K and 216 x 340 mm 2 in 1 Mode For copying two originals onto a single sheet This mode can be used with Duplex mode to copy four original...

Страница 129: ...e can be used with Duplex mode to copy eight originals onto one sheet The following 4 in 1 options and output orientations are available NOTE When placing the original on the platen be sure to copy th...

Страница 130: ...Function Menu appears 4 Press the U or V key to select Combine 5 Press the OK key Combine appears 6 Press the U or V key to select 2 in1 or 4 in 1 7 Press Detail the Right Select key 8 Press the U or...

Страница 131: ...creen returns to the basic screen for copying 11 Press the Start key Scanning begins If the original is placed on the platen replace the original and press the Start key After scanning all originals p...

Страница 132: ...key to select Continuous Scan 4 Press the OK key Continuous Scan appears 5 Press the U or V key to select On and then press the OK key Completed is displayed and the screen returns to the basic scree...

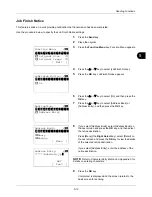
Страница 133: ...able job finish notification when making copies 1 Press the Copy key 2 Place the original 3 Press the Function Menu key Function Menu appears 4 Press the U or V key to select JobFinish Notice 5 Press...

Страница 134: ...n If you select Address Entry enter the address of the notice destination NOTE Refer to Character Entry Method on Appendix 5 for details on entering characters 9 Press the OK key Completed is displaye...

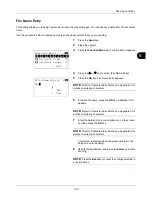
Страница 135: ...ess the OK key File Name Entry appears 6 Enter the file name press the OK key Additional Info appears NOTE Refer to Character Entry Method on Appendix 5 for details on entering characters 7 Enter the...

Страница 136: ...Press the OK key Print Override appears 4 Press the U or V key to select On 5 Press the OK key Completed is displayed the machine is put into the interruption copy mode and the basic screen appears 6...

Страница 137: ...4 18 Copying Functions...

Страница 138: ...ing 5 6 Original Orientation 5 7 File Format 5 9 Original Image 5 10 Adjusting Density 5 11 Scan Resolution 5 12 Color Grayscale Black and White Selection 5 13 Continuous Scan 5 14 File Name Entry 5 1...

Страница 139: ...ct the desired original size and then press the OK key Completed is displayed and the screen returns to the basic screen for sending 7 Specify the destination and press the Start key to start sending...

Страница 140: ...ion Menu key Function Menu appears 4 Press the U or V key to select Sending Size 5 Press the OK key Sending Size appears 6 Press the U or V key to select the desired sending size Item Size Sending Siz...

Страница 141: ...the OK key Completed is displayed and the screen returns to the basic screen for sending 8 Specify the destination and press the Start key to start sending NOTE Press the Reset key to reset the setti...

Страница 142: ...h the transmission size 1 Press the Send key 2 Place the original 3 Select the transmission size 4 Press the Function Menu key Function Menu appears 5 Press the U or V key to select Zoom 6 Press the O...

Страница 143: ...o select 1 sided or 2 sided If you select 2 sided press Detail the Right Select key select the binding edge and press the OK key and then select the original setting orientation on the next screen 7 P...

Страница 144: ...ng the original on the document processor Use the procedure below to select the orientation when placing the originals on the platen for sending 1 Press the Send key 2 Place the original 3 Press the F...

Страница 145: ...ge Top or Top Edge Left 7 Press the OK key Completed is displayed and the screen returns to the basic screen for sending 8 Specify the destination and press the Start key to start sending NOTE Press t...

Страница 146: ...ect the image quality 7 Press the OK key Completed is displayed and the screen returns to the basic screen for sending 8 Specify the destination and press the Start key to start sending NOTE Press the...

Страница 147: ...V key to select the desired image quality 7 Press the OK key Completed is displayed and the screen returns to the basic screen for sending 8 Specify the destination and press the Start key to start se...

Страница 148: ...ss the U or V key to select Auto or Manual If you select Manual press the OK key and then select the density on the next screen 7 Press the OK key Completed is displayed and the screen returns to the...

Страница 149: ...sending a scanned image is explained below 1 Press the Send key 2 Place the original 3 Press the Function Menu key Function Menu appears 4 Press the U or V key to select Scan Resolution 5 Press the O...

Страница 150: ...on Menu key Function Menu appears 4 Press the U or V key to select Color Selection 5 Press the OK key Color Selection appears 6 Press the U or V key to select the desired color mode 7 Press the OK key...

Страница 151: ...ss the U or V key to select Continuous Scan 4 Press the OK key Continuous Scan appears 5 Press the U or V key to select On and then press the OK key Completed is displayed and the screen returns to th...

Страница 152: ...details on entering characters 6 Enter the file name press the OK key Additional Info appears NOTE Refer to Character Entry Method on Appendix 5 for details on entering characters 7 Enter the date and...

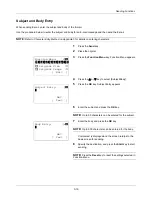
Страница 153: ...key to select Subject Body 5 Press the OK key Subject Entry appears 6 Enter the subject and press the OK key NOTE Up to 60 characters can be entered for the subject 7 Enter the body and press the OK...

Страница 154: ...window appears click Continue If the Found New Hardware window appears click Cancel 3 During the installation double click the icon shown on the task bar to display the Driver Software Installation sc...

Страница 155: ...key to confirm the destination and then press the Start key Transmission starts NOTE To change the destination computer press the Back key and then press Yes the Left Select key This brings you back t...

Страница 156: ...Address Book select Address Book on the next screen and press the OK key and then select the notice destination Press Menu the Right Select key select Detail on the next screen and press the OK key t...

Страница 157: ...Specify the destination and press the Start key to start sending When the sending is completed the finish notice is sent to the specified E mail address NOTE Press the Reset key to reset the settings...

Страница 158: ...FTP Encrypted TX 5 Press the OK key FTP Encrypted TX appears 6 Press the U or V key to select On and then press the OK key Completed is displayed and the screen returns to the basic screen for sending...

Страница 159: ...Press the U or V key to select File Separation 5 Press the OK key File Separation appears 6 Press the U or V key to select Each Page and then press the OK key Completed is displayed and the screen ret...

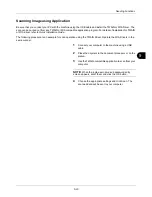
Страница 160: ...lation Guide The following procedure is an example for scan operation using the TWAIN Driver Operate the WIA Drivers in the same manner 1 Connect your computer to the machine using a USB cable 2 Place...

Страница 161: ...5 24 Sending Functions...

Страница 162: ...ox This chapter explains the typical procedure for utilizing Document Box Printing Documents Stored in USB Memory 6 2 Saving Documents to USB Memory Scan to USB 6 5 Removing USB Memory 6 7 Printing fr...

Страница 163: ...ry directly into the USB memory slot If connected via a USB hub the machine may not operate correctly Printing Print documents stored in the removable USB memory 1 Plug the USB memory into the USB mem...

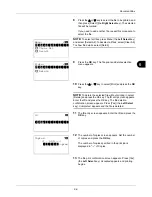
Страница 164: ...tions on page 4 1 10 Press the Start key Printing of the selected file begins IMPORTANT When removing the USB memory ensure that you use the correct removal procedure as described in Removing USB Memo...

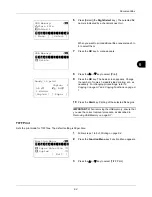
Страница 165: ...is setting XPS data is scaled to fit the paper size during printing If you select Off the data is printed at its original size 1 Follow steps 1 to 8 of Printing on page 6 2 2 Press the Function Menu k...

Страница 166: ...pears 5 Select the destination of the scanned image files To save the data directly to the USB memory go to step 6 To save the data in the folder of USB memory press the U or V key to select the folde...

Страница 167: ...ress the Start key The original is scanned and the data is stored in the USB memory IMPORTANT When removing the USB memory ensure that you use the correct removal procedure as described in Removing US...

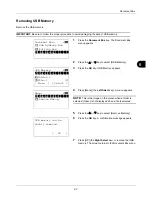
Страница 168: ...A menu appears NOTE This is the image on the screen when a folder is selected Open is not displayed when a file is selected 5 Press the U or V key to select Remove Memory 6 Press the OK key A confirm...

Страница 169: ...rinting only after the same 4 digit ID that was entered in the printer driver at the time of printing is entered at the operation panel The data is erased after printing For information on Private Pri...

Страница 170: ...TE To delete the selected file without printing it select Delete and press the OK key The ID entry screen appears Enter the ID and press the OK key The file deletion confirmation screen appears Press...

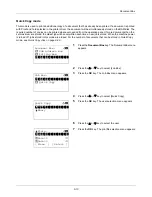
Страница 171: ...power is turned off jobs stored in this mode are erased For the number of documents that can be stored in Quick Copy mode see Quick Copy Jobs on page 8 89 1 Press the Document Box key The Document Bo...

Страница 172: ...pears 10 Press the U or V key to select Print and press the OK key NOTE To delete the selected file without printing it select Delete and press the OK key The file deletion confirmation screen appears...

Страница 173: ...6 12 Document Box...

Страница 174: ...pause or resume the jobs being processed or waiting to be printed This chapter also explains how to check the status of devices Checking Job Status 7 2 Checking Job History 7 8 Sending the Job Log Hi...

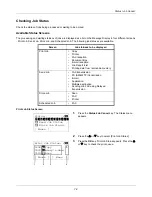
Страница 175: ...ess the U or V key to select Print Job Status 3 Press the OK key Print Job Status appears Press the U or V key to check the print queue Screen Job statuses to be displayed Print Job Copy Printer FAX r...

Страница 176: ...ed in detailed information When the job name in Job Name is displayed in a short form press Detail the Right Select key to see the complete job name Press the OK key to return to the original screen T...

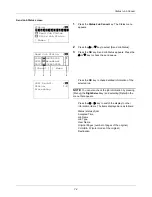
Страница 177: ...y pressing Menu the Right Select key and selecting Detail in the menu that appears Press the Y or Z key to switch the display to other information items The items displayed are as follows Status statu...

Страница 178: ...the desired destination and press the OK key This displays the complete name of the destination Press the OK key to return to the destination list Pressing Exit the Right Select key while the destinat...

Страница 179: ...essing Menu the Right Select key and selecting Detail in the menu that appears Press the Y or Z key to switch the display to other information items The items displayed are as follows Status status of...

Страница 180: ...tion Press Detail the Right Select key in Sender Info to see the complete destination information Press the OK key to return to the original screen The table below lists the items displayed in the Sto...

Страница 181: ...Press the Status Job Cancel key The Status menu appears 2 Press the U or V key to select Print Job Log 3 Press the OK key Print Job Log appears Press the U or V key to check the print log Screen Job h...

Страница 182: ...e Job Name Job Type User Name Page and Copy number of pages and copies to be printed Original Page number of pages of the original Sender Info destination information When complete job name not displa...

Страница 183: ...to Send Job Status screen on page 7 4 Press the OK key or Detail the Right Select key to check the detailed information of the selected send log Press the Y or Z key to switch the display to other inf...

Страница 184: ...of the destination Press the OK key to return to the destination list Pressing Exit the Right Select key while the destination list is displayed brings you back to the original screen Displaying Store...

Страница 185: ...f the original Sender Info destination information When complete job name not displayed in detailed information Press Detail the Right Select key in Job Name to see the complete job name Press the OK...

Страница 186: ...assword to log in NOTE Refer to Character Entry Method on Appendix 5 for details on entering characters 2 In the Sys Menu Count menu press the U or V key to select Report 3 Press the OK key The Report...

Страница 187: ...n the Destination menu press the U or V key to select Confirmation 2 Press the OK key Dest Confirm appears NOTE Press the OK key to edit delete the current destination Refer to Character Entry Method...

Страница 188: ...enter a destination press the U or V key to select Address Entry and then press the OK key This displays an entry screen Enter the destination address directly 3 Press the OK key Completed is display...

Страница 189: ...eric keys to enter the number of jobs to be sent at a time 4 Press the OK key Completed is displayed and the screen returns to the Job Log History menu Manual Job Log History Transmission You can also...

Страница 190: ...ail Subject Set the subject automatically entered when sending job log histories by e mail Use the procedure below to set the subject 1 In the Job Log History menu press the U or V key to select Subje...

Страница 191: ...eft Select key Printing is paused When you press Resume the Left Select key to resume printing NOTE When you press the Back key a confirmation screen appears Press Yes the Left Select key to resume pr...

Страница 192: ...V key to select Scanner Printer or FAX 3 Press the OK key This displays the status of the device selected in step 2 4 Press the OK key The screen returns to the Status menu The items you can check are...

Страница 193: ...ears 2 Press the U or V key to select USB Memory 3 Press the OK key This displays the status of the USB memory Press the Y or Z key to switch the display to other information items The items displayed...

Страница 194: ...gs 8 69 Printer Settings 8 75 Sending Settings 8 87 Document Box Settings 8 89 Printing Reports Sending Notice 8 93 Adjustment Maintenance 8 98 Editing Destination Address Book Adding One Touch Keys 8...

Страница 195: ...ount menu 1 Press the System Menu Counter key on the main unit operation panel When you are performing user management and have not logged in a login screen will appear Then enter the user ID and pass...

Страница 196: ...menu appears 3 Press the U or V key to select Language 4 Press the OK key The Language menu appears The available languages are as follows English Deutsch Fran ais Espa ol Italiano Nederlands Portugu...

Страница 197: ...l languages it is displayed in place of Portugues 5 Press the U or V key to select a language 6 Press the OK key Completed is displayed and the screen returns to the Common Settings menu Korean Simpli...

Страница 198: ...reen 6 Press the OK key Completed is displayed and the screen returns to the Common Settings menu Item Description Status The Status Job Cancel screen the screen shown when the Status Job Cancel key i...

Страница 199: ...4 Press the OK key Sound appears 5 Press the U or V key to select Buzzer 6 Press the OK key Buzzer appears 7 Press the U or V key to select Key Confirmation Item Value Description Key Confirmation Off...

Страница 200: ...key to select Display Bright 4 Press the OK key Display Bright appears 5 Press the U or V key to select the display brightness from Darker 3 to Lighter 3 6 Press the OK key Completed is displayed and...

Страница 201: ...ys to enter the paper length Y 8 Press the OK key Size Entry X appears 9 Use the numeric keys to enter the paper width X 10 Press the OK key Completed is displayed and the screen returns to the Orig P...

Страница 202: ...Press the U or V key to select Orig Paper Set 4 Press the OK key The Orig Paper Set menu appears 5 Press the U or V key to select Def Orig Size 6 Press the OK key Def Orig Size appears 7 Press the U...

Страница 203: ...ears 5 Press the U or V key to select Custom PaperSize Input units Dimensions Inch models Cassette X 4 13 to 8 50 in 0 01 increments Y 5 83 to 14 02 in 0 01 increments Paper Feeder Option X 5 83 to 8...

Страница 204: ...appears 8 Use the numeric keys to enter the paper length Y 9 Press the OK key Size Entry X appears 10 Use the numeric keys to enter the paper width X 11 Press the OK key Completed is displayed and th...

Страница 205: ...ssette 3 Set Follow the steps below when you select the main unit cassette Cassette 1 Operate in a similar fashion when you select an optional cassette Cassette 2 or 3 Item Description Paper Size Lett...

Страница 206: ...sette 1 Set menu 11 Press the U or V key to select Cassette 1 Type 12 Press the OK key Cassette 1 Type appears 13 Press the U or V key to select the paper type 14 Press the OK key Completed is display...

Страница 207: ...n Paper Size Letter Legal Statement Executive Oficio II A4 A5 A6 B5 B6 Folio 216 340mm 16K ISO B5 Envelope 10 Envelope 9 Envelope 6 Envelope Monarch Envelope DL Envelope C5 Hagaki Oufuku Hagaki Youkei...

Страница 208: ...n returns to the MP Tray Set menu 11 Press the U or V key to select MP Tray Type 12 Press the OK key MP Tray Type appears 13 Press the U or V key to select the paper type 14 Press the OK key Completed...

Страница 209: ...lain Yes Yes Normal2 Normal Yes Transparency Yes No Extra Heavy Normal No Preprinted Yes Yes Normal2 Normal Yes Labels Yes No Heavy1 Normal No Bond Yes Yes Normal3 Normal Yes Recycled Yes Yes Normal2...

Страница 210: ...r which you want to make settings 8 Press the OK key The menu for the selected paper type appears 9 Press the U or V key to select Paper Weight 10 Press the OK key The Paper Weight menu appears 11 Pre...

Страница 211: ...r type When the selected paper type is Custom 1 to 8 you can further set whether to enable or disable duplex and the name of the custom paper type 17 Press the U or V key to select Duplex 18 Press the...

Страница 212: ...Entry is displayed Enter the name of the custom paper type NOTE Refer to Character Entry Method on Appendix 5 for details on entering characters 23 Press the OK key Completed is displayed and the scr...

Страница 213: ...Common Settings 2 Press the OK key The Common Settings menu appears 3 Press the U or V key to select Orig Paper Set 4 Press the OK key The Orig Paper Set menu appears 5 Press the U or V key to select...

Страница 214: ...U or V key to select Orig Paper Set 4 Press the OK key The Orig Paper Set menu appears 5 Press the U or V key to select Def PaperSource 6 Press the OK key Def PaperSource appears 7 Press the U or V ke...

Страница 215: ...urpose tray load the face on which printing is supposed to be done upward When loading cover paper in a cassette load the face on which printing is supposed to be done down Use the procedure below to...

Страница 216: ...ect SpcialPaper Act 6 Press the OK key SpcialPaper Act appears 7 Press the U or V key to select Adj PrintDirect or Speed Priority 8 Press the OK key Completed is displayed and the screen returns to th...

Страница 217: ...ttings 2 Press the OK key The Common Settings menu appears 3 Press the U or V key to select Preset Limit 4 Press the OK key The Preset Limit menu appears 5 Press the U or V key to enter the number of...

Страница 218: ...gs 2 Press the OK key The Common Settings menu appears 3 Press the U or V key to select Measurement 4 Press the OK key The Measurement menu appears 5 Press the U or V key to select inch or mm 6 Press...

Страница 219: ...pecify the settings for error handling 1 In the Sys Menu Count menu press the U or V key to select Common Settings 2 Press the OK key The Common Settings menu appears 3 Press the U or V key to select...

Страница 220: ...or Handling menu 9 Press the U or V key to select PagerMismatchErr 10 Press the OK key PagerMismatchErr appears 11 Press the U or V key to select the method to handle paper mismatch 12 Press the OK ke...

Страница 221: ...date and time set here will be displayed on the header CAUTION Be sure to set Time Zone before the Date Time setup Use the procedure below to set the date and time 1 In the Sys Menu Count menu press t...

Страница 222: ...to move to the item Hour Min Second you want to enter Press the U or V key to set each item 10 Press the OK key Completed is displayed and the screen returns to the Date Settings menu NOTE If you try...

Страница 223: ...rator privileges to log in and press Login the Right Select key 4 The Date Settings menu appears 5 Press the U or V key to select Date Format 6 Press the OK key Date Format appears 7 Press the U or V...

Страница 224: ...ight Select key 4 The Date Settings menu appears 5 Press the U or V key to select Time Zone 6 Press the OK key Time Zone appears 7 Press the U or V key to select your location 8 Press the OK key Compl...

Страница 225: ...and password with administrator privileges to log in and press Login the Right Select key 4 The Date Settings menu appears 5 Press the U or V key to select Summer Time 6 Press the OK key Summer Time a...

Страница 226: ...ull Print job cannot be processed completely Maximum Number of scanned pages Job is canceled Print overrun Job is paused KPDL error Job is canceled USB memory error Job is canceled No multi copies Pre...

Страница 227: ...e seconds The default setting is 30 seconds If you set 0 as the time errors are not displayed NOTE If you select Off for Auto Error Clear the time display does not appear Use the procedure below to se...

Страница 228: ...displayed and the screen returns to the Timer Settings menu Power Off Rule The Power Off Rule is used to stop the power from automatically turning off when the machine is in certain states or certain...

Страница 229: ...s 5 Press the U or V key to select Power Off Rule 6 Press the OK key Power Off Rule appears 7 Press U or V key to select the condition to be set 8 Press the U or V key to select Off or On 9 Press the...

Страница 230: ...rator privileges to log in and press Login the Right Select key 4 The Timer Settings menu appears 5 Press the U or V key to select Power Off Timer 6 Press the OK key Power Off Timer appears 7 Press th...

Страница 231: ...tor privileges to log in and press Login the Right Select key 4 The Timer Settings menu appears 5 Press the U or V key to select Sleep Timer 6 Press the OK key Sleep Timer appears 7 Press the U or V k...

Страница 232: ...K key The Common Settings menu appears 3 Press the U or V key to select Timer Setting and press the OK key A login screen will appear Then enter the user ID and password with administrator privileges...

Страница 233: ...e reset time 1 In the Sys Menu Count menu press the U or V key to select Common Settings 2 Press the OK key The Common Settings menu appears 3 Press the U or V key to select Timer Setting and press th...

Страница 234: ...he unusable time period including printing of copy jobs and printer jobs and printing from USB memory Faxes and print jobs received during the unusable time period are printed after the unusable time...

Страница 235: ...End Time appears 11 Press the U or V key to set the End Time 12 Press the OK key Unlock Code appears 13 Press the U or V key or numeric keys to set the unlock code 14 Press the OK key Completed is di...

Страница 236: ...o select Common Settings 2 Press the OK key The Common Settings menu appears 3 Press the U or V key to select Function Default 4 Press the OK key The Function Default menu appears 5 Press the U or V k...

Страница 237: ...e OK key The Common Settings menu appears 3 Press the U or V key to select Function Default 4 Press the OK key The Function Default menu appears 5 Press the U or V key to select Scan Resolution 6 Pres...

Страница 238: ...or V key to select Original Image 6 Press the OK key Original Image appears 7 Press the U or V key to select Text Photo Photo Text or for OCR 8 Press the OK key Completed is displayed and the screen...

Страница 239: ...ion Default menu appears 5 Press the U or V key to select Density 6 Press the OK key Density appears 7 Press the U or V key to select Auto or Manual 8 Press the OK key Completed is displayed and the s...

Страница 240: ...s the OK key The Function Default menu appears 5 Press the U or V key to select Zoom 6 Press the OK key Zoom appears 7 Press the U or V key to select 100 or Auto 8 Press the OK key Completed is displa...

Страница 241: ...unction Default 4 Press the OK key The Function Default menu appears 5 Press the U or V key to select Collate 6 Press the OK key Collate appears 7 Press the U or V key to select Off or On 8 Press the...

Страница 242: ...nction Default menu appears 5 Press the U or V key to select Orig Orientation 6 Press the OK key Orig Orientation appears 7 Press the U or V key to select c Top Edge Top or d Top Edge Left 8 Press the...

Страница 243: ...on Default 4 Press the OK key The Function Default menu appears 5 Press the U or V key to select EcoPrint 6 Press the OK key EcoPrint appears 7 Press the U or V key to select Off or On 8 Press the OK...

Страница 244: ...or V key to select Common Settings 2 Press the OK key The Common Settings menu appears 3 Press the U or V key to select Function Default 4 Press the OK key The Function Default menu appears 5 Press t...

Страница 245: ...e scanned originals by E mail NOTE Refer to Send as E mail on page 3 19 Refer to Character Entry Method on Appendix 5 for details on entering characters Use the procedure below to set the default e ma...

Страница 246: ...ompleted is displayed and the screen returns to the Function Default menu Continuous Scan Set the continuous scan defaults The available default settings are shown below Refer to page 4 6 for Original...

Страница 247: ...creen returns to the Function Default menu File Format Select the default file type to send the scanned originals The available default settings are shown below NOTE Refer to page 5 9 for file formats...

Страница 248: ...r JPEG 8 Press the OK key Completed is displayed and the screen returns to the Function Default menu File Separation Select the default file separation setting The available default settings are shown...

Страница 249: ...e TIFF Print default The table below shows the available settings NOTE Refer to page 6 3 for TIFF Print Use the procedure below to set the default TIFF Print setting 1 In the Sys Menu Count menu press...

Страница 250: ...Default menu XPS FitTo Page Select the XPS FitTo Page default NOTE Refer to page 6 4 for XPS FitTo Page Use the procedure below to set the default XPS FitTo Page setting 1 In the Sys Menu Count menu p...

Страница 251: ...tems available for the default value are as follows Use the procedure below to select the default value for layout 1 In the Sys Menu Count menu press the U or V key to select Common Settings 2 Press t...

Страница 252: ...ted for Combine Items available for the default value are as follows Use the procedure below to select the default value for layout 1 In the Sys Menu Count menu press the U or V key to select Common S...

Страница 253: ...out 8 Press the OK key 4 in 1 Layout appears 9 Press the U or V key to select h Right then Down i Down then Right j Left then Down or k Down then Left 10 Press the OK key Completed is displayed and th...

Страница 254: ...key The Function Default menu appears 5 Press the U or V key to select Detail Setting 6 Press the OK key The Detail Setting menu appears 7 Press the U or V key to select Border Line Item Description...

Страница 255: ...elect the default value for the binding edge of the original 1 In the Sys Menu Count menu press the U or V key to select Common Settings 2 Press the OK key The Common Settings menu appears 3 Press the...

Страница 256: ...cted for Duplex Items available for the default value are as follows Use the procedure below to select the default value for the binding edge of the finished copies 1 In the Sys Menu Count menu press...

Страница 257: ...t is selected Select the default value in the range from 1 Low High Comp high compression to 5 High Low Comp low compression Use the procedure below to select the default value for image quality 1 In...

Страница 258: ...e default value for compression method for TIFF images handled by this machine Use the procedure below to set the default value for color TIFF compression method 1 In the Sys Menu Count menu press the...

Страница 259: ...V key to select Color TIFF Comp 8 Press the OK key Color TIFF Comp appears 9 Press the U or V key to select TIFF V6 or TTN2 10 Press the OK key Completed is displayed and the screen returns to the Det...

Страница 260: ...ation 4 Press the OK key Login Operation appears 5 Press the U or V key to select Use Numeric Key or Select Character 6 Press the OK key Completed is displayed and the screen returns to the Common Set...

Страница 261: ...M Disk Mode 4 Press the OK key RAM Disk Mode appears 5 Press the U or V key to select Off or On 6 If On is selected and the OK key is pressed the RAM disk size screen appears If Off is selected and th...

Страница 262: ...dure below to set Photo Processing 1 In the Sys Menu Count menu press the U or V key to select Copy 2 Press the OK key The Copy menu appears 3 Press the U or V key to select Photo Processing 4 Press t...

Страница 263: ...or V key to select Paper Selection 4 Press the OK key Paper Selection appears 5 Press the U or V key to select Auto or Def Paper Source 6 Press the OK key Completed is displayed and the screen return...

Страница 264: ...y to select AutoPaperSelect 4 Press the OK key AutoPaperSelect appears 5 Press the U or V key to select MostSuitableSize or Same as OrigSize 6 Press the OK key Completed is displayed and the screen re...

Страница 265: ...or V key to select Copy 2 Press the OK key The Copy menu appears 3 Press the U or V key to select Auto Priority 4 Press the OK key Auto Priority appears 5 Press the U or V key to select Off or On 6 P...

Страница 266: ...y EcoPrint Continuous Scan File Name Entry JobFinish Notice Print Override Use the procedure below to set Select Key Set 1 In the Sys Menu Count menu press the U or V key to select Copy 2 Press the OK...

Страница 267: ...ss the U or V key to select the function you want to register to the flexible key 8 Press the OK key Completed is displayed and the screen returns to the Copy menu IMPORTANT If you try to set the func...

Страница 268: ...9 Duplex 8 80 Copies 8 81 Orientation 8 82 FormFeed Timeout 8 83 LF Action 8 83 CR Action 8 84 Paper Feed Mode 8 85 NOTE If user login administration is enabled you can only change the settings by log...

Страница 269: ...e U or V key to select the printer you want to emulate 6 Press the OK key Completed is displayed and the screen returns to the Printer menu NOTE If you select KPDL or KPDL Auto the operation after sel...

Страница 270: ...uto Is Selected for Emulation If you use the KPDL Auto emulation mode KPDL and another emulation mode can be automatically switched according to the data alternative emulation For alternative emulatio...

Страница 271: ...ended for test copies where faded printing is not a problem Use the procedure below to specify the EcoPrint setting 1 In the Sys Menu Count menu press the U or V key to select Printer 2 Press the OK k...

Страница 272: ...V key to select Printer 2 Press the OK key The Printer menu appears 3 Press the U or V key to select Override A4 LTR 4 Press the OK key Override A4 LTR appears 5 Press the U or V key to select Off or...

Страница 273: ...U or V key to select Duplex 4 Press the OK key Duplex appears 5 Press the U or V key to select Off Bind Long Edge or Bind Short Edge 6 Press the OK key Completed is displayed and the screen returns t...

Страница 274: ...ess the OK key The Printer menu appears 3 Press the U or V key to select Copies 4 Press the OK key Copies appears 5 Press the U or V key or the numeric keys to set the default number of copies 6 Press...

Страница 275: ...ey The Printer menu appears 3 Press the U or V key to select Orientation 4 Press the OK key Orientation appears 5 Press the U or V key to select Portrait or Landscape 6 Press the OK key Completed is d...

Страница 276: ...FormFeed Timeout appears 5 Press the U or V key to set the Form Feed Timeout You can set the timeout delay in seconds You cannot use the numeric keys to enter this value 6 Press the OK key Completed...

Страница 277: ...chine receives the character return code character code 0DH The table below shows the available settings The default setting is CR Only Use the procedure below to specify a CR action 1 In the Sys Menu...

Страница 278: ...tting is Auto Use the procedure below to set Paper Feed Mode 1 In the Sys Menu Count menu press the U or V key to select Printer 2 Press the OK key The Printer menu appears 3 Press the U or V key to s...

Страница 279: ...System Menu 4 Press the OK key Paper Feed Mode appears 5 Press the U or V key to select Auto or Fixed 6 Press the OK key Completed is displayed and the screen returns to the Printer menu Paper Feed Mo...

Страница 280: ...Key Set If you register a function to the Left Select key or Right Select key you can quickly set the function when using sending functions You can register one of the following functions to each key...

Страница 281: ...elected in step 5 The screen shown is the one when Left is selected 7 Press the U or V key to select the function you want to register to the flexible key 8 Press the OK key Completed is displayed and...

Страница 282: ...ed Quick Copy Jobs The procedure for setting Quick Copy Jobs is explained below 1 In the Sys Menu Count menu press the U or V key to select Document Box 2 Press the OK key The Document Box menu appear...

Страница 283: ...V key to select Job Box 4 Press the OK key The Job Box screen appears 5 Press the U or V key to select JobRet Deletion 6 Press the OK key The Job Retention Deletion screen appears 7 Press the U or V...

Страница 284: ...f the following functions to each key for either of printing from and saving to a document box Print None Collate Paper Selection Duplex File Name Entry JobFinish Notice Print Override Encrypted PDF T...

Страница 285: ...key This displays the function selection screen for the flexible key selected in step 7 The screen shown is the one when Left is selected 9 Press the U or V key to select the function you want to reg...

Страница 286: ...also be configured NOTE If user login administration is enabled you can only print by logging in with administrator privileges Printing Reports Printable reports are as follows Menu map Outputs a menu...

Страница 287: ...key to select Report 2 Press the OK key The Report menu appears 3 Press the U or V key to select Report Print 4 Press the OK key The Report Print menu appears 5 Press the U or V key to select Menu Ma...

Страница 288: ...detailed information is available than on the Status Page Service personnel usually print the service status pages for maintenance purpose Network Status Page Check the information including network i...

Страница 289: ...cally print a report of transmission result when a transmission is complete The table below shows the available settings The default setting is Error Only Use the procedure below to send a Result Repo...

Страница 290: ...e report when canceling the operation before sending When selecting Off in both E mail Folder and FAX menu CancelBeforeSend is not displayed 7 Press the U or V key to select Off On or Error Only When...

Страница 291: ...w to adjust the copy density 1 In the Sys Menu Count menu press the U or V key to select Adjust Maint 2 Press the OK key The Adjust Maint menu appears 3 Press the U or V key to select Copy Denst Adj 4...

Страница 292: ...pears 3 Press the U or V key to select Send Box Density 4 Press the OK key Send Box Density appears 5 Press the U or V key to select Auto or Manual 6 Press the OK key This displays the density selecti...

Страница 293: ...es 1 In the Sys Menu Count menu press the U or V key to select Adjust Maint 2 Press the OK key The Adjust Maint menu appears 3 Press the U or V key to select Correct Bk Line Paper feed direction Item...

Страница 294: ...The Adjust Maint menu appears 3 Press the U or V key to select Service Setting 4 Press the OK key The Service Setting menu appears 5 Press the U or V key to select New Developer 6 Press the OK key A...

Страница 295: ...tration is enabled you can only edit destinations in the Address Book by logging in with administrator privileges Refer to Character Entry Method on Appendix 5 for details on entering characters Use t...

Страница 296: ...then press the OK key Registered is displayed and the screen returns to the Address Book list screen Refer to the descriptions below for how to enter each item Entering Contact Name 1 Press the Y or...

Страница 297: ...SMB FTP Address Folder SMB Address The table below explains the items to be entered Detail C b p E mail Address 4 7 t_maury N Edit Address Entry B b ABC Text Item Description Max No of Characters Hos...

Страница 298: ...e OK key Path appears 5 Enter the path name Item Description Max No of Characters Host Name If you specify a port number other than the default 21 use the Hostname port number format E g FTPhostname 1...

Страница 299: ...ress the OK key on their respective screens 11 Press Yes the Left Select key This makes a connection with the entered destination If the connection is successful Connected is displayed on the screen P...

Страница 300: ...uals into a group Designations in the group can be added at the same time When adding a group a maximum of 20 groups can be added in the Address Book NOTE If user login administration is enabled you c...

Страница 301: ...ays the screen for editing groups NOTE If the maximum number of groups has already been registered the screen will display Registered numbers exceeded and return to the Address Book 10 Enter each item...

Страница 302: ...group name is registered Entering Group Member 1 Press the Y or Z key to display Group Member 2 Press Edit the Right Select key This displays the list of destinations registered to the group 3 Press...

Страница 303: ...to Group Member NOTE If you select an individual destination that has already been registered to the group the screen will display This address is already registered and return to the screen of step...

Страница 304: ...t Select key An entry screen appears 3 Press the U or V key or the numeric keys to enter the address number 4 Press the OK key The address number is registered NOTE If you enter an address number that...

Страница 305: ...n The screen shown is the one when an individual s destination is selected 9 Edit items as necessary For how to edit each item refer to Adding an Individual Destination on page 8 102 and Adding a Grou...

Страница 306: ...creen shown is the one when No 1 No 12 is pressed and held 2 Press the U or V key to select the key number to which you want to register the destination 3 Press the OK key The Address Book list screen...

Страница 307: ...e the registration of the destination If you press Yes the Left Select key in the screen that appears Completed is displayed and the registration of the destination is deleted 5 Press the OK key The A...

Страница 308: ...er the user ID and password with administrator privileges to log in and press Login the Right Select key 2 The System menu appears 3 Press the U or V key to select Restart 4 Press the OK key A confirm...

Страница 309: ...unt menu press the U or V key to select System and press the OK key A login screen will appear Then enter the user ID and password with administrator privileges to log in and press Login the Right Sel...

Страница 310: ...settings are TCP IP Protocol On DHCP On Bonjour Off NOTE Prior to the IP address entries obtain permission from the network administrator Use the procedure below to setup the TCP IP IPv4 setting 1 In...

Страница 311: ...or V key to select On and then press the OK key Completed is displayed and the screen returns to the TCP IP Settings menu 10 Press the U or V key to select IPv4 Setting 11 Press the OK key The IPv4 Se...

Страница 312: ...e U or V key to select Off and then press the OK key Completed is displayed and the screen returns to the IPv4 Setting menu 18 Press the U or V key to select IP Address 19 Press the OK key IP Address...

Страница 313: ...eys to enter the Subnet Mask Press the Y or Z key to move the cursor position horizontally Press the U or V key or the numeric keys to enter the Subnet Mask Each 3 digits can be set between 000 and 25...

Страница 314: ...key or the numeric keys to enter the Default Gateway Each 3 digits can be set between 000 and 255 IMPORTANT When the DHCP Setting page 8 122 is On the current Default Gateway is displayed and cannot...

Страница 315: ...the Right Select key 2 The System menu appears 3 Press the U or V key to select Network Setting 4 Press the OK key The Network Setting menu appears 5 Press the U or V key to select TCP IP Settings 6 P...

Страница 316: ...ct IPv4 Setting 11 Press the OK key The IPv4 Setting menu appears 12 Press the U or V key to select DHCP 13 Press the OK key DHCP appears 14 Press the U or V key to select On or Off and then press the...

Страница 317: ...the Right Select key 2 The System menu appears 3 Press the U or V key to select Network Setting 4 Press the OK key The Network Setting menu appears 5 Press the U or V key to select TCP IP Settings 6 P...

Страница 318: ...Pv4 Setting 11 Press the OK key The IPv4 Setting menu appears 12 Press the U or V key to select Bonjour 13 Press the OK key Bonjour appears 14 Press the U or V key to select On or Off and then press t...

Страница 319: ...n the Right Select key 2 The System menu appears 3 Press the U or V key to select Network Setting 4 Press the OK key The Network Setting menu appears 5 Press the U or V key to select TCP IP Settings 6...

Страница 320: ...Sys Menu Count menu press the U or V key to select System and press the OK key A login screen will appear Then enter the user ID and password with administrator privileges to log in and press Login t...

Страница 321: ...starting the System on page 8 115 AppleTalk Setup Select the Apple Talk network connection The default setting is On Use the procedure below to setup the AppleTalk setting 1 In the Sys Menu Count menu...

Страница 322: ...dure below to setup the WSD SCAN setting The machine must be restarted after the setting is changed 1 In the Sys Menu Count menu press the U or V key to select System and press the OK key A login scre...

Страница 323: ...WSD PRINT setting The machine must be restarted after the setting is changed 1 In the Sys Menu Count menu press the U or V key to select System and press the OK key A login screen will appear Then ent...

Страница 324: ...or V key to select WSD PRINT 6 Press the OK key The WSD PRINT menu appears 7 Press the U or V key to select On or Off 8 Press the OK key Completed is displayed and the screen returns to the Network Se...

Страница 325: ...not to communicate using SNMP On z SMTP E mail TX Select whether or not to send e mail using SMTP Off POP3 E mail RX Select whether or not to receive e mail using POP3 Off RAW Port Select whether or n...

Страница 326: ...t TCP IP Settings 6 Press the OK key The TCP IP Settings menu appears 7 Press the U or V key to select Protocol Detail LDAP Select whether or not to use LDAP Off z The machine must be restarted after...

Страница 327: ...n shown is the one when FTP Client is selected 11 Press the U or V key to select On or Off If you select On for each of FTP Client and IPP and press the OK key a port number entry screen appears Press...

Страница 328: ...ing 1 In the Sys Menu Count menu press the U or V key to select System and press the OK key A login screen will appear Then enter the user ID and password with administrator privileges to log in and p...

Страница 329: ...HTTP port security settings SSL Make this setting Make this setting when you use SSL The default setting is Off Use the procedure below to make the setting 1 In the Sys Menu Count menu press the U or...

Страница 330: ...Specify the protocol to be used for IPP The default setting is IPPoverSSL only Use the procedure below to make the setting 1 In the Sys Menu Count menu press the U or V key to select System and press...

Страница 331: ...ss the OK key Completed is displayed and the screen returns to the Secure Protocol menu HTTP Security Specify the protocol to be used for HTTP The default setting is HTTPS only Use the procedure below...

Страница 332: ...the OK key Secure Protocol appears 7 Press the U or V key to select HTTP Security 8 Press the OK key HTTP Security appears 9 Press the U or V key to select HTTP HTTPS or HTTPS only 10 Press the OK key...

Страница 333: ...n and press Login the Right Select key 2 The System menu appears 3 Press the U or V key to select Network Setting 4 Press the OK key The Network Setting menu appears Item Description Off Do not use se...

Страница 334: ...e table below shows the available settings You can change the port number using Embedded Web Server Use the procedure below to make the setting 1 In the Sys Menu Count menu press the U or V key to sel...

Страница 335: ...e OK key Secure Protocol appears 7 Press the U or V key to select SMTP Security 8 Press the OK key SMTP Security appears 9 Press the U or V key to select Off SSL or STARTTLS 10 Press the OK key Comple...

Страница 336: ...log in and press Login the Right Select key 2 The System menu appears 3 Press the U or V key to select Network Setting 4 Press the OK key The Network Setting menu appears Item Description Off Do not...

Страница 337: ...2 or POP3 Security 3 set in the same way 8 Press the OK key POP3 Security 1 appears 9 Press the U or V key to select Off SSL TLS or STARTTLS 10 Press the OK key Completed is displayed and the screen...

Страница 338: ...g is Unblock Use the procedure below to specify the USB Host setting 1 In the Sys Menu Count menu press the U or V key to select System and press the OK key A login screen will appear Then enter the u...

Страница 339: ...menu press the U or V key to select System and press the OK key A login screen will appear Then enter the user ID and password with administrator privileges to log in and press Login the Right Select...

Страница 340: ...Count menu press the U or V key to select System A login screen will appear Then enter the user ID and password with administrator privileges to log in and press Login the Right Select key 2 Press the...

Страница 341: ...ng System Menu 6 Press the OK key Option I F appears 7 Press the U or V key to select Unblock or Block 8 Press the OK key Completed is displayed and the screen returns to the System menu Option I F a...

Страница 342: ...rvice personnel for maintenance work There is no need for customers to use this menu Optional Functions You can use the optional applications installed on this machine Opt Functions Although nothing i...

Страница 343: ...8 150 Default Setting System Menu...

Страница 344: ...9 1 9 Maintenance This chapter describes cleaning and toner replacement Cleaning 9 2 Toner Container Replacement 9 5...

Страница 345: ...t use thinner or other organic solvents Document Processor If black streaks or dirt appears in copies when using the document processor clean the slit glass with the supplied cleaning cloth The messag...

Страница 346: ...e 3 Remove the drum unit from the machine by holding the green levers with both hands NOTE The drum unit is sensitive to light Never expose the drum unit to light for more than five minutes 4 Place th...

Страница 347: ...IMPORTANT Remove the fixing tape on the main charger cleaner before cleaning for the first time After cleaning make sure you restore the main charger cleaner to its home position 7 When cleaning is c...

Страница 348: ...ront cover 2 Turn the toner container lock lever to the unlock position Push the toner container lock lever to the position marked by the arrow and pull out the toner container NOTE Put the old toner...

Страница 349: ...ositions marked PUSH until you hear a click 6 Turn the toner container lock lever to the lock position 7 Close the front cover NOTE Return the exhausted toner container to your dealer or service repre...

Страница 350: ...10 1 10 Troubleshooting This chapter explains how to solve problems with the machine Solving Malfunctions 10 2 Responding to Error Messages 10 6 Clearing Paper Jams 10 13...

Страница 351: ...slit glass 2 52 When placing originals in the document processor place them face up 2 53 Printouts are too light Is the machine in Manual Density mode Select the correct density level 5 11 When chang...

Страница 352: ...rted type Is it in good condition Remove the paper turn it over and reload it 2 39 Is the paper curled folded or wrinkled Replace the paper with new paper 2 39 Are there any loose scraps or jammed pap...

Страница 353: ...USB memory not recognized Check that the USB memory is securely plugged into the machine Is the USB host blocked Select Unblock in the USB host settings 8 145 Vertical streaks appear on prints Is the...

Страница 354: ...the Host Name been entered properly Check the name of the computer to which data is being sent 2 29 Has the Path been entered properly Check the share name for the shared folder 2 34 Has the Login Us...

Страница 355: ...either the paper cassettes or optional paper feeders and check if the paper is loaded correctly Cannot connect to Authentication Server Press the OK key and check the following items Registration to A...

Страница 356: ...on the RAM disk Change the size of RAM disk with the numeric keys 8 68 RAM disk error Press OK A RAM disk error has occurred Look at the error code given in place of The possible error codes and thei...

Страница 357: ...error Job is canceled This job is canceled Press the OK key Removable memory is full Job is canceled This job is canceled Press the OK key Cannot feed paper set cassette 1 Is any of the paper feeders...

Страница 358: ...ost name correctly 1102 The login user name is incorrect or the domain name has not been entered Enter login user name domain name and password correctly 1103 The network path name is incorrect or you...

Страница 359: ...ur service representative Refer to the corrective action for the error message An error has occurred 9181 The scanned original exceeds the acceptable number of pages of 999 Send the excess pages separ...

Страница 360: ...ed toner container s regional specification match the machines s Install the specified container 9 5 Insufficient memory Cannot start the job Further scanning cannot be performed due to insufficient m...

Страница 361: ...onnect the modular cord correctly Is Permitted FAX No or Permitted ID No registered correctly Check Permitted FAX No and Permitted ID No FAX Operation Guide Chapter 6 Registering Permit FAX No and Reg...

Страница 362: ...moval be sure to remove any loose scraps of paper from inside the machine Scraps of paper left in the machine could cause subsequent jamming A page affected by a paper jam will be printed again CAUTIO...

Страница 363: ...and front cover to clear the error Cassette Paper Feeder Follow the steps below to clear paper jams in cassette or paper feeder 1 Pull out the cassette or optional paper feeder 2 Remove any partially...

Страница 364: ...any jammed paper Open the duplexer s cover at the rear of the machine and remove any jammed paper 3 Push the cassette back in securely and open and close the front cover to clear the error The machine...

Страница 365: ...o light Never expose the drum unit to light for more than five minutes 4 If the jammed paper appears to be pinched by rollers pull it along the normal running direction of the paper 5 Return the drum...

Страница 366: ...result in burn injury If the paper is jammed inside the fuser unit open the fuser cover and remove the paper by pulling it out 2 Close the rear cover and open and close the top cover to clear the err...

Страница 367: ...ginal is caught in the rollers or difficult to remove proceed to the next step 4 Open the document processor 5 Remove the jammed original If the original tears remove every loose scrap from inside the...

Страница 368: ...11 1 11 Management This chapter explains the following operations User Login Administration 11 2 Job Accounting 11 15 Checking the Counter 11 37...

Страница 369: ...irst user login administration Enable user login administration page 11 2 T Add a user page 11 6 T Log out page 11 5 T The registered user logs in for operations page 11 5 Enabling Disabling User Logi...

Страница 370: ...e User Job Account menu appears 4 Press the U or V key to select User Login Set 5 Press the OK key The User Login Set menu appears 6 Press the U or V key to select User Login 7 Press the OK key User L...

Страница 371: ...authentication server and press the OK key NOTE If the login user name and password are rejected check the following settings Network Authentication setting of the machine User property of the Authen...

Страница 372: ...tions 2 Press the OK key enter the login user name and then press the OK key 3 Press the V key to select Login Password press the OK key enter the login password and then press the OK key 4 Check the...

Страница 373: ...ntering characters 1 Press the System Menu Counter key on the main unit operation panel 2 Press the U or V key to select User Job Account Item Description User Name Mandatory at user registration Ente...

Страница 374: ...Press the OK key Local User List appears 8 Press Menu the Right Select key press the U or V key to select Add User and then press the OK key 9 Enter the user name and press the OK key enter the login...

Страница 375: ...evel press Change the Right Select key select the user access privilege and then press the OK key NOTE If the user list is for device administrator Change is not displayed 16 Press the Z key to select...

Страница 376: ...ount A login screen will appear Then enter the user ID and password with administrator privileges to log in and press Login the Right Select key 3 The User Job Account menu appears 4 Press the U or V...

Страница 377: ...necessary 4 After completing changing the user information press the OK key again 5 The overwrite confirmation screen appears Press Yes the Left Select key The user information is changed and the scr...

Страница 378: ...details on entering characters 1 Press the System Menu Counter key on the main unit operation panel 2 Press the U or V key to select User Job Account A login screen will appear Then enter the user ID...

Страница 379: ...Character Entry Method on Appendix 5 for details on entering characters 1 Press the System Menu Counter key on the main unit operation panel 2 Press the U or V key to select User Job Account A login s...

Страница 380: ...and Job Accounting is set to valid follow the procedure when the Account ID is unknown The table below shows the available settings Use the procedure below to process jobs sent from unknown users NOT...

Страница 381: ...s 4 Press the U or V key to select Unknown ID Job 5 Press the OK key Unknown ID Job appears 6 Press the U or V key to select Reject or Permit 7 Press the OK key Completed is displayed and the screen r...

Страница 382: ...999 999 copies Resetting the print counter for each account or for all accounts combined First Job Accounting Setup Follow these steps for the first job accounting setup Enable job accounting page 11...

Страница 383: ...s the U or V key to select On To disable job accounting select Off 9 Press the OK key Completed is displayed and the screen returns to the Job Account Set menu NOTE When the display returns to the Sys...

Страница 384: ...ound and login will fail Enter the correct account ID By pressing Counter the Left Select key you can refer to the number of pages printed and the number of pages scanned When the screen to enter the...

Страница 385: ...istrator privileges to log in and press Login the Right Select key 3 The User Job Account menu appears 4 Press the U or V key to select Job Account Set Item Description Account Name Enter the account...

Страница 386: ...ot be used Enter any other account ID 11 Press the U or V key to select Exit and then press the OK key Select Detail and press the OK key to see information of the registered accounts 12 Account List...

Страница 387: ...User Job Account menu appears 4 Press the U or V key to select Job Account Set 5 Press the OK key The Job Account Set menu appears 6 Press the U or V key to select Account List 7 Press the OK key Acc...

Страница 388: ...essary 4 After completing changing the account information press the OK key again A confirmation screen appears 5 Press Yes the Left Select key The account information is changed Registered is display...

Страница 389: ...ng Report on page 11 35 for details Use the procedure below to set the counting methods 1 Press the System Menu Counter key on the main unit operation panel 2 Press the U or V key to select User Job A...

Страница 390: ...leted is displayed and the screen returns to the Default Setting menu Restricting the Use of the Machine This section explains how to restrict the use of the machine by account or the number of sheets...

Страница 391: ...ion Printer Limits the number of sheets used for printing Scan Restriction Others Limits the number of sheets scanned excludes copying and sending fax Fax TX Restriction Limits the number of sheets se...

Страница 392: ...limit number of pages in the next screen and then press the OK key 5 Repeat step 3 to 4 to set items as necessary 6 Press the OK key again A confirmation screen appears 7 Press Yes the Left Select ke...

Страница 393: ...Method on Appendix 5 for details on entering characters 3 The User Job Account menu appears 4 Press the U or V key to select Job Account Set 5 Press the OK key The Job Account Set menu appears Item D...

Страница 394: ...t Apply Limit 9 Press the OK key Apply Limit appears 10 Press the U or V key to select Immediately Subsequently or Alert Only 11 Press the OK key Completed is displayed and the screen returns to the D...

Страница 395: ...ion Sets the default restriction on the number of sheets used for copying Print Restriction Sets the default restriction on the number of sheets used for printing Scan Restriction Other Sets the defau...

Страница 396: ...lect Default Setting 7 Press the OK key The Default Setting menu appears 8 Press the U or V key to select Counter Limit 9 Press the OK key Counter Limit appears 10 Press the U or V key to select the i...

Страница 397: ...e default restriction on the number of sheets and then press the OK key Completed is displayed and the screen returns to Counter Limit 12 Repeat steps 10 to 11 set other default restrictions on the nu...

Страница 398: ...hen enter the user ID and password with administrator privileges to log in and press Login the Right Select key NOTE The User Job Account menu appears Refer to Character Entry Method on Appendix 5 for...

Страница 399: ...tems 9 After confirming the content press the OK key The screen returns to the Total Accounting menu 10 To reset the counter press the U or V key to select Counter Reset 11 Press the OK key A confirma...

Страница 400: ...er the user ID and password with administrator privileges to log in and press Login the Right Select key NOTE The User Job Account menu appears Refer to Character Entry Method on Appendix 5 for detail...

Страница 401: ...of output sheets is restricted by an account management function the upper limit on the number of output sheets is also displayed 11 After confirming the content press the OK key The screen returns t...

Страница 402: ...below to print a job accounting report 1 Press the System Menu Counter key on the main unit operation panel 2 Press the U or V key to select User Job Account A login screen will appear Then enter the...

Страница 403: ...elect Account Report and then press the OK key 7 In the confirmation screen press Yes the Left Select key A job accounting report is printed User Job Account a b 1 User Login Set 3 Unknown ID Job Exit...

Страница 404: ...the Y or Z key to check the count 5 After completing checking the count press the OK key The screen returns to the menu for the account Item Description Printed Pages By Function You can check the nu...

Страница 405: ...11 38 Management...

Страница 406: ...Appendix 1 Appendix Optional Equipment Appendix 2 Character Entry Method Appendix 5 Paper Appendix 9 Specifications Appendix 18 Glossary Appendix 23...

Страница 407: ...Cassettes 1 Expansion Memory To expand the printer memory for more complex print jobs and faster print speed you can plug in optional memory module dual in line memory module in the memory slot provid...

Страница 408: ...ble 2 Remove the right cover 3 Remove the screws and the memory slot cover as shown in the figure 4 Remove the memory module from its package 5 Aligning the cutouts of the memory module with the match...

Страница 409: ...he right cover and the memory slot cover from the machine Then carefully push out the two socket clamps Ease the memory module out of the socket to remove Verifying the expanded memory To verify that...

Страница 410: ...e character to the left of it is deleted 3 Back Key Press this key to return to the screen from which you invoked the character entry screen 4 Cursor Keys Use these to select the entry position or sel...

Страница 411: ...screen press Text the Right Select key to select the type of characters you want to enter Each time you press Text the Right Select key the character type switches as follows ABC 123 Symbol ABC NOTE B...

Страница 412: ...c Symbol d e f D E F 3 Numeric 3 Alphabetic Symbol g h i G H I 4 Numeric 4 Alphabetic Symbol j k l J K L 5 Numeric 5 Alphabetic Symbol m n o M N O 6 Numeric 6 Alphabetic Symbol p q r s P Q R S 7 Numer...

Страница 413: ...ys to display the Symbols screen Use cursor keys to select the symbol you want to enter and then press the OK key Entry When Select Character Is Selected in Login Operation Settings In the login scree...

Страница 414: ...nched High Quality Custom 1 to 8 A4 JIS B5 A5 Folio Legal Letter Oficio II Executive 16K 216 340mm Custom 148 210 to 216 356mm 5 13 16 8 5 16 to 8 1 2 14 inches 250 80g m2 Supported types Supported pa...

Страница 415: ...9 Envelope 6 Envelope Monarch Envelope DL Envelope C5 Youkei 4 Youkei 2 Other sizes Portrait 2 76 to 8 50 or 70 to 216 mm Landscape 5 83 to 14 02 or 148 to 356 mm 1 Transparency OHP film Letter A4 1 S...

Страница 416: ...er that is supported with this machine Refer to the subsequent sections for further details NOTE Some recycled paper does not meet requirements for use with this machine as listed in the Basic Paper S...

Страница 417: ...e than 20 of the total paper content consists of cotton or other fibers Supported Paper Sizes Paper of the following sizes is supported by the machine Measurements in the table take into account a 0 7...

Страница 418: ...and weakening print contrast Wavy or tight edges may cause the paper to slip when it is supplied Try to keep the moisture content between 4 to 6 To maintain the right level of moisture content bear i...

Страница 419: ...gh Quality Custom 1 to 8 When using these paper and media choose that are designed specifically for copiers or page printers such as laser printers Use the multi purpose tray for transparencies thick...

Страница 420: ...gaki into the multi purpose tray fan them and align the edges If the Hagaki paper is curled straighten it before loading Printing onto curled Hagaki may cause jams Use unfolded Oufuku Hagaki available...

Страница 421: ...ulti purpose tray fan it and align the edges Some thick paper may still have rough edges developed by a paper cutter on the back side Remove any such rough edges just as with Hagaki by placing the pap...

Страница 422: ...of the Appendix The colored ink must be able to withstand the heat of printing It must be resistant to silicone oil as well Do not use paper with a treated surface such as glossy paper used for calen...

Страница 423: ...mum 5 1 2 8 1 2 A6 Duplex 7 1 4 10 1 2 A5 Cassette Option Maximum 8 1 2 14 Legal Minimum 7 1 4 10 1 2 A5 MP Tray Maximum 8 1 2 14 Legal Minimum 3 5 8 6 1 2 A6 Duplex 7 1 4 10 1 2 A5 Paper Capacity Fro...

Страница 424: ...538 2 W U S A Canada 481 6 W European countries With options 539 8 W U S A Canada 486 W European countries 35 ppm model with fax Standard 548 3 W U S A Canada 501 7 W European countries With options...

Страница 425: ...0 141 129 115 90 86 78 70 64 50 25 Continuous Copying 1 to 999 sheets can be set in one sheet increments Resolution 600 600 dpi Supported Original Types Sheet Book 3 dimensional objects maximum origin...

Страница 426: ...dpi 400 dpi 300 dpi 200 dpi 200 400 dpi 200 100 dpi File Format JPEG TIFF PDF XPS Scanning Speed 1 1 sided B W 20 Images min Color 7 Images min A4 landscape 600 dpi Image quality Text Photo original I...

Страница 427: ...Ger t ist nicht f r die Benutzung im unmittelbaren Gesichtsfeld am Bildschirmarbeitsplatz vorgesehen Um st rende Reflexionen am Bildschirmarbeitsplatz zu vermeiden darf dieses Produkt nicht im unmitt...

Страница 428: ...ts If Bonjour does not run stably check the firewall settings and ensure that Bonjour is registered on the exceptions list and that Bonjour packets are accepted If you install Bonjour on Windows XP Se...

Страница 429: ...ki transparencies or labels NetBEUI NetBIOS Extended User Interface An interface developed by IBM in 1985 as an update from NetBIOS It enables more advanced functions on smaller networks than other pr...

Страница 430: ...he subnet address When you enter the subnet mask be sure to set the DHCP setting to Off TCP IP Transmission Control Protocol Internet Protocol TCP IP is a suite of protocols designed to define the way...

Страница 431: ...Appendix 26...

Страница 432: ...4 in 1 Mode 4 10 Page Boundary Lines 4 11 Connecting LAN Cable 2 5 Power Cable 2 8 USB Cable 2 8 Connection Method 2 3 Continuous Scan Copy 4 13 Send 5 14 Conventions in This Guide xxvi Copy Adjustin...

Страница 433: ...d Originals 2 53 Document processor open close handle 1 6 dpi Appendix 23 Duplex 3 12 8 80 DVD 2 2 E EcoPrint Mode Appendix 23 Copy 4 8 Print 8 78 E mail Send as E mail 3 19 Embedded Web Server 2 26 E...

Страница 434: ...8 132 HTTP 8 132 HTTPS 8 132 IPP over SSL 8 132 LAN Interface 8 116 LDAP 8 133 LPD 8 132 NetBEUI 8 132 NetWare 8 127 POP3 E mail RX 8 132 Raw Port 8 132 SMTP E mail TX 8 132 SNMP 8 132 TCP IP IPv4 8 1...

Страница 435: ...8 83 LF Action 8 83 Orientation 8 82 Override A4 Letter 8 79 Printing 3 16 Printing from a Job Box 6 8 Printing from Applications 3 16 Printing Reports Sending Notice 8 93 Font List 8 94 Network Statu...

Страница 436: ...ystem Menu 8 1 T TCP IP Appendix 25 Top cover 1 6 Trade Names xx TWAIN Appendix 25 U Unusable Time 8 41 USB Appendix 25 USB Cable Connecting 2 8 USB Interface 2 4 USB Memory Printing Documents 6 2 Rem...

Страница 437: ...Index 6 Index Index...

Страница 438: ...you need and the instructions for handling the waste correctly for example location and times of the waste collection centres etc b When you purchase a new device of ours give a used device similar t...

Страница 439: ......

Страница 440: ...First edition 2011 12 2MHLVEN000...

Отзывы: