background image

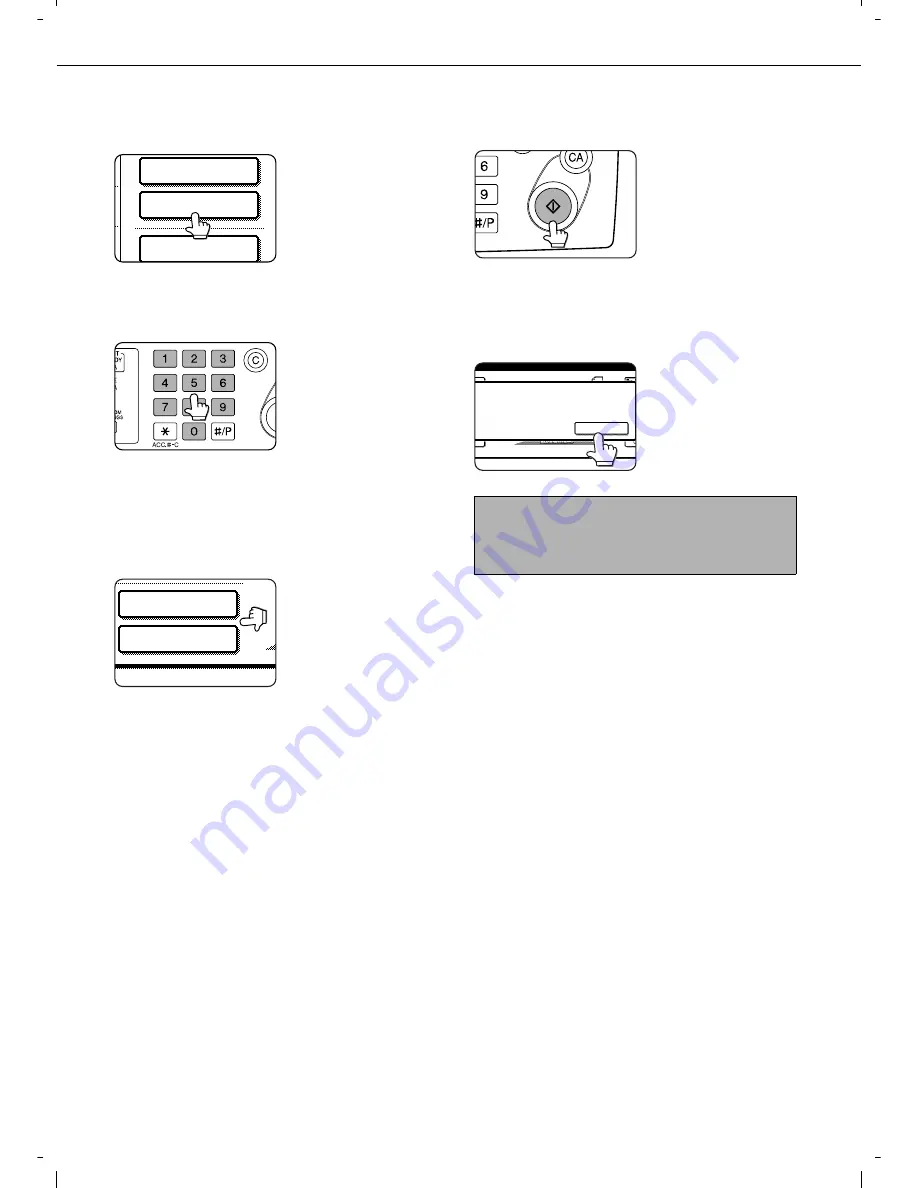
NORMAL COPYING

4-12

4

Select the desired output mode. (page 4-
9.)

Group mode is the
default mode.

To select sort mode,
touch the [OUTPUT]
key, touch the [SORT]
key in the screen that
appears, and then touch
the [OK] key.

5

Use the numeric keys to set the desired
number of copies.

Up to 999 can be set.
If you are only making a
single copy, the copy can
be made with the copy
number display showing
"0".

Use the [C] (clear) key to

cancel an entry if a mistake has been made.

6

If needed, touch the [FILE] key or the
[QUICK FILE] key*.

* Can only be used on the d-Copia 3501 / 4501

version, or when the document filling function has
been added.

Either key can be
touched to store the
scanned document
image on the machine's
hard disk. The stored
image can be re-used
later. 

For more information on this function, see
"Document filing function" in chapter 7.
If the [FILE] key is greyed out, only the [QUICK
FILE] key can be selected.
When you touch the [QUICK FILE] key, a message
asking you to confirm the save will appear. Touch
the [OK] key in the message screen and go to the
next step.
If you wish to cancel the save, touch the [QUICK
FILE] key after touching the [OK] key so that the
[QUICK FILE] key is no longer highlighted.

7

Press the [START] key.

Replace the original with
the next original and
press the [START] key.
Repeat this operation
until all originals have
been scanned.

If you selected "Sort" for

the output mode in step 4 and pressed the
[START] key, it is necessary to touch the [READ-
END] key.

8

Touch the [READ-END] key.

2-SIDED COPY

OUTPUT

FILE

QUICK FILE

FILE

To cancel copying...
To cancel a copy job in progress, press the [CA] key.
A confirmation message will appear. Touch the
[YES] key to cancel copying.

READ-END

PLACE NEXT ORIGINAL. PRESS [START].

WHEN FINISHED, PRESS [READ-END].

Содержание d-Copia 3501

Страница 1: ...t from the product Before installing this product be sure to read the installation requirements and cautions sections Be sure to keep all operation manuals handy for reference including this manual th...

Страница 2: ...duct certifies that the product satisfies the basic quality requirements Your attention is drawn to the following actions which could compromise the conformity attested to above as well as the charact...

Страница 3: ...pe Should the fuse need to be replaced a BSI or ASTA approved fuse to BS1362 marked or and of the same rating as the one removed from the plug must be used Always refit the fuse cover after replacing...

Страница 4: ...you need and the instructions for handling the waste correctly for example location and times of the waste collection centres etc b When you purchase a new device of ours give a used device similar t...

Страница 5: ...Part 1 General Information...

Страница 6: ......

Страница 7: ...he printer driver settings Operation manual for printer This manual explains the procedures for using the machine as a printer Operation manual for network scanner This manual explains the procedures...

Страница 8: ...or very dusty exposed to direct sunlight poorly ventilated subject to extreme temperature or humidity changes e g near an air conditioner or heater 4 Be sure to allow the required space around the ma...

Страница 9: ...Money Stamps Bonds Stocks Bank drafts Checks Passports Driver s licences The part indicated in the illustration is only to be handled by a service technician Absolutely do not touch this part Some mod...

Страница 10: ...IBLE LASER RADIATION WHEN OPEN INTERLOCKS DEFEATED AVOID EXPOSURE TO BEAM VORSICHT UNSICHTBARE LASERSTRAHLUNG WENN ABDECKUNG GE FFNET UND SICHERHEITSVERRIEGELUNG BERBR CKT NICHT DEM STRAHL AUSSETZEN A...

Страница 11: ...the paper feed area 2 21 REMOVING AN ORIGINAL MISFEED 2 23 Removing a misfed original from the automatic document feeder 2 23 TROUBLESHOOTING 2 24 CHAPTER 3 PERIPHERAL DEVICES DUPLEX MODULE 3 2 Part n...

Страница 12: ...aning the document glass and the automatic document feeder 6 2 Cleaning the main charger of the photoconductive drum 6 2 TROUBLESHOOTING 6 3 CHAPTER 7 DOCUMENT FILING FUNCTION OVERVIEW 7 2 Document fi...

Страница 13: ...g the product Page INTRODUCTION 1 2 MAIN FEATURES 1 3 PART NAMES AND FUNCTIONS 1 9 Exterior 1 9 Interior 1 10 Part names and functions of peripheral devices 1 11 Operation panel 1 13 Touch panel 1 14...

Страница 14: ...ows use of standard sizes in both the AB and inch systems These are shown in the tables below The meaning of R in original and paper size indications Some original and paper sizes can be placed in eit...

Страница 15: ...See page 1 7 Interrupting a copy run See page 1 7 Offset mode See page 1 7 When the Finisher or Saddle stitch finisher is installed Staple sort mode See page 1 7 When the Finisher or Saddle stitch fin...

Страница 16: ...ages of a book can be successively copied onto separate sheets Pamphlet Copy See page 5 6 One sided or two sided pamphlet style copies can be made Original Enlargement Reduction Copy Original Copy Ima...

Страница 17: ...ncies Multi Shot See page 5 23 Multiple original pages can be copied onto a single sheet of paper in a uniform layout Book Copy See page 5 25 Books and other bound originals can be copied pamphlet sty...

Страница 18: ...gram saves you the trouble of selecting those settings each time you wish to use them Mirror Image See page 5 28 A mirror image copy can be made B W Reverse See page 5 28 White and black can be invert...

Страница 19: ...16 Sets of copies can be automatically stapled Saddle stitch See page 3 14 When a saddle stitch finisher is installed copies can be automatically folded in half and stapled at the fold Use with the p...

Страница 20: ...ode but the time to recover to the ready condition will be longer The preset time to enter this mode can be set by a key operator program When this product is used as a printer and either of the above...

Страница 21: ...output area Centre tray Finished sheets are deposited here 6 Upper exit tray extension Provides support for large size paper 7 Operation panel 8 Front cover Open to add toner 9 Power switch Press to...

Страница 22: ...as occurred in the main unit 17 Toner cartridge drum toner cartridge The toner cartridge must be replaced when indicated on the operation panel See page 2 15 18 Photoconductive drum Images are formed...

Страница 23: ...per drawer AR D28 This paper feed unit contains an upper multi purpose drawer see item 6 and a lower drawer which can hold a maximum of 2000 sheets of 80 g m2 20 lbs paper 5 Multi purpose drawer ARMU2...

Страница 24: ...is kit is required to add the network scanning feature The network printer function is required to add on the network scanner function On models that do not have the network printer function as a stan...

Страница 25: ...ting is being performed 4 JOB STATUS key Press to display the current job status See page 1 15 5 CUSTOM SETTINGS key This is used to store edit and delete user names and folder names for the document...

Страница 26: ...in a setting screen at the time the screen appears the OK key can be pressed to store the selection without further operation Example 2 A function in the special functions screen is selected by touchi...

Страница 27: ...r jobs will not be printed if the paper runs out during printing If you need to change the paper size because the specified paper size is not available touch the current job key to select it and then...

Страница 28: ...ITY key Touch this key after selecting a stored job in this JOB QUEUE list to print the job ahead of the other jobs Note that a job in progress cannot be interrupted if it is an interrupt copy job or...

Страница 29: ...ower switch or unplugging the power cord while the lights are blinking may damage the hard disk and cause the data being stored or received to be lost NOTES Turn both switches off and unplug the power...

Страница 30: ...s displayed Check the number in the display and touch the OK key 2 Follow the appropriate steps to perform the copy job When copying is begun the following message will appear To perform an interrupt...

Страница 31: ...s multi purpose drawer 2 10 Loading paper in the stand 3 x 500 sheet paper drawer 2 10 Specifications stand 3 x 500 sheet paper drawer 2 10 Loading paper in the stand MPD 2000 sheet paper drawer 2 11...

Страница 32: ...ength and width of the paper The guide plates A and B are slidable Adjust them to the paper size to be loaded while squeezing their lock levers 3 Load paper into the tray 4 Gently push tray 1 into the...

Страница 33: ...be used with the automatic detection function A4 A4R B5 B5R If AUTO INCH is selected in setting the paper type and paper size page 2 5 the following paper sizes can be used with the automatic detectio...

Страница 34: ...x 11 thick paper ranging from 60 to 105 g m2 or 16 to 28 lbs can be used Other thick papers Index stock 176 g m2 or 65 lbs can be used Cover stock 200 to 205 g m2 or 110 lbs can be used but only for...

Страница 35: ...To store or edit a user type name or set tray attributes see Programming and editing paper types on page 2 7 NOTE To automatically switch to a tray with the same size and type of paper if there is one...

Страница 36: ...ng the paper type and paper size see page 2 6 AUTO INCH key Select when you have loaded an inch based size of paper AUTO AB key Select when you have loaded an AB size of paper SIZE INPUT key Select to...

Страница 37: ...PAPER TYPE FIXED PAPER SIDE TYPE NAME PAPER TYPE REGISTRATION No 01 USER TYPE 1 DISABLE STAPLE DISAB DISAB FIXED PAPER SIDE TYPE NAME PAPER TYPE REGISTRATION No 01 USER TYPE 1 DISABLE STAPLE DISAB DIS...

Страница 38: ...ostcards print side up to the rear left of the tray as shown Loading envelopes Envelopes can only be printed on the address side Be sure to place envelopes with the address side up and the top of the...

Страница 39: ...ge to the envelopes or smudges on prints may occur even if envelopes within specification are used In this case the problem may be reduced by shifting the fusing unit pressure adjusting levers from th...

Страница 40: ...loading paper is the same as for paper tray 1 in the main unit See the description page 2 2 Specifications stand 3 x 500 sheet paper drawer Name Multi purpose drawer Paper size weight See specificatio...

Страница 41: ...able holds approximately 800 sheets After loading paper be sure to return the paper guide 3 Gently push the large capacity paper tray into the machine Push the tray firmly all the way into the machine...

Страница 42: ...trator of the machine to configure machine settings A key appears for these settings in the custom settings menu screen For information on these settings see the key operator s guide 1 These settings...

Страница 43: ...ST 2004 10 20 MON 14 27 DD MM YYYY AME ON OK T 12 HOUR CUSTOM SETTINGS LIST PRINT FAX DATA RECEIVE FORWARD PAPER TRAY SETTINGS EXIT DEFAULT SETTINGS SENDER CONTROL KEY OPERATOR PROGRAMS ADDRESS CONTRO...

Страница 44: ...guration O Keyboard 2 AZERTY configuration O Keyboard 3 ABCDEF configuration The default setting is Keyboard 1 Example Character entry screen when Keyboard 3 is selected Q List print This is used to p...

Страница 45: ...tridge lock lever 8 Close the front cover NOTE To view the approximate amount of toner remaining hold down the COPY key during printing or when the machine is on standby The percentage of toner remain...

Страница 46: ...ter shaking the cartridge vigorously and will remain inside the cartridge without flowing out For best copying results be sure to use only Olivetti Genuine Supplies which are designed engineered and t...

Страница 47: ...i purpose drawer page 2 21 Misfeed in the stand MPD 2000 sheet paper drawer page 2 21 Misfeed in the stand 3 x 500 sheet paper drawer page 2 21 Misfeed in the document feeder page 2 22 Misfeed in the...

Страница 48: ...pen tab to open the fusing unit and remove the misfed paper If paper is misfed in the exit area remove it as shown while taking care not to tear the paper If the duplex module is equipped with an exit...

Страница 49: ...ntly remove it while taking care not to tear the paper If paper is misfed at the lower part of the duplex module gently remove it while taking care not to tear the paper 4 Close the cover of the duple...

Страница 50: ...cking the partially fed paper may tear and leave torn pieces in the machine increasing the difficulty of removal NOTE The paper may not be extending out far from inside the machine but must be removed...

Страница 51: ...multi purpose drawer shown to the left to remove the misfed paper Q Misfeed in the stand MPD 2000 sheet paper drawer For misfeed removal in the upper tray follow the procedure of Misfeed in the multi...

Страница 52: ...pen the document feeder and turn the green rotating knob in the direction of the arrow to remove any misfed originals 2 Open and close the document feeder Opening and closing the cover clears the misf...

Страница 53: ...hat requires service In this event stop using the machine unplug the power cord and contact your Olivetti dealer Note Letters and numbers appear in When you contact your Olivetti dealer please tell yo...

Страница 54: ...n using a special size of paper set the correct paper size as explained in Setting the paper type and paper size on page 2 5 If the paper size setting is not correct part of the image may be cut off o...

Страница 55: ...e on the wrong side of the paper The paper is loaded in the tray with the print side face down Face up if the paper type is PRE PRINTED PRE PUNCHED or LETTER HEAD Load paper in the tray with the print...

Страница 56: ......

Страница 57: ...cations 3 5 Misfeed in the mail bin stacker 3 6 FINISHER 3 7 Part names 3 7 Specifications 3 7 Finisher functions 3 8 Using the finisher functions 3 9 Staple cartridge replacement 3 10 Misfeed in the...

Страница 58: ...aper weight for duplex copy 1 60 to 105 g m2 or 16 to 28 lbs Reference paper position Centre Bypass tray paper capacity 2 100 sheets A4 or 8 1 2 x 11 size 80 g m2 or 20 lbs Dimensions Duplex module 11...

Страница 59: ...en using A5 paper 5 1 2 x 8 1 2 paper or postcards be sure to load them with their shorter edge into the feed slot as shown in the illustration When loading plain paper other than Olivetti standard pa...

Страница 60: ...ss tray are skewed Does the number of sheets exceed the limit Set paper within the allowable range Paper guides properly set Set the paper guides properly to the paper size A paper misfeed occurs in t...

Страница 61: ...f trays 8 Top tray and seven mail bins Paper output Print face down Tray type Top tray normal tray Mail bins mail bin tray Tray capacity Top tray 250 sheets A4 or 8 1 2 x 11 size 80 g m2 or 20 lbs Mai...

Страница 62: ...not to tear the misfed paper during removal After removing the paper press down on the top cover to close it 3 If the misfed paper is not found in step 2 open the front cover 4 Turn the roller rotati...

Страница 63: ...0 lbs Paper sizes Top tray same as the specifications of paper for feeding in the main unit Lower tray Max A4 or 8 1 2 x 11 Min B5 Paper weight Top tray same as the specifications of paper for feeding...

Страница 64: ...e for stapling and stapling capacity are shown below Original Printouts Offset mode Non offset mode Original Printouts Stapling positions Top left corner of printouts Centre left two positions of prin...

Страница 65: ...elivered 4 Icon display An icon representing a selected function sort staple sort or group is displayed 5 OFFSET key See page 3 8 If Offset is checked offset is enabled If not checked offset will not...

Страница 66: ...e arrow of the staple cartridge with that of the staple box When reinstalling the staple box push it in until it clicks into place 6 Remove the tape from the staple cartridge by pulling it straight 7...

Страница 67: ...t to face up 6 Pull the release lever for the staple box and remove the box 7 Raise the lever at the end of the staple box Remove the top staple if it is bent If bent staples remain a staple jam will...

Страница 68: ...e tab in the direction of the arrow as shown in the illustration to open the top cover 3 Remove the misfed paper Be careful not to tear the misfed paper during removal After removing the paper press d...

Страница 69: ...iler Stapling cannot be performed Is a CHECK THE STAPLER UNIT or CHECK STAPLER POSITION OR STAPLER JAM message displayed Check the staple unit See page 3 11 Is a message ADD STAPLES displayed Replace...

Страница 70: ...11 or smaller sizes 80 g m2 or 20 lbs max 30 stapled sets and max 500 sheets for B4 or 8 1 2 x 13 or larger sizes 80 g m2 or 20 lbs Lower tray Stapled print capacity is 6 10 sheets x 10 sets or 1 5 s...

Страница 71: ...ly be used in the offset tray Stapled sets will not be offset Stapling capacity A4 or 8 1 2 x 11 or smaller size 50 sheets 80 g m2 or 20 lbs B4 or 8 1 2 x 14 or larger size 25 sheets 80 g m2 or 20 lbs...

Страница 72: ...orientation Available paper sizes A4 B5 and 8 1 2 x 11 Stapling capacity Up to 50 sheets for any sizes Same as above Same as above Available paper sizes A3 B4 A4R 11 x 17 8 1 2 x 14 8 1 2 x 13 and 8 1...

Страница 73: ...ge rotation will not function when the hole punching function is used Two or three holes can be punched depending on the paper size See paper sizes for hole punching on page 4 4 If the punching functi...

Страница 74: ...the offset will not function If the staple sort is selected the check mark of offset will be automatically selected 6 CENTRE TRAY key If the centre tray is selected output paper will be delivered to...

Страница 75: ...unlock the staple box cover and remove the staple cartridge 6 Insert a new staple cartridge into the staple box After inserting the staple cartridge press down on the staple box cover to lock the cart...

Страница 76: ...shown in the illustration until the blue indication is seen 4 Remove the paper from the stapler compiler 5 If saddle stitch was selected open the saddle stitch section cover 6 Remove the misfed paper...

Страница 77: ...ce 14Push the stapler section back into the finisher 15Close the front cover 16Push the saddle stitch finisher back against the machine Disposal of hole punch scrap 1 Unlatch the saddle stitch finishe...

Страница 78: ...rotate it Only when an optional punch unit is installed Rotating roller rotating knob B releases the caught paper 4 Open the top cover 5 Remove the misfed paper Remove the paper gently taking care not...

Страница 79: ...in the direction of the arrow 12Remove any misfed paper from the saddle stitch tray Remove the paper gently taking care not to tear it 13Close the cover of the saddle stitch section 14Close the front...

Страница 80: ...lled See page 3 20 Different size paper included Stapling cannot be performed onto different size paper Stapled sets are not stacked correctly or some sheets in a set are not stapled Paper heavily cur...

Страница 81: ...Part 2 Copier Operation...

Страница 82: ......

Страница 83: ...size 4 5 STORING DELETING AND USING ORIGINAL SIZES 4 6 Storing or deleting an original size 4 6 NORMAL COPYING 4 7 Making copies with the automatic document feeder 4 7 Automatic two sided copying usin...

Страница 84: ...specified range may cause an original misfeed Before loading originals into the document feeder tray be sure to remove any staples or paper clips If originals have damp spots from correction fluid ink...

Страница 85: ...in the appropriate position for its size as shown above NOTE Do not place any objects under the original size detector because they may damage it or the original size may not be detected properly Ori...

Страница 86: ...automatically rotated 90 and copied When an image is rotated a message will be displayed If a function is selected that is not suitable for rotation such as enlarging the copy to greater than A4 8 1 2...

Страница 87: ...dard size original is placed in the document feeder or on the document glass touch the SIZE INPUT tab and then enter the X width and Y length dimensions of the original X is initially selected Enter t...

Страница 88: ...e original with the keys X width is initially selected Enter X and then touch the key to enter Y A width of 64 to 432 mm can be entered in X and a length of 64 to 297 mm can be entered in Y 6 Touch th...

Страница 89: ...PER will appear If the message appears load paper in a paper tray with paper of the required size Even if the message above appears copying can be performed onto the currently selected paper The follo...

Страница 90: ...he FILE key is greyed out only the QUICK FILE key can be selected When you touch the QUICK FILE key a message asking you to confirm the save will appear Touch the OK key in the message screen and go t...

Страница 91: ...when a saddle stitch finisher is installed The screen that appears when a finisher is installed is slightly different SPECIAL MODES 2 SIDED COPY OUTPUT OUTPUT SORT GROUP Original Press the START key S...

Страница 92: ...ument feeder tray pages 4 3 to 4 6 2 Touch the 2 SIDED COPY key 3 Select the desired copy mode The display will vary depending on the equipment installed When making automatic two sided copies of a on...

Страница 93: ...message LOAD xxxxxx PAPER will appear If the message appears load paper in a paper tray with paper of the required size Even if the message above is displayed copying can be performed onto the current...

Страница 94: ...this function see Document filing function in chapter 7 If the FILE key is greyed out only the QUICK FILE key can be selected When you touch the QUICK FILE key a message asking you to confirm the sav...

Страница 95: ...n the appropriate position for its size as shown above 2 Touch the 2 SIDED COPY key 3 Touch the 1 sided to 2 sided copy key When making automatic two sided copies of a one sided A3 11 x 17 or B4 8 1 2...

Страница 96: ...imum background TEXT PHOTO This provides the best balance for copying an original which contains both text and photos This mode is also useful for copying printed photographs PHOTO This mode provides...

Страница 97: ...hapter 7 If the FILE key is greyed out only the QUICK FILE key can be selected When you touch the QUICK FILE key a message asking you to confirm the save will appear Touch the OK key in the message sc...

Страница 98: ...y ratio from 25 to 400 can be set in 1 increments Touch the key to increase the ratio or the key to decrease the ratio If you continue to touch the key the ratio will change automatically After 3 seco...

Страница 99: ...e FILE key is greyed out only the QUICK FILE key can be selected When you touch the QUICK FILE key a message asking you to confirm the save will appear Touch the OK key in the message screen and go to...

Страница 100: ...become highlighted when touched Zoom ratios Any ratio from 25 to 400 can be set in 1 increments Touch the key to increase the ratio or the key to decrease the ratio If you continue to touch the key t...

Страница 101: ...LECT key and select the paper size If the AUTO PAPER SELECT mode is on the appropriate copy paper size will have been automatically selected based on the original size and selected copy ratios 10Selec...

Страница 102: ...the currently selected paper type 2 The Y key shows the size of paper loaded in the bypass tray 3 To change the displayed paper type touch the X key before touching the Y key When loading paper if you...

Страница 103: ...using special functions 5 2 Margin shift 5 3 Erase 5 4 Dual page copy 5 5 Pamphlet copy 5 6 Job build 5 8 Tandem copy 5 9 Covers inserts 5 11 Transparency film with insert sheets 5 22 Multi shot 5 23...

Страница 104: ...The following special functions can be selected in the 3rd screen 3 3 B W reverse page 5 28 Print menu page 5 29 General procedure for using special functions 1 Touch the SPECIAL MODES key 2 Touch the...

Страница 105: ...opy mode NOTES The initial setting for the margin width can be changed in the key operator programs to any value from 0 to 20 mm 0 to 1 Page 15 of the Key operator s guide When margin shift is selecte...

Страница 106: ...the amount of erase and touch the OK key Use the and keys to set the erase width to any value from 0 to 10 mm in 1 mm increments 0 to 1 in increments of 1 8 4 Touch the OK key on the special modes scr...

Страница 107: ...8 1 2 x 11 A4 size paper is selected If A4 8 1 2 x 11 size paper is not selected touch the PAPER SELECT key to select A4 8 1 2 x 11 size paper The dual page copy function can be used only when copyin...

Страница 108: ...appear The pamphlet copy icon etc will also appear in the upper left corner of the screen to indicate that the function is turned on 2 Designate the type of originals to be copied 1 sided or 2 sided...

Страница 109: ...ls have been scanned The next step is not needed When using the document glass Replace the original with the next original and press the START key Repeat this operation until all originals have been s...

Страница 110: ...re that the desired paper size is selected select the number of copies or other copy settings and press the START key Scanning of originals will start After scanning of the first set of originals A in...

Страница 111: ...e tandem settings should be configured by your network administrator If the server and client machines will alternate server and client roles the IP address of the server machine must also be entered...

Страница 112: ...et to 999 and Non staple is selected tandem copying will take place 2 If tandem copying is executed for a two sided copy job with the number of copies set to 999 and Staple is selected tandem copying...

Страница 113: ...tions for using covers and inserts Load the cover insert paper in the tray before using the cover insert function Use the same size of paper for the covers inserts as for the copies For the procedures...

Страница 114: ...e only applies to the front cover paper When the back cover paper is selected the selection only applies to the back cover paper 3 The Z key shows the tray selected for the front cover paper in step 3...

Страница 115: ...possible when the YES key of X has been selected The one sided two sided selection made here only applies to insertion type A paper When insertion type B is selected the selection only applies to inse...

Страница 116: ...B key is highlighted the insert settings apply to INSERTION TYPE B SETTING 10Touch the OK key in the screen of step 9 You will return to the screen of step 2 11If you wish to insert a different paper...

Страница 117: ...e key of the insert that you wish to edit or delete in the page layout screen When the key is touched the CANCEL DELETE or AMEND keys appear To cancel touch the CANCEL key To delete an inserted page t...

Страница 118: ...ending on the settings Type Symbol Meaning Icon appearing in display Type Symbol Meaning Icon appearing in display Front cover Front cover when not copied on Inserts Insert when not copied on Front co...

Страница 119: ...ng copies Front cover Back cover No copying No copying One sided copying No copying Two sided copying No copying No copying One sided copying No copying Two sided copying One sided copying One sided c...

Страница 120: ...g copies Front cover Back cover No copying No copying One sided copying No copying Two sided copying No copying No copying One sided copying No copying Two sided copying One sided copying One sided co...

Страница 121: ...t cover Back cover No copying No copying One sided copying No copying Two sided copying No copying No copying One sided copying No copying Two sided copying One sided copying One sided copying One sid...

Страница 122: ...Front cover Back cover No copying No copying One sided copying No copying Two sided copying No copying No copying One sided copying No copying Two sided copying One sided copying One sided copying On...

Страница 123: ...page of the insert is set to page 3 1st page 2nd page 3rd page 4th page 5th page 6th page 1 2 3 4 5 6 Copying on insert Resulting copies one sided copying Resulting copies two sided copying No copying...

Страница 124: ...4 Touch the TRAY SETTINGS key 5 Touch the key to display the tray settings screen of tray 2 6 Touch the TYPE SIZE key 7 Touch the TRANSPARENCY key 8 Touch the OK key If the paper size was changed from...

Страница 125: ...right top see the next page When using the multi shot function place the originals select the desired paper size and select the copying mode before selecting the multi shot function on the special mod...

Страница 126: ...s in which the images are arranged 4 Touch the OK key inside OK key on the multi shot setting screen You will return to the special modes screen 5 Touch the OK key in the special modes screen You will...

Страница 127: ...he book copy setting screen You will return to the special modes screen 3 Select any desired cover settings If you wish to use a different type of paper for the cover perform steps 4 to 12 on pages 5...

Страница 128: ...ginal with the keys X width is initially selected Enter X and then touch the Y key to enter Y To return the X and Y values to the initial settings configured in the key operator programs touch the SIZ...

Страница 129: ...7 Press the START key The front side of the card is scanned 8 Place the back side of the original face down on the document glass see step 5 9 Press the START key The back side of the card is scanned...

Страница 130: ...isplay the special modes screen See General procedure for using special functions on page 5 2 TRANSPARENCY INSERTS MULTI SHOT MIRROR IMAGE CARD SHOT About the steps that follow If an automatic documen...

Страница 131: ...ber 2004 Meeting Top left Top right Top centre Bottom left Bottom right Bottom centre Print menu Printing area Maximum number of settings DATE A One position only STAMP B 6 positions PAGE NUMBERING A...

Страница 132: ...e 5 2 Not selected print menu setting has not been selected Selected during selection of the print menu setting Not selected print menu setting has already been selected PRINT MENU B W REVERSE SPECIAL...

Страница 133: ...the document glass is being used see pages 4 11 through 4 13 2 OK OK LAYOUT CANCEL S WHEN COPYING ON COVERS INSERTS 2 SIDED ORIGINAL TYPE NOTE To cancel print menu Touch the CANCEL key in the screen o...

Страница 134: ...ar month or day that needs to be changed and then adjust the number with the or key When finished touch the OK key 5 Select the pages to be printed on Select whether to print on only the first page or...

Страница 135: ...ARGER is initially selected To make the stamp smaller touch the LARGER SMALLER key Smaller is selected when SMALLER is highlighted 6 Select the pages to be printed on Select whether to print on only t...

Страница 136: ...it will not be included in the total pages However if COUNT BACK COVER is selected the last page will be counted See step 7 O When used in combination with Dual page copy Multi shot or Card shot the n...

Страница 137: ...e NOTE To cancel a page number setting Touch the CANCEL key in the page number selection screen The screen of step 10 OK LAST NUMBER AUTO COVERS INSERTS COUNTING CANCEL OK TOTAL PAGE AUTO MANUAL PAGE...

Страница 138: ...3 11 15 12 15 13 15 Not printed Not printed PRINTING STARTS FROM SHEET 3 Not printed Not printed 1 3 2 3 3 3 A 1 5 B 2 5 C 3 5 D 4 5 E 5 5 Setting Value 1st page 2nd page 3rd page 4th page 5th page Fr...

Страница 139: ...ARTS FROM SHEET 3 Not printed count Not printed count Not printed Not printed 1 6 2 6 3 6 4 6 5 6 6 6 A B 1 8 C 2 8 D 3 8 E 4 8 F 5 8 G 6 8 H 7 8 I 8 8 Setting Value 1st page 2nd page 3rd page insert...

Страница 140: ...ext sequence will appear in each key When 6 keys are displayed up to 22 characters appear in each key 5 Touch the OK key To edit the selected text sequence touch the DIRECT ENTRY key to display the ch...

Страница 141: ...uch the AMEND key To delete the text touch the DELETE key When the AMEND key is touched the character entry screen appears The selected text sequence is entered For information on entering characters...

Страница 142: ...ontent to a position that already has print content set a message will appear asking you if you wish to overwrite the previously set content To overwrite the content touch the YES key To cancel the mo...

Страница 143: ...d the job program Number keys in which job programs are already stored are highlighted 4 Select the copy settings that you wish to store in the job program The number of copies cannot be stored 5 Touc...

Страница 144: ...s been stored is selected the screen will change to the screen of step 4 on the previous page for storing a job program 4 Touch the DELETE key The selected program is deleted and you return to the scr...

Страница 145: ...the exposure mode paper size number of copies and any other copy settings as needed and then press the START key 4 The previous copy job automatically resumes after the interrupt job finishes NOTES I...

Страница 146: ......

Страница 147: ...his chapter explains procedures for cleaning the machine and troubleshooting Page USER MAINTENANCE 6 2 Cleaning the document glass and the automatic document feeder 6 2 Cleaning the main charger of th...

Страница 148: ...Cleaning the main charger of the photoconductive drum If black or white lines appear even after you have cleaned the document glass and document feeder use the charger cleaner to clean the main charg...

Страница 149: ...on a copy An appropriate exposure mode for the original has not been selected Change the exposure mode to TEXT See page 4 14 Smudges appear on copies Document glass or document cover dirty Clean regul...

Страница 150: ......

Страница 151: ...een of document filing 7 5 Document filing icons 7 5 SAVING A DOCUMENT IMAGE FILE 7 6 Quick File 7 6 Filing 7 7 Print jobs 7 9 Scan Save 7 10 CALLING UP AND USING A FILE 7 13 Searching for and calling...

Страница 152: ...uick File in copy mode or fax image send mode Data flow File 1 File 2 QUICK FILE FOLDER File 1 File 2 MAIN FOLDER CUSTOM FOLDER A password can be set A password can be set A password can be set Folder...

Страница 153: ...th the document filing function This prevents a file from being moved or automatically or manually deleted Three attributes are available for saved files SHARING PROTECT and CONFIDENTIAL When saved wi...

Страница 154: ...ric value for a setting 5 C key clear key Use this key if you make a mistake when entering a password or numeric setting This key is also used to cancel scanning of a document 6 CA key Clear all key U...

Страница 155: ...m folder When the key is touched the files in the main folder or the folders in the custom folder appear 6 QUICK FILE FOLDER key Touch to call up a file from the Quick File folder When the key is touc...

Страница 156: ...cel the save touch the QUICK FILE key after touching the OK key so that the QUICK FILE key is no longer highlighted 3 Press the START key on the operation panel To prevent accidental saving of the doc...

Страница 157: ...ame maximum of 30 characters See page 7 26 to enter characters 7 Touch the STORED TO key 8 Touch the desired folder name in the list of folder names that appears Folder names must be previously stored...

Страница 158: ...n to the screen of step 10 The set password is displayed with 15Touch the OK key You will return to the main screen 16Press the START key on the operation panel When copying begins the image is saved...

Страница 159: ...QUICK FILE FOLDER key the files in the Quick File folder appear Go to step 4 3 Touch the key of the folder that contains the desired file If a password is set for the selected folder a password entry...

Страница 160: ...17 on page 7 11 To set the original size perform steps 7 to 10 To set the resolution perform steps 11 to 13 on page 7 11 To select the exposure perform steps 14 to 16 on page 7 11 If you no not wish t...

Страница 161: ...e using the document glass touch the READ END key after all pages have been scanned 18The saved image can be called up using the file name folder name or user name or from the filing folder To call up...

Страница 162: ...in the fax and network scanner manuals It is also equivalent to the Multi shot function in copy mode however only 2in1 is possible for scan save This function reduces two original pages and arranges t...

Страница 163: ...DER NAME To search by user name follow steps 3 to 6 To search by file name or folder name perform step 8 To stop searching touch the CANCEL key Searching by user name 3 Touch the USER NAME key 4 Touch...

Страница 164: ...6 to enter characters 9 Touch the SEARCH START key 10The results of the file or folder name search appear Touch the desired file name or folder name See page 7 5 for a list of the document filing icon...

Страница 165: ...uched the FILE FOLDER key the files in the main folder or the folders in the custom folder appear If you open the wrong folder touch the MAIN FOLDER key or the CUSTOM FOLDER key and open the correct f...

Страница 166: ...ved image may cause these keys to have the opposite effect If neither key is selected one sided printing will take place To perform two sided printing the optional duplex module is necessary 4 TANDEM...

Страница 167: ...estinations 9 SPECIAL MODES key Touch this key to display the special function menu The functions that can be selected vary depending on the transmission mode Scan to E mail FTP TIMER The transmission...

Страница 168: ...attribute A file that is set to SHARING can be changed to PROTECT or CONFIDENTIAL However a SHARING file that is saved in the Quick File folder can only be changed to PROTECT A file that is set to PRO...

Страница 169: ...This operation is used to delete the selected file Touch the DELETE key in the operation select screen A message asking you to confirm the deletion will appear Touch the YES key to delete the file Onl...

Страница 170: ...4 To view information on the file touch the DETAIL key Use the keys to change screens When you are finished touch the OK key to return to the screen of step 3 5 Touch the CALL key The operation select...

Страница 171: ...y of the operation that you wish to perform Go to the page indicated below for the selected operation 1 USER NAME REGISTRATION key Program a user name See the next page 2 AMEND DELETE USER NAME key Ed...

Страница 172: ...to create a new folder or if no folders have been created touch the ADD NEW key If you touched the ADD NEW key program a name for the folder as explained on page 7 24 The user name programmed in step...

Страница 173: ...key in the screen of step 2 Deleting 6 Touch the DELETE key 7 Touch the YES key You will return to the screen of step 2 To delete another user name repeat steps 2 3 and 6 To exit touch the EXIT key in...

Страница 174: ...n step 1 5 Touch the OK key 6 Touch the USER NAME key You will select a user name that will be associated with the folder name you are programming Selection of a user name cannot be omitted 7 The prog...

Страница 175: ...ed to the right of No To stop using a password touch the PASSWORD key and then touch the OK key without entering anything for the password will appear and the password will be cancelled 5 When you hav...

Страница 176: ...ct character You can also press the AB ab 12 key during entry to enter a number or symbol 4 Touch the SPACE key The cursor moves forward and a space is entered 5 Touch the key 6 Touch the key To switc...

Страница 177: ...e the cursor back one space and then enter the correct character You can continue touching keys to enter characters You can also touch another character type selection key key or AB ab 12 key to enter...

Страница 178: ...ile was saved in the Quick File folder that name will be used However if the name is longer than the maximum name length of the Quick File folder 30 characters the excess characters will be discarded...

Страница 179: ...8 1 CHAPTER 8 SPECIFICATIONS This chapter contains useful information about the machine Page SPECIFICATIONS 8 2 LIST OF COMBINATION OF PERIPHERAL DEVICES 8 4 INDEX 8 5...

Страница 180: ...total 376 steps Fixed presets 25 50 70 81 86 100 115 122 141 200 and 400 for AB system 25 50 64 77 100 121 129 200 and 400 for inch system Continuous copy 999 copies Dimensions including automatic do...

Страница 181: ...ecifications Output method Face down output Maximum number of sheets 80g m2 20lbs recommended paper 400 sheets Paper type Plain paper and special paper The maximum number of pages that can be held var...

Страница 182: ...00 sheet paper drawer Saddle stitch finisher Finisher Mail bin stacker Exit tray Punch unit Duplex module bypass tray Duplex module Multi purpose drawer Stand 3 x 500 sheet paper drawer Stand MPD 2000...

Страница 183: ...ng up and using a saved file 7 15 Delete 7 19 Detail 7 19 Move 7 19 Print 7 16 Property change 7 18 Send 7 17 Card shot 1 6 5 2 5 26 7 12 Cartridge lock lever 1 10 Centre erase 5 4 Centre tray 1 9 4 9...

Страница 184: ...y 3 3 Multi purpose drawer 2 8 Stand 3 x 500 sheet paper drawer 2 10 Stand MPD 2000 sheet paper drawer 2 11 Tray 1 2 2 Lower cover 3 2 M Mail bins 3 5 Mail bin stacker 1 11 3 5 Main charger 6 2 Main f...

Страница 185: ...Scan save 7 10 to 7 11 SCAN TO HDD key 7 5 SEARCH key 7 5 Searching for a file 7 13 to 7 14 Selecting a function 1 14 Selecting the exposure level 4 14 Selecting the exposure mode 4 14 Selecting the o...

Страница 186: ...ubleshooting Copier operation 6 3 Document filing function 7 28 Duplex module 3 4 Finisher 3 13 General information 2 23 to 2 25 Saddle stitch finisher 3 24 Types and sizes of paper 2 3 to 2 4 Types a...

Страница 187: ...en 89 336 EEG en 73 23 EEG gewijzigd door 93 68 EEG Dette udstyr overholder kravene i direktiv nr 89 336 EEC og 73 23 EEC med till g nr 93 68 EEC Quest apparecchio conforme ai requisiti delle direttiv...

Страница 188: ...525008EN...

Отзывы: