background image

9-8

User Authentication and Accounting (User Login, Job Accounting) > Setting User Login Administration

3

Check the user information.

Change or add information as needed.

*1

Required item when registering a user.

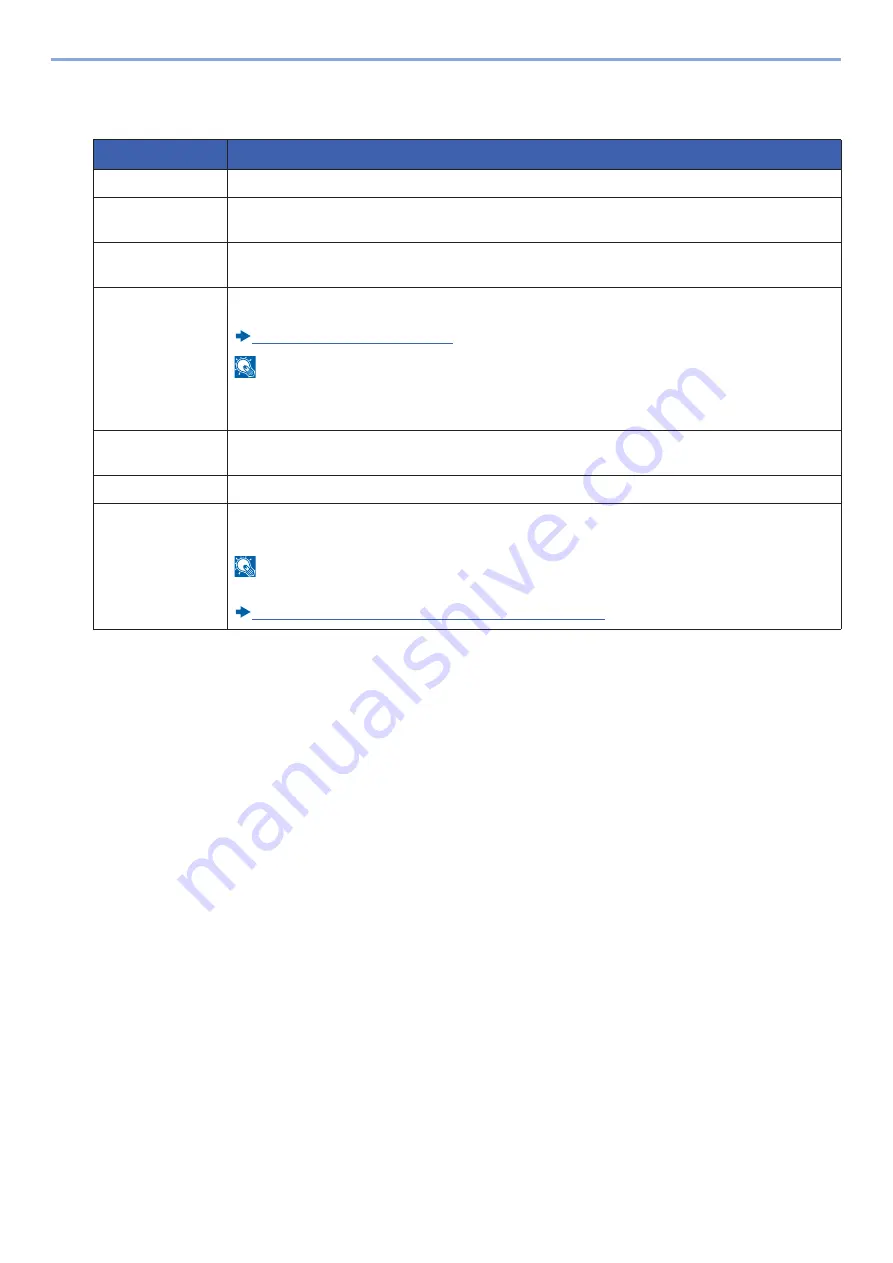
Item

Descriptions

User Name

*1

Enter the name displayed on the user list (up to 32 characters).

Login User 
Name

*1

Enter the login user name to login (up to 64 characters). The same login user name cannot be 
registered.

Login Password

Enter the password to login (up to 64 characters). Reenter the same password for confirmation and 
select the [OK] key.

Account Name

Add an account where the user belongs. The user, who registered his/her account name, can login 
without entering the account ID. 

User Login/Job Accounting (9-27)

NOTE

Select [

Name

] or [

ID

] from the "Sort" to sort the account list.

Select [

Search (Name)

] or [

Search (ID)

] to search by account name or account ID.

E-mail Address

The user can register his/her E-mail address. The registered address will be automatically selected 
for subsequent operations that need any E-mail function.

Access Level

*1

Select "Administrator" or "User" for user access privileges.

ID Card 
Information

Register ID card information. 

Place the ID card on the ID card reader, and select [

Read

].

NOTE

This function is displayed when the optional ID Card Authentication Kit is activated.

Card Authentication Kit(B) <Card Authentication Kit> (12-3)

Содержание d-COPIA 255MF

Страница 1: ...Code 595201en OPERATION GUIDE d COPIA255MF ...

Страница 2: ...al including photocopying recording or by any information storage and retrieval system without permission in writing from the Publisher 0DUNLQJ HFODUDWLRQ RI RQIRUPLW IRU XVHUV RI WKH XURSHDQ 8QLRQ 8 7KLV SURGXFW FRPSOLHV ZLWK WKH IROORZLQJ 8 GLUHFWLYHV 8 DQG 8 GLUHFWLYHV 7KLV GHFODUDWLRQ LV YDOLG IRU WKH DUHD RI WKH XURSHDQ 8QLRQ 7KLV GHYLFH PXVW EH XVHG ZLWK D VKLHOGHG LQWHUIDFH FDEOH 7KH XVH RI...

Страница 3: ... reference We recommend the use of our own brand supplies Please use our genuine toner containers which have passed rigorous quality control testing The use of non genuine toner containers may cause failure We will not be liable for any damages caused by the use of third party supplies in this machine Checking the Equipment s Serial Number The equipment s serial number is printed in the location s...

Страница 4: ...isconnection of Power 1 7 Compliance and Conformity 1 8 Other precautions for users in California the United States 1 8 Warranty the United States and Canada 1 9 Legal Restriction on Copying Scanning 1 10 EN ISO 7779 1 11 EK1 ITB 2000 1 11 Legal Information 1 11 Energy Saving Control Function 1 17 Automatic 2 Sided Print Function 1 18 Resource Saving Paper 1 19 Environmental benefits of Power Mana...

Страница 5: ...trator 2 41 Embedded Web Server RX 2 42 Accessing Embedded Web Server RX 2 42 Changing Security Settings 2 43 Changing Device Information 2 44 Setting SMTP and E mail 2 45 Migrating the Address Book 2 49 Backing Up Address Book Data to PC 2 49 Writing Address Book Data to the Machine 2 51 Application 2 54 Installing Applications 2 54 Uninstalling Applications 2 55 3 Preparation before Use 3 1 Usin...

Страница 6: ...Copy Send and Document Box Settings 3 48 Adding Shortcuts 3 48 Edit the shortcut 3 48 Deleting a Shortcut 3 49 Using Document Boxes 3 50 What is Custom Box 3 50 What is Job Box 3 50 What is Removable Memory Box 3 50 The F Code Box Polling Box and FAX Memory Receive Box are for storing FAX data 3 51 Using Machine Operations to Create a New Custom Box 3 51 Using Embedded Web Server RX to Create a Ne...

Страница 7: ... Key 5 29 Choosing from the Speed Dial 5 30 Checking and Editing Destinations 5 30 Confirmation Screen of Destinations 5 30 Recall 5 31 How to Use the FAX Function 5 32 Basic Operation for Document Box 5 33 Box List Operations 5 33 Document List Operations 5 33 Custom Box Operations 5 34 Saving Scanned Documents to a Custom Box 5 34 Moving Documents in Custom Box 5 34 Copying Documents in Custom B...

Страница 8: ... 15 Density 6 16 Original Image 6 17 EcoPrint 6 18 Color Selection 6 19 Sharpness 6 20 Contrast 6 21 Background Density Adj 6 22 Prevent Bleed through 6 23 Zoom 6 24 Combine 6 26 Margin 6 28 Duplex 6 29 Continuous Scan 6 32 Auto Image Rotation 6 33 Job Finish Notice 6 34 File Name Entry 6 35 Priority Override 6 36 Skip Blank Page 6 37 2 sided Book Original 6 38 Sending Size 6 39 File Format 6 40 F...

Страница 9: ...ome 8 22 Copy 8 23 Send 8 24 Document Box 8 25 FAX 8 26 Application 8 26 Internet 8 26 Address Book One Touch 8 27 User Login Job Accounting 8 28 Printer 8 29 System Network 8 32 Date Timer Energy Saver 8 56 Adjustment Maintenance 8 59 9 User Authentication and Accounting User Login Job Accounting 9 1 Overview of User Login Administration 9 3 Managing the Job Account from PC 9 3 Enabling User Logi...

Страница 10: ...9 44 Registering User Property for an Unknown ID User 9 45 10 Maintenance 10 1 Regular Maintenance 10 2 Cleaning Glass Platen 10 2 Cleaning Slit Glass 10 2 Consumable Replacement and Replenishment 10 4 Toner Container Replacement 10 4 Waste Toner Box Replacement 10 7 Loading Paper 10 9 Staple Cartridge Replacement Document Finisher 10 10 11 Troubleshooting 11 1 General Troubles 11 2 Solving Malfun...

Страница 11: ...lication 12 10 Character Entry Method 12 11 Entry Screens 12 11 Entering Characters 12 12 Paper 12 14 Basic Paper Specifications 12 14 Paper Appropriate Paper 12 15 Special Paper 12 18 Specifications 12 21 Machine 12 21 Copy Functions 12 23 Printer Functions 12 24 Scanner Functions 12 25 Document Processor 12 25 Paper Feeder 500 sheet 12 26 Paper Feeder 500 sheet x 2 12 2 Glossary 12 28 Index Inde...

Страница 12: ...r s license or an insurance card When you scan the front and back of the card both sides will be combined and copied onto a single sheet 6 3 Original Size Specify the original size to be scanned 6 4 Original Orientation Select the orientation of the original document top edge to scan correct direction 6 9 Mixed Sized Originals Scans all sheets in the document processor even if they are of differen...

Страница 13: ... Scans a large number of originals in separate batches and then produce as one job 6 32 Auto Image Rotation Automatically rotates the image 90 degrees when the sizes of the original and the loaded paper matches but the orientations are different 6 33 Job Finish Notice Sends E mail notice when a job is complete 6 34 Document Name Entry Adds a file name 6 35 Priority Override Suspends the current jo...

Страница 14: ...les on a WSD compatible computer WSD Scan 5 21 Functions Description Reference Page Color Selection Select the color mode setting 6 19 File FormatSpecify the image file format Image quality level can also be adjusted 6 40 Original Size Specify the original size to be scanned 6 4 Original Orientation Select the orientation of the original document top edge to scan correct direction 6 9 Mixed Sized ...

Страница 15: ...reduce or enlarge the image 6 24 Continuous Scan Scans a large number of originals in separate batches and then produce as one job 6 32 Document Name Entry Adds a file name 6 35 E mail Subject Body Adds subject and body when sending a document 6 45 Long Original Reads long sized original documents using a document processor 6 50 Job Finish Notice Sends E mail notice when a job is complete 6 34 FTP...

Страница 16: ...are of different sizes 6 7 Storing Size Select size of image to be stored 6 49 Original Image Select original image type for best results 6 17 Sharpness Adjusts the sharpness of image outlines 6 20 Contrast You can adjust the contrast between light and dark areas of the image 6 21 Background Density Adj Removes dark background from originals such as newspapers 6 22 Prevent Bleed thru Hides back si...

Страница 17: ... document from the box once printing is complete 3 52 Functions Description Reference Page Paper Output Specify the output tray 6 15 Staple Staples the finished documents 6 12 Margin Add margins white space In addition you can set the margin width and the back page margin 6 28 Priority Override Suspends the current job and gives a new job top priority 6 36 Document Name Entry Adds a file name 6 35...

Страница 18: ...FAX Operation Guide Functions Description Reference Page File Format Specify the image file format Image quality level can also be adjusted 6 40 File Separation Creates several files by dividing scanned original data page by page and sends the files 6 43 Resolution Select fineness of scanning resolution 6 44 FAX TX Resolution Select fineness of images when sending FAX FAX Operation Guide Document ...

Страница 19: ...print of multiple print job and holds printing of the remaining copies 5 42 5 43 Function key Description Reference Page File Format Specify the image file format Image quality level can also be adjusted 6 40 2 sided Book Original Select the type and binding of originals 6 38 Scan Resolution Select fineness of scanning resolution 6 44 Density Adjust density using 9 levels 6 16 Document Name Entry ...

Страница 20: ...u Hides back side image bleed through when scanning a thin paper original 6 23 Skip Blank Page When there are blank pages in a scanned document this function skips the blank pages and scans only pages that are not blank 6 37 Zoom Adjust the zoom to reduce or enlarge the image 6 24 Continuous Scan Scans a large number of originals in separate batches and then produce as one job 6 32 Long Original R...

Страница 21: ...white space Set the margin width In addition you can set the margin width and the back page margin 6 28 EcoPrint EcoPrint saves toner when printing 6 18 Job Finish Notice Sends E mail notice when a job is complete 6 34 Document Name Entry Adds a file name 6 35 Priority Override Suspends the current job and gives a new job top priority 6 36 Encrypted PDF Password Enter the preassigned password to p...

Страница 22: ...ion Reference Page Original Size Specify the original size to be scanned FAX Operation Guide Original Orientation Select the orientation of the original document top edge to scan correct direction 2 sided Book Original Select the type and orientation of the binding based on the original FAX TX Resolution Select fineness of images when sending FAX Density Adjust density using 9 levels Original Imag...

Страница 23: ... 䝁 㻲䝁 䝁 䝁 䝁 䝁 䝁 䝁 㻲䝁䞊 㻲䝁 䝁 䝁 㻲䝁䞊 䝁 㻲䝁䞊 䞊 㻲䝁䞊 㻲䝁䞊 㻲䝁䞊 䝁 䝁 䝁 䝁 䝁 䝁 䝁 䝁 䝁 䝁 㻲䝁 䝁 䝗 䝗 䝗 䝗 䝗 䝗 䝗 䝗 䝗 䝗 䝗 䝗 䝗 䝗 䝗 䝗 䝗 䝗 䝗 䝗 䝗 䝗 䝗 䝗 䝗 䝗 䝗 䝗 䝗 䝗 䝪䝑䜽 䝪䝑䜽 䝪䝑䜽 䝪䝑䜽 䜽 䝪䝑䜽 䝪䝑䜽 䝪䝑䜽 䝪䝑䜽 䝪䝑䜽 䜽 䝪 䜽 䝪䝑䜽 䝪䝑䜽 䝑䜽 䝪䝑䜽 䝑䜽 䝪䝑䜽 䝪䝑䜽 䝪䝑䜽 䝪䝑䜽 䝪䝑䜽 䝪䝑䜽 䝪䝑䜽 䝪䝑䜽 䝪䝑䜽 䝪䝑 䝪䝑䜽 䝪䝑䜽 䝪䝑䜽 䝪䝑䜽 䝪䝑䜽 䝑䜽 䝪 䝪䝑䜽 䜽 䝑䜽 䝪䝑䜽 䝪䝑䜽 䝪䝑䜽 䝑䜽 䝑䜽 䝑䜽 䝪䝑䜽 䝪䝑䜽 䝪䝑䜽 䝪䝑 䝑䜽 䝪䝑䜽 䜽 䝑䜽 䝑 䝪䝑䜽 䝑 䝑 䝑䜽 䝑䜽䝇 䝇 䝇 䝇 䝇 䝇 䝇 䝇 䝇 䝇 䝇 䝇 䝇 䝇 䝇 䝇 䝇 䝇 䝇 䝇 䝇 䝇 䝇 䝇 䝇 䝇 䝇 䝇 䝇 䝇 䝇 䝇 ...

Страница 24: ...Job Log screen 7 7 Sending Job Log Displays the Sending Job Log screen 7 7 Storing Job Log Displays the Storing Job Log screen 7 7 FAX Job Log Displays the FAX Job Log screen FAX Operation Guide Scanner The status of an original scanning or the error information paper jam opened cover etc is displayed 7 10 Printer Error information such as paper jam out of toner or out of paper and status such as ...

Страница 25: ...tion status of an optional network interface kit appears 7 11 Wi Fi Direct The connection status of the Wi Fi Direct is displayed 7 11 Wireless Network The connection status of the Wireless Network Interface Kit is displayed 7 11 Wi Fi Shows the connection status of the Wi Fi 7 11 SSD Shows the status of the option SSD 7 11 NFC The network connection status appears 7 11 or System Menu Settings Des...

Страница 26: ...on is available than on the Status Page Service personnel usually print the service status pages for maintenance purpose 8 5 Accounting Report Print Accounting Report 8 5 Sub Address Box List Printing a Sub Address Box List FAX Operation Guide FAX List Index You can print the list of destinations Index registered in the Address Book FAX Operation Guide FAX List No You can print the list of destina...

Страница 27: ...er a set number of jobs has been logged 8 7 Destination Set the destination to which log histories are sent Only E mail address can be set 8 7 Job Log Subject Set the subject automatically entered when sending log histories by E mail 8 7 Personal Information Select whether to include personal information in the job log 8 7 System Menu Settings Description Reference Page Counter Printed Pages Check...

Страница 28: ...ction 8 13 Special Paper Action When printing on the special paper such as Prepunched Preprint and Letterhead select whether or not to adjust the paper orientation to the original orientation 8 14 Show Paper Setup Message Set whether to display the confirmation screen for the paper setting when a new paper is set for each cassette 8 14 Function Defaults File Format Set the default type of the file...

Страница 29: ... scanned originals by E mail 6 45 FTP Encrypted TX Set the default value for document encryption during transmission 6 46 JPEG TIFF Print Select the image size resolution when printing JPEG or TIFF file 6 52 XPS Fit to Page Set the default value for the XPS fit to page function 6 53 Detail Settings Image Quality Select the default PDF TIFF JPEG XPS file quality 8 18 PDF A Select the default PDF A ...

Страница 30: ... inch or metric for the unit for paper dimensions 8 19 Low Toner Alert Set the amount of remaining toner to notify the administrator when to order a toner when the toner is running low 8 20 Keyboard Layout Change the layout of the touch panel keyboard used to enter characters 8 20 USB Keyboard Type Select the type of USB keyboard that you want to use 8 20 Offset Documents by Job Select whether to ...

Страница 31: ...rom the orientation of the paper 8 23 System Menu Settings Description Reference Page Dest Check before Send Select whether to display the confirmation screen of destinations after pressing the Start key when performing sending jobs 8 24 Entry Check for New Dest When adding new destination select whether to display the entry check screen to check the entered destination 8 24 Send and Forward Forwa...

Страница 32: ...d after they have been saved for a set time 8 25 Storage Media Select which storage media to use 8 25 Polling Box Configure settings for Polling Box FAX Operation Guide FAX Memory RX Box Configure settings for FAX Memory RX Box Embedded Web Server RX User Guide System Menu Settings Description Reference Page FAX Settings related to the fax function can be configured FAX Operation Guide System Menu...

Страница 33: ...y Configure settings for One Touch Key 3 39 Address Book Defaults Sort Select the default sort setting of the address for the address book 8 27 Address Book Type This procedure can be used to filter narrow down the types of destination listed when the address book is displayed 8 27 Edit Restriction Address Book Restrict editing of the address book 8 27 One Touch Key Restrict editing of the One Tou...

Страница 34: ...al Authorization Select whether or not to use Local Authorization 9 16 User Account Lockout Settings Lockout Select whether or not account lockout policy is enabled 9 5 Lockout Policy Specify the conditions and the extent to which the account lockout is applied 9 5 Locked out Users List Displays a list of locked out users 9 5 Group Authorizati on Set Group Authorizati on Set restrictions of the ma...

Страница 35: ...ets the counts by account 9 40 Accounting List You can add change and delete an account 9 29 Default Setting Apply Limit This specifies how the machine behaves when the counter has reached the limit of restriction 9 37 Copy Printer Count You can select management by totalizing the number of sheets used for copying and printing or management by individual counts 9 37 Counter Limit When you add a ne...

Страница 36: ...fy the timeout time 8 29 LF Action Set the line feed action when the machine receives the line feed code character code 0AH 8 29 CR Action Set the character return action when the machine receives the character return code character code 0DH 8 29 Job name Set whether the job name set in the printer driver is displayed 8 30 User Name Set whether the user name set in the printer driver is displayed ...

Страница 37: ...etwork Wi Fi Select whether or not Wi Fi is enabled 8 39 Available Network Wired Network Select whether or not Wired Network is enabled 8 39 IPSec Select whether to use IPSec 8 39 Protocol Settings NetBEUI Selects whether to receive documents using NetBEUI 1 8 40 LPD Selects whether to receive documents using LPD 1 8 40 SMTP E mail TX Select whether to send E mail using SMTP 8 40 POP3 E mail RX Se...

Страница 38: ...rietary web services 1 8 45 Enhanced WSD over SSL Set whether to use our proprietary web services over SSL 1 2 8 45 eSCL Selects whether to receive scanned documents using eSCL 1 8 45 eSCL over SSL Selects whether to receive scanned documents using eSCL over SSL 1 2 8 46 Security Settings SSL Select whether to use SSL for communication 3 8 46 IPP Security Select the IPP security level This setup i...

Страница 39: ... protects the USB interface connector USB Device 8 50 USB Storage This locks and protects the USB memory slot 8 50 Option Interface Slot 1 2 This locks and protects the optional interface slots 8 50 Bluetooth Settings Set the Bluetooth keyboard 8 51 Security Level Specify the security level 8 51 Restart Restart the CPU without turning the power switch off 8 51 RAM Disk Settings Create a RAM disk a...

Страница 40: ...56 Sleep Rules Select whether to use the Sleep mode for the following functions individually 8 56 Sleep Timer Set amount of time before entering Sleep 8 57 Energy Saver Recovery Level Select the method of recovery from energy saver 8 57 Auto Error Clear In the Auto Error Clear mode automatically clear the error after a set amount of time elapses 8 57 Error Clear Timer If you select On for Auto Err...

Страница 41: ... background density adjustment during copying 8 59 Send Box Auto Darkens or lightens overall background density when sending images or storing them in the Document Box 8 59 Toner Save Level EcoPrint Copy Select the default Toner Save Level EcoPrint for copying 8 59 Printer Select the default Toner Save Level EcoPrint for printing 8 59 Print Density This makes overall print density darker or lighte...

Страница 42: ...se read this information before using your machine Safety Precautions 1 1 To prepare the device for use including setting up cable connections and installing software refer to the following Installing and Setting up the Machine 2 1 To learn how to load paper set up shared folders and add addresses to the address book refer to the following Preparation before Use 3 1 You can apply the various machi...

Страница 43: ...time Mixed Size Originals It is useful when preparing conference materials You can set the different sized originals at one time so you don t need to reset the originals regardless of size Mixed Size Originals 6 7 Optimize your office workflow Scan a large number of originals in separate batches and produce as one job Continuous Scan It is useful when preparing many page handouts When a large numb...

Страница 44: ... sides of the paper You can also print multiple originals onto one sheet Combine 6 26 Duplex 6 29 Skip blank pages when printing Skip Blank Page When there are blank pages in a scanned document this function skips the blank pages and prints only pages that are not blank Skip Blank Page 6 37 Create attractive documents Prevent image bleed through Prevent Bleed through Hides back side image bleed th...

Страница 45: ...Security 8 53 Prevent loss of finished documents Private Print Temporarily saving print jobs in the main unit document box and outputting them when in front of the device can prevent documents from being taken by others Printing Documents from Private Print Box 5 40 Strengthen security Log in by ID card Card Authentication You can log in simply by touching an ID card You don t need to enter your u...

Страница 46: ...B memory It is useful when you need to print documents outside your office or you cannot print documents from your PC You can print the document from the USB memory by plugging it directly into the machine Original scanned at the machine can be saved in the USB memory also Printing from Removable USB Memory 5 49 Use functions more efficiently Specify image file format File Format You can select th...

Страница 47: ...ails on modes that can be selected when sending storing refer to the information below Color Selection 6 19 Color mode Description Reference image Reference page Before After Auto Color Automatically recognizes whether a document being scanned is color or black white 6 19 Full Color Scans a document in full color 6 19 Grayscale Scans a document in grayscale 6 19 Black White Scans a document in bla...

Страница 48: ...recisely Emphasize or blur the image outline Example Emphasize the image outlines Sharpness 6 20 Adjust the difference between dark and light parts of the image Contrast 6 21 Darken or lighten the background the area with no texts or images of a document Example Lightening the background Background Density Adj 6 22 Prevent bleed through in 2 sided originals Prevent Bleed thru 6 23 Adjust the scann...

Страница 49: ...e s Operation Guide this Guide 1 Explains how to load paper and perform copy print and scan operations and indicates default settings and other information Use the fax functions FAX Operation Guide 1 Explains how to use the fax function Use the ID card Card Authentication Kit B Operation Guide Explains how to perform authentication using the ID card Strengthen security Data Security Kit E Operatio...

Страница 50: ...ing versions of Adobe Reader to view the manuals on the DVD Version 8 0 or later Scan images and save with information File Management Utility User Guide Explains how to use File Management Utility to set various parameters and send and save scanned documents ...

Страница 51: ...machine such as placing originals making copies sending documents and using document boxes 6 Advanced Function Settings Explains convenient functions that are available on the machine 7 Managing Jobs Consumables and Devices Explains how to check the status of a job and the job history and how to cancel jobs being printed or waiting to print Also explains how to check paper and toner levels how to ...

Страница 52: ...fer to Click an item in the Table of Contents to jump to the corresponding page Click to move from the current page to the previously displayed page This is convenient when you want to return to the page from which you jumped to the current page IMPORTANT Indicates operational requirements and restrictions to operate the machine correctly and avoid damage to the machine or property NOTE Indicates ...

Страница 53: ...n the horizontal orientation In addition the following icons are used to indicate original and paper placement orientations on the touch panel 1 Original paper sizes that can be used vary depending on the function and source tray For details refer to the following Machine 12 21 Actual procedure Procedure indicated in this guide Press the System Menu Counter key Select Select Common Settings Select...

Страница 54: ...s for users in California the United States 1 9 Legal Restriction on Copying Scanning 1 10 EN ISO 7779 1 11 EK1 ITB 2000 1 11 Legal Information 1 11 Energy Saving Control Function 1 17 Automatic 2 Sided Print Function 1 18 Resource Saving Paper 1 19 Environmental benefits of Power Management 1 20 Energy Star ENERGY STAR Program 1 21 Wireless Connection Mexico only 1 22 Security Precautions when Us...

Страница 55: ...performed Specifics of the required action are indicated inside the symbol Please contact your service representative to order a replacement if the safety warnings in this Operation Guide are illegible or if the guide itself is missing fee required Note An original which resembles a bank note closely may not be copied properly in some rare cases because this machine is equipped with a counterfeiti...

Страница 56: ...r Avoid poorly ventilated locations If the floor is delicate against casters when this machine is moved after installation the floor material may be damaged During copying some ozone is released but the amount does not cause any ill effect to one s health If however the machine is used over a long period of time in a poorly ventilated room or when making an extremely large number of copies the sme...

Страница 57: ... contact a physician If you do happen to get toner in your eyes flush them thoroughly with water If there is any remaining tenderness contact a physician If toner does happen to get on your skin wash with soap and water Do not attempt to force open or destroy parts which contain toner Other precautions Return the exhausted toner container and waste toner box to your dealer or service representativ...

Страница 58: ...in the protective housing and external cover In the normal operation of the product by user no radiation can leak from the machine This machine is classified as Class 1 laser product under IEC EN 60825 1 2014 Caution Performance of procedures other than those specified in this manual may result in hazardous radiation exposure Regarding CLASS 1 laser products information is provided on the rating l...

Страница 59: ...e CDRH Act A laser product related act was implemented on Aug 2 1976 by the Center for Devices and Radiological Health CDRH of the U S Food and Drug Administration FDA This act prohibits the sale of laser products in the U S without certification and applies to laser products manufactured after Aug 1 1976 The label shown below indicates compliance with the CDRH regulations and must be attached to ...

Страница 60: ... isolation device Other switches on the equipment are only functional switches and are not suitable for isolating the equipment from the power source Attention Le débranchement de la fiche secteur est le seul moyen de mettre l appareil hors tension Les interrupteurs sur l appareil ne sont que des interrupteurs de fonctionnement ils ne mettent pas l appareil hors tension ...

Страница 61: ...connected Consult the dealer or an experienced radio TV technician for help The use of a non shielded interface cable with the referenced device is prohibited CAUTION The changes or modifications not expressly approved by the party responsible for compliance could void the user s authority to operate the equipment This device complies with Part 15 of FCC Rules Operation is subject to the following...

Страница 62: ...ions Other precautions for users in California the United States Other precautions for users in California the United States Perchlorate Material special handling may apply See www dtsc ca gov hazardouswaste perchlorate ...

Страница 63: ... of the copyright owner Copying Scanning the following items is prohibited and may be penalized by low It may not be limited to these items Do not knowingly copy scan the items that are not to be copied scanned Paper money Bank note Securities Stamp Passport Certificate Local laws and regulations may prohibit or restrict copying scanning of other items not mentioned above ...

Страница 64: ...ration AppleTalk Bonjour Macintosh and Mac OS are trademarks of Apple Inc registered in the U S and other countries All European language fonts installed in this machine are used under licensing agreement with Monotype Imaging Inc Helvetica Palatino and Times are registered trademarks of Linotype GmbH ITC Avant Garde Gothic ITC Bookman ITC ZapfChancery and ITC ZapfDingbats are registered trademark...

Страница 65: ...d OpenSSL nor may OpenSSL appear in their names without prior written permission of the OpenSSL Project 6 Redistributions of any form whatsoever must retain the following acknowledgment This product includes software developed by the OpenSSL Project for use in the OpenSSL Toolkit http www openssl org THIS SOFTWARE IS PROVIDED BY THE OpenSSL PROJECT AS IS AND ANY EXPRESSED OR IMPLIED WARRANTIES INC...

Страница 66: ...t a non exclusive license to use the Software to reproduce and display weights styles and versions of letters numerals characters and symbols Typefaces solely for your own customary business or personal purposes at the address stated on the registration card you return to Monotype Imaging Under the terms of this License Agreement you have the right to use the Fonts on up to three printers If you n...

Страница 67: ...the Knopflerfish Project http www knopflerfish org Copyright 2003 2010 The Knopflerfish Project All rights reserved Redistribution and use in source and binary forms with or without modification are permitted provided that the following conditions are met Redistributions of source code must retain the above copyright notice this list of conditions and the following disclaimer Redistributions in bi...

Страница 68: ...tion submitted means any form of electronic verbal or written communication sent to the Licensor or its representatives including but not limited to communication on electronic mailing lists source code control systems and issue tracking systems that are managed by or on behalf of the Licensor for the purpose of discussing and improving the Work but excluding communication that is conspicuously ma...

Страница 69: ...PARTICULAR PURPOSE You are solely responsible for determining the appropriateness of using or redistributing the Work and assume any risks associated with Your exercise of permissions under this License 8 Limitation of Liability In no event and under no legal theory whether in tort including negligence contract or otherwise unless required by applicable law such as deliberate and grossly negligent...

Страница 70: ...where energy consumption is reduced after a certain amount of time elapses since the device was last used as well as a Sleep where printer and fax functions remain in a waiting state but power consumption is still reduced to a minimum when there is no activity with the device within a set amount of time Low Power Mode 2 22 Sleep 2 23 ...

Страница 71: ...to a single sheet of paper as a 2 sided print it is possible to lower the amount of paper used Duplex 6 29 Printing in duplex mode reduces paper consumption and contributes to the conservation of forest resources Duplex mode also reduces the amount of paper that must be purchased and thereby reduces cost It is recommended that machines capable of duplex printing be set to use duplex mode by defaul...

Страница 72: ...itiatives or carrying recognized ecolabels which meet EN 12281 2002 or an equivalent quality standard be used This machine also supports printing on 64 g m2 paper Using such paper containing less raw materials can lead to further saving of forest resources EN12281 2002 Printing and business paper Requirements for copy paper for dry toner imaging processes Consult your dealer or service representat...

Страница 73: ...ent function that automatically activates energy saving mode when the machine is idle for a certain period of time Although it takes the machine a slight amount of time to return to READY mode when in energy saving mode a significant reduction in energy consumption is possible It is recommended that the machine be used with the activation time for energy saving mode set to the default setting ...

Страница 74: ...ENERGY STAR Program Energy Star ENERGY STAR Program We have determined as a participating company in the International Energy Star Program that this product is compliant with the standards laid out in the International Energy Star Program ...

Страница 75: ...co only The operation of this equipment is subject to the following two conditions 1 it is possible that this equipment or device may not cause harmful interference and 2 this equipment or device must accept any interference including interference that may cause undesired operation ...

Страница 76: ... numbers Contents of email messages Illegal Intrusion A third party with malicious intent may gain unauthorized access to personal or company networks and conduct the following illegal actions Extracting personal and confidential information information leak Entering into communication while impersonating a specific person and distributing unauthorized information spoofing Modifying and retransmit...

Страница 77: ...automatic control equipment If this product is used in devices that are directly related to service including airplanes trains ships and automobiles or this product is used in applications requiring high reliability and safety to function and in devices requiring accuracy including those used in disaster prevention and crime prevention and those used for various safety purposes please use this pro...

Страница 78: ...w Power Mode 2 22 Energy Saver Recovery Level 2 22 Sleep 2 23 Auto Sleep 2 23 Sleep Rules models for Europe 2 24 Sleep Level Energy Saver models except for Europe 2 24 Quick Setup Wizard 2 25 Installing Software 2 27 Software on DVD Windows 2 27 Installing Software in Windows 2 28 Uninstalling the Software 2 33 Installing Software on a Mac Computer 2 34 Setting TWAIN Driver 2 37 Setting WIA Driver...

Страница 79: ...2 2 Installing and Setting up the Machine Uninstalling Applications 2 55 ...

Страница 80: ...hine Exterior 1 Original Feeder 2 Platen 3 Original Size Indicator Plates 4 Optical Lock Cover 5 Slit Glass 6 Operation panel 7 Inner Tray 8 Front Cover 9 Cassette 1 10 Power switch 11 USB Memory Slot A1 12 Right Cover 1 13 Handles 14 Job Separator Tray 1 3 5 4 6 7 8 9 13 12 11 10 2 14 ...

Страница 81: ...achine Exterior 15 Original width guides 16 Original table 17 Cleaning Cloth Compartment 18 Toner Container 19 Toner Container 20 Waste Toner Box 21 Paper Width Guide 22 Paper Length Guide 23 Multi Purpose Tray 24 Paper Guide 15 18 19 16 17 20 21 24 23 22 ...

Страница 82: ...ng up the Machine Part Names Connectors Interior Part Names Connectors Interior 1 USB Interface Connector B1 2 Network Interface Connector 3 Option Interface Slot 2 4 Option Interface Slot 1 5 Cassette Heater switch 5 2 3 1 4 ...

Страница 83: ...ne Part Names With Optional Equipments Attached Part Names With Optional Equipments Attached 1 Support Tray 2 Finisher Tray 3 Top cover 4 Staple Cover 5 Staple Cartridge Holder 6 Bridge Unit Cover 7 Cassette 2 8 Cassette 3 7 7 8 6 5 4 3 1 2 ...

Страница 84: ...nvironment and purpose of the machine use When Connecting the Machine to the PC via USB When Connecting the Machine to the PC or Tablet by network cable Wi Fi or Wi Fi direct NOTE If you are using wireless LAN refer to the following Wireless Network Settings 2 15 USB 㻺㼑㼠㼣㼛㼞㼗 㻺㼑㼠㼣㼛㼞㼗㻌㼏㼍㼎㼘㼑 㼏㼛㼚㼚㼑㼏㼠㼕㼛㼚 㼃㼕㻙㻲㼕㻌㼍㼏㼏㼑㼟㼟㻌㼜㼛㼕㼚㼠 㼀㼍㼎㼘㼑㼠 㼃㼕㻙㻲㼕 㼏㼛㼚㼚㼑㼏㼠㼕㼛㼚 㼃㼕㻙㻲㼕㻌㻰㼕㼞㼑㼏㼠 㼏㼛㼚㼚㼑㼏㼠㼕㼛㼚 ...

Страница 85: ...ng the Network FAX refer to the FAX Opera tion Guide Connection Environment Function Necessary Cable Connect a LAN cable to the machine Printer Scanner Network FAX 1 LAN cable 10BASE T 100BASE TX 1000BASE T Connect a USB cable to the machine Printer USB 2 0 compatible cable Hi Speed USB compliant Max 5 0 m IMPORTANT Using a cable other than a USB 2 0 compatible cable may cause failure ...

Страница 86: ... Network Settings Network settings 2 13 Connecting USB Cable 1 Connect the cable to the machine 1 Connect the USB cable to the USB interface connector located on the left side of the body 2 Connect the other end of the cable to the PC Connecting the Power Cable 1 Connect the cable to the machine Connect one end of the supplied power cable to the machine and the other end to a power outlet IMPORTAN...

Страница 87: ... an extended period e g overnight turn it off at the main power switch If the machine will not be used for an even longer period of time e g vacation remove the power plug from the outlet as a safety precaution IMPORTANT If using the products equipped with the fax function note that turning the machine off at the main power switch disables fax transmission and reception Remove paper from the casse...

Страница 88: ...work configuration and energy saving functions as needed The Machine Setup Wizard is launched when the equipment is turned on for the first time after being installed Also configure the following settings if necessary NOTE The default settings of the machine can be changed in System Menu For settings that are configurable from System Menu refer to the following System Menu 8 1 ...

Страница 89: ...iguration refer to the following Date Timer Energy Saver 8 56 The correct time can be periodically set by obtaining the time from the network time server Embedded Web Server RX User Guide Item Description Time Zone Set the time difference from GMT Choose the nearest listed location from the list If you select a region that utilizes summer time configure settings for summer time Date Time Set the d...

Страница 90: ... the connection can be set by using Embedded Web Server RX For the optional IB 50 the connection can be set by using the dedicated Web page Embedded Web Server RX User Guide IB 50 Operation Guide Setting the Connection by Using the Setup Utility of IB 50 This is the setup tool included in the CD of IB 50 You can use it on Windows IB 50 Operation Guide NOTE If user login administration is enabled y...

Страница 91: ...ddress DHCP Set to Off IP Address Enter the address Subnet Mask Enter the subnet mask in decimal representation 0 to 255 Default Gateway Enter the address Auto IP Off NOTE When using the Auto IP enter 0 0 0 0 in IP Address IMPORTANT After changing the setting restart the network from System Menu or turn the machine OFF and then ON Restart Network 8 47 ...

Страница 92: ...ring Connections on the Web Page For the IB 36 the connection can be set from the Embedded Web Server RX Embedded Web Server RX User Guide For the IB 51 the connection can be set by using the dedicated web page IB 51 Operation Guide Setting the Connection by Using the Setup Utility of IB 51 This is the setup tool included in the CD of IB 51 You can use it on both Windows and Mac OS IB 51 Operation...

Страница 93: ... computer is generated automatically 2 Insert the DVD 3 Display the screen 4 Select Maintenance 5 Wi Fi Setup Tool OK NOTE Installation on Windows must be done by a user logged on with administrator privileges If the Welcome to the Found New Hardware Wizard dialog box displays select Cancel If the auto run screen is displayed click Run setup exe If the user account management window appears click ...

Страница 94: ...etwork is configured Wireless LAN Connection by Using Wi Fi Direct 1 Display the screen System Menu Counter key System Network Enter a login user name and password Login Network Wi Fi Direct Settings Wi Fi Direct 2 Configure the settings On OK 3 Restart the network System Menu Counter key System Network Network Restart Network 4 Connect a computer or a handheld device with the machine Setting Wi F...

Страница 95: ...m as device discovery method Specify the IP address or host name to search the machine 4 Select the machine Next NOTE Installation on Windows must be done by a user logged on with administrator privileges If the Welcome to the Found New Hardware Wizard dialog box displays select Cancel If the auto run screen is displayed click Run setup exe If the user account management window appears click Yes A...

Страница 96: ...er key System Network Network Restart Network 4 Specify the machine name from the computer or handheld device If a confirmation message appears on the operation panel of the machine select Yes The network between this machine and the computer or handheld device is configured Connecting to Computers or Handheld Devices that do not Support Wi Fi Direct The following procedure is an example for conne...

Страница 97: ...between this machine and the computer or handheld device is configured Setting NFC NFC Near Field Communication is an international standard for near radio communication that is limited to a data communication distance of 10 cm Data communication can be performed by simply holding an NFC capable portable terminal near the machine The configuration methods are as follows Configuring Settings Using ...

Страница 98: ...l on This Machine NFC settings can be configured from the system menu NFC 8 55 This section provides an example of how to configure NFC settings from the system menu 1 Display the screen System Menu Counter key System Network Enter a login user name and password Login Network NFC 2 Configure the settings On OK ...

Страница 99: ... Also when fax data arrives while the machine is in Sleep the machine automatically wakes up and starts printing To resume perform one of the following actions Press any key on the operation panel Touch the touch panel Open the document processor Place originals in the document processor The machine will be ready to operate within the following time d COPIA 255MF within 8 seconds Note that ambient...

Страница 100: ...ine automatically wakes up and starts printing To resume perform the following actions Press any key on the operation panel Touch the touch panel Place originals in the document processor The machine will be ready to operate within the following time d COPIA 255MF within 13 9 seconds Note that ambient environmental conditions such as ventilation may cause the machine to respond more slowly Auto Sl...

Страница 101: ...ver mode and Quick Recovery mode The default setting is Energy Saver mode Energy Saver mode reduces power consumption even more than Quick Recovery mode and allows Sleep Mode to be set separately for each function The ID card cannot be recognized To change the preset sleep time refer to the following To resume select the Energy Saver key on the operation panel If print data is received during Slee...

Страница 102: ...t to Wired Network 4 This function is displayed when DHCP is set to On 1 Display the screen System Menu Counter key Quick Setup Wizard NOTE The default settings of the machine can be changed in System Menu For settings that are configurable from System Menu refer to the following System Menu 8 1 Function Item Description FAX Setup Configures basic fax settings FAX functions are available only on p...

Страница 103: ... If you experience difficulty configuring the settings refer to the following Help Screen 3 13 Item Description End Exits the wizard Settings configured so far are applied Previous Returns to the previous item Skip Advances to the next item without setting the current item Next Advances to the next screen Back Returns to the previous screen Finish Register the settings and exit the wizard ...

Страница 104: ...ts PCL and KPDL There are some restrictions on the machine features and option features that can be used with this driver FAX Driver FAX Driver This makes it possible to send a document created in a computer software application as a fax via the machine TWAIN Driver This driver enables scanning on the machine using a TWAIN compliant software application ż WIA Driver WIA Windows Imaging Acquisition...

Страница 105: ...he following Install using Custom Install 2 30 1 Insert the DVD 2 Display the screen NOTE Installation on Windows must be done by a user logged on with administrator privileges If the Welcome to the Found New Hardware Wizard dialog box displays select Cancel If the auto run screen is displayed click Run setup exe If the user account management window appears click Yes Allow 1 Click View License Ag...

Страница 106: ... choices and click OK IMPORTANT If Wi Fi or Wi Fi Direct is enabled be sure to specify the IP address for the port name Installation may fail if the host name is specified NOTE The machine cannot be detected unless it is on If the computer fails to detect the machine verify that it is connected to the computer via a network cable or a USB cable and that it is turned on and click Update If the Wind...

Страница 107: ...If you are installing the TWAIN driver continue by configuring the following Setting TWAIN Driver 2 37 Install using Custom Install Instructions are based on interface elements as they appear in Windows 8 1 1 Insert the DVD 2 Display the screen NOTE Installation on Windows must be done by a user logged on with administrator privileges If the Welcome to the Found New Hardware Wizard dialog box disp...

Страница 108: ...e to specify the IP address for the port name Installation may fail if the host name is specified NOTE The machine cannot be detected unless it is on If the computer fails to detect the machine verify that it is connected to the computer via a network cable and that it is turned on and click Refresh Click Update If the desired device does not appear select Add custom device to display the list and...

Страница 109: ...nstalled 4 Click Install When you click Install a screen asking for your cooperation with data collection will be displayed Select one of the answer choices and click OK NOTE To install Status Monitor on versions of Windows prior to Windows 8 it is necessary to install Microsoft NET Framework 4 0 beforehand 1 2 3 ...

Страница 110: ...e following Setting TWAIN Driver 2 37 Uninstalling the Software Perform the following procedure to delete the Software with Product Library from your computer 1 Display the screen Perform the procedure below on the computer to select the software Click Search in charms and enter Uninstall Olivetti Product Library in the search box Select Uninstall Olivetti Product Library in the search list Softwa...

Страница 111: ...ck the Olivetti icon NOTE The software can also be uninstalled using the Product Library In the Product Library screen click Uninstall and follow the on screen instructions to uninstall the software NOTE Installation on Mac OS must be done by a user logged on with administrator privileges When installing software on a Mac computer set the machine s emulation to KPDL or KPDL Auto Printer 8 29 If co...

Страница 112: ...re Install the printer driver as directed by the instructions in the installation software This completes the printer driver installation If a USB connection is used the machine is automatically recognized and connected If an IP connection is used the settings below are required 4 Configure the settings 1 Open System Preferences and add the printer 1 2 1 1 2 ...

Страница 113: ... appears in Name and then select the driver 3 Select the options available for the machine 4 The selected printer is added NOTE When using an IP connection click IP and then enter the host name or IP address The number entered in Address will automatically appear in Name Change if needed 1 2 4 3 2 1 ...

Страница 114: ... in the search list TWAIN Driver setting screen appears 2 Click Add 2 Configure the settings NOTE In Windows 7 select Start button on the Windows All Programs Olivetti and then TWAIN Driver Setting 1 Enter the machine name 2 Select this machine from the list 3 Enter the machine IP addresses or host name 4 Set units of measurement 5 When using SSL select the checkbox beside SSL 6 Click OK NOTE When...

Страница 115: ...2 38 Installing and Setting up the Machine Installing Software 3 Finish registering NOTE Click Delete to delete the added machine Click Edit to change names ...

Страница 116: ...and then the Scanners and Cameras screen appears 2 Select the same name as this machine from WIA Drivers and click Properties 2 Configure the settings NOTE In Windows 7 click Start button on the Windows and enter Scanner in Program and File Search Click View scanners and cameras in the search list and then the Scanners and Cameras screen appears 1 Click the Settings tab 2 Enter the machine IP addr...

Страница 117: ...ed on the Driver Software Installation screen the installation is completed Installation is complete when Your devices are ready to use is displayed on the Driver Software Installation screen In Windows 10 1 In Windows right click the start button and then select the following Control Panel Devices and Printers 2 Install the driver Click Add a device Select the machine s icon and then click Next W...

Страница 118: ...d I want to Function Name Reference page Restrict the users of the machine User Login 9 3 Authentication Security 9 5 Auto Panel Reset 8 56 ID Card Settings 1 9 24 Restrict the basic functions that can be used Local Authorization 9 16 Group Authorization Set 9 16 Guest Authorization Set 9 18 Prevent another user from handling the documents stored in the machine Custom Box 2 5 34 Prevent the data s...

Страница 119: ...he navigation menu The factory default setting for the default user with administrator privileges is shown below Upper case and lower case letters are distinguished case sensitive Login User Name Admin Login Password Admin Item Description Administra tor General User Device Information The machine s structure can be checked ż ż Job Status Displays all job information including print and scan jobs ...

Страница 120: ...ft of the screen Changing Security Settings 1 Display the screen 1 Launch your Web browser NOTE If the screen There is a problem with this website s security certificate is displayed configure the certificate Embedded Web Server RX User Guide You can also continue the operation without configuring the certificate NOTE To fully access the features of the Embedded Web Server RX pages enter the User ...

Страница 121: ...ileges The factory default setting for the default user with administrator privileges is shown below Upper case and lower case letters are distinguished case sensitive Login User Name Admin Login Password Admin 4 Click Security Settings 2 Configure the Security Settings From the Security Settings menu select the setting you want to configure Changing Device Information 1 Display the screen 1 Launc...

Страница 122: ... User Name Admin Login Password Admin 4 From the Device Settings menu click System 2 Specify the host name Enter the device information and then click Submit Setting SMTP and E mail By configuring the SMTP settings it is possible to send the images scanned by the machine as E mail attachments and to send E mail notices when jobs have been completed To use this function this machine must be connect...

Страница 123: ... screen 1 Launch your Web browser 2 In the address or location bar enter the machine s IP address or the host name Click in the following order to check the machine s IP address and the host name Device Information in the home screen Identification Wired Network 3 Log in with administrator privileges The factory default setting for the default user with administrator privileges is shown below Uppe...

Страница 124: ...Setting up the Machine Embedded Web Server RX 2 Configure the Settings Set SMTP E mail TX to On in the Send Protocols 3 Display the screen Display the E mail Settings screen From the Function Settings menu click E mail 1 2 ...

Страница 125: ...en you only enable the function of sending e mail from the machine Set the following items if you want to enable the function of receiving e mail on the machine Embedded Web Server RX User Guide Check Interval Run once now Domain Restriction POP3 User Settings E mail Send Settings E mail Size Limit Enter the maximum size in Kilobytes of E mail that can be sent When E mail size is greater than this...

Страница 126: ...ed using NETWORK PRINT MONITOR on the included DVD For details on operating the NETWORK PRINT MONITOR refer to the following NETWORK PRINT MONITOR User Guide Backing Up Address Book Data to PC 1 Launch the NETWORK PRINT MONITOR 2 Create a backup 1 Right click the model name from which you want to back up the Address Book and the select Advanced Set multiple devices 2 Select Custom Mode and click N...

Страница 127: ...om Overwrite settings on target device and then click Next 6 Select the model you want to back up and click Next NOTE If the Admin Login screen appears enter the Admin Login and Login Password and then click OK The default settings are as follows Upper case and lower case letters are distinguished case sensitive Login User Name Admin Login Password Admin 1 2 1 3 2 1 2 ...

Страница 128: ...ure to select XML File 9 After saving the file always click Cancel to close the screen Please note that selecting Finish will write the data to the machine s Address Book Writing Address Book Data to the Machine 1 Launch the NETWORK PRINT MONITOR 2 Load the Address Book data 1 Right click on the model name to which you want to transfer the Address Book and select Advanced Set multiple devices 1 2 ...

Страница 129: ...tion device group and then click Next 4 Select Device Address Book and click Next 5 Select Create from file and remove the checkmark from Overwrite settings on target device and then click Next Selecting the Overwrite settings on target device checkbox will overwrite the machine s Address Book from entry No 1 1 2 1 2 1 2 1 3 2 ...

Страница 130: ... the Machine Migrating the Address Book 6 Click Browse and select the backup Address Book file and then click Next 7 Click Finish The write process of the Address Book data starts 8 Once the write process is complete click Close 1 2 ...

Страница 131: ...into the USB Memory Slot 3 Select the application to be installed Install You can view detailed information on the selected application by selecting NOTE This function can only be used when the optional SSD is installed NOTE You can install applications and certificates on the machine The number of applications you can run may vary according to the type of application NOTE If the user authenticati...

Страница 132: ... You can view detailed information on the selected application by selecting 2 Select Yes in the confirmation screen NOTE To install another application repeat steps 2 3 and 2 4 To remove the removable memory select Remove Memory and wait until the message Removable Memory can be safely removed appears Then remove the removable memory NOTE If the user authentication screen appears enter your login ...

Страница 133: ...domain name 3 24 Configuring Shared Folder Access Permissions 3 25 Creating a Shared Folder Making a Note of a Shared Folder 3 26 Sharing File and Printers 3 29 Configuring Windows Firewall Settings 3 30 Adding a Destination 3 34 Adding a Destination Address Book 3 34 Changing an Address Book Destination 3 38 Deleting an Address Book Destination 3 39 Assigning a Destination to a One Touch Key 3 39...

Страница 134: ...de Box Polling Box and FAX Memory Receive Box are for storing FAX data 3 51 Using Machine Operations to Create a New Custom Box 3 51 Using Embedded Web Server RX to Create a New Custom Box 3 53 Edit the custom box 3 54 Deleting Custom Box 3 55 127 7KH 1 6 5 RSWLRQ LV QRW DYDLODEOH RQ G 23 0 ...

Страница 135: ... Start key Starts copying and scanning operations and processing for setting operations 9 Stop key Cancels or pauses the job in progress 10 Reset key Returns settings to their default states 11 Energy Saver key Puts the machine into Sleep Mode Recovers from Sleep if in Sleep Mode 12 Authentication Logout key Authenticates user switching and exits the operation for the current user i e log out 13 I...

Страница 136: ...d register another function F1 Function Key 1 Copy F2 Function Key 2 Send F3 Function Key 3 FAX option 1 Display a screen System Menu Counter key Common Settings Function Key Assignment 2 Configure the settings 1 Select the function key whose setting you want to change NOTE If the user authentication screen appears enter your login user name and login password and select Login For this you need to...

Страница 137: ...screen 5 24 FAX 1 Displays the FAX screen FAX Operation Guide Custom Box 2 Displays the Custom Box screen 3 50 Job Box Displays the Job Box screen 5 40 Removable Memory Displays the Removable Memory screen 5 47 Sub Address Box 1 Displays the Sub Address Box screen FAX Operation Guide Polling Box 1 Operate the polling box FAX Operation Guide Send to Me E mail 3 Displays the Send screen The E mail a...

Страница 138: ...on Panel Display the Home screen This screen is displayed by selecting the Home key on the operation panel Selecting an icon will display the corresponding screen You can change the icons to display on the Home screen as well as its background Editing the Home Screen 3 8 ...

Страница 139: ...ill show screen appears Once the error clears the display will return to normal 5 Task Screen Displays the Task screen 6 Logout Logout This is displayed when user login administration is enabled 7 Login User Name Displays the logged in user name This is displayed when user login administration is enabled Selecting Login User Name will display the information of the logged in user 8 Task Screen Dis...

Страница 140: ...The factory default login user name and login password are set as shown below Login user name d COPIA 255MF 2500 Login Password d COPIA 255MF 2500 Item Description Customize Desktop Specify the function icons to display on the desktop 1 Select Add 3 or 4 to display the screen for selecting the function to display Select the function to display and then OK Select an icon and Previous or After to ch...

Страница 141: ...3 50 Job Box 1 Displays the Job Box screen 3 50 Removable Memory 1 Displays the Removable Memory screen 3 50 Polling Box 2 Displays the polling box FAX Operation Guide FAX Memory RX Box 2 Displays the FAX Memory RX box screen FAX Operation Guide Send to Me E mail 4 Displays the Send screen The E mail address of the logged in user is set as the destination 5 23 Send to Me E mail from Box E mail 3 4...

Страница 142: ...ence Page Status Job Cancel Displays the Status screen If an error occurs the icon will show Once the error clears the display will return to normal Device Information Displays the Device Information screen Allows you to check system and network information as well as options that are used 3 10 Language Displays the Language setting screen in System Menu 8 4 Paper Settings Display the paper settin...

Страница 143: ...and the IP address Wi Fi 1 You can check ID information such as the model name serial number host name and location and the IP address FAX 2 You can check the local fax number local fax name local fax ID and other fax information Software Version Capability You can check the software version and performance Option You can check information on the options that are used 1 The function is displayed 2...

Страница 144: ...user control NOTE If a key that you wish to use is grayed out the settings of the previous user may still be in effect In this case select the Reset key and try again If the key is still grayed out after the Reset key is selected it is possible that you are prohibited from using the function by user control Check with the administrator of the machine Ready to copy Copy Copies Paper Selection Zoom ...

Страница 145: ...een 1 Shows the help title 2 Displays information about functions and machine operation 3 Closes the Help screen and returns to the original screen 4 Scrolls up and down when the help text cannot be displayed in its entirety on a single screen One Touch Key No Entry 10 10 001 100 Cancel OK 㑅ᢥ ື 㻝㻜㻦㻝㻜 㻭㻠 㻻㻷 䜻䝱䞁䝉䝹 㻝㻛㻞 ᬑ 㻭㻠 ᬑ 㻭㻠 ᬑ 䝁䝢䞊䛷䛝䜎䛩䚹 䛧䛯䛔䝃䜲䝈䛾 䛜ධ䛳䛯䜹䝉䝑䝖䜎䛯䛿 ᡭᕪ䛧䝖䝺䜲䜢㑅ᢥ䛧䜎䛩䚹 ື㻦ཎ 䛸タᐃෆᐜ䛻ྜ䜟䛫䛶 䛜 ືⓗ䛻 㑅ᢥ䛥䜜䜎䛩...

Страница 146: ...gin NOTE The factory default login user name and login password are set as shown below Login user name d COPIA 255MF 2500 Login password d COPIA 255MF 2500 You will be unable to login if you forget your login user name or login password In this event login with administrator privileges and change your login user name or login password NOTE If Network Authentication is selected as the user authenti...

Страница 147: ...ication Logout key to return to the login user name login password entry screen Users are automatically logged out in the following circumstances When the machine enters the sleep state When the auto panel reset function is activated NOTE If a user password is required an input screen will be displayed 10 10 Menu Select the user to login A None None B None None C None None 1 3 01 04 07 02 05 08 03...

Страница 148: ...ey Counter Printed Pages Print Coverage 2 The selected Last Page or Last Job data is displayed Last Page The data of the last printed page is displayed Last Job The data of the last printed job is displayed NOTE The printing volume as calculated from information indicated on print coverage data will not match on actual printed volume The actual printing volume varies depending on the usage printin...

Страница 149: ...y paper remaining in the multi purpose tray to its paper storage bag and seal the bag for storage Leaving paper in the cassette for a long time may cause a discoloration of paper by heat from the cassette heater If the machine will not be used for a prolonged period protect all paper from humidity by removing it from the cassettes and sealing it in the paper storage bag IMPORTANT If you copy onto ...

Страница 150: ...Legal Statement R Folio 216mm 340mm Officio II 8K 16KR 16K Plain Preprinted Bond Recycled Vellum Rough Letterhead Color Prepunched Thick High Quality Custom 1 to 8 500 sheets 80 g m2 Loading Paper into Cassette 1 to 3 3 18 2 Cassette 2 3 Cassette 3 NOTE The number of sheets that can be held varies depending on your environment and paper type You should not use inkjet printer paper or any paper wit...

Страница 151: ...just the paper length guide to the paper size required 3 Adjust the position of the paper width guides located on the left and right sides of the cassette NOTE When using 11X17 Ledger paper lower the paper length guide to the left edge of the paper ...

Страница 152: ...he print side facing up After removing new paper from its packaging fan the paper before loading it in the multi purpose tray Precaution for Loading Paper 3 17 Before loading the paper be sure that it is not curled or folded Paper that is curled or folded may cause paper jams Ensure that the loaded paper does not exceed the level indicator If paper is loaded without adjusting the paper length guid...

Страница 153: ...ssette MP Tray Settings Cassette 1 9 Configure the function Select the paper size and paper type Cassette 1 to 3 8 9 NOTE If the size label is required please contact your dealer or our sales and service representative Paper size is automatically detected Refer to the information below Paper Selection 6 5 Cassette 1 to 3 8 9 ...

Страница 154: ...3 22 Preparation before Use Using the Output Stopper Using the Output Stopper When using A3 ledger or larger paper open the paper stopper as shown in the figure ...

Страница 155: ... Paper Stack Guide Using the Paper Stack Guide To use an envelope thick paper and cardstock open the paper stack guide as shown below Besure to restore the guide when you are using paper other than an envelope thick paper and cardstock 1 2 ...

Страница 156: ...ck the Window icon and select System 2 Check the status Check the computer name and full computer name Screen example Computer name PC4050 Full computer name pc4050 abcdnet com After checking the computer name click the Close button to close the System Properties screen Making a note of the user name and domain name Check the domain name and user name for logging onto Windows NOTE Log on to Window...

Страница 157: ...ccess Permissions If there is a workgroup item in System Properties configure the settings below to limit folder access to a specific user or group 1 Display a screen From the desktop charms Settings Control Panel Appearance and Personalization Folder Options NOTE In Windows Vista or Windows 7 Windows Start button All Programs or Programs Accessories Command Prompt In Windows 10 right click the Wi...

Страница 158: ...e the document in the destination computer NOTE If there is a workgroup in System Properties configure the settings below to limit folder access to a specific user or group 1 Select Settings in charms on the Desktop and then select Control Panel Appearance and Personalization Folder Options In Windows 7 Start Control Panel Appearance and Personalization Folder Options In Windows 10 Start up Explor...

Страница 159: ...r computer For example create a folder with the name scannerdata on the desktop 2 Configure permission settings 1 Right click the scannerdata folder and click Share and Advanced sharing Click the Advanced Sharing button 2 Select the Share this folder checkbox and click the Permissions button 3 Make a note of the Share name 1 2 2 1 ...

Страница 160: ...irst dot in the full computer name that you made a note of does not appear in From this location click the Locations button select the text after the dot and click the OK button Example abcdnet com Making a note of the computer name and full computer name 3 24 2 Enter the user name that you made a note of on page in the text box and click the OK button Also the user name can be made by clicking th...

Страница 161: ...the user does not appear on Group or user names click Edit button to add user in a similar way of configuration of permission settings 4 Make sure that checkmarks appear on Allow checkbox for the Modify and Read execute permissions 5 Click the Close button NOTE Log on to Windows with administrator privileges NOTE In Windows Vista from Start button on the Windows select Control Panel Security and t...

Страница 162: ... Security and then Windows Firewall NOTE Log on to Windows with administrator privileges NOTE In Windows Vista from Start button on the Windows select Control Panel Security and then Turn Windows Firewall on or off In Windows 7 Start button Control Panel System and Security Check firewall status In Windows 8 From the desktop charms Settings Control Panel System and Security Windows Firewall In Win...

Страница 163: ...Preparation for Sending a Document to a Shared Folder in a PC 2 Add a port 1 Select Advanced settings 2 Select Inbound Rules 3 Select New Rules 4 Select Port NOTE In Windows Vista Exceptions tab Add Port Perform procedure 2 5 1 2 ...

Страница 164: ...ts and enter 445 then click Next 6 Select Allow the connection and click the Next button 7 Make sure all checkboxes are selected and click the Next button NOTE In Windows Vista use Name to assign a name to the port to be added Example Scan to SMB Enter 445 in Port Number Select TCP for Protocol After settings are the way you want click the OK button 2 1 1 2 1 2 1 2 ...

Страница 165: ...3 33 Preparation before Use Preparation for Sending a Document to a Shared Folder in a PC 8 Enter Scan to SMB in Name and click Finish 1 2 1 2 ...

Страница 166: ...ess FTP server folder path computer folder path FAX No etc Maximum number of addresses 200 1 Display a screen System Menu Counter key Address Book One Touch Address Book Individual 2 Add the name 1 Enter the destination name to be displayed in the address book Next NOTE Registering and editing of the Address Book can also be done in Embedded Web Server RX Using Embedded Web Server RX to Add Destin...

Страница 167: ...hat appears select the host name computer name and then select Next NOTE You can enter up to 128 characters For details on entering characters refer to the the following Character Entry Method 12 11 NOTE For the computer name share name domain name and user name enter the information that you noted when you created the shared folder For details on creating shared folders refer to the following Pre...

Страница 168: ...group name or user name To check the connection to the specified computer select Menu Connection Test If the connection fails check the entries you made Item Description Max No of Characters Host Name Host name or IP address of FTP server 64 characters Path 1 Path for the file to be stored For example Use ScanData If no path is entered the file is stored in the home directory 128 characters Path P...

Страница 169: ...If you have more destinations to add repeat Steps 2 to 4 5 Select End 6 If you want to specify an address number select Address Number NOTE Before adding a group in the Address Book the contacts to be included in the group must be added first Register one or more individual destinations as needed before proceeding The number of groups that can be added is described below Destinations 100 5 total d...

Страница 170: ...ss For details on how to edit refer to the information below Registering a contact address 3 34 3 Save Yes Register the changed destination Editing a Group 1 Select for the destination you want to edit 2 Change Name and Address Number For details on how to edit refer to the information below Adding a Group 3 37 3 Select Member 4 To delete a destination from the group select Yes To add a destinatio...

Страница 171: ...ignments 100 1 Display the screen System Menu Counter key Address Book One Touch One Touch Key NOTE Destinations can be sorted or searched by destination name or address number Checking and Editing Destinations 5 30 NOTE Refer to the following for use of One Touch Key Checking and Editing Destinations 5 30 You can add One Touch keys and change their settings on Using Embedded Web Server RX to Add ...

Страница 172: ...een 1 System Menu Counter key Address Book One Touch One Touch Key 2 Select a One Touch Key number 001 to 100 to edit For direct entry of a One Touch Key number select the Quick No Search key 2 Changing the Registered Information 1 Menu Edit Destination NOTE For details on the Quick No Search key refer to the information below Using the Quick No Search Key 3 13 NOTE Destinations can be sorted or s...

Страница 173: ...h Key number 001 to 100 to edit For direct entry of a One Touch Key number select the Quick No Search key 2 Delete the Registered Information Select Yes The data registered in the One Touch Key is deleted NOTE Destinations can be sorted or searched by destination name or address number Checking and Editing Destinations 5 30 Address Book All 10 10 002 ABCD OK Cancel Menu 123456 EFGH IJKL MNOP 1 2 0...

Страница 174: ...rk Example 1 https 192 168 48 21 for IP address Example 2 https MFP001 if the host name is MFP001 3 Log in with administrator privileges The factory default setting for the default user with administrator privileges is shown below Upper case and lower case letters are distinguished case sensitive Login User Name Admin Login Password Admin 4 On the Address Book menu click Machine Address Book 5 Cli...

Страница 175: ...older on a computer or to the FTP folder You can configure destination color and other settings as indicated by the instructions that appear Transmission Function Wizard Mode Destination New folder Color Full Color Document Name Entry Initial default File Format PDF Continuous Scan Off Scan Resolution 300 300 dpi Scan to PC Address Book Use this when you want to send an image to any shared folder ...

Страница 176: ...nfigure destination color and other settings as indicated by the instructions that appear Transmission Function Wizard Mode Destination Address Book Color Full Color Document Name Entry Initial default File Format PDF Continuous Scan Off Scan Resolution 300 300 dpi E mail Subject Initial default Mail Body Initial default NOTE Up to 20 functions combining copying and sending can be registered in th...

Страница 177: ... function transmission function FAX function send destination and or other settings to be added to Favorites 1 Display a screen 1 Home key Send 2 This configures send function and or destination settings to be registered in a program 3 Select Favorites 2 Adds Favorites 1 Menu Add 2 Select the job type 3 Select Program 4 Enter a name for the favorite Next Character Entry Method 12 11 Item Descripti...

Страница 178: ...elect Favorites or select the key of a favorite If you selected the key of a favorite that favorite will be recalled If you selected Favorites proceed with the following steps 2 Select the key of the favorite you want to recall 2 This executes the favorite 1 A series of screens will appear so configure settings and then select Next The Transmit Settings dialog box will appear 2 Place the originals...

Страница 179: ...orite 1 Place the originals Start key Editing a Favorite You can use the procedure in this section to modify favorite numbers favorite names and sharing settings Use the procedure below to edit favorites 1 Display a screen 1 Home key Favorites 2 Editing a Favorite 1 Menu Edit 2 Select the favorite you want to modify 3 Modify the favorite name favorite number and or sharing settings Adding to Favor...

Страница 180: ...the name Next Up to 24 characters can be entered Character Entry Method 4 Select Register The shortcut is registered Edit the shortcut 1 Display the screen The steps below can be performed while the Copy Send FAX or Document Box screen is displayed Functions Add Edit Shortcut 2 Edit the shortcut 1 Select Edit 2 Select the shortcut key you want to edit NOTE You can register up to 2 shortcuts for co...

Страница 181: ... Number or Name Modify settings OK 4 Save Yes Deleting a Shortcut 1 Display a screen The steps below can be performed while the Copy Send FAX or Document Box screen is displayed Functions Add Edit Shortcut 2 Delete the shortcut 1 Select Delete 2 Select the shortcut you want to delete Yes ...

Страница 182: ... Quick Copy Proof and Hold Box These Job Boxes cannot be created or deleted by a user The four types of Job Box are listed below Private Print Box 5 39 Hold Box 5 41 Quick Copy Box 5 42 Proof and Hold Box 5 43 What is Removable Memory Box A USB memory stick can be connected to the USB memory slot on the machine to print a saved file You can print data directly from the USB memory without a PC Imag...

Страница 183: ... are for storing FAX data NOTE To use Custom Box an optional SSD must be installed in the machine If user login administration is enabled you can only change the settings by logging in with administrator privileges The factory default login user name and login password are set as shown below Login user name d COPIA 255MF 2500 Login Password d COPIA 255MF 2500 If user login administration is enable...

Страница 184: ...sword of up to 16 characters in both Password and Confirm Password This can be set if Shared is selected in Permission Usage Restriction The usage for a box can be restricted To enable a capacity restriction enter a value for the storage capacity of the Custom Box in megabytes by selecting or number keys Though the limit value changes with the number of Custom Boxes that are created the maximum ra...

Страница 185: ...and the host name On the MFP Home screen Device Information Identification Network Example 1 https 192 168 48 21 for IP address Example 2 https MFP001 if the host name is MFP001 3 On the Submit menu click Network Security 4 Click Add 2 Configure the settings 1 Enter the box details Enter the information for the custom box you want to register For details on the fields to populate refer to the foll...

Страница 186: ...n each item refer to the information below Using Machine Operations to Create a New Custom Box 3 51 NOTE When you have logged in as a user you can only edit a box whose owner is set to that user When you have logged in as administrator you can edit all boxes Privileges Settings that can be changed Administrator Box Name Box No Owner Permission Box Password Usage Restriction Auto File Deletion Over...

Страница 187: ...lay a screen 1 Home key Custom Box 2 Delete the box 1 Menu Delete 2 Select the box you want to delete 3 Select Yes NOTE When you have logged in as a user you can only delete a box whose owner is set to that user When you have logged in as administrator you can delete all boxes ...

Страница 188: ... Data in Machine Memory and Printing Data in Machine Memory 4 11 On the computer specify the document box and save the job 4 11 Using Embedded Web Server RX to Print a Job Stored in a Custom Box 4 12 Monitoring the Printer Status Status Monitor 4 14 Accessing the Status Monitor 4 14 Exiting the Status Monitor 4 14 Status Monitor Display 4 14 Printing Progress Tab 4 15 Paper Tray Status Tab 4 15 To...

Страница 189: ...arious layouts including booklet printing combine mode poster printing and scaling Finishing tab This tab lets you configure settings related to finishing of printed media Imaging tab This tab lets you configure settings related to the quality of the print results Publishing tab This tab lets you create covers and inserts for print jobs and put inserts between sheets of OHP film Job tab This tab l...

Страница 190: ...t Settings Screen 2 Profiles Printer driver settings can be saved as a profile Saved profiles can be recalled at any time so it s a convenient practice to save frequently used settings 3 Reset Click to revert settings to their initial values ...

Страница 191: ...o learn about print settings open the printer driver print settings screen and display Help as explained below 1 Click the button in the upper right corner of the screen 2 Click the item you want to know about NOTE The Help appears even when you click the item you want to know about and press the F1 key on your keyboard 1 2 ...

Страница 192: ... as they appear in Windows 8 1 For the settings refer to the following Printer Driver User Guide 1 In charms on Desktop click Settings Control Panel and then Devices and Printers 2 Right click the printer driver icon of the machine and click the Printer properties menu of the printer driver 3 Click the Basic button on the General tab 4 Select the default settings and click the OK button NOTE In Wi...

Страница 193: ...tion 2 Configure the settings 1 Select the machine from the Name menu and click the Properties button 2 Select the Basic tab NOTE To print the document from applications install the printer driver on your computer from the supplied DVD Product Library In some environments the current settings are displayed at the bottom of the printer driver When printing the cardstock or envelopes load the cardst...

Страница 194: ...s of the machine register the paper size in the Basic tab of the print settings screen of the printer driver The registered size can be selected from the Print Size menu Instructions are based on interface elements as they appear in Windows 8 1 1 Display the screen 1 In charms on Desktop click Settings Control Panel and then Devices and Printers In Windows 7 click Start button on the Windows and t...

Страница 195: ... 2 Click the Page Sizes button 3 Click the New button 4 Enter the paper size 5 Enter the name of the paper 6 Click the Save button 7 Click the OK button 8 Click the OK button 3 Display the print settings screen Click File and select Print in the application 1 2 3 4 5 6 7 8 ...

Страница 196: ...sparency click Media type menu and select the media type 4 Select the paper source in the Source menu 5 Click OK button to return to the Print dialog box 5 Start printing Click the OK button Canceling Printing from a Computer To cancel a print job executed using the printer driver before the printer begins printing do the following NOTE If you loaded a postcard or envelope select Cardstock or Enve...

Страница 197: ...C 1 Double click the printer icon displayed on the taskbar at the bottom right of the Windows desktop to display a dialog box for the printer 2 Click the file for which you wish to cancel printing and select Cancel from the Document menu ...

Страница 198: ...rint job will be saved in the Job Box memory and printing can be executed at the machine Follow the work flow below when using Document Boxes 1 On the computer specify the document box and save the job 4 11 2 On the control panel specify and print the file in the document box 5 40 On the computer specify the document box and save the job Use the procedure below to store data in a Job Box 1 Click F...

Страница 199: ... a Custom Box A document stored in a Custom Box can be printed from Embedded Web Server RX 1 Display the screen 1 Launch your Web browser 2 In the address or location bar enter the machine s IP address or the host name Click in the following order to check the machine s IP address and the host name Device Information in the home screen Identification Wired Network NOTE For information on how to us...

Страница 200: ...the Document Box menu click Custom Box 4 Click the number or name of the Custom Box in which the document is stored 2 Print the document 1 Select the document you wish to print Select the checkbox of the document to be printed 2 Click Print 3 Configure settings for printing click Print 1 2 3 1 2 ...

Страница 201: ...ect Exit in the menu to exit the Status Monitor Exit automatically The Status Monitor automatically shuts down after 7 minutes if it is not being used Status Monitor Display The status of the printer is displayed using icons Detailed information is displayed when the Expand button is clicked Detailed information is displayed by clicking on each icon tab NOTE When you activate Status Monitor check ...

Страница 202: ...s is displayed Select a job on the job list and it can be canceled using the menu displayed with a right click Paper Tray Status Tab Information is displayed about the paper in the printer and about the amount of paper remaining Toner Status Tab The amount of toner remaining is displayed 1 Status icon 2 Job list 1 2 ...

Страница 203: ...he settings icon is clicked Embedded Web Server RX If the printer is connected to a TCP IP network and has its own IP address use a web browser to access the to modify or confirm the network settings This menu is not displayed when using USB connection Embedded Web Server RX User Guide Notification This sets the display of the Status Monitor Status Monitor Notification Settings 4 17 Exit Exits the...

Страница 204: ... 1 Select Enable event notification If this setting is set to Off then the Status Monitor will not start up even when printing is executed 2 Select an event to use with the text to speech function in Available events 3 Click Sound file Text to Speech column Click the browse button to notify the event by sound file When customizing the message texts to read on the screen aloud enter the texts in th...

Страница 205: ...anceling Scanning 5 26 Destination Operations 5 27 Choosing from the Address Book 5 27 Choosing from the External Address Book 5 29 Choosing from the One Touch Key 5 29 Choosing from the Speed Dial 5 30 Checking and Editing Destinations 5 30 Confirmation Screen of Destinations 5 30 Recall 5 31 How to Use the FAX Function 5 32 Basic Operation for Document Box 5 33 Box List Operations 5 33 Document ...

Страница 206: ... and Hold Box 5 43 Printing Documents in Custom Box 5 43 Printing from the Handheld Device 5 45 Printing by AirPrint 5 45 Printing by Google Cloud Print 5 45 Printing by Mopria 5 45 Printing with Wi Fi Direct 5 45 Printing with NFC 5 46 Operating Using Removable USB Memory 5 47 Saving Documents to USB Memory Scan to USB 5 47 Check the USB Memory Information 5 48 Removing USB Memory 5 48 Printing f...

Страница 207: ...ce the two sided originals Placing Originals on the Platen You may place books or magazines on the platen in addition to ordinary sheet originals 1 Put the scanning side facedown 2 Align it flush against the original size indicator plates with the back left corner as the reference point NOTE A5 is detected as A4 R Set the paper size to A5 by using the function key on the touch panel Original Size ...

Страница 208: ...For the procedure for feeding envelopes or cardstock refer to the following When you place envelopes or cardstock on the platen 5 9 CAUTION Do not leave the document processor open as there is a danger of personal injury IMPORTANT Do not push the document processor forcefully when you close it Excessive pressure may crack the platen glass When placing books or magazines on the machine do so with t...

Страница 209: ...inals to jam Originals with adhesive tape or glue Originals with cut out sections Curled original Originals with folds Straighten the folds before loading Failure to do so may cause the originals to jam Carbon paper Crumpled paper 1 Adjust the original width guides Weight 45 to 160 g m2 duplex 50 to 120 g m2 Sizes Maximum A3 Ledger 297 x 432 mm Long sized 297 x 1 900 mm to Minimum A5 R Statement R...

Страница 210: ... For details on Original Orientation refer to the following Original Orientation 6 9 IMPORTANT Confirm that the original width guides exactly fit the originals If there is a gap readjust the original width guides The gap may cause the originals to jam Ensure that loaded originals do not exceed the level indicator Exceeding the maximum level may cause the originals to jam Originals with punched hol...

Страница 211: ...per 104 7 g m2 25 sheets A4 or smaller plain paper 80 g m2 recycled paper or color paper 25 sheets Hagaki Cardstock 20 sheets Envelope DL Envelope C5 Envelope 10 Commercial 10 Envelope Monarch Youkei 4 Youkei 2 5 sheets OHP film 10 sheet 1 Open the multi purpose tray IMPORTANT If you are using a paper weight of 106 g m2 or more set the media type to Thick and set the weight of the paper you are us...

Страница 212: ...on panel Multi Purpose Tray 8 10 IMPORTANT When loading the paper keep the print side facing down Curled paper must be uncurled before use When loading paper into the multi purpose tray check that there is no paper left over in the tray from a previous job before loading the paper If there is just a small amount of paper left over in the multi purpose tray and you want to add more first remove the...

Страница 213: ...aki Return postcard 2 Hagaki Cardstock 3 Banker Envelope Open the flap 4 Pocket Envelope Close the flap IMPORTANT Use unfolded Oufuku hagaki Return postcard How to load envelopes orientation and facing will differ depending on the type of envelope Be sure to load it in correctly otherwise printing may be done in the wrong direction or on the wrong face NOTE When you load envelopes in the multi pur...

Страница 214: ...n a trial basis select Trial without entering the license key 3 Select Yes 3 Press the Home screen application icon to start up Select the application icon The application will start up NOTE If the user authentication screen appears enter your login user name and login password and select Login For this you need to log in with administrator privileges The factory default login user name and login ...

Страница 215: ...enu Deactivate You can view detailed information on the selected application by selecting 2 Select Yes NOTE If the user authentication screen appears enter your login user name and login password and select Login For this you need to log in with administrator privileges The factory default login user name and login password are set as shown below Login user name d COPIA 255MF 2500 Login Password d...

Страница 216: ... Functions Copy x 4 Use the numeric keys to enter the copy quantity Specify the desired number up to 999 5 Press the Start key Copying starts NOTE This function allows you to reserve the next job during printing When the current print job ends the reserved copy job is printed When Off is selected for the Off setting Disconnect All will appear Select Reserve Next and configure the necessary setting...

Страница 217: ... 1 Select the Stop key with the copy screen displayed 2 Cancel a job When there is a job is being scanned The copy job is canceled When there is a job printing or on standby Canceling job screen appears The current print job is temporarily interrupted Select the job you want to cancel Connected Device List Yes NOTE If the machine is left unused for 60 seconds in interrupt copy mode interrupt copyi...

Страница 218: ...ned Document via E mail 5 14 Send to Folder SMB Stores a scanned original image in a shared folder of any PC Sending to a Shared Folder on a Computer SMB 5 16 Send to Folder FTP Stores a scanned original image in a folder of an FTP server Sending to an Folder on an FTP Server FTP 5 18 Image Data Scanning with TWAIN WIA Scan the document using a TWAIN or WIA compatible application program Scanning ...

Страница 219: ... next destination Number of allowable E mail address entries 100 To add the entered mail address to the Address Book selecting Menu Back You can also replace the information for a previously registered destination Destinations can be changed later Checking and Editing Destinations 5 30 5 Selecting the functions To select a function and configure its settings select it with Functions Send xii 6 Pre...

Страница 220: ...o 500 addresses can be displayed Select the host name PC name that you want to specify in the screen that appears and select Next The login user name and login password entry screen appears After you enter the login user name and login password name of the destination PC the shared folders appear Select the folder that you want to specify and select Next The address of the selected shared folder i...

Страница 221: ...ectly established If Cannot connect appears check the information you entered To enter multiple destinations select Next Destination and enter the next destination You can register the entered information in the address book by selecting Add Address Book 8 Select OK Destinations can be changed later Checking and Editing Destinations 5 30 9 Selecting the functions Selecting Functions displays a lis...

Страница 222: ...er or the IP Address Port Number IPv6 address enclose the IPv6 address in square brackets Example Example 2001 db8 a0b 12f0 1 21 The default port number 21 is used if a port number is not specified 2 When the FTP server is based on Linux UNIX the path including the sub folder is combined by the slash and not the back slash 6 Check the status 1 Check the information Change if needed NOTE Before sen...

Страница 223: ...ting Functions displays a list of other functions Send xii 9 Press the Start key Start sending Scanning with a TWAIN WIA Compatible Application This section explains how to scan an original using TWAIN or WIA 1 Display the screen 1 Start up the TWAIN or WIA compatible application 2 Select the machine using the application and display the dialog box 2 Configure the settings Select scanning settings...

Страница 224: ...20 Operation on the Machine Frequently Used Sending Method 3 Place the originals Connecting cable 5 3 4 Scan the originals Click the Scan button This scans the original and stores the data on the computer ...

Страница 225: ...ng to Different Types of Destinations Multi Sending 5 23 Send to Me E mail Sends to the E mail address of the logged in user when user login is enabled Sending to the E mail Address of the Logged In User 5 23 Executing WSD Scan WSD scan saves images of originals scanned on this machine as files on a WSD compatible computer 1 Home key Send 2 Place the originals Connecting cable 5 3 3 Display the sc...

Страница 226: ...ng on the computer or server on which File Management Utility is installed 2 Place the originals 3 Recalling a Favorite Select Favorites on the Home Screen or Send Favorites Select the icon that appears 4 Follow the on screen instructions to enter the necessary information and select Next 5 When the scan settings screen appears press each item and configure the necessary settings The features that...

Страница 227: ...he destinations of respective types Continue to enter E mail address or folder path so that they appear in the destination list Press the Start key to start transmission to all destinations at one time Sending to the E mail Address of the Logged In User When user login is enabled documents in the custom box are sent to the E mail address of the logged in user NOTE If the destinations include a fax...

Страница 228: ...mation Directly 1 Select Enter FAX Number 2 Enter the fax number 3 Select OK Destinations can be changed later Checking and Editing Destinations 5 30 Selecting from the Address Book 1 Select Address Book 2 Specify the destination Choosing from the Address Book 5 27 NOTE A fax server is required to use this function For information about the fax server contact the applicable administrator FAX serve...

Страница 229: ...ddress Book 1 Select Ext Address Book 2 Specify the destination Choosing from the Address Book 5 27 3 Select OK Destinations can be changed later Destination Operations 5 27 5 Selecting the functions Place the originals Send xii 6 Press the Start key Start sending NOTE For details on the External Address Book refer to the following Embedded Web Server RX User Guide ...

Страница 230: ... the Stop key with the send screen displayed 2 Cancel a job When there is a job is being scanned Job Cancel appears When there is a job sending or on standby Canceling job screen appears Select the job you wish to cancel Delete Yes NOTE Selecting the Stop key will not temporarily stop a job that you have already started sending ...

Страница 231: ...the Speed Dial 5 30 Choosing from the FAX FAX Operation Guide Choosing from the Address Book Select a destination registered in the Address Book 1 In the basic screen for sending select Address Book NOTE You can set the machine up so that the address book screen appears when you select the Send key Default Screen 8 11 If you are using the products equipped with the fax function you can specify the...

Страница 232: ...destinations In this case selection of a previously registered group containing multiple recipients also is not supported Broadcast 8 24 Keys used Search type Subjects searched 1 Advanced search by destination Advanced search narrows down registered destinations according to type mail folder SMP FTP FAX group 2 Narrow Down Advanced search by destination Advanced search narrows down registered dest...

Страница 233: ...he basic screen for sending select the One Touch Keys where the destination is registered NOTE For details on the External Address Book refer to the following Embedded Web Server RX User Guide NOTE To change to a different external address book select Switch Ext Addr Book and then select the external address book you want NOTE You can set the default Sort settings Sort 8 27 NOTE If the One Touch K...

Страница 234: ...ns that specify a new mail address or computer can be modified Select the destination and then select to delete the destination Confirmation Screen of Destinations If On is selected for the Destination Check before Send setting pressing the Start key displays a destination check screen NOTE If you entered the speed dial in 1 to 3 digit select OK NOTE When selecting On for Entry Check for New Desti...

Страница 235: ...s the destination of the last send 2 Press the Start key Transmission begins NOTE Be sure to confirm all destination by displaying them on the touch panel You cannot select Check unless you have confirmed all destination NOTE When the last sending included FAX folders and E mail destinations they are also displayed Add or delete destinations as required NOTE OnWhen On is selected in Dest Check bef...

Страница 236: ...hine How to Use the FAX Function How to Use the FAX Function On products with a FAX function it is possible to use the FAX function The optional FAX Kit is required in order to make use of fax functionality FAX Operation Guide ...

Страница 237: ...rations search for a Document Box search box name box number change the sorting sequence of display items box name box number owner register a new box modify or delete a box 3 This displays detailed information about each box 1 A check mark indicates an item is selected 2 You can select Menu and then perform one of the following operations print move search for by name edit or delete a document se...

Страница 238: ...tures that can be set refer to the following Store File xiv 3 Press the Start key The original is scanned and the data is stored in the specified Custom Box Moving Documents in Custom Box This function allows you to move documents stored in custom boxes into other boxes 1 Display the screen Home key Custom Box Select the box NOTE Enter up to 32 characters as the file name To add or recall a favori...

Страница 239: ...ox 2 Move the documents 1 Select the document in the list that you want to copy by selecting the checkbox The document is marked with a checkmark 2 Menu Move Copy Copy to Another Custom Box 3 Select the copy destination 4 Copy Yes The selected document is copied NOTE To cancel a selection select the checkbox again so that it is no longer ticked NOTE If the box to which the document is being moved ...

Страница 240: ... the screen Home key Custom Box Select the box 2 Join the document 1 Select the documents in the list that you wish to join by selecting the checkbox The document is marked with a checkmark You can join up to 100 documents 2 Arrange the documents in the order they will be joined OK Highlight the document you want to move and then use Cancel and Clear to move it NOTE If a custom box is protected by...

Страница 241: ...splay the screen 1 Home key Custom Box Select the box 2 Send Start 1 Select the document in the list that you want to send by selecting its checkbox The document is marked with a checkmark NOTE After joining the original documents are left unchanged Delete the documents if they are no longer needed NOTE If a custom box is protected by a password enter the correct password NOTE You cannot select wi...

Страница 242: ...re sent to the E mail address of the logged in user 1 Select Home key 2 Select Send to Me E mail NOTE Depending on the settings the address book screen may appear NOTE For information about registering a shortcut or recalling a favorite refer to the information below Registering Shortcuts Copy Send and Document Box Settings 3 48 Recalling Frequently Used Functions Favorites 3 43 NOTE When this fun...

Страница 243: ... scanned from Document List Enter the document data name in the Search Name to find the data having the same document data name or the document data name with the same beginning Click the Detail button to display the selected document data When the document data includes multiple pages select the checkbox beside the pages you want to scan The selected pages will be scanned 2 Click the Acquire butt...

Страница 244: ... the screen 1 Home key Job Box 2 Select Private Print Stored Job 3 Select the creator of the document 2 Print the document 1 Select the document to print Print 2 Enter the access code 3 Specify the number of copies to print as desired 4 Select OK Printing starts Upon completion of printing the Private Print job is automatically deleted Deleting the Documents Stored in the Private Print Box 1 Displ...

Страница 245: ...to print Print 2 Specify the number of copies to print as desired 3 Select OK Printing starts Deleting the Documents Stored in the Stored Job Box 1 Display the screen 1 Home key Job Box 2 Select Private Print Stored Job 3 Select the creator of the document 2 Delete the document 1 Select the document to delete 2 Enter the access code The document is deleted NOTE If the document is protected by an a...

Страница 246: ...fy the number of copies to print as desired 3 Select OK Printing starts Deleting the Documents Stored in the Quick Copy Box 1 Display the screen 1 Home key Job Box 2 Select Quick Copy Proof and Hold 3 Select the creator of the document 2 Delete the document 1 Select the document to delete 2 Select Yes The document is deleted NOTE Number of storable documents factory default 32 When the number of j...

Страница 247: ... 3 Select the creator of the document 2 Print the document 1 Select the document to print Print 2 Specify the number of copies to print as desired 3 Select OK Printing starts Deleting the Documents Stored in the Proof and Hold Box 1 Display the screen 1 Home key Job Box 2 Select Quick Copy Proof and Hold 3 Select the creator of the document 2 Delete the document 1 Select the document to delete 2 S...

Страница 248: ... the settings used at the time of printing when the document was saved select Print As Is Select OK to start printing If you need to change the print settings select Print after Change Settings 4 Set the paper selection duplex printing etc as desired For the features that can be set refer to the following Print xv 5 Press the Start key Printing of the selected document begins NOTE If a custom box ...

Страница 249: ...ng by Mopria Mopria is a standard on printing function included in Android 4 4 or later products Mopria Print Service needs to be installed and enabled in advance For details on how to use refer to a Web site of Mopria Alliance Printing with Wi Fi Direct Wi Fi Direct is a wireless LAN standard that Wi Fi Alliance has been established This is one of the functions of the wireless LAN without a wirel...

Страница 250: ...e Printing from the Handheld Device Printing with NFC When the Delete after Print and Wi Fi Direct has been configured in advance the network between this machine and handheld device will be configured by simply tapping an NFC tag ...

Страница 251: ...d PDF file Version 1 7 or older TIFF file TIFF V6 TTN2 format JPEG file format XPS file format OpenXPS file format Encrypted PDF file In addition you can store scanned image files in USB memory connected to the machine The following file types can be stored PDF file format TIFF file format JPEG file format XPS file format OpenXPS file format High compression PDF file format Saving Documents to USB...

Страница 252: ...cluding the root folder 2 Select 3 Set the type of original file format etc as desired For the features that can be set refer to the following Store File xvii 4 Press the Start key The original is scanned and the data is stored in the USB memory Check the USB Memory Information 1 In the removable memory screen select Memory Information 2 Once you confirm the information select Close Removing USB M...

Страница 253: ...folder that contains the file to be printed The machine will display documents in the top 3 folder levels including the root folder NOTE USB memory can also be removed after checking the status of the device Check the status of Device Device Communication 7 10 NOTE PDF files you wish to print should have an extension pdf Files to be printed should be saved no further down than the top 3 folder lev...

Страница 254: ...g Removable USB Memory 2 Select the file to be printed Print 3 Change the number of copies duplex printing etc as desired For the features that can be set refer to the following Print xix 4 Press the Start key Printing of the selected file begins ...

Страница 255: ...s 6 20 Contrast 6 21 Background Density Adj 6 22 Prevent Bleed through 6 23 Zoom 6 24 Combine 6 26 Margin 6 28 Duplex 6 29 Continuous Scan 6 32 Auto Image Rotation 6 33 Job Finish Notice 6 34 File Name Entry 6 35 Priority Override 6 36 Skip Blank Page 6 37 2 sided Book Original 6 38 Sending Size 6 39 File Format 6 40 File Separation 6 43 Scan Resolution 6 44 E mail Subject Body 6 45 FTP Encrypted ...

Страница 256: ...in This Chapter Icons in This Chapter On pages that explain a convenient function the modes in which that function can be used are indicated by icons Printing Sending Storing Copy Custom Box USB Memory Send Custom Box USB Memory Custom Box ...

Страница 257: ...ttings ID Card Copy ID Card Copy Use this when you want to copy a driver s license or an insurance card When you scan the front and back of the card both sides will be combined and copied onto a single sheet Value Off On Copy ...

Страница 258: ...eries standard sizes Metric A3 A4 R A4 A5 R A5 A6 R B4 B5 R B5 B6 R B6 Folio 216 x 340 mm Select from the Metric standard sizes Others 8K 16K R 16K Hagaki Cardstock Oufuku Hagaki Return postcard Custom 1 Select from special standard sizes and custom sizes Size Entry Metric X 50 to 432 mm in 1 mm increments Y 50 to 297 mm in 1 mm increments Enter the size not included in the standard sizes 2 When y...

Страница 259: ...er matching the size of the original is selected automatically To select MP tray press Paper Settings and specify the paper size and the media type NOTE Specify in advance the size and type of the paper loaded in the cassette Cassette MP Tray Settings 8 9 Cassettes after Cassette 2 to 3 are displayed when the optional paper feeder is installed Copy Custom Box USB Memory ...

Страница 260: ...m sizes Size Entry Metric X 148 to 432 mm in 1 mm increments Y 98 to 297 in 1 increments Enter the size not included in the standard size 1 When you have selected Size Entry use or the numeric keys to set the sizes of X horizontal and Y vertical Select Keys to use the numeric keys for entry Inch X 5 83 to 17 00 in 0 01 increments Y 3 86 to 11 69 in 0 01 increments Media type Plain 60 to 105 g m2 T...

Страница 261: ...laced are as follows B4 and B5 A3 and A4 Ledger and Letter A4 R and Folio Legal and Letter R Item Value Description Mixed Size Originals Off Configure the settings Scans and copies multiple sheets of the same width using the document processor Item Value Description Mixed Size Originals Off Same Width Scans and sends multiple sheets of the same width using the document processor Item Value Descrip...

Страница 262: ...Example B4 and B5 NOTE When mixing the original sizes as using the following combination make sure to set Auto Detect Original Size to On for Folio A4 R and Folio Auto Detect Original Size 8 12 Loading Originals in the Document Processor up to 30 sheets ...

Страница 263: ...ns the document s original orientation must be set Zoom Duplex Margin Combine Stapling Option 2 sided Book Original Select original orientation from Top Edge on Top Top Edge on Left Item Image Top Edge on Top Top Edge on Left z NOTE The default setting for Original Orientation can be changed Original Orientation Copy 8 16 Original Orientation Send Store 8 16 Copy Send Custom Box USB Memory ...

Страница 264: ...Function Settings Collate Offset Collate Offset Offsets the output by page or set Collate Scans multiple originals and delivers complete sets of copies as required according to page number Copy Custom Box USB Memory ...

Страница 265: ... offset when output NOTE When offset is used without a Document Finisher an additional paper feed unit is required The paper size of the additional paper feed unit must be the same as that of the selected paper feed unit but the paper orientation must be different The paper sizes supported in Offset A4 B5 Letter 16K Item Description Off Sort and offset are not performed Collate Only Collate Only O...

Страница 266: ...elect the staple position For details on original orientation and staple position refer to the following Original Orientation and Staple Position 6 13 1 staple Top Right 2 staples Left 2 staples Top 2 staples Right Original Orientation Top Edge on Top Top Edge on Left Press Original Orientation and then select the original orientation as either Top Edge on Top or Top Edge on Left Next select OK Co...

Страница 267: ...izes have the same width as shown in the combinations below the output can be stapled A3 and A4 B4 and B5 Ledger and Letter Legal and Letter R Original Orientation Top Edge on Top Top Edge on Left Image Cassette paper orientation Cassette paper orientation NOTE One position staple is not slanted for the following paper sizes B5 R 16K R ...

Страница 268: ...le 8K and 16K NOTE Number of sheets that can be stapled up to 25 sheets When performing Mixed Size Stapling refer to the following Mixed Size Originals 6 7 A3 A4 B4 B5 Ledger Letter B5 Ledger Letter A3 A4 B4 Legal Letter R Legal Letter R ...

Страница 269: ...led Item Description Inner Tray 1 Outputs to the Inner Tray of the machine Job Separator Tray Delivery to the job separator tray Item Description Finisher Tray 1 Delivery to the tray of the optional Document Finisher Job Separator Tray Delivery to the job separator tray NOTE The default setting for Paper Output can be changed Paper Output 8 18 Copy Custom Box USB Memory ...

Страница 270: ...6 16 Advanced Function Settings Density Density Adjust density Value 4 to 4 Lighter to Darker Copy Send Custom Box USB Memory ...

Страница 271: ...t for mixed text and photo documents Photo Best for photos taken with a camera Text Best for documents that are mostly text Graphic Map Best for graphics and maps Highlighter On Select to bring out text and markings made with a highlighter pen Reproduces the color of the highlighter pen to the extent possible Off Does not reproduce the color of the highlighter Item Description Text Photo Best for ...

Страница 272: ...nced Function Settings EcoPrint EcoPrint EcoPrint saves toner when printing Use this function for test prints or any other occasion when high quality print is not required Value Off On Copy Custom Box USB Memory ...

Страница 273: ...can color documents in Full Color and black and white documents in Grayscale Auto Color Color B W Automatically recognizes whether the document is color or black and white and scan color documents in Full Color and black and white documents in Black and White Full Color Scans a document in full color Grayscale Scans the document in grayscale Produces a smooth detailed image B W Prints in black whi...

Страница 274: ... up of patterned dots such as magazine photos in which moire 1 patterns appear edge softening and weakening of the moire effect can be obtained by setting the sharpness toward Blur 1 Patterns that are created by irregular distribution of halftone dots Item Description 1 to 3 Vivid Emphasizes the image outline 1 to 3 Grayish Blurs the image outline Can weaken a Moire 1 effect Copy Send Custom Box U...

Страница 275: ...ast Contrast You can adjust the contrast between light and dark areas of the image Item Description 1 to 4 Higher Increases the sharpness of colors 1 to 4 Lower Creates smoother colors Copy Send Custom Box USB Memory Original Higher Lower ...

Страница 276: ...s obtrusive select Auto If Auto does not remove the background color select Manual and adjust the background color density Item Description Off Does not adjust the ground color Auto Automatically adjusts the background density based on the original Manual Select 1 to 5 Lighter Darker to adjust the background density manually Copy Send Custom Box USB Memory ...

Страница 277: ...6 23 Advanced Function Settings Prevent Bleed through Prevent Bleed through Hides background colors and image bleed through when scanning thin original Value Off On Copy Send Custom Box USB Memory ...

Страница 278: ... select or to enter the any magnification Model Zoom Level Original Copy Model Zoom Level Original Copy Metric Models 400 Max 200 A5 A3 141 A4 A3 A5 A4 127 Folio A3 106 11x15 A3 100 90 Folio A4 75 11x15 A4 70 A3 A4 A4 A5 50 25 Min Inch Models 400 Max 200 STMT Ledger 154 STMT Legal 129 Letter Ledger 121 Legal Ledger 100 78 Legal Letter 77 Ledger Legal 64 Ledger Letter 50 Ledger STMT 25 Min Model Zo...

Страница 279: ...toring Item Description 100 Reproduces the original size Auto Reduces or enlarges original to sending storing size NOTE To reduce or enlarge the image select the paper size sending size or storing size Paper Selection 6 5 Sending Size 6 39 Storing Size 6 49 ...

Страница 280: ...eet 4 in 1 Prints a four sheet original on a single sheet Others Combine Off 2 in 1 L to R T to B 2 in 1 R to L B to T 4 in 1 Right then Down 4 in 1 Left then Down 4 in 1 Down then Right 4 in 1 Down then Left Select how to lay out the pages of scanned original Border Line None Solid Line Dotted Line Positioning Mark Select the boundary line type Original Orientation Top Edge on Top Top Edge on Lef...

Страница 281: ...in 1 Right then Down Left then Down Down then Right Down then Left NOTE The paper sizes supported in Combine mode A3 A4 R A4 A5 R B4 B5 R B5 Folio 216 340mm Ledger Letter R Letter Legal Statement R Oficioll 8K 16K R 16K When placing the original on the platen be sure to copy the originals in page order ...

Страница 282: ...o adjust the L R 18 18 and T B 18 18 margin values You can enter numeric values using the Keys T B 18 18 Back Page Auto For duplex copying press Back Page and then and select Auto or Manual An appropriate margin is applied automatically on the rear page depending on a margin specified for the front page and a binding orientation Manual L R 18 18 Metric 18 mm to 18 mm in 1 mm increments Inch 0 75 t...

Страница 283: ...on the back sides are rotated 180 degrees Copies can be bound on the top edge facing the same orientation when turning the pages Copies each side of a two sided original onto two individual sheets The following binding options are available Binding Left Right Images on the second sides are not rotated Binding Top Images on the second sides are rotated 180 degrees Produces two sided copies from two...

Страница 284: ...rom right to left NOTE The original sizes supported in Book to One sided mode A3 A4 R A5 R B4 B5 R Ledger Letter R and 8K The paper sizes supported in Book to One sided mode A4 B5 Letter and 16K Produces two sided copies from an open book original with facing pages NOTE The original sizes supported in Book to Two sided mode A3 A4 R A5 R B4 B5 R Ledger Letter R and 8K The paper sizes supported in B...

Страница 285: ... ʊ Copy the original with the default setting For the default settings refer to the following 2 sided 1 sided ʊ 2 sided 2 sided ʊ Others Duplex 1 sided 1 sided 1 sided 2 sided 2 sided 1 sided 2 sided 2 sided Book 1 sided Book 2 sided Select the desired duplex option Binding in Original 1 Binding Left Right Binding Top Binding Left Binding Right Select the binding orientation of originals Binding i...

Страница 286: ... a large number of originals in separate batches and then produce as one job Originals will be scanned continuously until you select Finish Scan Select On to use continuous scanning Value Off On Copy Send Custom Box USB Memory 1 to 10 1 1 to 30 1 11 to 20 11 21 to 30 21 ...

Страница 287: ... sizes of the original and the loaded paper matches but the orientations are different Value Off On NOTE You can select whether to rotate the image automatically in the default settings Auto Image Rotation 8 17 When you have enabled this function you can select how the images are rotated Auto Image Rotation Action 8 23 Copy ...

Страница 288: ...settings refer to the following Embedded Web Server RX 2 42 E mail can be sent to a single destination Item Description Off Disables the function Job Finished Only To add a new destination select Menu Add Address Book Select the notification destination from the address book and select OK Ext Address Book 1 Select the notification destination from the external address book Address Entry Enter the ...

Страница 289: ...check a job history or job status using the file name date and time or job number specified here Enter the file name and select OK Maximum number of characters Up to 32 To add date and time select Date and Time To add job number select Job No The added information will be displayed in Additional Info Copy Custom Box USB Memory Send Custom Box Custom Box USB Memory ...

Страница 290: ... The suspended job resumes after the other job is finished Value Off On NOTE This function is not available if current job was an override Priority override may not be available depending on the status of the current print job and memory usage In this case try the interrupt copy Interrupt Copy 5 13 Copy Custom Box USB Memory ...

Страница 291: ...ed to check for blank pages in the document Item Description Off Everything including blank pages is scanned Configure the settings Blank Pages Ruled Lines Blank pages and pages that include ruled lines are judged to be blank pages Blank Pages Only Blank pages only are judged to be blank pages Blank Pages Some Text Blank pages and pages that include a small amount of text are judged to be blank pa...

Страница 292: ...of the originals either Top Edge on Top or Top Edge on Left Then select OK Book 1 Binding Binding Left Binding Right Select the binding orientation of originals Others 2 sided Book Original 1 sided Select this setting for a one sided sheet original 2 sided Binding Left Right Select this setting for a two sided sheet original with left or right binding 2 sided Binding Top Select this setting for a ...

Страница 293: ...egal Statement 11x15 Oficio II Select from the Inch series standard sizes Metric A3 A4 A5 A6 B4 B5 B6 Folio 216 340 mm Select from the Metric series standard sizes Others 8K 16K Hagaki Cardstock Oufukuhagaki Return postcard Select from special standard sizes Original size and sending size are the same different Original Size 6 4 Specify as necessary Specify as necessary Sending Size Select Same as...

Страница 294: ...Comp to 5 High Quality Low Comp Performs processing using TIFF format PDF 1 Low Quality High Comp to 5 High Quality Low Comp Performs processing using PDF format JPEG 1 Low Quality High Comp to 5 High Quality Low Comp Performs processing using JPEG format One file is created per original page XPS 1 Low Quality High Comp to 5 High Quality Low Comp Performs processing using XPS format OpenXPS 1 Low ...

Страница 295: ... confirmation and select OK When you have entered the password and selected Detail to edit print document you can specifically limit the operation Printing Allowed Not Allowed Allowed Restricts printing of the PDF file Changes Allowed Not Allowed Disables the change to the PDF file Commenting Can only add commenting Page Layout except extracting Pages Can change the page layout except extracting t...

Страница 296: ...esolution Changes Allowed Not Allowed Disables the change to the PDF file Inserting Deleting Rotating Pages Can only insert delete and rotate the pages of the PDF file Commenting Can only add commenting Any except extracting Pages Can conduct all operations except extracting the pages of the PDF file Copying of Text Images Others Disable Enable Restricts the copying of text and objects on the PDF ...

Страница 297: ... several files by dividing scanned original data page by page and sends the files Value Off Each Page Select Each Page to set File Separation NOTE A three digit serial number such as abc_001 pdf abc_002 pdf is attached to the end of the file name Send Custom Box USB Memory ...

Страница 298: ...scanning resolution Value 600 600 dpi 400 400 dpi Ultra 300 300 dpi 200 400 dpi Super 200 200 dpi Fine 200 100 dpi Normal NOTE The larger the number the better the image resolution However better resolution also means larger file sizes and longer send times Send Custom Box USB Memory ...

Страница 299: ...E mail Subject Body Adds subject and body when sending a document Select Subject Body to enter the E mail subject body NOTE The maximum number of characters that can be entered are as shown below Subject 60 characters Body 500 characters Send Custom Box ...

Страница 300: ...tion secures the document transmission Value Off On NOTE Click Security Settings and then Network Security in the Embedded Web Server RX Be sure that SSL of Secure Protocol Settings is On and one or more effective encryption are selected in Client side settings Embedded Web Server RX User Guide Send Custom Box ...

Страница 301: ...6 47 Advanced Function Settings Delete after Printed Delete after Printed Automatically delete a document from the box once printing is complete Value Off On Custom Box ...

Страница 302: ...6 48 Advanced Function Settings Delete after Transmitted Delete after Transmitted Automatically deletes a document from the box once transmission is complete Value Off On Custom Box ...

Страница 303: ...Statement 11x15 Oficio II Select from the Inch series standard sizes Metric A3 A4 A5 A6 B4 B5 B6 Folio 216x340 mm Select from the Metric series standard sizes Others 8K 16K Hagaki Cardstock Oufukuhagaki Return postcard Select from special standard sizes Original size and sending size are the same different Original Size 6 4 Specify as necessary Specify as necessary Sending Size Select Same as Orig...

Страница 304: ...ing a document processor Value Off On 1 1 600 mm 63 if fax functions are used NOTE Long originals are sent in black and white or Grayscale Only a single side of a long original cannot be scanned Originals of up to 1 900 mm 74 8 1 long can be scanned You can select resolution 300 300 dpi or less Send USB Memory ...

Страница 305: ...ncrypted PDF Password Encrypted PDF Password Enter the preassigned password to print the PDF data Enter the Password and select OK NOTE For details on entering the password refer to the following Character Entry Method 12 11 USB Memory ...

Страница 306: ...nt Select the image size when printing JPEG or TIFF files Item Description Paper Size Fits the image size to the selected paper size Image Resolution Prints at resolution of the actual image Print Resolution Fits the image size to the print resolution USB Memory ...

Страница 307: ...6 53 Advanced Function Settings XPS Fit to Page XPS Fit to Page Reduces or enlarges the image size to fit to the selected paper size when printing XPS file Value Off On USB Memory ...

Страница 308: ...s Screen 7 5 Scheduled Job Status Screen 7 5 Checking Detailed Information of Jobs 7 6 Checking Job Histories 7 7 Available Job History Screens 7 7 Displaying the Job History Screen 7 7 Checking the Detailed Information of Histories 7 8 Sending the Log History 7 8 Job Operation 7 9 Pausing and Resuming a Job 7 9 Canceling a Job 7 9 Check the status of Device Device Communication 7 10 Checking the ...

Страница 309: ...ancel key 2 Select the job to check details Select either of Print Job Status Send Job Status Store Job Status or Scheduled Job to check the status Print Job Status Screen 7 3 Send Job Status Screen 7 4 Store Job Status Screen 7 5 Scheduled Job Status Screen 7 5 Status Display Job status to be displayed Print Job Status Copy job Printer job FAX reception E mail reception Job from Document Box Data...

Страница 310: ...b name Job name or file name 4 Select the key of the job whose detailed information you want to display Checking Detailed Information of Jobs 7 6 5 Status Status of job Number of Sheets Printed Total Number of Sheets Printing Processing The status before starting to print Waiting Print Waiting Pause Pausing print job or error Canceling Canceling the job 6 Cancel Select the job you want to cancel f...

Страница 311: ...to display Checking Detailed Information of Jobs 7 6 5 Status Status of job InProcess The status before starting sending such as during scanning originals Sending Sending Waiting Waiting Sending Canceling Canceling the job Pause Pausing the job 6 Menu Selecting this key displays Priority Override A fax job can be given send priority Use the list to select the fax job to be sent immediately Menu Pr...

Страница 312: ...Checking Detailed Information of Jobs 7 6 5 Status Status of job InProcess The status before starting to save such as during scanning originals Storing Storing Data Canceling Canceling the job Pause Pausing the job 6 Cancel Select the job you want to cancel from the list and press this key Num ber Item Description 1 Display Key Acceptance No of job 2 Type Icon indicates job type Scheduling Job FAX...

Страница 313: ...ailed information select Close 3 Destination Destination Either destination name FAX number or No of broadcast items 4 Select the job whose detailed information you want to display from the list and press this key Checking Detailed Information of Jobs 7 6 5 Start Time Time to start the scheduled job 6 Menu Selecting this key displays Start Now From the list select the job you want to send immediat...

Страница 314: ...b Server RX or NETWORK PRINT MONITOR Embedded Web Server RX User Guide NETWORK PRINT MONITOR User Guide You can show the job log of all users or only your own job log Display Status Log 8 21 This setting can also be changed from Embedded Web Server RX Embedded Web Server RX User Guide Screen Job histories to be displayed Printing Jobs Copy job Printer job FAX reception E mail reception Job from Do...

Страница 315: ...nformation of the selected job is displayed 2 To exit from the detailed information select Close Sending the Log History You can send the log history by E mail You can either send it manually as needed or have it sent automatically whenever a set number of jobs is reached Sending Log History 8 7 NOTE Select or to view information on the next page or previous page Print Job Log 10 10 Status Job Can...

Страница 316: ...l key 2 Select Pause All Print Jobs on the printing jobs status screen Printing is paused When resuming the printing of jobs that have been paused select Resume All Print Jobs Canceling a Job A job in printing waiting status can be canceled 1 Display the screen Select the Status Job Cancel key 2 Select the job to be canceled from the list and select Cancel 3 Select Yes in the confirmation screen ...

Страница 317: ...per jam opened cover etc is displayed Printer Error information such as paper jam out of toner or out of paper and status such as waiting or printing are displayed FAX Memory RX Box FAX Operation Guide This displays information document name file size etc about a document in the FAX Memory RX Box Embedded Web Server RX User Guide FAX To cancel a fax that is currently being sent received select Lin...

Страница 318: ...the Bluetooth Keyboard Network Connection Status The network connection status appears Option Network Connection Status The connection status of an optional network interface kit appears Wi Fi Direct Shows the connection status of Wi Fi Direct Wireless Network The connection status of the Wireless Network Interface Kit is displayed Wi Fi Shows the connection status of Wi Fi SSD The status of the S...

Страница 319: ...uch panel 1 Display the screen 1 Select the Status Job Cancel key 2 Select the item you want to check 2 Check the status The items you can check are described below Toner Status The amount of toner remaining is shown in levels And you can check the status of waste toner box Paper Status You can check the size orientation type and remaining amount of paper in each paper source The amount of paper r...

Страница 320: ...unter 8 8 Cassette MP Tray Settings 8 9 Common Settings 8 11 Home 8 22 Copy 8 23 Send 8 24 Document Box 8 25 FAX 8 26 Application 8 26 Internet 8 26 Address Book One Touch 8 27 User Login Job Accounting 8 28 Printer 8 29 System Network 8 32 Date Timer Energy Saver 8 56 Adjustment Maintenance 8 59 127 7KH 1 6 5 RSWLRQ LV QRW DYDLODEOH RQ G 23 0 ...

Страница 321: ...If the login user name entry screen appears during operations log in by referring to the machine s Operation Guide for Administrator User Name and Password The factory default login user name and login password are set as shown below Login User Name d COPIA 255MF 2500 Login Password d COPIA 255MF 2500 If function default settings have been changed the Reset key can be selected in each function scr...

Страница 322: ...X Setup Configures basic fax settings FAX functions are available only on products with the optional fax function installed FAX Operation Guide Energy Saver Setup Configures energy saver function settings 1 Sleep Mode Sleep Timer Sleep Level models except for Europe 2 Low Power Mode Low Power Timer Network Setup 1 Network Wi Fi Wired Network DHCP 1 IP Address 2 Subnet Mask 2 Default Gateway 2 NOTE...

Страница 323: ...tem Menu Language Language Menu Transition System Menu Counter key Language Set the language to be displayed on the machine screen Item Description Language Set the language to use for the touch panel display ...

Страница 324: ...t List Prints the font list allowing you to check the font samples installed in the machine Network Status Prints the network status allowing you to check the information including network interface firmware version network address and protocol Service Status Prints the service status More detailed information is available than on the Status Page Service personnel usually print the service status ...

Страница 325: ...u to check the information including optional network interface firmware version network address and protocol NOTE This function appears when the optional Network Interface Kit or Wireless Interface kit is installed Item Description Send Result Report Automatically print a report of transmission result when a transmission is complete E mail Folder Automatically print a report of transmission resul...

Страница 326: ...nations whenever a set number of jobs has been logged Value Off On NOTE If On is selected specify the number of job histories to be automatically sent The setting range is 1 to 16 Destination This specifies the destination to which log histories are sent Only E mail address can be set Job Log Subject Set the subject automatically entered when sending log histories by E mail Value Up to 60 characte...

Страница 327: ...ed Pages Print Coverage 2 The selected Last Page or Last Job data is displayed Last Page The data of the last printed page is displayed Last Job The data of the last printed job is displayed NOTE The printing volume as calculated from information indicated on print coverage data will not match on actual printed volume The actual printing volume varies depending on the usage printing content contin...

Страница 328: ...m Selectable Size Type PaperSize Auto Paper size is automatically detected and selected Value Metric Inch Metric Available options are as follows Value A3 A4 R A4 A5 R B4 B5 R B5 Folio 216 x 340 mm inch Available options are as follows Value Ledger Letter R Letter Legal Statement R Oficio II Others Select from special standard sizes Value 8K 16K R 16K Media Type 1 Select the media type Value Plain...

Страница 329: ...olio 216 x 340 mm Others Select from special standard sizes and custom sizes Value 8K 16K R 16K ISO B5 Envelope 10 Envelope 9 Envelope 6 Envelope Monarch Envelope DL Envelope C5 Envelope C4 Hagaki Cardstock Oufuku hagaki Return postcard Youkei 4 Youkei 2 Size Entry Enter the size not included in the standard size Value Metric X 148 to 432 mm in 1mm increments Y 98 to 297 mm in 1mm increments Inch ...

Страница 330: ...p default screen Value Home Copy Send FAX 1 Custom Box Job Box Removable Memory Sub Address Box 1 Polling Box 1 FAX Memory RX Box 1 Favorites 3 Status Item Description Buzzer Set options for buzzer sound during the machine operations Volume Set the buzzer volume level Value 0 Mute 1 Minimum 2 3 Medium 4 5 Maximum Key Confirmation Emit a sound when the operation panel and touch panel keys are selec...

Страница 331: ...o 11 69 in 0 01 increments X Length Y Width Auto Detect Original Size Automatically detect the original size Select Metric when automatically detecting the originals in centimeter sizes Select Inch when detecting the originals in inch sizes Value Metric Inch Metric A6 Hagaki Cardstock As A6 and Hagaki Cardstock are similar in size select either one of them for automatic detection Value A6 Cardstoc...

Страница 332: ...the default paper source from Cassette 1 3 and multi purpose tray Value Cassette 1 to 3 Multipurpose Tray NOTE Cassette 2 and Cassette 3 are displayed when the options below are installed Cassette 2 Paper feeder 500 sheets or Paper feeders 550 sheets x 2 Cassette 3 When a paper feeder 500 sheet x 2 is installed Paper Selection This specifies whether the paper source should be selected automaticall...

Страница 333: ...ld appear whenever paper is loaded into the cassette Value On Off NOTE Cassette 2 and Cassette 3 are displayed when the options below are installed Cassette 2 Paper feeder 500 sheets or Paper feeders 550 sheets x 2 Cassette 3 When a paper feeder 500 sheet x 2 is installed Cassette 1 to 3 Multipurpose Tray Paper Weight Weight g m2 Media Type Paper Weight Weight g m2 Media Type Light 59 g m2 Heavy 1...

Страница 334: ...e can be changed Item Description Duplex Permit Duplex printing allowed Prohibit Duplex printing not allowed Name Change names for Custom 1 8 Names should be not more than 16 characters Selecting media type at multi purpose tray the name after change will be displayed Character Entry Method 12 11 ...

Страница 335: ...e setting Value Auto Color Gray Auto Color B W Full Color Grayscale Black White Original Image Copy Set the default original document type for copying Value Text Photo Photo Text Graphic Map Original Image Send Store Set the default original document type for sending storing Value Text Photo Photo Text Text for OCR Light Text Fine Line Background Density Adj Copy Set the default Backgrnd Density C...

Страница 336: ...information such as Date and Time and Job No can also be set Value File Name Up to 32 characters can be entered Additional Info None Date and Time Job No Job No Date and Time Date and Time Job No E mail Subject Body Set the subject and body automatically entered default subject and body when sending the scanned originals by E mail Value Subject Up to 60 characters can be entered Body Up to 500 cha...

Страница 337: ...high compressed PDF files Value Compression Ratio Priority Standard Quality Priority Detect Items to Skip Copy Select the default Skip Blank Page settings Value Blank Pages Ruled Lines Blank Pages Only Blank Pages Some Text Detect Items to Skip Send Store Select the default Skip Blank Page settings Value Blank Pages Ruled Lines Blank Pages Only Blank Pages Some Text Item Description Paper Output S...

Страница 338: ...tapling Display Error Message to cancel printing is displayed NOTE Requires the optional Document Finisher Stapling Limit Error Set what to do when stapling capacity is exceeded during printing Value Ignore Printing continues without stapling Display Error Message to cancel printing is displayed NOTE Requires the optional Document Finisher Paper Mismatch Error Set what to do when the selected pape...

Страница 339: ...oner when the toner is running low This notification is used for event report Status Monitor SNMP Trap Value Off On NOTE If On is selected set the amount of remaining toner to alert The setting range is 5 to 100 in 1 increments Item Description Keyboard Layout Change the layout of the touch panel keyboard used to enter characters Value QWERTY QWERTZ AZERTY Item Description USB Keyboard Type Select...

Страница 340: ...u Counter key Common Settings Show Power Off Message Item Description Display Jobs Detail Status Value Show All My Jobs Only Hide All Display Jobs Log Value Show All My Jobs Only Hide All Display FAX Log 1 Value Show All Hide All Item Description Function Key 1 Value None Copy Send FAX Server 1 FAX 2 Custom Box 3 Job Box Removable Memory Sub Address Box 2 Polling Box 2 FAX Memory RX Box 2 ID Card ...

Страница 341: ...8 22 System Menu Home Home Menu Transition System Menu Counter key Home Configure settings for Home screen Editing the Home Screen 3 8 ...

Страница 342: ...ify the paper size to be used for a case where the original is too small to be detected in the Auto Paper Selection mode Value Default Paper Source A4 R A4 A5 R A6 R B5 R B5 B6 R Letter R Letter Statement R Original Size of Undetected Original This specifies the size to use for the original when the original size is not detected Value According to default paper source Display size selection screen...

Страница 343: ...f On is selected select from among the following for the forwarding rule FAX 1 E mail Folder SMB Folder FTP Destination Set the destination to which the original is forwarded One destination can be set Follow the steps below to register the destination Address Book Ext Address Book Address Entry Mail Address Entry Folder Destination Operations 5 27 Color TIFF Compression Specify the compression me...

Страница 344: ...ntain free space on the box you can set the maximum number of stored jobs Value number between 0 and 300 NOTE When 0 is set Quick Copy cannot be used Deletion of Job Retention This setting specifies that documents such as Private Printing Quick Copying or Proof and Hold Printing saved temporarily in the job box are automatically deleted after they have been saved for a set time Value Off 1 hour 4 ...

Страница 345: ...ication Item Description Proxy This configures the proxy setting Value Off On Use Same Proxy Set whether the same proxy server is used for all protocols If you do not want to use the same proxy server select Off Value Off On HTTP Proxy Server Set a proxy server HTTP Value Enter the proxy address and port number HTTPS ProxyServer Set a proxy server HTTPS This setup is available when the Use the Sam...

Страница 346: ...ress Book Defaults 1 Appears only when an External The Address Book can be used Edit Restriction Menu Transition System Menu Counter key Address Book One Touch Edit Restriction Print List Menu Transition System Menu Counter key Address Book One Touch Print List FAX Operation Guide Item Description Sort Select the default sort setting of the address for the address book Value Number Furigana Addres...

Страница 347: ... Login Job Accounting Menu Transition System Menu Counter key User Login Job Accounting Configure settings for machine management Overview of User Login Administration 9 3 User Login Job Accounting 9 27 Setting Unknown Number Processing Method 9 44 ...

Страница 348: ...hen printing Value Off A4 and Letter are not regarded as the same in size On A4 and Letter are regarded as the same in size The machine will use whichever size is in the paper source Duplex Select binding orientation for duplex mode Value 1 sided 2 sided Bind LongEdge 2 sided Bind ShortEdge Copies Set the default number of copies from 1 to 999 Value 1 to 999 copies Orientation Set the default orie...

Страница 349: ...the paper feed will be from the MP tray regardless of what is set in the printer driver Paper Feed Mode While printing from the computer select how to feed paper when the paper source and type are specified Value Auto Search the paper source that matches the selected paper size and type Fixed Print on paper loaded in the specified paper source Auto Cassette Change Select the following actions when...

Страница 350: ...until the end due to your environment and the other reason Value EOJ END of Job Up to the detection of a command indicating the end of job data is regarded as one job End of Network Session The data included in a network session at network connection is regarded as one job UEL Universal Exit Language The UEL included in the termination of the job data is regarded as one job until it is detected It...

Страница 351: ...ce Kit is an option for some models Contact your dealer or our sales or service representatives for detail IB 36 Wireless Network Interface Kit 12 3 Item Description Wi Fi Direct Select whether to use Wi Fi Direct Value Off On Device Name Configure the device name setting NOTE Up to 32 characters can be entered This function is displayed when On is selected for the Wi Fi Direct setting IP Address ...

Страница 352: ...int that supports the automatic wireless network setup connection settings can be configured by Quick Setup Available Network Displays access points to which the machine can connect Select a desired access point from the list WEP Key Index Select the key index value that is set on the access point Value 0 to 3 Push Button Method If the access point supports the push button method wireless settings...

Страница 353: ...hod The setting values vary depending on the Network Authentication setting When Network Authentication is set to Open Value Disable WEP WEP Key Up to 26 characters WEP Key Index 0 to 3 When Network Authentication is set to WPA2 WPA PSK Value AES Auto Pre shared Key Up to 64 characters When Network Authentication is set to WPA2 PSK Value AES Fixed Pre shared Key Up to 64 characters When Network Au...

Страница 354: ...nction will be grayed out and the value cannot be entered Subnet Mask Set the IP subnet mask Value NOTE When DHCP is set to On this function will be grayed out and the value cannot be entered Default Gateway Set the IP gateway address Value NOTE When DHCP is set to On this function will be grayed out and the value cannot be entered IMPORTANT When setting the Auto IP enter 0 0 0 0 in IP Address Aft...

Страница 355: ...s consisting of four digit hexadecimal digits The groups are separated by colon NOTE This function is displayed when IPv6 is set to On To enter Default Gateway set RA Stateless to Off RA Stateless Select whether to use RA Stateless Value Off On NOTE This function is displayed when IPv6 is set to On Selecting On displays IP address in IP Address Stateless after restarting the network DHCP Select wh...

Страница 356: ...On IP Address Set the IP address Value NOTE When DHCP is set to On this function will be grayed out and the value cannot be entered Subnet Mask Set the IP subnet mask Value NOTE When DHCP is set to On this function will be grayed out and the value cannot be entered Default Gateway Set the IP gateway address Value NOTE When DHCP is set to On this function will be grayed out and the value cannot be ...

Страница 357: ... to On To enter Default Gateway set RA Stateless to Off RA Stateless Select whether to use RA Stateless Value Off On NOTE This function is displayed when IPv6 is set to On Selecting On displays IP address in IP Address Stateless after restarting the network DHCP Select whether to use the DHCP IPv6 server Value Off On NOTE This function is displayed when IPv6 is set to On Selecting On displays IP a...

Страница 358: ...ork IPSec Item Description Protocol Settings Select whether to use Bonjour Value Off On Available Network Wi Fi Direct Select whether or not each network is enabled Value Disable Enable NOTE This setting is displayed when the Protocol Settings setting is On Available Network Wi Fi Available Network Wired Network Item Description IPSec Select whether to use IPSec Value Off On ...

Страница 359: ...etting is displayed when the Protocol Settings setting is On Available Network Wi Fi Available Network Wired Network SMTP E mail TX Select whether to send E mail using SMTP Value Off On POP3 E mail RX Select whether to receive E mail using POP3 Value Off On FTP Client Transmission Select whether to send documents using FTP To use the Thin Print protocol set the protocol to On The default port numb...

Страница 360: ...On Available Network Wi Fi Available Network Wired Network DSM Scan Select whether to use DSM scan 1 Value Off On LDAP Select whether to use LDAP Value Off On SNMP ʊ Protocol Settings Select whether to communicate using SNMP 1 Value Off On Available Network Wi Fi Direct Select whether or not each network is enabled Value Disable Enable NOTE This setting is displayed when the Protocol Settings sett...

Страница 361: ...ailable Network Wi Fi Available Network Wired Network IPP ʊ Protocol Settings Selects whether to receive documents using IPP To use the IPP protocol set IPP to On and set SSL to Off In addition select Not Secure IPP IPPS for the security settings from Embedded Web Server RX 1 Value Off On NOTE When selecting On it also requires a certificate for SSL the default certificate is the self certificate ...

Страница 362: ...er used The default port number is 4000 Value 1 to 32767 NOTE This setting is displayed when the Protocol Settings setting is On Available Network Wi Fi Direct Select whether or not each network is enabled Value Disable Enable NOTE This setting is displayed when the Protocol Settings setting is On Available Network Wi Fi Available Network Wired Network Raw Port ʊ Protocol Settings Select whether t...

Страница 363: ... 1 to 32767 NOTE This setting is displayed when the Protocol Settings setting is On Thin Print over SSL To use the Thin Print over SSL protocol set Thin Print Over SSL and SSL to On Value Off On NOTE When selecting On it also requires a certificate for SSL The default certificate is the self certificate of the machine Available Network Wi Fi Direct Select whether or not each network is enabled Val...

Страница 364: ... it also requires a certificate for SSL the default certificate is the self certificate of the machine Available Network Wi Fi Direct Select whether or not each network is enabled Value Disable Enable NOTE This setting is displayed when the Protocol Settings setting is On Available Network Wi Fi Available Network Wired Network eSCL Selects whether to receive scanned documents using eSCL 1 Value Of...

Страница 365: ... Wi Fi Available Network Wired Network Item Description SSL Select whether to use SSL for communication Value Off On IPP Security Select the IPP security level This setup is available when SSL is On Value IPP IPP over SSL IPPoverSSL only HTTP Security Select the HTTP security level This setup is available when SSL is On Value HTTP HTTPS HTTPS Only SMTP Security Select the communication protocol in...

Страница 366: ...the proxy for connection to the Internet from an application Value Off On Use Same Proxy Set whether the same proxy server is used for all protocols Value Off On HTTP Proxy Server Set a proxy server HTTP Value Enter the proxy address and port number HTTPS Proxy Server Set a proxy server HTTPS This setup is available when Use the Same Proxy Server for All Protocols is Off Value Enter the proxy addr...

Страница 367: ...Ware Use NetWare to receive documents Network Interface Kit Operation Guide Value Off On AppleTalk Selects whether to receive documents using AppleTalk 1 Value Off On LAN Interface Select the LAN interface 1 Value Auto 10Base Half 10Base Full 100Base Half 100Base Full 1000BASE T NOTE This function is displayed when the optional Network Interface Kit IB 50 is installed MAC Address Filter Select whe...

Страница 368: ...minal Starts connection using the PIN code of the access point Enter the PIN code of the access point Custom Setup The detailed settings for wireless LAN can be changed Network Name SSID Set the SSID Service Set Identifier of the wireless LAN to which the machine connects NOTE An SSID can contain up to 32 characters Connection Mode Set the connection mode Value Ad Hoc Infrastructure NOTE Ad Hoc Di...

Страница 369: ...ce operating as a client or with an external Address Book Value Wi Fi Wired Network Optional Network NOTE Wi Fi is displayed when the Wireless Network Interface Kit IB 36 is installed Optional Network is displayed when the optional Network Interface Kit IB 50 or Wireless Network Interface Kit IB 51 is installed For the e mail settings you need to configure the equipped network interface and the op...

Страница 370: ...alue Low This mode is used during maintenance Do not use normally High This is the security setting we recommend Use this setting normally Very High In addition to High setting this setting disables the machine settings to be changed from external command NOTE The settings of this function can be configured by a user logged in with administrator privileges Adding a User Local User List 9 6 Item De...

Страница 371: ...ption RAM Disk Setting This creates a RAM disk and specifies its capacity Creating a RAM disk enables printing of print data from the Job Box Value RAM Disk Setting Off On Ram Disk Size The size setting range depends on the size of the installed memory and option memory usage settings IMPORTANT After changing the setting restart the network or turn the machine OFF and then ON Restart 8 51 ...

Страница 372: ...o delete all the data stored in the SSD Overwrite all the data stored in the SSD when disposing of the machine IMPORTANT If you accidentally turn the power switch off during initialization the SSD might possibly crash or initialization might fail NOTE If you accidentally turn off power during initialization turn it back on Initialization will restart automatically Data Sanitization Return the foll...

Страница 373: ...ion user list address book Document Box registered by the user etc Account information of job accounting Network certificates Initial screen on machine changed by service representative FAX 1 Fax settings configured by users Communication restriction settings Encryption key settings Transmission histories Scheduled Job Conditional reception forwarding settings Application Application program added...

Страница 374: ...fix and domain name to be attached to a destination NOTE For information about the fax server contact the fax server administrator File Format Set the default type of the files Value PDF TIFF XPS Address Book Defaults This specifies the External Address Book to be used NOTE This is displayed when On is selected by the fax server This is not displayed if the External Address Book setting is not con...

Страница 375: ... list If you select a region that utilizes summer time configure settings for summer time Setting Date and Time 2 12 Auto Panel Reset If no jobs are run for a certain period of time automatically reset settings and return to the default setting Select to use Auto Panel Reset or not Value Off On NOTE Refer to the following for the time until reset Panel Reset Timer 8 56 Panel Reset Timer If you sel...

Страница 376: ...mediately However this mode saves less energy Normal Recovery In this mode you can select the method from the following enabling the use of all functions immediately or enabling the use of desired functions only If you want to use all functions immediately select the Energy Saver key to execute recovery Power Saving Recovery This mode enables the use of desired functions only This mode saves energ...

Страница 377: ... installed 2 Displayed when the optional Card Authentication Kit is activated 3 Displayed only when the optional fax function is installed Unusable Time 3 FAX Operation Guide Ping Timeout Set the time until timeout occurs when Ping is executed in System Network Value 1 to 30 seconds in 1 second increments Item Description ...

Страница 378: ...1 0 Normal 1 2 3 Higher Background Density Adj Darkens or lightens overall background density adjustment Copy Auto Darkens or lightens overall background density adjustment during copying Adjustment can be made in 7 levels Value 3 Lighter 2 1 0 Normal 1 2 3 Darker Send Box Auto Darkens or lightens overall background density when sending images or storing them in the Document Box Adjustment can be ...

Страница 379: ...al tone Tone Curve Adjustment 11 25 Drum Refresh Remove image blur and white dots from the printout This process takes about one to two minutes The time required may vary depending on the operating environment Drum Refresh 11 26 NOTE Drum Refresh cannot be performed while printing Execute Drum Refresh after the printing is done Auto Drum Refresh This specifies the Auto Drum Refresh execution time ...

Страница 380: ...gs 9 24 PIN Code Authorization 9 25 Using User Login Administration 9 26 Login Logout 9 26 User Login Job Accounting 9 27 Enabling Job Accounting 9 28 Job Accounting Access 9 28 Setting an account Local 9 29 Adding an Account Accounting List 9 29 Restricting the Use of the Machine 9 30 Setting Processing When the Limit is Exceeded 9 31 Editing an Account 9 31 Deleting an Account 9 32 Managing the ...

Страница 381: ...9 2 User Authentication and Accounting User Login Job Accounting Registering User Property for an Unknown ID User 9 45 127 7KH 1 6 5 RSWLRQ LV QRW DYDLODEOH RQ G 23 0 ...

Страница 382: ...on the machine from PCs To Manage the Users to Use TWAIN for Scanning TWAIN driver settings on the PC are necessary to manage the users that use TWAIN for scanning Managing the Users to Use TWAIN for Scanning 9 13 To Manage the Users to Use WIA for Scanning WIA driver settings on the PC are necessary to manage the users that use WIA for scanning Managing the Users to Use WIA for Scanning 9 14 To M...

Страница 383: ... 3 8 Item Description Local Authentication User authentication based on user properties on the local user list stored in the machine Network Authentication User authentication based on Authentication Server Use a user property stored in Authentication Server to access the network authentication login page NOTE If the user authentication screen appears enter your login user name and login password ...

Страница 384: ...in with administrator privileges The factory default login user name and login password are set as shown below Login User Name d COPIA 255MF 2500 Login Password d COPIA 255MF 2500 Item Description Lockout Select whether or not account lockout policy is enabled Value Off On Lockout Policy Specify the conditions and the extent to which the account lockout is applied Value Number of Retries until Loc...

Страница 385: ...re distinguished case sensitive Machine Administrator User Name DeviceAdmin Login User Name d COPIA 255MF 2500 Login Password d COPIA 255MF 2500 Access Level Machine Administrator Administrator User Name Admin Login User Name Admin Login Password Admin Access Level Administrator It is recommended to periodically change the user name login user name and login password regularly for your security NO...

Страница 386: ...to be registered Item Descriptions User Name Enter the name displayed on the user list up to 32 characters Login User Name Enter the login user name to login up to 64 characters The same login user name cannot be registered Access Level Select Administrator or User for user access privileges NOTE For details on entering characters refer to the the following Character Entry Method 12 11 ...

Страница 387: ...unt where the user belongs The user who registered his her account name can login without entering the account ID User Login Job Accounting 9 27 NOTE Select Name or ID from the Sort to sort the account list Select Search Name or Search ID to search by account name or account ID E mail Address The user can register his her E mail address The registered address will be automatically selected for sub...

Страница 388: ...plex printing is allowed Combine Restriction Specify whether only Combine is allowed EcoPrint Restriction Specify whether only EcoPrint is allowed Send Select whether or not to reject usage of the send functions FAX Transmission 2 Select whether or not to disable FAX transmission Storing in Box Select whether or not to reject usage of storing in the document boxes Storing Restr in Memory Select wh...

Страница 389: ... the machine administrator you must log in with machine administrator authority You can only view user information if you log in as a regular user The factory default login user name and login password are set as shown below Login User Name d COPIA 255MF 2500 Login Password d COPIA 255MF 2500 NOTE If the user authentication screen appears enter your login user name and login password and select Lo...

Страница 390: ...ers can be entered Login User Name Displays the login user name that is entered at login Login Password Changes the password that is entered at login Up to 64 characters can be entered Account Name Displays the department to which the user belongs E mail Address Changes the user s e mail address Up to 128 characters can be entered NOTE If the user logs in with user authority and New Destination En...

Страница 391: ...ings 1 Select User Login on the User Login tab Simple Login When simple login is enabled changes associated settings NOTE This function does not appear when Simple Login is set to Off or the user is not registered in Simple Login ID Card Information Displays the ID card information of the logged in user NOTE This function is displayed when the optional ID Card Authentication Kit is activated Card ...

Страница 392: ...er name computer or prompt for login user name When printing the Windows user name is searched in the Login user names and printing is possible if the name is registered If the name is not registered the printing will be canceled for users with only user authority If the user has administrator privileges the screen to enter the user name and password will appear 3 Click OK Managing the Users to Us...

Страница 393: ...uctions are based on interface elements as they appear in Windows 8 1 1 Display the screen 1 Click Search in charms and enter View scanners and cameras in the search box Click View scanners and cameras in the search list then the Scanners and Cameras screen appears 2 Select the same name as this machine from WIA Drivers and click Properties NOTE In Windows 7 click Start button on the Windows and e...

Страница 394: ...e of the machine to be used as the FAX Driver and select Printing preferences from the pull down menu that appears 3 Click FAX TX Setting in the Printing Preferences window 2 Configure the settings 1 Select User Login on the Authentication tab 2 Set the User Login Administration Use Specific Login User Name This option can be used to specify a user name and password to use the same User login for ...

Страница 395: ...he group authorization NOTE When using Local Authorization the user authentication type must be set to Local Authentication Enabling User Login Administration 9 4 NOTE If the user authentication screen appears enter your login user name and login password and select Login For this you need to log in with administrator privileges The factory default login user name and login password are set as sho...

Страница 396: ...t 2 Enter the group name up to 32 characters Next NOTE If the user authentication screen appears enter your login user name and login password and select Login For this you need to log in with administrator privileges The factory default login user name and login password are set as shown below Login User Name d COPIA 255MF 2500 Login Password d COPIA 255MF 2500 NOTE If the user authentication scr...

Страница 397: ... and 4294967295 Group Name Enter the name displayed on the group list up to 32 characters Access Level Select Administrator or User for group access privileges Printer Specify whether or not to disable print functions Copy Specify whether or not to disable copy functions Duplex Restriction Select whether only duplex printing is allowed Combine Restriction Specify whether only Combine is allowed Ec...

Страница 398: ...s you need to log in with administrator privileges The factory default login user name and login password are set as shown below Login User Name d COPIA 255MF 2500 Login Password d COPIA 255MF 2500 NOTE If the guest authorization setting is enabled the Authentication Logout key must be selected when logging in In the guest user default settings only monochrome copying can be used If you wish to us...

Страница 399: ...age authority for each user The items you can restrict the access level with are as follows Print Restriction Select whether or not use of the print function of the printer is prohibited Copy Restriction Select whether or not use of the copy print function is prohibited Duplex Restriction Select whether only duplex printing is allowed Combine Restrict Specify whether only Combine is allowed EcoPri...

Страница 400: ... login user name and login password and select Login For this you need to log in with administrator privileges The factory default login user name and login password are set as shown below Login User Name d COPIA 255MF 2500 Login Password d COPIA 255MF 2500 Item Description Server Name 1 Enter the LDAP server name or the IP address up to 64 characters If a server name is not entered user informati...

Страница 401: ...o the following Adding a User Local User List 9 6 To use Simple Login User Login Administration must be enabled in User Login Settings Enabling User Login Administration 9 4 When the guest authorization setting is enabled the Simple Login screen is not displayed NOTE If the user authentication screen appears enter your login user name and login password and select Login For this you need to log in...

Страница 402: ... If you are specifying a user for whom a domain is set in network authentication select the Domain Name and select the domain where the user is registered Select Next 4 Enter the user name to be displayed select Next 5 Password Login On or Off Icon NOTE To sort the user list select Menu Sort Name or Sort Login User Name Select Menu Search Name or Search Login User Name to search by account name or...

Страница 403: ...d Authentication kit is activated Card Authentication Kit B Card Authentication Kit 12 3 This function does not appear when the user logs in as a network authentication user NOTE If the user authentication screen appears enter your login user name and login password and select Login For this you need to log in with administrator privileges The factory default login user name and login password are...

Страница 404: ... settings 1 Select Off or On 2 Select OK NOTE To select Network network authentication must be enabled and Ext must be selected for server type Enabling User Login Administration 9 4 NOTE If the user authentication screen appears enter your login user name and login password and select Login For this you need to log in with administrator privileges The factory default login user name and login pas...

Страница 405: ...ounting Login Logout If user login administration is enabled the login user name and login password entry screen appears each time you use this machine Login If the login user name entry screen appears during operations log in by referring to the following Login 3 14 Logout When the operations are complete select the Authentication Logout key to return to the account ID entry screen ...

Страница 406: ...he Scan Job Account by Using WIA To manage the scan job account by using WIA you need to configure the WIA driver settings on the computer connected to the machine Job Accounting for Scan Using WIA 9 35 Managing the FAX Job Transmitted from a PC To manage the number of FAX jobs transmitted from the PC you need to configure the settings by using the FAX Driver on the PC Job Accounting for the FAX T...

Страница 407: ...ory default login user name and login password are set as shown below Login User Name d COPIA 255MF 2500 Login Password d COPIA 255MF 2500 NOTE To disable job accounting select Off When the display returns to System Menu default screen logout is automatically executed and the screen to enter the Account ID appears To continue the operation enter the Account ID NOTE If the user authentication scree...

Страница 408: ...striction Restricting the Use of the Machine 9 30 4 Select Register A new account is added on the Account List Item Description Account Name Number of characters Up to 32 Account ID Allowable Input Range 0 to 99999999 up to 8 digits NOTE If the user authentication screen appears enter your login user name and login password and select Login For this you need to log in with administrator privileges...

Страница 409: ...r Total Limits the number of sheets used for printing Applicable print functions are those below Printing from a box Printing from removable memory Printing from PC Scan Others Limits the number of sheets scanned excludes copying FAX Transmission Restricts the number of fax sheets that can be sent Displayed only on products with the optional fax function installed Item Description Print Total Limi...

Страница 410: ...ion Immediately 1 Job stops when the counter reaches its limit Subsequently Printing scanning of the job continues but the subsequent job will be rejected Alert Only Job continues while displaying an alert message NOTE If the user authentication screen appears enter your login user name and login password and select Login For this you need to log in with administrator privileges The factory defaul...

Страница 411: ...ing List 2 Deleting 1 Select the account name you wish to delete 2 Yes The account is deleted NOTE To perform a name or ID search select Menu Search Name or Search ID To sort the account name select Menu Sort Name or Sort ID NOTE If the user authentication screen appears enter your login user name and login password and select Login For this you need to log in with administrator privileges The fac...

Страница 412: ...the user does not have to enter the Account ID for each print job Prompt for account ID A screen for entering the Account ID will be displayed when attempting a printing The Account ID must be entered each time a printing is attempted Prompt for account ID and validate A screen for entering the Account ID will be displayed when attempting a printing The Account ID stored in the Account ID list nee...

Страница 413: ...ructions are based on interface elements as they appear in Windows 8 1 1 Display the screen 1 Click Search in charms and enter TWAIN Driver Setting in the search box Select TWAIN Driver Setting in the search list 2 Select the machine click Edit 2 Configure the settings 1 Click User Authentication Settings 2 Select the checkbox beside Account and enter the account ID 3 Click OK NOTE Select Start bu...

Страница 414: ...ear in Windows 8 1 1 Display the screen 1 Click Search in charms and enter View scanners and cameras in the search box 2 Select the same name as this machine from WIA Drivers and click Properties 2 Configure the settings 1 Select the checkbox beside Account ID on the Settings tab and enter the Account ID 2 Click OK NOTE In Windows 7 click Start button on the Windows and enter Scanner in Program an...

Страница 415: ... as the FAX Driver and select Printing preferences from the pull down menu that appears 3 Click FAX TX Setting in the Printing Preferences window 2 Configure the settings 1 Select Job Accounting on the Authentication tab 2 Configure job accounting settings Use Specific Account ID This option can be used to specify an account ID to use the same Account ID for every FAX job If this option is selecte...

Страница 416: ...on the number of sheets used You can set any number from 1 to 9 999 999 The items that can be set differ depending on whether Individual or Total is selected for Copy Printer Count Copier Printer Count Method Setting 9 42 Individual selected for Copy Printer Count Copy Total Sets the default restriction on the number of sheets used for copying Printer Total Sets the default restriction on the numb...

Страница 417: ...en 1 System Menu Counter key User Login Job Accounting 2 Job Accounting Settings Default Setting Count by Paper Size Paper Size 1 5 2 Configure the settings 1 Select On 2 Select the paper size 3 Select Media Type to specify media type 4 Select the media type and select OK 5 Select OK NOTE Paper size is available in four types 1 to 5 These types are specified in accounting reports Print Accounting ...

Страница 418: ...hich was stored for a certain period of time 1 Display the screen 1 System Menu Counter key User Login Job Accounting 2 Job Accounting Settings Total Job Accounting or Each Job Accounting NOTE If the user authentication screen appears enter your login user name and login password and select Login For this you need to log in with administrator privileges The factory default login user name and logi...

Страница 419: ...e number of pages used Copy Total Displays the number of pages copied Printer Total Displays the number of pages printed Applicable print functions are those below Printing from a box Printing from removable memory Printing from PC Copy Print Total Displays the total number of pages used for copying and printing FAX 1 Displays the number of pages received Total Displays the total number of pages u...

Страница 420: ...per is loaded in the cassette 2 Display the screen System Menu Counter key User Login Job Accounting Job Accounting Settings 3 Print the document Print Accounting Report Yes Accounting report is printed NOTE To perform the Account ID select Menu Search Name or Search ID Select Select Others to search by account name or account ID To sort the account name select Menu Sort Name or Sort ID NOTE If th...

Страница 421: ...s log in by referring to the following Restricting the Use of the Machine 9 30 Counting the Number of Pages Printed 9 39 Print Accounting Report 9 41 1 Display the screen 1 System Menu Counter key User Login Job Accounting 2 Job Accounting Settings Default Setting Copy Printer Count 2 On 1 Select Total or Individual 2 Select OK NOTE If the user authentication screen appears enter your login user n...

Страница 422: ...login administration is enabled the screen to enter the login user name and password appears Enter a login user name and password to login If the user has already registered the account information the account ID entry would be skipped Adding a User Local User List 9 6 2 Proceed to complete the rest of the steps Logging Out Job Accounting When the operations are complete select the Authentication ...

Страница 423: ...is disabled and account administration is enabled Setting items are shown below 1 Display the screen 1 System Menu Counter key User Login Job Accounting 2 Select Unknown ID Job 2 On Select Reject or Permit Item Description Permit The job is processed Reject The job is not processed NOTE If the user authentication screen appears enter your login user name and login password and select Login For thi...

Страница 424: ...ogin user name and login password and select Login For this you need to log in with administrator privileges The factory default login user name and login password are set as shown below Login User Name d COPIA 255MF 2500 Login Password d COPIA 255MF 2500 Item Description User Name Enter up to 32 characters for the user name Account Name This assigns an account to an unknown ID user User Login Job...

Страница 425: ...topics Regular Maintenance 10 2 Cleaning Glass Platen 10 2 Cleaning Slit Glass 10 2 Toner Container Replacement 10 4 Waste Toner Box Replacement 10 7 Loading Paper 10 9 Staple Cartridge Replacement Document Finisher 10 10 127 7KH 1 6 5 RSWLRQ LV QRW DYDLODEOH RQ G 23 0 ...

Страница 426: ...th moistened with alcohol or a mild detergent Cleaning Slit Glass When using the original feeder clean the slit glass surface and the reading guide with the provided cleaning cloth 1 Take out the cleaning cloth CAUTION For safety always unplug the power cord before cleaning the machine IMPORTANT Do not use thinner or other organic solvents NOTE Dirt on the slit glass or the reading guide may cause...

Страница 427: ...10 3 Maintenance Regular Maintenance 2 Clean the slit glass and the reading guide ...

Страница 428: ...Toner is low Replace when empty 1 Open the front cover 2 Remove the toner container NOTE For the toner container always use a genuine toner container Using a toner container that is not genuine may cause image defects and product failure The memory chip in the toner container of this product stores information necessary for improving customer convenience operation of the recycling system for used ...

Страница 429: ...ce Consumable Replacement and Replenishment 3 Put used toner containers into the plastic waste bag 4 Remove the new toner container from the box 5 Tap the toner container IMPORTANT Do not touch the points shown below ...

Страница 430: ...cover IMPORTANT Insert the toner container as far as it will go NOTE If the front cover does not close check that the new toner container is installed correctly Return the used toner container to your dealer or service representative The collected toner container will be recycled or disposed in accordance with the relevant regulations ...

Страница 431: ...elow will appear when the waste toner box is full Replace the waste toner box Check the waste toner box 1 Open the front cover 2 Remove the Waste Toner Box 3 Put used toner containers into the plastic waste bag CAUTION Do not attempt to incinerate parts which contain toner Dangerous sparks may cause burns ...

Страница 432: ...move the new Waste Toner Box 5 Install the Waste Toner Box 6 Close the front cover NOTE Return the used waste toner box to your dealer or service representative The collected waste toner box will be recycled or disposed in accordance with the relevant regulations ...

Страница 433: ...e cassette number Add paper in Multi Purpose tray Loading Paper into Cassette 1 to 3 3 18 Loading Paper in the Multi Purpose Tray 5 7 NOTE When On is selected for the Show Paper Setup Message the paper setting confirmation screen will appear If you changed to a different paper type select Change and then configure the paper settings as required Cassette 1 to 3 8 9 Multi Purpose Tray 8 10 ...

Страница 434: ...sher The message shown below will appear when staples run out When this happens replace the staple cartridge Staple is empty 1 Open the Staple Cover of the Document Finisher 2 Remove the Staple Cartridge Holder 3 Replace the staples NOTE If staples run out contact your dealer or service representative ...

Страница 435: ...10 11 Maintenance Consumable Replacement and Replenishment 4 Install the Staple Cartridge Holder 5 Close the staple cover ...

Страница 436: ...esh 11 26 Clearing Paper Jams 11 27 Jam Location Indicators 11 27 Remove any jammed paper in the Multipurpose Tray 11 28 Remove any jammed paper in Right Cover 1 11 29 Remove any jammed paper in Cassette 1 2 and 3 11 30 Remove any jammed paper in Right Cover 2 3 11 31 Remove any jammed paper in the Document Finisher 11 33 Remove any jammed paper in the Bridge Unit 11 34 Remove any jammed paper in ...

Страница 437: ... actions you should take If a problem occurs with your machine look into the checkpoints and take the indicated actions If the problem persists contact your dealer or Service Representative See the last page of this manual for contact phone numbers NOTE When contacting us the serial number will be necessary To check the serial number refer to the following Display for Device Information 3 10 ...

Страница 438: ... the platen place them face down and align them with the original size indicator plates 5 3 When placing originals in the document processor place them face up 5 5 ʊ Check that the settings of the application software ʊ Paper often jams Is the paper loaded correctly Load the paper correctly 3 18 ʊ Turn the orientation 180 degrees around in which the paper is positioned 3 18 Is the paper of the sup...

Страница 439: ...me resolution is there intermixing with an IP address private address of another network that cannot access Only one host name and one domain name can be used with the MFP Configure network settings keeping this restriction in mind ʊ Use Embedded Web Server RX to change the NetBEUI DNS and other name resolution settings or change the network environment settings CommandCen ter RX User Guide On the...

Страница 440: ...exceptions for Windows Firewall been configured properly Configure exceptions for Windows Firewall properly 3 30 Do the time settings for the equipment domain server and data destination computer differ Set the equipment domain server and data destination computer to the same time ʊ Is the screen displaying Send error Refer to the Send Error Codes 11 22 Cannot connect to this MFP using Wi Fi Direc...

Страница 441: ... evenly within the toner container Shake the toner container from side to side several times 10 4 Is EcoPrint mode enabled Change the EcoPrint setting to Off 6 18 ʊ Run Drum Refresh 11 26 ʊ Make sure the paper type setting is correct for the paper being used 8 9 The white parts of the image seem to have a grayish cast Have you changed the density Select appropriate density level 6 16 8 59 Copies h...

Страница 442: ...securely before placing the originals 5 5 Is the paper loaded correctly Check the position of the paper width guides 3 18 ʊ Perform centerline adjustment For information about this adjustment contact your Service Representative Printouts have vertical lines Is the slit glass dirty Clean the slit glass 10 2 Dirt on the top edge or back of the paper Is the interior of the machine dirty Open the righ...

Страница 443: ...e front ʊ Change the Prevent Bleed thru Copy or Prevent Bleed Send Store setting to On 6 23 The color of the original is of concern ʊ Run Background Density Adj 6 22 Color shading is not as expected ʊ Run Tone Curve Adjustment 11 25 Symptom Checkpoints Corrective Actions Reference Page ...

Страница 444: ...r Load paper Select Paper Selection to select the other paper source Select Continue to print on the paper in the currently selected paper source 3 18 Add staples Has any of the document finisher run out of staples If the staples are depleted the machine will stop and the location of staple depletion will be indicated on the screen Leave the machine on and follow the instruction to replace the sta...

Страница 445: ...not connect to Authentication Server Set machine time to match the server s time 2 12 Check the domain name 9 4 Check the host name 9 4 Check the connection status with the server Cannot connect This appears when the Wi Fi or Wi Fi Direct connection did not complete Check the settings and check the signal conditions Cannot duplex print on the following paper Did you select a paper size type that c...

Страница 446: ...s NOTE If you unchecked the System Menu check the System Menu again after the printing is completed If not print speed may be reduced Cannot process this job This job is canceled because it is restricted by User Authorization or Job Accounting Select End Cannot read data in this ID card In registration process the ID card information was not read correctly Hold again the ID card over the ID card r...

Страница 447: ... full Replace the waste toner box 10 7 Symptom Checkpoints Corrective Actions Reference Page Developer unit is not installed Replace the developer unit g See the leaflet supplied with the developer unit Drum unit is not installed Replace the drum unit See the leaflet supplied with the drum unit for details Symptom Checkpoints Corrective Actions Reference Page Error occurred at cassette Remove the ...

Страница 448: ...nder is a domain user specify the domain name Login User ID Domain Name Example sa720XXXX km Login password Folder share permissions of the recipient Failed to specify Job Accounting Failed to specify Job Accounting when processing the job externally The job is canceled Select End Failed to store job retention data The job is canceled Select End Insufficient free space in the Job Box Try to perfor...

Страница 449: ...then resumes Symptom Checkpoints Corrective Actions Reference Page Job Accounting restriction exceeded Is the acceptable printing count restricted by Job Accounting exceeded The printing count exceeded the acceptable count restricted by Job Accounting Cannot print any more This job is canceled Select End Job separator tray is full of paper Is the maximum capacity of the job separator tray exceeded...

Страница 450: ...imum number of scanned pages Is the acceptable scanning count exceeded Only one copy of the scanned pages is available Select Continue to print send or store the scanned pages Select Cancel to cancel printing sending or storing Memory card error An error has occurred on the memory card Job is canceled Select End The error cord is as follows 04 Insufficient space on the memory card to complete this...

Страница 451: ... job as the memory is used up Select Continue to print the scanned pages The print job cannot be processed completely Select Cancel to cancel the job The machine may reproduce the same originals by arranging the following settings Select On of RAM Disk Setting in System Menu and then decrease the RAM disk size Select Printer Priority of Optional Memory in System Menu NOTE Before changing the RAM D...

Страница 452: ... jam If a paper jam occurs the machine will stop and the location of the jam will be indicated on the screen Leave the machine on and follow the instruction to remove the jammed paper 11 27 Perform Tone Curve Adjustment Over long periods of use the effects of the ambient temperature and humidity can cause color output hues to vary slightly Run Tone Curve Adjustment 11 25 Performing Drum Refresh Th...

Страница 453: ... as follows 01 The amount of data that can be saved at once has been exceeded Restart the system or turn the power OFF ON If the error still occurs the removable memory is not compatible with the machine Use the removable memory formatted by this machine If the removable memory cannot be formatted it is damaged Connect a compatible removable memory Is writing to a removable memory prohibited An er...

Страница 454: ... at once Furthermore the machine may reproduce the same originals by arranging the following settings Select Copy Priority of Optional Memory in System Menu NOTE Before changing the Optional Memory setting contact your administrator 8 51 Scheduled sending jobs exceeded The number of jobs has exceeded the limit set for delayed transmission Select End The job is canceled Wait until the delayed trans...

Страница 455: ...f the document processor open Close the document processor cover Is there any cover which is open Close the cover indicated on the screen The device cannot be connected because allowed connections would be exceeded Are three handheld devices connected simultaneously Cancel a connection to a portable device that is not being used or set the machine s auto disconnect time to break portable device co...

Страница 456: ...toner container 10 4 Toner is empty Replace the toner container 10 4 Toner is low Replace when empty It is almost time to replace the toner container Obtain a new toner container 10 4 Symptom Checkpoints Corrective Actions Reference Page Unknown Toner Installed PC Does the installed toner container s regional specification match the machine s Install the specified container 10 4 Use MP tray to pri...

Страница 457: ... mail Check the following on the Embedded Web Server RX SMTP login user name and login password POP3 login user name and login password E mail size limit 2 45 Failed to send via FTP Check the FTP settings Login user name and login password NOTE If the sender is a domain user specify the domain name Path Folder share permissions of the recipient 5 18 1103 Failed to send via SMB Check the SMB settin...

Страница 458: ...tion Key Assignment Menu Report Print 5 18 1132 Failed to send via FTP Check the following of the FTP server Is FTPS available Is the encryption available 2101 Failed to send via SMB Check the network and SMB settings The network cable is connected The hub is not operating properly The server is not operating properly Host name and IP address Port number Failed to send via FTP Check the network an...

Страница 459: ... hub is not operating properly The server is not operating properly 2204 Failed to send the e mail Check the e mail size limit of the SMTP settings on the Embedded Web Server RX 2 45 3101 Failed to send the e mail Check the authentication methods of both the sender and the recipient Failed to send via FTP Check the network The network cable is connected The hub is not operating properly The server...

Страница 460: ...atterns are read sequentially during the adjustment 1 Load paper 2 Display the screen 1 System Menu Counter key Adjustment Maintenance Tone Curve Adjustment Menu Description Reference page Tone Curve Adjustment Adjusts the shading of the printed image 11 25 Drum Refresh Remove image blur and white dots from the printout 11 26 IMPORTANT Load the paper with the print side facing up After removing ne...

Страница 461: ... adjustment begins The second pattern is output 4 Check that the number 2 is printed at the bottom of the pattern and repeat steps 2 to 3 once again to scan pattern 2 5 Select OK in the adjustment end confirmation screen Drum Refresh Remove image blur and white dots from the printout 1 Display the screen System Menu Counter key Adjustment Maintenance Drum Refresh 2 Adjust as required Select Start ...

Страница 462: ...cel key will cause Hold to become selected Selecting Hold displays the status screen which you can use to check the status of jobs 6 Selecting Display Error returns to paper jam guidance Paper Jam Location Indicator Paper Jam Location Reference page 1 Multipurpose Tray 11 28 2 Right Cover 1 11 29 3 Cassette 1 11 30 4 Right Cover 3 11 31 5 Cassette 2 11 30 10 10 JAM 0001 Paper jam Back Next 1 3 Cle...

Страница 463: ...pose Tray 1 Remove any jammed paper 2 Remove all the paper 3 Reload the paper 6 Cassette 3 11 30 7 Document Finisher 11 33 8 Bridge Unit 11 34 9 SpecificationsDocument Processor 11 35 CAUTION Do not reuse jammed papers If the paper tears during removal be sure to remove any loose scraps of paper from inside the machine Scraps of paper left in the machine could cause subsequent jamming Paper Jam Lo...

Страница 464: ...ammed paper in Right Cover 1 1 Open Right Cover 1 2 Remove any jammed paper 3 Open the fuser cover a and remove any jammed paper CAUTION The fixing unit is extremely hot Take sufficient care when working in this area as there is a danger of getting burned ...

Страница 465: ... Remove any jammed paper in Cassette 1 2 and 3 Here we ll explain the procedures for Cassette 1 as an example CAUTION Do not reuse jammed papers If the paper tears during removal be sure to remove any loose scraps of paper from inside the machine Scraps of paper left in the machine could cause subsequent jamming ...

Страница 466: ...emove any jammed paper 3 Push Cassette 1 back in Remove any jammed paper in Right Cover 2 3 CAUTION Do not reuse jammed papers If the paper tears during removal be sure to remove any loose scraps of paper from inside the machine Scraps of paper left in the machine could cause subsequent jamming ...

Страница 467: ...11 32 Troubleshooting Clearing Paper Jams 1 Open Right Cover 3 2 Remove any jammed paper 3 Open Right Cover 2 4 Remove any jammed paper ...

Страница 468: ...d paper in the Document Finisher 1 Remove any jammed paper 2 Open the top cover CAUTION Do not reuse jammed papers If the paper tears during removal be sure to remove any loose scraps of paper from inside the machine Scraps of paper left in the machine could cause subsequent jamming ...

Страница 469: ... any jammed paper in the Bridge Unit 1 Open the Bridge Unit cover and remove any jammed paper CAUTION Do not reuse jammed papers If the paper tears during removal be sure to remove any loose scraps of paper from inside the machine Scraps of paper left in the machine could cause subsequent jamming ...

Страница 470: ...ammed paper in the Document Processor 1 Remove the originals from the Original Table 2 Open the front cover and remove any jammed paper CAUTION If the paper tears during removal be sure to remove any loose scraps of paper from inside the machine Scraps of paper left in the machine could cause subsequent jamming ...

Страница 471: ...11 36 Troubleshooting Clearing Paper Jams 3 Open Reverse Unit C and remove any jammed paper 4 Turn dial B clockwise to feed jammed paper and remove it 5 Push the top cover C B ...

Страница 472: ...a Staple Jam Clearing a Staple Jam Clearing a staple jam of the Document Finisher 1 Open the staple cover of the Document Finisher 2 Remove the Staple Cartridge Holder 3 Remove the jammed staple 4 Install the Staple Cartridge Holder ...

Страница 473: ...11 38 Troubleshooting Clearing a Staple Jam 5 Close the staple cover ...

Страница 474: ...n Use 12 9 Checking Details of Application 12 10 Character Entry Method 12 11 Entry Screens 12 11 Entering Characters 12 12 Specifications 12 21 Machine 12 21 Copy Functions 12 23 Printer Functions 12 24 Scanner Functions 12 24 Document Processor 12 25 Paper Feeder 500 sheet 12 25 Paper Feeder 500 sheet x 2 12 26 Glossary 12 27 127 7KH 1 6 5 RSWLRQ LV QRW DYDLODEOH RQ G 23 0 ...

Страница 475: ...nt Optional Equipment Overview of Optional Equipment The following optional equipment is available for the machine 1 PF 470 2 PF 471 3 IB 36 4 Card Authentication Kit B 8 IB 50 7 HD 6 HD 7 9 IB 51 5 Fax System 13 6 Expansion Memory ...

Страница 476: ...dition network printing is possible without using the wireless LAN router because Wi Fi Direct is supported This is standard in Inch Model 4 Card Authentication Kit B Card Authentication Kit Option Card Authentication Kit User login administration can be performed using ID cards To do so it is necessary to register ID card information on the previously registered local user list Card Authenticatio...

Страница 477: ... electrostatic charge touch a water tap or some metal object to discharge it from your body before loading the expansion memory If possible you should wear an anti static wristband or take other anti static measures Installing or Replacing Memory 1 Power Off Turn off power and disconnect the power cord and any cables connected to the machine 2 Remove the covers 3 Install the memory 1 Remove the op...

Страница 478: ...ve Expansion Memory that has been installed remove the machine s right cover Carefully press the two stoppers of the socket and then remove the Expansion Memory from the socket Checking Expansion Memory Improperly installed Expansion Memory will cause the following message to appear Machine Failure Re install the memory to clear the error You can check whether or not Expansion Memory is properly i...

Страница 479: ... Hard Disk installed in the machine received data can be rasterized and stored on this Hard Disk Installation of an SSD enables use of Document Box functions Using Document Boxes 3 50 Installing the SSD 1 Power Off Turn off power and disconnect the power cord and any cables connected to the machine 2 Remove the covers OPT2 NETWORK ...

Страница 480: ...12 7 Appendix Optional Equipment 3 Install the SSD 1 Remove the SSD from its package 2 Insert straight into the Option Interface Slot 3 Fix it with the 2 screws ...

Страница 481: ...ecifications IEEE802 11n Max 300 Mbps and 11 g b The IB 51 provides support for AppleTalk Netware and similar conventional protocols Only supports minimum function of standard utilities The IB 51 setup utility is compatible with a Windows OS and Mac OSX 10 Data Security kit E Data Security Kit The Data Security Kit overwrites all unnecessary data in the storage area of the hard disk so that it can...

Страница 482: ...on screen Application Data Security Kit Card Authentication Kit 1 ThinPrint Option 1 NOTE Restrictions such as the number of times the application can be used during the trial period differ depending on the application If you change the date time while using the trial version of an application you will no longer be able to use the application NOTE If the user authentication screen appears enter yo...

Страница 483: ... item you can view To extend the trial period select Print after Change Settings Yes NOTE If the user authentication screen appears enter your login user name and login password and select Login For this you need to log in with administrator privileges The factory default login user name and login password are set as shown below Login user name d COPIA 255MF 2500 Login Password d COPIA 255MF 2500 ...

Страница 484: ...er to enter 3 Cancel Select to cancel entered characters and return to the screen before the entry was made 4 Back Select to return to the previous screen 5 OK Next Select to save the entered characters and move to the next screen 6 Enter Key Select to enter a line break 7 Space Key Select to insert a space 8 Delete Key Select to delete a character to the left of the cursor 9 Input Limit Display D...

Страница 485: ...cursor key and scroll the screen to view other numbers or symbols to enter Input Limit Back Next Cancel AB Del 2 32 ABC A a Q W E R T Y U I O P A S D F G H J K L _ Z X C V B N M Add Name Input Limit Symbol Del 3 32 Back Next Cancel Add Name 123 㻝㻟 Input Limit Back Next Cancel L Del 1 32 ABC A a Q W E R T Y U I O P A S D F G H J K L _ Z X C V B N M Add Name Input Limit Back Next Cancel Add Name p o...

Страница 486: ...12 13 Appendix Character Entry Method 3 Register the characters you entered Select Next The entered characters are registered Input Limit Symbol Del 8 32 Back Next Cancel Add Name List A 1 ...

Страница 487: ... paper Poor quality paper may result in unsatisfactory output Basic Paper Specifications that can be Used with This Machine The following table lists the specifications of paper that is supported with this machine Refer to the subsequent sections for further details We are not responsible for the problems occurred from the use of paper that does not conform to our specifications Criteria Specifica...

Страница 488: ... weight i e thickness may cause several sheets to be supplied at once accidentally and may also cause blurring or other printing problems if the toner fails to adhere correctly Moisture content Paper moisture content is the ratio of moisture to dryness expressed as a percentage Moisture affects how the paper is supplied the electrostatic chargeability of the paper and how the toner adheres Paper m...

Страница 489: ...especially careful when you cut the paper yourself Packaging Choose paper that is properly packaged and stacked in boxes Ideally the packaging itself should have been treated with a coating to inhibit moisture Specially treated paper We do not recommend printing onto the following types of paper even if it conforms to the basic specifications When you use these kinds of paper purchase a small amou...

Страница 490: ... 4 3 5 8 6 1 2 1 Envelope Monarch 3 7 8 7 1 2 1 Envelope DL 110 220 mm 1 Envelope C5 162 229 mm 1 Envelope C4 229 324 mm 1 Hagaki Cardstock 100 148 mm 1 Oufuku hagaki Return postcard 148 200 mm 1 Youkei 4 105 235 mm 1 Youkei 2 114 162 mm 1 Custom Multi Purpose Tray 98 148 to 297 432 mm 1 1 This paper can be used in Multi Purpose Tray ...

Страница 491: ...eneral precautions when printing onto special paper are given below Note that we are not responsible for any harm to the user or damage to the machine caused by moisture or specifications of special paper Select a cassette or multi purpose tray for special paper OHP Transparencies Transparencies must be able to withstand the heat of printing Transparencies must meet the following conditions To avo...

Страница 492: ...e loading Hagaki Cardstock fan them and align the edges Hagaki Cardstock should be fed from the MP tray with the print side down or the cassette and the optional paper feeder with the print side up If the Hagaki Cardstock paper is curled straighten it before loading Printing onto curled Hagaki Cardstock may cause jams Use unfolded Oufuku hagaki Return postcard available at post offices Some Hagaki...

Страница 493: ...n the edges Some thick paper may still have rough edges developed by a paper cutter on the back side Remove any such rough edges just as with Hagaki Cardstock by placing the paper on a flat surface and rubbing the edges gently a few times with a ruler Printing onto paper with rough edges may cause jams Colored paper Colored paper must conform to the specifications Basic Paper Specifications that c...

Страница 494: ...atement Oficio II 216 340 mm Folio 8K 16K Multi Purpose Tray A3 A4 A5 A6 B4 B5 B6 216 340 mm Ledger Letter Legal Statement Executive Oficio II Folio 8K 16K ISO B5 Envelope 10 Envelope 9 Envelope 6 3 4 Envelope Monarch Envelope DL Envelope C5 Envelope C4 Hagaki Cardstock Oufuku Hagaki Return postcard Youkei 4 Youkei 2 Custom 98 x 148 to 297 x 432 mm Printable Area Print margin for top is 4 5 1 5 mm...

Страница 495: ... 90 5 F Humidity 10 to 80 Altitude 3 500 m 11 482 ft maximum Brightness 1 500 lux maximum Dimension W D H without Document Processor 23 23 x 23 23 x 27 09 590 x 590 x 688 mm Weight without toner container d COPIA 255MF Approx 108 0 lb Approx 49 kg Space Required W D Using multi purpose tray 34 37 x 23 23 873 x 590 mm Power Source 120 V Specification Model 120 V 60 Hz 9 8 A 220 V 240 V Specificatio...

Страница 496: ...ets min 11 sheets min B5 25 sheets min 17 sheets min B5 R 16 sheets min 14 sheets min A5 R 12 sheets min 12 sheets min A6 R 12 sheets min First Copy Time A4 place on the platen feed from Cassette 5 8 seconds or less Zoom Level Manual mode 25 to 400 1 increments Auto mode Preset Zoom Continuous Copying 1 to 999 sheets Resolution 600 600 dpi Supported Original Types Sheet Book 3 dimensional objects ...

Страница 497: ... sheets min B4 Legal 8 sheets min 7 sheets min B5 22 sheets min 17 sheets min B5 R 10 sheets min 9 sheets min A5 R 12 sheets min 12 sheets min First Print Time A4 feed from Cassette 5 8 seconds or less Resolution 600 x 600 dpi Fine 1200 Operating System Windows Vista Windows 7 Windows 8 Windows 8 1 Windows 10 Windows Server 2008 R2 Windows Server 2012 R2 Windows Server 2016 Mac OS X 10 5 or more I...

Страница 498: ...ASE TX 1000 BASE T Wireless LAN Option 1 For IB 36 mounting 2 Transmission System SMB SMTP SMTP over SSL FTP FTP over SSL TWAIN 3 WIA 3 WSD Item Description Original Feed Method Automatic feed Supported Original Types Sheet originals Paper Size Maximum A3 Ledger Custom 297 x 432 mm Long sized 297 x 1900 mm Minimum A5 R Statement R Custom 140 x 182 mm Paper Weight 1 sided 45 to 160 g m2 2 sided 50 ...

Страница 499: ... roller feeder No Sheets 500 80 g m2 2 cassettes Paper Size A3 A4 A5 B4 B5 Ledger Letter Legal Statement Oficio II 216 340 mm Folio 8K 16K Supported Paper Paper weight 60 to 163 g m2 Media types Plain Recycled Material Dimensions W D H 23 23 x 23 19 x 13 86 590 589 352 mm Weight Approx 46lb Approx 21 kg ...

Страница 500: ...for a specific period In Sleep mode power consumption is kept to a minimum Bonjour Bonjour also known as zero configuration networking is a service that automatically detects computers devices and services on an IP network Bonjour because an industry standard IP protocol is used allows devices to automatically recognize each other without an IP address being specified or DNS server being set Bonjo...

Страница 501: ... mode are thus lighter than normal Emulation The function to interpret and execute other printers page description languages The machine emulates operation of PCL6 KPDL3 PostScript 3 compatible Enhanced WSD Proprietary web services FTP File Transfer Protocol A protocol to transfer files on the TCP IP network whether the Internet or an intranet Along with HTTP and SMTP POP FTP is now frequently use...

Страница 502: ...ts Windows as a standard protocol for file sharing and printing services Outline font With outline fonts character outlines are represented with numerical expressions and fonts can be enlarged or reduced in different ways by changing the numeric values of those expressions Printing remains clear even if you enlarge fonts since the characters are defined with outlines represented with numerical exp...

Страница 503: ...y capacity total number of prints and scans and paper source settings Subnet Mask The subnet mask is a way of augmenting the network address section of an IP address A subnet mask represents all network address sections as 1 and all host address sections as 0 The number of bits in the prefix indicates the length of the network address The term prefix refers to something added to the beginning and ...

Страница 504: ... and OCR software USB Universal Serial Bus 2 0 A USB interface standard for Hi Speed USB 2 0 The maximum transfer rate is 480 Mbps This machine is equipped with USB 2 0 for high speed data transfer WIA Windows Imaging Acquisition A function to import images supported after Windows Me XP from digital cameras and other peripheral devices This function replaces what TWAIN used to do The feature is pr...

Страница 505: ...ams Bride Unit 11 34 Jam Location Indicators 11 27 Multi Purpose Tray 11 28 Original Feeder Reverse Automatic 11 35 Right Cover 1 11 29 Right Cover 2 3 11 31 Collate Offset 6 10 Color Background Density Adjustment 6 22 8 59 Color Selection 6 19 Combine 6 26 Embedded Web Server RX 2 42 Common Settings 8 11 Default Screen 8 11 Display Status Log 8 21 Error Handling 8 19 Finish Documents by Job 8 20 ...

Страница 506: ...ox 8 25 Document BoxCustom Box 3 50 Document BoxJob Box 3 50 Document Name Entry Default 8 17 Document Processor Loading Originals 5 5 Originals Supported by the Document Processor 5 5 Document processor Loading Originals 5 5 dpi 12 29 DSM Scan Protocol Settings 8 41 Duplex 6 29 E EcoPrint 6 18 12 29 Edit Destination Address book 3 34 Address Book Defaults 8 27 Edit Restriction 8 27 Group 3 37 Ind...

Страница 507: ...ounter 9 39 Defaults 9 37 Delete 9 32 Edit 9 31 FAX 9 36 Job Accounting Access 9 28 Logout 9 43 Print 9 33 Restrictions 9 30 TWAIN 9 34 WIA 9 35 Job Accounting Settings Copy Print Count 9 43 Job Box 12 30 Private Print 5 40 Proof and Hold 5 43 Quick Copy Job Retention 8 25 Specifying a Job Box from a Computer and Saving a Job 4 11 Job BoxQuick Copy Box 5 42 Job Finish Notice 6 34 Job Finish Notice...

Страница 508: ...l width guides 2 4 Original Paper Settings 8 12 Outline font 12 30 Output Stopper 3 22 P Panel Reset Timer 8 56 Paper 5 9 Appropriate Paper 12 15 Cassette 8 9 Handling Precautions 3 4 3 17 Loading an Original on the Multi Purpose Tray 5 14 Loading Paper into a Cassette 3 18 Multi Purpose Tray 8 10 Selecting Paper Feeder Units 3 18 Special Paper 12 18 Specifications 12 14 Paper Length Guide 3 19 Pa...

Страница 509: ...ep Level Energy Saver 2 24 Quick Recovery 2 24 Slit Glass 2 3 SMB Client Send Protocol Settings 8 40 SMB Send 5 16 SMTP 12 31 SMTP Mail Send Protocol Settings 8 40 SNMP Protocol Settings 8 41 SNMPv3 Protocol Settings 8 41 Sort Offset Default 8 16 Sound 8 11 Specifications Copy Functions 12 23 Document Finisher 12 26 Document Processor 12 25 Paper Feeder 500 sheet x 2 12 26 Paper Feeder 500 sheet 1...

Страница 510: ...5 47 Remove 5 48 Save 5 47 USB Memory Slot 2 3 Useful Sending Method 5 21 User Information 9 11 User Login Administration Adding a User 9 6 Enabling 9 4 FAX 9 15 Group Authorization 9 16 Guest Authorization Settings 9 18 IC Card Settings 9 24 Local Authorization 9 16 Login 3 14 Logout 3 15 Modifying User Information 9 10 Obtain NW User Properties 9 20 Overview of User Login Administration 9 3 9 4 ...

Страница 511: ......

Страница 512: ...n you need and the instructions for handling the waste correctly for example location and times of the waste collection centres etc b When you purchase a new device of ours give a used device similar to the one purchased to our dealer for disposal The crossed dustbin symbol on the device means that When it to be disposed of the device is to be taken to the equipped waste collection centres and is ...

Страница 513: ... ú ăÁ öÄ Áă ăæ Ý Ô Á Þ ú ăæ ăÁ óöæ Ĉ ă ú öÄ ÄÞ ăÁÄú Ý ÞĈ ă ÞĚ ÝæÝ Þă Þ ĔÄăÁæĈă ÄēÄÞ óöÄæö Ĕ öÞÄÞ ǯ Hæ ó öă æ ăÁÄú æ ĈÝ Þă Ý Ě æóÄ Ǫ ö óöæ Ĉ æö ăö ÞúÝÄăă ÄÞ ÞĚ æöÝ æö Ě ÞĚ Ý ÞúǪ ăöæÞÄ æö Ý Á ÞÄ Ǫ ÄÞ Ĉ ÄÞ óÁæăæ æóĚÄÞ Ǫ ö æö ÄÞ æö æăÁ öǪ ĔÄăÁæĈă æ ă ÄÞÄÞ óöÄæö ĔöÄăă Þ ĈăÁæöÄú ăÄæÞ öæÝ ăÁ óĈ ÄúÁ r ...

Отзывы: