


E-20
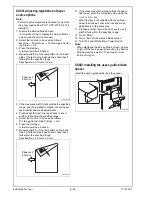
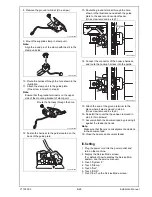
27. Check whether the difference in the width D
between the chart and the copy sample is within
the specified range.
Difference in the width D = D of the copy sample
– D of the chart
Specifications: 0 ± 2.0 mm
* If the difference in the width D does not fall within
the specified range, perform the following
adjustment.
28. Display the Service Mode screen.
(For details of how to display the Service Mode
screen, see the service manual.)
29. Touch “ADF.”
30. Touch “Main Scanning Direction Zoom.”
31. Check that “Main scanning direction zoom adj.”
is selected.
32. Specify a value using the -/+ key.
Adjustable range: -1.00 % to +1.00 %
(0.1% per step)
If the difference in the width D is greater than the
specifications, use the – (minus) key.
If the difference in the width D is smaller than the
specifications, use the + (plus) key.
33. Touch “END.”
34. Touch “Exit” on the Service Mode screen.
35. Turn OFF and ON the Main Power Switch.
Note:
When displayed the Service Mode screen, be sure
to turn off the main power after exiting the Service
Mode screen and wait for 10 seconds or more
before turning on.
36. Make copies again and check the difference in
the width D.
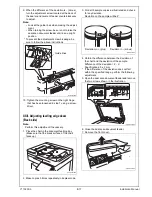
XXIV. Mixed original size adjustment
Note:
Perform this adjustment if necessary.
1. Display the Service Mode screen.
(For details of how to display the Service Mode
screen, see the service manual.)
2. Touch “ADF.”
3. Touch “Mixed original size adjustment.”
4. Place the chart in the document feeding tray
(lengthwise).
5. Press the Start key.
6. Check that “Adjustment Result” is “OK.”
7. Touch “END.”
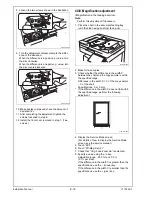
XXV. Adjusting the document stop posi-
tion
<Sub Scanning Direction 1-side/ Sub Scanning
Direction 2-side>
Note:
Perform this adjustment if necessary.
1. Place the chart in the document feeding tray (with
the side having an arrow facing up).
2. Make full size copies.
A1DMIXC015DA
A3CFIXC028DA
A3CFIXC013DA
Installation Manual
Y115290-3
Installation Manual
Y115290-3


