Rail Assembly
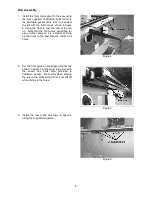
1. Install the front rail support to the saw using
the four supplied chamfered bolts found in
the hardware packet of the rails. It is easiest
to start with the first hole as shown in figure
4, using the floor to rest the end of the rail
on. Note that the rail comes pre-drilled for
use on other saws so it is a matter of lining
up the holes in the saw with the correct rail
holes.
2. Set the front guide on the support bracket as
shown in figure 5 and secure into place with
the seven hex bolts also provided in
hardware packet. Be careful when placing
the rail on the bracket that it does not fall off
when lining up the holes.
3. Install the rear guide as shown in figure 6
using the supplied hardware.
Figure 4
Figure 5
Figure 6
8


