


MAESTRO SMART
US-ENG- 9
US-ENGLISH
2.4.3 -
ASSEMBLY OF THE AIR DUCTS AND ExTERNAL GRILLES (
fig
.10-11-12)
• After having drilled the holes, insert the plastic sleeves (supplied with the unit) into them. Since the
sleeves are made for 8” (200 mm) holes, the installer will have to trim 5.1” (129 mm) from the long side
of the sleeve, if using 6.4” (160 mm) holes.
the length of the sleeves must be 2.5” (63.5 mm) less than the thickness of the wall. roll up the sleeves
and insert them into the hole. Pay attention to the splicing line (G) which must always face upwards.
to position the external grids, proceed as follows:
a
. Apply the seal (D) to the wall flange (F), ensuring it lines up with the outer edge of the flange as indicated
in the figure 13.
b
. Fix the two flanges using 2 pegs with a diameter of 1/4” (6 mm) and check that the two fixing holes are
horizontal.
c
. Fit the small eyelet of the spring, with the long stem, on the cap pin, on both components. (fig. 17)
d
. insert the two caps (with spring), on the front part of the external grille, on its two housings, pulling until
it clicks (fig. 18) then couple the two chains to the large eyelet of the spring.
e
. Using one hand, grip the two chains connected to the grille.
f
. Bend the external grille back, gripping them with your free hand where they bend and insert your fingers
inside the single louvres (fig. 19).
g
. insert your arm into the sleeve until the grille protrudes completely outwards. reopen the grille, being
careful to keep your fingers inside the louvres.
h
. turn the grille until the louvres are fully horizontal and tilted downwards.
i
. Pull the chain, tensioning the spring, couple the chain ring to the pin of the inner flange through which
the sleeves pass (fig. 20).
l
.
Use hand shears to cut off any excess chain links.
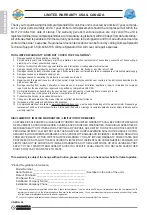
Olimpia Splendid recommends using the supplied grilles, or grilles with similar char-
acteristics that are factory approved to ensure proper unit performance.
2.4.4 -
PREPARING THE HOLES ON THE UNIT
the unit is designed to operate with 6.4” (165 mm) sleeves, however to ensure the best performance and
lowest air noise level, the factory recommendation is to use the 8” (200 mm) holes. if using the 8” (200 mm)
sleeves use a cutter to remove the knock out from the rear of the unit (fig. 21).
2.4.5 -
FITTING THE UNIT ON THE BRACKET (
fig
.22-23-24-25)
after ensuring the mounting bracket is properly anchored to the wall and that all required preparatory work
has been carried out for the electrical connections and/or the condensate drainage the unit can be fixed to
the wall. lift the unit by holding it from the sides of the lower base.
to facilitate the operation of fastening it to the bracket, tilt it slightly toward you. to make the electrical con-
nection and fasten the drain pipe, place a wedge between the unit and the wall.
When you have finished, inspect carefully to make sure there are no open spaces at the rear of the unit.
The insulating gasket must fit firmly against the wall, particularly in the area where air enters and leaves the
unit.
Содержание Maestro Smart
Страница 1: ...SMART ENG INSTRUCTIONS FOR INSTALLATION USE AND MAINTENANCE...
Страница 2: ......
Страница 6: ...3 A 4 5...
Страница 7: ...min 300mm min 12 8mm 8 6 7 9 H G G min 200mm min 8 10 11 G 6a...
Страница 8: ...12 F D F G 13 14 6mm 15 16 F...
Страница 9: ...19 17 20 18 E E E 21...
Страница 10: ...H L A L 24 22 23 25 26 27...
Страница 11: ...32 30 31 J1 P1 P1 P2 28 29 33 9...
Страница 12: ...34 10 9 35 3 F 36 37 F1 F2 F1 F2...
Страница 37: ......
Страница 38: ......
Страница 39: ......


