OKIDATA Microline ML395 Скачать руководство пользователя страница 17

Setting Top of Form

                                                                                                                                                
Setting Top of Form

The top of form is the place on the page where printing starts. When the printer advances to the next 
page, it stops at the top of form.

Your printer stores the top of form position independently for the three standard types of paper feeding: 
top, rear, and bottom.

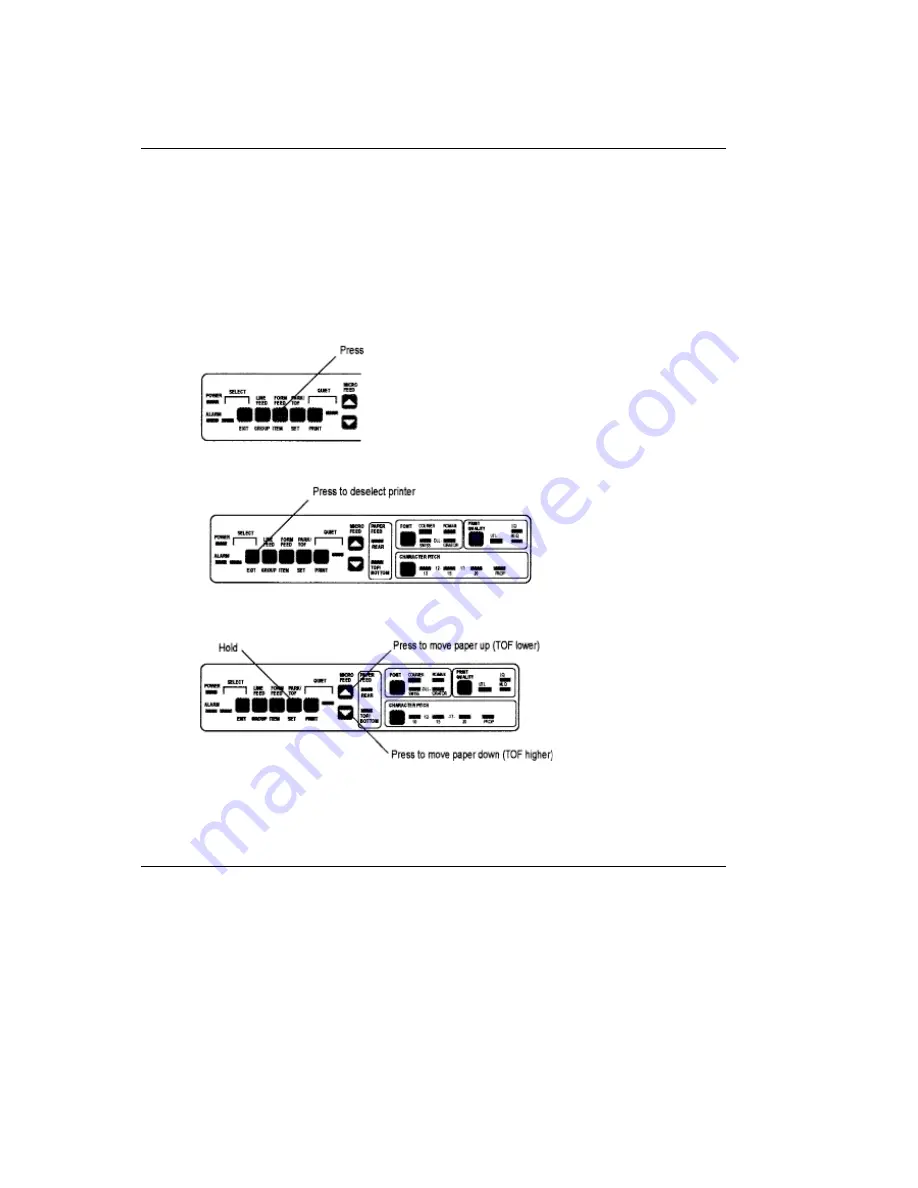
The method of setting top of form is the same for all types of paper:

1. Feed a page into printer by pressing FORM FEED button.

2. Make sure printer is deselected (SELECT light off). If it's not, press SELECT/EXIT button to deselect 
it.

3. Press and hold PARK button while you adjust page up or down using MICRO FEED buttons. Red line 
on plastic ribbon shield marks base of printing line:  use this as a guide.

4. When you release PARK button, position will be registered in printer's memory until you change it.


ML395 ( 96-02-07 )

Содержание Microline ML395

Страница 1: ...Chapter 0 Front Cover ML395 96 02 07...

Страница 2: ...of printer 2 Remove shipping restraint located under printhead Note It s a good idea to save the shipping restraint and the packing material in case you ever need to ship the printer Unpack your prin...

Страница 3: ...minor tasks that must be performed before you can begin Removing the Shipping Restraint 1 Open front cover of printer 2 Remove shipping restraint located under printhead Note It s a good idea to save...

Страница 4: ...ob Installing the Platen Knob You will notice that the shaft on the platen knob has a flat side that matches the flat side of the shaft in the printer Line up these two flat sides and push the knob in...

Страница 5: ...discard used cartridge 4 Unpack ribbon remove its shipping restraint and push idler roller latch in 5 Place ribbon cartridge in printer pins on either end of car tridge fit in notches in plates on ei...

Страница 6: ...The power cable and the interface cable have to be connected before you can use your printer Caution Before you begin make sure power switch is OFF ML395 96 02 07...

Страница 7: ...Power Connection Power Connection Plug the power cord into the printer but do not plug it into an electrical outlet until setup is complete ML395 96 02 07...

Страница 8: ...parallel cable and fasten the printer s clips to it Using the Serial Port To use the serial interface loosen the metal plate with a Phillips screwdriver and slide it to the right to cover the parallel...

Страница 9: ...aper To adjust the head gap open the access cover The blue head gap lever is located on the right side of the printer Use the recommended head gap from the table below to ensure the best print quality...

Страница 10: ...eed continuous forms if you install the op tional push tractor unit and or the optional pull tractor You can also expand top feed convenience by installing one of the optional cut sheet feeders on top...

Страница 11: ...s position 2 Open rear cover and locate tractors 3 Open both tractor covers and pull forward on right hand lock lever to unlock right tractor 4 Insert paper under rear cover and pull it through 5 Slid...

Страница 12: ...paper to tear 7 Close rear cover 8 Press FORM FEED button to advance paper 9 Set Top of Form TOF by holding PARK button while pressing appropriate MICRO FEED button Paper will advance up or down in di...

Страница 13: ...ack to single sheet position 2 Lift paper support to upright position 3 Align left paper guide with paper icon on support 4 Insert a piece of single sheet paper and adjust right paper guide to width o...

Страница 14: ...6 Set top of form by holding PARK button while pressing appropriate MICRO FEED button Paper will advance up or down in direction of arrow on button youre pressing ML395 96 02 07...

Страница 15: ...rinter 2 Press PARK button to retract continuous forms paper from paper path 3 Move paper lever to single sheet position if you re switching from rear feed 4 Lift paper support to upright position and...

Страница 16: ...single sheet paper in printer 2 Move paper lever to continuous forms position if you re switching to rear feedleave it set for single sheets if you re switching to bottom feed 3 Lower paper support 4...

Страница 17: ...thod of setting top of form is the same for all types of paper 1 Feed a page into printer by pressing FORM FEED button 2 Make sure printer is deselected SELECT light off If it s not press SELECT EXIT...

Страница 18: ...Resetting Top of Form Resetting Top of Form To reset the Top of Form to the factory default 1 Turn off printer 2 Hold down LINE FEED and QUIET buttons while turning printer back on ML395 96 02 07...

Страница 19: ...Paper Handling Paper Handling Your printer has the following handy paper handling features Form Tear Off Paper Park ML395 96 02 07...

Страница 20: ...will print the invoices without stopping If the last invoice does nt print add the Form Feed command at the end of the program Offline This setting causes the printer to go offline deselected after i...

Страница 21: ...ave continuous form paper loaded and you wish to switch to another paper path first tear off the printed pages then simply press the PARK button The continuous form paper will immediately retract from...

Страница 22: ...turns on without starting to print you didnt hold LINE FEED button long enough To stop the Font Test Press the SELECT button or turn off the printer Rolling ASCII Test The Rolling ASCII Test produces...

Страница 23: ...ter commands will normally be sent to the printer by your software and you won t need to think about them Printer commands are signals sent by your PC to the printer which guide and control its operat...

Страница 24: ...Emulations Emulations Your printer has three emulations Epson LQ factory default IBM Proprinter IBM AGM ML395 96 02 07...

Страница 25: ...ion enter the Menu Mode by deselecting the printer press SELECT button then pressing the QUIET button The following line will print Printer Control Emulation Mode Epson LQ Press the SET button until t...

Страница 26: ...d when you purchased your software Important Check your software documentation for instructions on how to install a printer driver Use this driver for color printing Note OKIDATA MICROLINE 395 395C dr...

Страница 27: ...r Selection Selecting a software printer driver is usually a part of the program installation process Changing printers may require use of an external routine or may be possible from within the progra...

Страница 28: ...Chapter 5 Control Panel Indicator Lights Control Panel Indicator Lights ML395 96 02 07...

Страница 29: ...Control Panel Buttons Menu Mode ML395 96 02 07...

Страница 30: ...Control Panel Buttons Print Mode Control Panel Buttons Print Mode ML395 96 02 07...

Страница 31: ...ont panel buttons can also be used in combination on power up to perform different functions Buttons Function held on power up SELECT FORM FEED Activates Hex Dump Mode SELECT PARK Resets Menu to defau...

Страница 32: ...n Swiss or Orator fonts You can also downline load fonts you generate using your computer To select a font press the FONT button repeatedly until the light next to the font you wish to select glows To...

Страница 33: ...ts or internal correspondence It is much faster than LQ or NLQ printing Usable at 10 12 15 17 and 20 cpi High Speed Draft HSD printing is designed for high volume printing of rough drafts or reports H...

Страница 34: ...d in characters per inch cpi To select the character pitch press the CHARACTER PITCH button repeatedly until the light next to the pitch you wish to use glows To select 12 cpi keep pressing until the...

Страница 35: ...Menu Mode allows you to change your printers default configuration These changes remain even when the printer is turned off until you or in some cases your software change them again Important Certai...

Страница 36: ...s deselected SELECT light off press SELECT to deselect printer then press the QUIET button or hold down the QUIET button while you turn on the printer The following line will print across the page Pri...

Страница 37: ...Exiting the Menu Mode Exiting the Menu Mode To exit the Menu Mode press the EXIT button ML395 96 02 07...

Страница 38: ...to Factory Defaults Resetting Menu to Factory Defaults To reset your printer Menu to the factory defaults turn the printer off then hold the SELECT and PARK buttons while turning the printer back on...

Страница 39: ...e up of groups Within each group column 1 are items column 2 each item has several settings column 3 To print out a list of the settings currently engaged enter the Menu Mode then press the PRINT butt...

Страница 40: ...enu settings first enter the Menu Mode When you do this the first Group Item Setting will print out To change the setting press the SET button To move to the next group press the GROUP button To chang...

Страница 41: ...mal Italics Size Single Double Triple Smoothing No Yes Group Item Setting General Control Graphics Bi directional uni directional Paper Out Override No Yes Print Registration 5 4 3 2 1 0 1 2 3 4 5 Ope...

Страница 42: ...Italian Spanish I Japanese Norwegian Danish II Spanish II Latin American French Canadian Dutch Publisher Zero Character Slashed Unslashed General Interface Max Receive Buffer 1 Line 8K 23K Print Supp...

Страница 43: ...select SSD SSD 9V select SSD DTR 9V select DTR RTS 9V select RTS Busy Time Serial Interface only Choose 200 mS factory default or 1 sec Sets the length of the busy signal when the Ready Busy protocol...

Страница 44: ...u can control these features only through your software This can be useful when several people are using the printer and you dont want its settings changed Note This feature also prevents access to th...

Страница 45: ...ctory default or Film Ribbon For Model 395C color ribbon the selections include Black Ribbon Film Ribbon Black Yellow Magenta factory default Cyan Violet Orange or Green If you have the black ribbon i...

Страница 46: ...our software documentation on how to select a printer driver then check to be sure that you have selected one of the drivers listed for that emulation on page 16 The closer the driver is to the top of...

Страница 47: ...orm paper This can make the paper cling to the rear cover If you have this problem during high volume printing jobs try moving the single sheet paper guides on the cover together so that the paper res...

Страница 48: ...ure to use only ribbons specifically for use with 393 series and 395 395C printers For best results use genuine OKIDATA ribbons Black ribbon Part No 52103601 Black film ribbon Part No 52103801 Color r...

Страница 49: ...ten knob Rear Feed Jams To clear a rear feed paper jam 1 Turn off printer 2 Back paper out of printer carefully using platen knob 3 Open access cover and rear cover and remove any torn pieces of paper...

Страница 50: ...old some single sheet continuous feed paper over three times to produce a page four sheets thick 5 Load this quadruple thick sheet onto tractor pins and close tractor covers 6 Turn platen knob to draw...

Страница 51: ...ML395 96 02 07...

Страница 52: ...e Sheet Feed Jams To remove jammed single sheets of paper top feed 1 Turn off printer 2 Use platen knob to back paper out of printer 3 If necessary open access cover and remove any torn pieces from ar...

Страница 53: ...urn off printer 2 Use platen knob to back paper out of printer 3 If you have bottom feed push tractor unit installed open the printer access cover and the tractor access door and remove any shreds of...

Страница 54: ...this 1 Turn off printer and remove paper from paper path 2 Open access cover and rear cover 3 Use clean dry cloth to dust area around carriage shaft and platen Be sure to remove any loose particles o...

Страница 55: ...s 10 cpi proportional superscript subscript double triple width height Swiss 18 point outline shadow Orator 10 12 cpi superscript subscript Utility Gothic 10 12 15 17 1 20 cpi HSD Gothic 15 cpi Bar Co...

Страница 56: ...ilm Ribbon 400 000 characters Dimensions 22 4 W x 16 4 D x 7 1 H 570 x 417 x 180 mm Weight 37 lbs 16 8 kg Environmental Requirements Operating Temperature 41 to 104 F 5 to 40 C Storage Temperature 14...

Страница 57: ...s table override Menu settings Except as noted these commands are cancelled and the printer returns to the factory and Menu settings when the printer receives an Initialization Software I Prime or Cha...

Страница 58: ...ain the same even if character pitch is changed Set relative tab stops ASCII ESC e n m Dec 27 101 n m Hex 1B 65 n m n 0 Horizontal tabs n 1 Vertical tabs m 0 to 127 Execute relative tab ASCII ESC f n...

Страница 59: ...to Justification ASCII ESC a n Dec 27 97 n Hex 1B 61 n Justifies text according to the value of n n 0 Left n 1 Center n 2 Right n 3 Full left right use carriage return only at end of paragraph Repeat...

Страница 60: ...g n 0 to 255 n 0 no line feed but initiates printing Form Feed ASCII FF Dec 12 Hex 0C Prints data in buffer and advances paper to next top of form Cancels SO and ESC SO command With Cut Sheet Feeder i...

Страница 61: ...e same even if line spacing is changed n 1 to 255 Cancel Skip Over Perforation ASCII ESC O Dec 27 79 Hex 1B 4F Deactivates Skip Over Perforation Command overrides menu Cut Sheet Feeder Option Cut Shee...

Страница 62: ...anish II n 4 Danish In 12 Latin American n 5 Swedishn 13 French Canadian n 6 Italian n 14 Dutch n 7 Spanish I n 15 Publisher Select Epson Character Set ASCII ESC t n Dec 27 116 n Hex 1B 74 n Selects E...

Страница 63: ...1B 10 42 m n data Prints bar code data m amount of data in bytes to follow n specifies Code 128 mode when Code 128 is selected n 65 Set A n 66 Set B n 67 Set C Select and Print Postnet Bar Code Data A...

Страница 64: ...ines all text except tabs n 1 Start underlining n 0 Stop underlining Start Superscript Subscri pt ASCII ESC S n Dec 27 83 n Hex 1B 53 n n 0 Start superscript n 1 Start subscript Stop Superscript Subsc...

Страница 65: ...For all graphics commands the number of dot columns of graphic data is as follows dots n1 n2 x 256 Graphics Select Print ASCII ESC m n1 n2 graphic data Dec 27 42 m n1 n2 graphic data Hex 1B 2A m n1 n...

Страница 66: ...ived calculated as n1 n2 x 256 Quasi Double Density Graphics ASCII ESC y n Dec 27 121 n Hex 1B 79 n n 0 Turn off quasi 8 bit graphics n 1 Turn on quasi 8 bit graphics Reassign Graphics ASCII ESC m n D...

Страница 67: ...menu defaults current position becomes top of page Custom character data is not touched This command is acknowledged only if Reset Inhibit in Menu is set to No factory default Cancel ASCII CAN Dec 24...

Страница 68: ...ror Enable Paper Out Sensor ASCII ESC 9 Dec 27 57 Hex 1B 39 OKI unique command Enables paperout sensor to detect when less than 1 2 of paper is left When ALARM light is on pressing SELECT prints 1 lin...

Страница 69: ...number of characters per line k 1 to 28 n1 0 clear tabs Default every 8 columns Horizontal Tab ASCII HT Dec 9 Hex 09 Moves to next horizontal tab stop Reset Tabs to Default ASCII ESC R Dec 27 82 Hex 1...

Страница 70: ...s is the line spacing used for graphics Activate Line Spacing ASCII ESC 2 Dec 27 50 Hex 1B 32 This command is required to activate the line spacing set by the ESC A n command see below Set n 60 Line S...

Страница 71: ...der Vertical Tab ASCII VT Dec 11 Hex 0B Prints buffer data and moves to next vertical tab stop Set Vertical Tab Stops ASCII ESC B n1 n2 nk NUL Dec 27 66 n1 n2 nk 0 Hex 1B 42 n1 n2 nk 00 Sets vertical...

Страница 72: ...n Hex 1B 21 n OKI unique command Selects character set containing special characters used in foreign language printing n 64 US ASCII slashed zero n 71 Norwegian n 65 US ASCII unslashed zero n 72 Dutc...

Страница 73: ...B 10 42 n m data OKI unique command n specifies amount of data to follow m selects Code 128 mode Code 128 must be selected for this command to be recognized m 65 Set A m 66 Set B m 67 Set C Select and...

Страница 74: ...n 14 12 cpi LQ RAM n 2 10 cpi letter quality LQ ROM n 16 17 cpi UTL ROM n 3 Proportional LQ ROM n 18 17 cpi LQ ROM n 4 10 cpi UTL RAM n 20 17 cpi UTL RAM n 6 10 cpi LQ RAM n 22 17 cpi LQ RAM n 7 Prop...

Страница 75: ...y to end of line can be canceled by DC4 CAN or ESC W 1 command Stop Immediate Double Width Printing ASCII DC4 Dec 20 Hex 14 Cancels double width set by SO command Start Triple Width Printing ASCII ESC...

Страница 76: ...s received calculated as l h x 256 Double Density Full Speed Graphics ASCII ESC Y l h graphic data Dec 27 89 l h graphic data Hex 1B 59 l h graphic data Same as low speed double density 120 dpi but pr...

Страница 77: ...y 8 pin 60 dpi same as ESC 0 m 1 Double density 8 pin 120 dpi same as ESC 1 m 2 Double speed double density 8 pin quasi 120 dpi same as ESC 2 m 3 Quadruple density 8 pin quasi 240 dpi same as ESC 3 m...

Страница 78: ...s active processes all data received Stop Printing ASCII ESC j Dec 27 106 Hex 1B 6A Deselects the printer Press SELECT to reactivate No data is lost Disable Paper Out Sensor ASCII ESC 8 Dec 27 56 Hex...

Страница 79: ...Appendix D IBM Serial Cable Configurations IBM Serial Cable Configurations IBM 25 Pin Serial Cable Configuration IBM 9 Pin Serial Cable Configuration ML395 96 02 07...

Отзывы: