Oki LUCIDIOM EQ-9800 Скачать руководство пользователя страница 6


8.


On the Additional Port 
Information Required
 menu, 
choose Custom, then click the 
Settings… button. 

9.


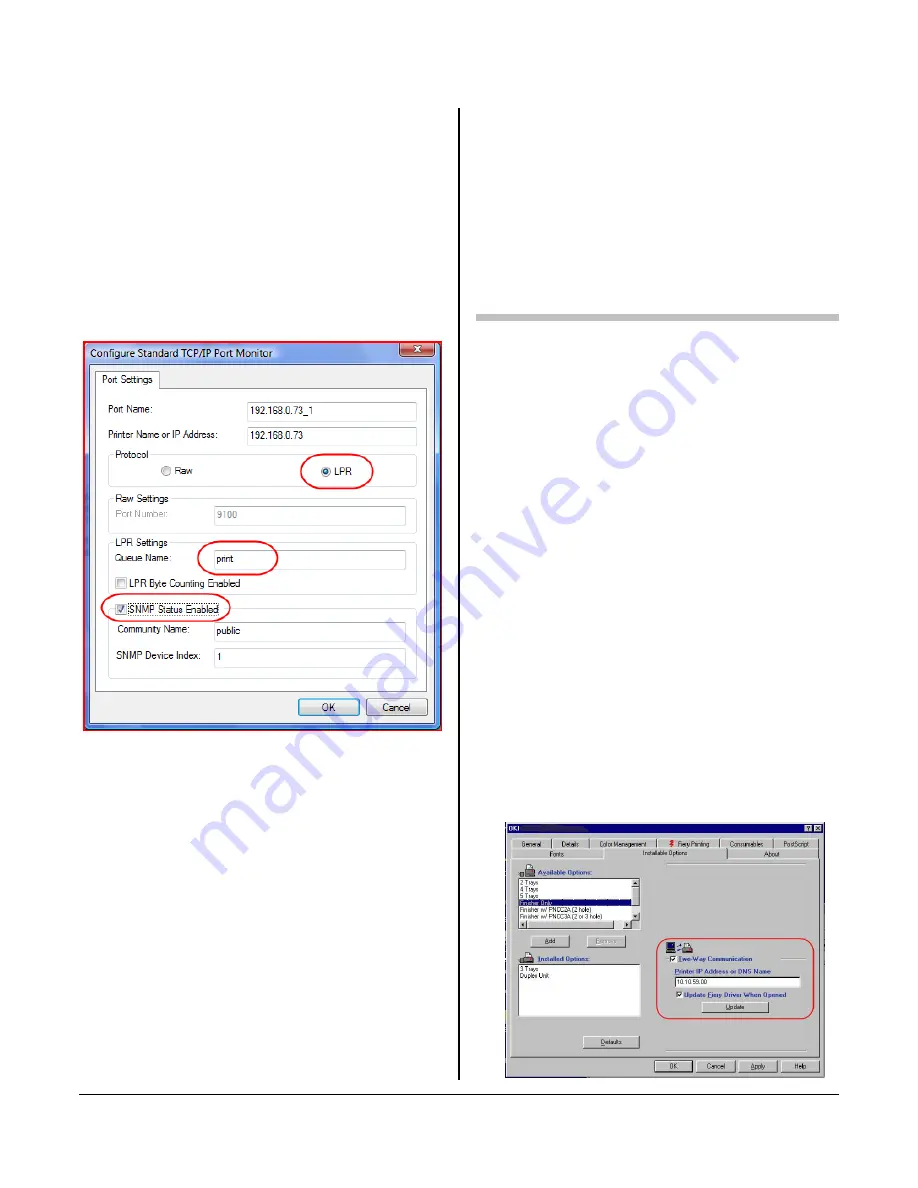
On the Port Settings page, 
change the Protocol to LPR.  
Enter Print as the Queue Name.  
Check SNMP Status Enable, then 

On the Install the printer driver 

click Ok.  Click Next, then Finish

10.


11.


ate to the 

12.


S

xt

15.


type EQ-9800 and click Next

ter 

17.


Next, then 


6


AY 

C

OMMUNICATION


page, click Have disk… 
Click browse, then navig
driver location on Drivers, Color 
and Network Utilities CD
.   

<cdrom>\drivers\win2k_xp\p

elect OP723PS.inf.  Click Ok. 

13.


Choose Oki C9800, then Next

14.


Select Keep existing driver 
(recommended), then click Ne
On the Name Your Printer page, 

16.


On the Printer Sharing page, 
choose Do not share this prin
and click Next
Print a test page to confirm your 
installation.  Clic
Finish

T

WO 

W

After you have completed the printer 
driver installation, you must configure 


A

UTOMATICALLY


bled network, 

cally update your 

S

tab. 

the printer for the installed options. 
You can configure the options manually
or, for TCP/IP network connections, 
you can use the Two-Way 
Communication feature to configure 
the options automatically. 

T

C

ONFIGURE 

O

PTIONS 

If you have a TCP/IP-ena
you can automati
printer driver to reflect the options 
currently installed on the printer. 

1.


Click S

TART


S

ETTINGS


P

RINTER

2.


Right-click the EQ-9800 icon. 

3.


Click Properties

4.


Click the Installable Options 


Содержание LUCIDIOM EQ-9800

Страница 1: ...LUCIDIOM EQ 9800 Installation Guide ...

Страница 2: ...rinter 3 Disable Auto Tray Switch 4 Media Type Setting 4 Disable Media Check 4 5 Add a printer 4 6 Two Way Communication 5 To Configure Options Automatically 5 7 Printing Preferences Defaults 6 8 Install Command Workstation 6 9 Color Setup 6 10 Install Eye One Device 7 11 Calibrate Printer 7 12 Checklist 9 Configuration Page 9 Driver Setup 10 Rev 3 6 ...

Страница 3: ...ady to receive printer PC is available and setup to install drivers and software Order of preference WinXP with Photo Finale Lab PFLAB WinXP with Print Station Any WinXP computer Only schedule setup when customer has WinXP PC should be able to contact printer s IP address Open ports between PC and printer SNMP port 161 HTTP port 80 LPR port 515 ES 1000 Eye One Spectrometer to calibrate printer Equ...

Страница 4: ...fig displays Select No Press ENTER 9 The default IP Address displays Use T to change each octet Press ENTER to proceed to the next octet or to leave the octet unchanged 10 Subnet Mask displays Repeat instructions in step 9 11 TCP IP bound to Ethernet displays Press ENTER 12 Gateway Address displays Repeat instructions in step 9 13 Press ENTER to exit TCP IP Setup Protocol Setup and Network Setup 1...

Страница 5: ...ontinue to press ENTER until you come to Med 6 T S key Off Press ENTER Continue to press Enter Changes T S Yes Pres ENTER T S key Exit Setup Press ENTER LINE 5 ADD A PRINTER 1 Open Printers by clicking the Start button clicking Control Panel clicking Printers and Faxes 2 Click Add a printer 3 When the Welcome to the Add Printer Wizard appears click Next 4 Select Local printer attached to this comp...

Страница 6: ...ng driver recommended then click Ne On the Name Your Printer page 16 On the Printer Sharing page choose Do not share this prin and click Next Print a test page to confirm your installation Clic Finish TWO W After you have completed the printer driver installation you must configure AUTOMATICALLY bled network cally update your S tab the printer for the installed options You can configure the option...

Страница 7: ... Media Check to Off Click on Paper Sourc close those items Click on Colorwise Select Exp Color then click Ex Settings button Click Update Click on the drop do RGB Source P Vivid Click on the drop down menu for Render Photographic Click on the drop down menu for Output Profile a 0 Click on Image Quality then choose Best Close Image Quality 1 Click on Finishing 12 Click on the drop down box for Two ...

Страница 8: ... it asks you to connect to Windows Update then click Next 3 Select Install the software automatically Recommended then click Next 4 Click Finish when Windows has completed installing the hardware 11 CALIBRATE PRINTER 1 Click START ALL PROGRAMS FIERY COMMAND WORKSTATION4 2 Choose Log in Log out from the Server menu CWS4 will start searching for Fiery servers Choose the device that matches the corre...

Страница 9: ... judge the correct speed from start to finish use a count of 4 11 Place the printed page on a stack of 5 sheets of blank paper to prevent bleed through 19 When the scan has been successful a check will appear and the red cross will move to the next color 12 Align the plastic guide strip up so that the center passes through the Click Measure 20 When all four colors have been scanned click the Accep...

Страница 10: ...tate Zip Printer Serial No CONFIGURATION PAGE Update Information Check for Photo_2 2 Network Setup Check the IP address and record Step 3 Printer Setup Last Calibration should be today on 12x6 Dot Screen Step 11 Check that Media Check Disabled Step 4 Color Setup RGB Source Profile Vivid RGB Step 9 Rendering Style Photographic Step 9 Output Profile Photo_r2 Step 9 Tray Configuration Auto Tray Switc...

Страница 11: ...abled Checked Step 5 General Tab Print Preferences Fiery Tab Paper Source Media Type Glossy Step 7 Auto Tray Switch Off Step 7 Media Check Off Step 7 Colorwise Expert Color is selected RGB Source Profile Vivid RGB Step 7 Rendering Style Photographic Step 7 Output Profile Photo_r2 Step 7 Image Quality Image Mode Best Step 7 Finishing 2 Sided Printing Long Edge Binding Step 7 10 ...

Страница 12: ......

Страница 13: ......

Страница 14: ......

Отзывы: