background image

B2500

4 - WLAN network

B2500 MFP User’s Guide

23

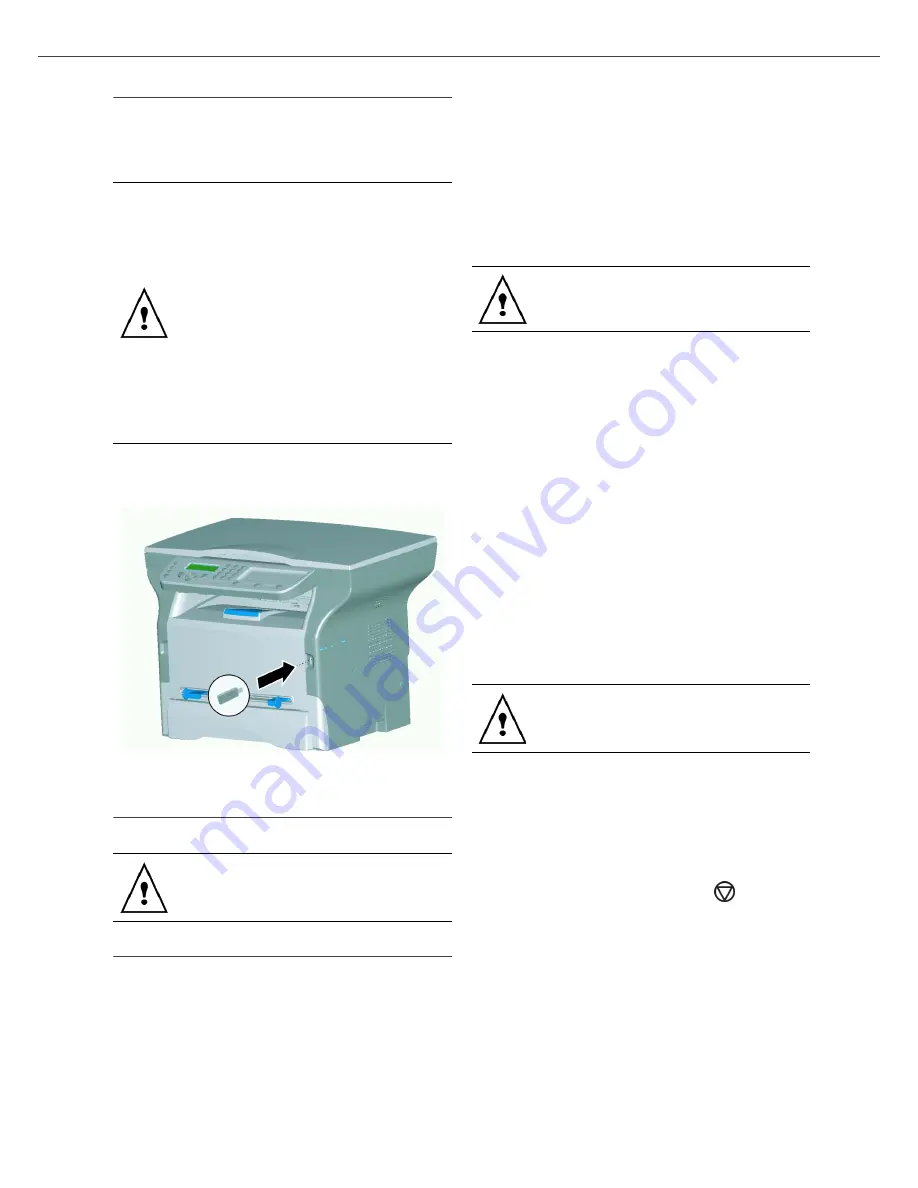
Connect your WLAN adaptor

Your machine belongs to a new generation of 

terminals that you can incorporate into a WLAN 

network using a WLAN USB key.

Plug your WLAN USB key into the USB port of your 

machine.

Configure your network

Creating or rejoining a network

Before attempting to use a WLAN adaptor on your 

machine, you must enter the parameters that will 

allow a WLAN network to recognize your machine.

On your machine you will find simple instructions 

that guide you step by step through the set-up of 

your network. 

 281 - SETUP/WLAN/ASS. CONFIG.

1

Type in 

, select the menu 

SETUP

 using the 

keys 

 or 

 and confirm with 

OK

.

2

Select 

WLAN

 using the keys 

 or 

 and 

confirm with 

OK

.

3

Select 

ASS. CONFIG.

 using the keys 

 or 


and confirm with 

OK

.

4

Select 

NEW NETWORK

 using the keys 

 or 


and confirm with 

OK

.

5

SSID

 appears on the screen, enter the name of 

your network using the numerical keypad, 

pressing the keys one after the other until you 
obtain the name you want (32 characters 

maximum) and confirm with 

OK

.

6

AD-HOC MODE

 or 

INFRA. MODE 

appear on 

the screen. Go back to the beginning of the 
chapter and make your choice.


Select one of these modes and confirm with 

OK

.

- If you choose AD-HOC mode, the sub-

menu 

CHANNEL

 appears, enter a figure 

between 1 and 13 and confirm with 

OK

.

7

WITHOUT SECURITY

 or 

WITH SECURITY


appear on the screen.


Select the option you want and confirm with 

OK

.

- If you choose 

WITH SECURITY

 the sub-

menu WEP KEY 1 appears, enter the key 

number (1 to 4 maximum) that you are 

using on your network.

8

IP CONF.: MANU

 or 

IP CONF.: AUTO

 appear 

on the screen.


If you choose to set up the system manually, 

go to the next paragraph and enter the 
parameters IP ADDRESS, SUBNET MASK and 

GATEWAY.

9

At the end of this procedure, you return to the 

main menu of

 ASS. CONFIG.

10

Exit this menu by pressing the 


key.

Your machine’s network radio adaptor 
transmits data using the radio protocol IEEE 
802.11g; it can also be incorporated into an 
existing IEEE 802.11b network.

When connecting to your machine, only use 
the approved adaptor. Other transmitting or 
receiving adaptors may damage your 
device. 

Regardless of whether you use your 
machine in an infrastructure or ad-hoc 
network, you must set up certain network 
and security parameters (for example, the 
Service-Set-ID (SSID) and the WEP key). 
These must match the network’s 
specifications.

We recommend that the settings of your 
WLAN network should only be changed by a 
person with a good knowledge of the 
configuration of your computer. 

If you choose an existing network, steps 5 
and 6 ( and possibly 7) are carried out 
automatically.

The WEP key number may be configured in 
the menu:

 29 - SETUP/TECHNICALS/WEP KEYS 

NBR

Содержание B2500 MFP

Страница 1: ......

Страница 2: ...ossible we make no warranty of any kind expressed or implied as to the accuracy or completeness of the information contained herein The most up to date drivers and manuals are available from the web s...

Страница 3: ...hine To reduce the risk of electrical shock you must not carry out these operations yourself Opening or removing the covers exposes you to two hazards The laser beam can cause irreversible eye damage...

Страница 4: ...n scan edit and save documents through the PC You have a connection with a WLAN adaptor optional equipment to communicate with a personal computer WLAN is an option working only with an original adapt...

Страница 5: ...d hoc network 22 Radio networks WLAN 22 Connect your WLAN adaptor 23 Configure your network 23 Creating or rejoining a network 23 Referring to or changing your network parameters 24 An example of how...

Страница 6: ...2500 B2500 MFP User s Guide 6 Specifications 39 Physical specifications 39 Electrical specifications 39 Environmental specifications 39 Peripheral specifications 39 Safety 40 Consumables 41 Service 42...

Страница 7: ...important precautions below when using the machine Running environment Temperature 50 F to 89 6 F 10 C to 32 C with a maximum fluctuation of 10 C per hour Humidity 15 to 80 of ambient humidity withou...

Страница 8: ...and contact your retailer Otherwise you would face a fire hazard or an electric shock hazard In case of heat smoke unusual smell or abnormal noise emissions turn the machine off unplug the power cord...

Страница 9: ...ront side 1 Commands panel 2 Scanner Cover 3 Paper output 4 Master USB connection USB key 5 Cartridge access cover 6 Paper tray 7 Manual paper feed setup guides 8 Manual Input Tray 9 Fold down stop fo...

Страница 10: ...B2500 1 Installation B2500 MFP User s Guide 10 Back side 1 Paper jam cover 2 Power supply cord connection 3 On Off switch 4 Slave USB connection for PC 1 2 3 4...

Страница 11: ...ing 6 Button validation 7 OK Button confirms the displayed selection 8 Button menu access and navigation down the menus 9 C Button back to the previous menu and input correction 10 Button navigation u...

Страница 12: ...0 MFP User s Guide 12 Packaging contents The packaging contains the items listed below Multifunction device 1 toner cartridge 1 installation guide 1 PC installation user guide CD ROM 1 power cord 1 bo...

Страница 13: ...s support it with both hands Pulling the cassette out quickly with one hand may lead to it being unable to be supported and being dropped Paper Handling 1 Paper curling must be corrected before printi...

Страница 14: ...lever A Then adjust the lateral paper guides to the paper format by pushing lever B located on the left guide Adjust the length paper guide to the paper format by pushing lever C 4 Take a paper stack...

Страница 15: ...e manual input tray 3 Adjust the paper guides against the right and left edges of the sheet or the envelope 4 Print making sure that the chosen paper format corresponds to the selected format on the p...

Страница 16: ...fter aligning in case it is bent or warped Toner Cartridge installation 1 Stand in front of the machine 2 Push the left and right sides of the cover and pull it at the same time towards you 3 Unpack t...

Страница 17: ...provided with the new toner cartridge as shown on the picture below 6 A wait message appears The smart card is read Remove the smart card from the reader your machine is ready to print again 7 The mac...

Страница 18: ...e desired zoom level from 25 TO 400 with the buttons or confirm with the OK button 9 Adjust the desired origin values with the digital keyboard buttons or then confirm with the OK button 10Choose the...

Страница 19: ...m your choice by pressing the OK button 3 Quit this menu by pressing the button Paper type setup 851 ADVANCED FCT SCAN PRINT PAPER TYPE 1 Select the paper NORMAL or THICK that you use with the buttons...

Страница 20: ...sing the button Read the counters You can view the activity counters for your machine at any time This function shows you the number of scanned pages 823 ADVANCED FCT COUNTERS SCANNED PAGE 1 Press on...

Страница 21: ...confirm with OK 5 Quit this menu by pressing the button Declare the number of authorized WEP keys You can create a network with WEP keys to allow several personal computers to use the machine as a net...

Страница 22: ...ed of communication across the whole radio network is as fast as the weakest connection in the network The speed of communication is also dependent on spatial distance between transmitter and receiver...

Страница 23: ...EL appears enter a figure between 1 and 13 and confirm with OK 7 WITHOUT SECURITY or WITH SECURITY appear on the screen Select the option you want and confirm with OK If you choose WITH SECURITY the s...

Страница 24: ...enu SETUP using the keys or and confirm with OK 2 Select WLAN using the keys or and confirm with OK 3 Select PARAMETERS using the keys or and confirm with OK 4 Select SSID using the keys or and confir...

Страница 25: ...255 255 0 0 multifunction machine s gateway 0 0 0 0 Setting up a multifunction machine 1 Plug the WLAN USB key into the USB connector of the multifunction machine 2 Type in select the menu SETUP usin...

Страница 26: ...k 3 Join the network house once this has been detected 4 Now set up the WLAN network connection of your PC To do this you must configure the element Protocol Internet TCP IP for the WLAN connection th...

Страница 27: ...firm with OK 4 Select FILE with the or buttons and confirm with OK 5 You have three possibilities to print your files ALL to print all the files located in the USB memory key Select ALL with the or bu...

Страница 28: ...us chapters Save a document on a USB memory key This function allows you to digitize and save a document directly in a USB memory key 1 Place the document to be copied face down on the glass 2 Insert...

Страница 29: ...es minimum for Windows 98 Me and 2000 192 Mbytes minimum for Windows XP Home and Pro Installation Install the software on your PC Turn your PC on Open an ADMINISTRATOR session unless working in 98SE a...

Страница 30: ...ress 13The Companion Suite Pro software is installed on your PC 14Click on the CONTINUE button to copy the utilities and PaperPort SE software that come along with the kit 15At the end of the installa...

Страница 31: ...driver is installed Test the driver installation To test the USB and printer driver installation print a test page 1 Click START SETTINGS PRINTERS FAXES 2 Right click OKI B2500 MFP 3 Click PROPERTIES...

Страница 32: ...wish to add You can test the connection between the PC and the hardware by clicking on the TEST button Click on the OK button 4 Select what you wish to add from the hardware list Click on the NEXT bu...

Страница 33: ...nage the multifunction machine run the MF Director application by clicking on the icon located on your desktop or from the menu START PROGRAMS COMPANION SUITE COMPANION SUITE PRO LL MF DIRECTOR Checki...

Страница 34: ...ure your multifunction machine from the tabs COMPANION Presents the multifunction machine screen CONSUMABLES Displays the consumables status SCAN TO Scan Mode and Resolution parameters setup these par...

Страница 35: ...rting the digitization 3 Once the document is digitized you can archive it or edit it Printing You can print your documents via the USB connection or the Wifi connection During the installation of the...

Страница 36: ...n the screen 1 Press OK 2 Stand in front of the device 3 Push on the left and right sides of the cover and pull it towards you 4 Raise and remove the toner cartridge from the machine 5 Unpack the new...

Страница 37: ...et of paper may get stuck in the printer or the paper tray and cause a paper jam In case of a paper jam in the machine the following message appears Open the paper jam cover located at the back of the...

Страница 38: ...emove the paper tray and remove the sheet of paper which caused the paper jam Check that the paper sheets in the paper tray are correctly placed Replace the paper tray in the machine 3 Make sure that...

Страница 39: ...thout condensation Type Laser on normal paper Resolution 600 dpi Speed 16 ppm maximum Preheating time 21 sec First page out time 13 sec Type Autonomous Black and White Copy speed 16 ppm maximum Resolu...

Страница 40: ...eries according to the manufacturer s instructions Used batteries must be disposed of following the manufac turer s instructions Depending on the model the unit s power plug may be the only way to dis...

Страница 41: ...can produce up to 4 000 pages when printing on Letter paper with a 5 max black and white ratio The initial toner cartridge can produce up to 1 500 pages when printing on Letter paper with a 5 max blac...

Страница 42: ...ery Dennison Corporation HammerMill is a registered trademark of HammerMill MasterCard is a registered trademark of MasterCard International Inc VISA is a registered trademark of Visa Windows is eithe...

Отзывы: