Adventurer Pro Balances Instruction Manual
Страница 1: ...Adventurer Pro Balances Instruction Manual...
Страница 2: ......
Страница 3: ...3 Turning Power On and Off EN 10 2 6 Initial Calibration EN 10 3 OPERATION EN 11 3 1 Overview of Controls Display Functions EN 11 3 1 1 Models AV53 AV212 AV412 AV812 AV1502 AV2101 AV4101 AV8101 EN 11...
Страница 4: ...6 Unit EN 31 3 7 7 Print 1 and Print 2 EN 31 3 7 8 RS232 1 and RS232 2 EN 32 3 7 9 GLP Data EN 33 3 7 10 GLP Print EN 34 3 7 11 Reset EN 34 3 7 12 Lockout EN 35 3 7 13 End EN 35 3 8 Legal for Trade LF...
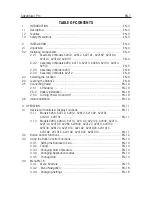
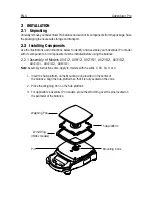
Страница 5: ...s The Adventurer Pro balances include many standard features These include Battery or AC Adapter operation AC Adapter included Weighing Parts Counting Percent Weighing Check Weighing Animal Weighing D...
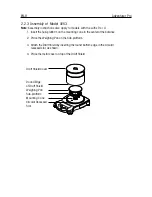
Страница 6: ...stalled before using the balance 2 2 1 Assembly of Models AV412 AV812 AV2101 AV2102 AV3102 AV4101 AV4102 AV8101 1 Insert the Sub platform on the Mounting Cone located in the center of the balance Alig...
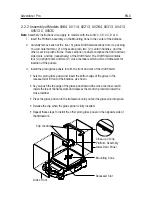
Страница 7: ...posts and two 2 cross members which act as a framework for insertion of the panels 3 Install the plain glass panels to form the front and rear of the Draft Shield Select a plain glass panel and insert...
Страница 8: ...d and position each door so that the handle is near the front of the balance and the small notch on the bottom edge of the door is lined up with the tab that protrudes from the side of the balance hou...
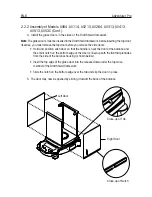
Страница 9: ...eld by holding the door vertically over the top of the Draft Shield framework as shown Position the back edge of the door so that it lines up with two small hinges located on the rear cross member Gen...
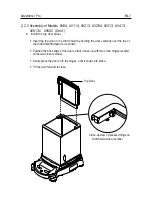
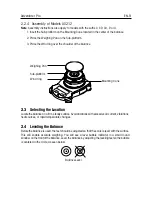
Страница 10: ...he mounting cone in the center of the balance 2 Place the Weighing Pan on the Sub platform 3 Attach the Draft Shield by inserting the round bottom edge in the circular recessed slot as shown 4 Place t...
Страница 11: ...the balance on a firm steady surface Avoid locations with excessive air current vibrations heat sources or rapid temperature changes 2 4 Leveling the Balance Before the balance is used the feet should...
Страница 12: ...cone cover and re install the pan and its components Press the On Zero button to turn power on The balance performs a segment check The balance then displays the last selected application mode To turn...
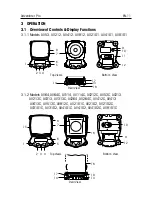
Страница 13: ...7 8 9 11 12 10 Top Views Bottom View Rear View 2 3 1 8 5 7 15 12 10 3 1 2 Models AV64 AV64C AV114 AV114C AV212C AV53C AV213 AV213C AV313 AV313C AV264 AV264C AV412C AV413 AV413C AV513C AV812C AV2101C...
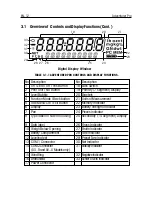
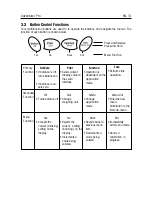
Страница 14: ...e Back button 21 Units of Measurement 5 Tare Menu Cal Exit Button 22 Memory Indicator 6 Display 23 Battery Strength Indicator 7 Pan 24 Pieces Indicator 8 Type label on side of housing 25 Secondary 14...
Страница 15: ...button is shown below Press and Release Menu Function On Zero If balance is off turns balance on If balance is on sets zero Off Turns balance off Yes Accepts the current blinking setting on the displa...
Страница 16: ...d and Net weight is displayed The Tare value is automatically cleared when the container is removed from the pan Preset Tare Use the xT command in the command table to enter a preset tare value throug...
Страница 17: ...d RS2 GLP DATA 3 7 9 User ID Proj ID Time Date End GLP Data GLP PRINT 3 7 10 Time Balance ID User ID Project ID Difference Name End GLP Prt PRINT 2 Optional Output When Stable GLP Tare Auto Print Cont...
Страница 18: ...on until MENU appears on the primary 7 Segment display Release the button and the first sub menu appears on the secondary 14 Segment display blinking Note When the secondary display is blinking press...
Страница 19: ...sure these units must be turned on in the Unit menu See Section 3 7 5 3 5 2 Parts Counting Use the Parts Counting Mode to count samples of uniform weight Press and hold Mode until Count is displayed t...
Страница 20: ...the secondary display Pressing the Function button momentarily displays the APW on the secondary display The example shows an APW of 2 000g Clearing the APW Press and hold the Mode button until COUNT...
Страница 21: ...dary display 3 5 4 Check Weighing Check Weighing is used to compare the weight of a sample against target limits Press and hold the Mode button When Check Weighing is displayed release the button If C...
Страница 22: ...eck Weighing begins Place the sample on the pan The UNDER ACCEPT OVER status is shown on the primary display while the actual weight of the item is shown on the secondary display 3 5 5 Animal Weighing...
Страница 23: ...The Animal Weigh level and mode settings are made in the Mode menu 3 5 6 Display Hold The Display Hold Mode allows the user t o capture and store the highest stable weight in a series of weight measu...
Страница 24: ...he item on the weighing pan The weight of the item is shown on the primary display Press the Function button to add the weight of the item to the total The new total is shown on the secondary display...
Страница 25: ...klight is normally off to conserve power The backlight turns on when the display becomes unstable or when a button is pressed The backlight turns off 5 seconds after the display becomes stable or afte...
Страница 26: ...y calibration minimizes deviation between actual and displayed weights within the balance s weighing range Three weight values are used zero a weight value at midpoint of the balance s weighing range...
Страница 27: ...alternate calibration weight Press Yes when the desired calibration weight is displayed Place the specified calibration weight on the platform After calibration remove the weight from the platform To...
Страница 28: ...follow the screen instructions Use the weight values shown on the primary display First the zero reading is taken Next the display shows the first calibration weight value PUT WEIGHT blinking is disp...
Страница 29: ...TE is displayed Press Yes to enter calibration Press No until CAL TEST is displayed Press Yes and follow the screen instructions Place the specified weight on the platform After a short period the dis...
Страница 30: ...on calibration adjustment is recommended Following a calibration adjustment repeat the internal calibration and verification procedures To perform a calibration adjustment press the Menu Cal button an...
Страница 31: ...E2 AV313 150g 300g 150g 200g 250g 300g 1 E2 AV412 200g 400g 100g 200g 300g 400g 2 F1 AV413 200g 400g 200g 300g 400g 1 E2 AV513 200g 500g 200g 300g 400g 500g 500g 500g 500g 500g 1 E2 AV812 400g 800g 20...
Страница 32: ...Filter Allows setting the balance filter level Low Medium High Compensates for vibration or excessive air currents READOUT Auto Zero Off 5d 1d 2d 5d Filter Low Medium High Gross Ind G B Off End Read...
Страница 33: ...factor and an exponent The factor is a value between 0 1000000 and 1 999999 inclusive The exponent moves the decimal point of the factor to the right for positive values or to the left for negative v...
Страница 34: ...be printed Load Zero When set to Off the Auto print feature is disabled Content All of these features can be set On or Off Numeric data only Header Gross Net Tare Reference Result GLP See sample prin...
Страница 35: ...menu item 3 7 9 GLP Data Entering a User ID or Project ID Enter the user or Project ID one character at a time The character to be entered is highlighted by a blinking cursor underscore Press the No b...
Страница 36: ...ress the No button to return to Time Unit Select Yes to return all Unit menu items to their factory settings Print 1 Select Yes to return all Print 1 menu items to their factory settings Print 2 If CO...
Страница 37: ...GLP Print Menu Reset Set On to lock the Reset Menu Lock Set Set On to lock all submenu lock settings When set Off the lock settings for all menus are accessible To turn Lock Set off refer to section E...
Страница 38: ...e Balance 6 Wire Seal Paper Seal Rear of the Balance 3 10 Printing Data Printing data to an external computer or printer requires that the communication parameters in the RS232 1 and or RS232 2 submen...
Страница 39: ...drafts reference weight Error 8 1 Weight reading exceeds Clear platform Power On Zero limit Error 8 2 Weight reading below Put platform on Power On Zero limit balance Error 8 3 Weight reading exceeds...
Страница 40: ...l completion 4 3 Troubleshooting Cont 4 4 Service Information If the Troubleshooting section does not resolve or describe your problem contact your authorized Ohaus Service Agent For Service assistanc...
Страница 41: ...10 x 7 6 in 25 4 x 19 3 cm housing 12103980 In Use Cover Kit 11 8 x 8 7 in 30 x 22 cm housing 12103879 Top Door Kit 12103873 Glass Door Kit 8 7 in 22 cm draftshield 12103645 Glass Door Kit 5 in 12 5 c...
Страница 42: ...bility is assured at ambient temperatures between 5 and 40 C Power AC adapter To national standard as per list in Section 4 6 Balance power input 6 14 5 VAC 50 60Hz 4VA or 7 20VDC 4W Batteries 4 x AA...
Страница 43: ...EN 41 Adventurer Pro 5 1 Drawings A B A B C C A B C Note See table on next page for model designations and dimensions Figure 5 1 Figure 5 2 Figure 5 3 Figure 5 4 C B A...
Страница 44: ...5 1 AV53C AV213 AV213C AV313 AV313C AV413 AV413C AV513C 19 cm 7 5 in 22 cm 8 7 in 30 cm 11 8 in 5 2 AV53 14 5 cm 5 7 in 19 3 cm 7 6 in 25 4 cm 10 in 5 3 AV212 AV412 AV812 AV2101 AV4101 AV8101 7 2 cm...
Страница 45: ...t Mesghal Tola Custom Application Modes Weighing Parts Counting Percent Weighing Check Weighing Animal Weighing Display Hold Totalize Tare Range To Capacity by Subtraction Stabilization Time s 2 5 3 D...
Страница 46: ...ts Counting Percent Weighing Check Weighing Animal Weighing Display Hold Totalize Tare Range To Capacity by Subtraction Stabilization Time s 2 3 Power Requirements AC Adapter included Calibration Digi...
Страница 47: ...des Weighing Parts Counting Percent Weighing Check Weighing Animal Weighing Display Hold Totalize Tare Range To Capacity by Subtraction Stabilization Time s 3 2 Power Requirements AC Adapter included...
Страница 48: ...56 0000 x 0 0005 Newton 0 50014 x 0 00001 0 637432 x 0 000001 1 078732 x 0 000001 2 549729 x 0 000001 2 05940 x 0 00001 ounce 1 79895 x 0 00005 2 292805 x 0 000005 3 880135 x 0 000005 9 171230 x 0 000...
Страница 49: ...x 0 00001 4 02073 x 0 00001 5 00139 x 0 00001 2 0594 x 0 0001 4 0207 x 0 0001 7 9434 x 0 0001 ounce 10 93495 x 0 00005 14 46230 x 0 0001 17 98970 x 0 0001 7 4075 x 0 0005 14 4625 x 0 0005 28 5720 x 0...
Страница 50: ...5940 x 0 0001 30 4006 x 0 0001 40 2073 x 0 0001 20 594 x 0 001 40 20 x 0 001 79 434 x 0 001 ounce 74 0755 x 0 0005 109 3495 x 0 0005 144 6230 x 0 0005 74 075 x 0 005 144 625 x 0 005 285 720 x 0 005 ou...
Страница 51: ...Zero Key T Same as pressing Tare Key xT Establish a preset Tare value in grams X preset tare value in grams PT Prints Tare weight stored in memory PM Print current mode weighing mode M Scroll to the...
Страница 52: ...TS 9 Remote Print COM 2 MINI DIN Connector TARE PRINT External PRINT and or TARE switches may be installed as shown in the diagram Momentary contact switches must be used To enable this feature contac...
Страница 53: ...ized representative within the EC or by the national weights and measures W M authorities The first stage of the initial verification has been carried out at the manufacturer s work It comprises all t...
Страница 54: ...g that the Ohaus quality management system is compliant with the ISO 9001 standard s requirements On May 21 2009 Ohaus Corporation USA was re registered to the ISO 9001 2008 standard LIMITED WARRANTY...
Страница 55: ......
Страница 56: ...oration 7 Campus Drive Suite 310 Parsippany NJ 07054 USA Tel 973 377 9000 Fax 973 944 7177 80251161 With offices worldwide www ohaus com 2015 Ohaus Corporation all rights reserved P N 80251161E Printe...