Officine Gullo
10
DECLARATION OF COMPLIANCE
This appliance is manufactured by OFFICINE GULLO S.r.l
Headquarters and factory
Via Della Torricella 29, Antella, Bagno a Ripoli
50012 Florence - Italy
Tel. +39 055 65 60 3324
+39 055 62 18 07
officinegullo.com | [email protected]
The manufacturer declines any responsibility for direct or indirect damage caused by improper or incorrect
installation, alterations, maintenance or use of the appliance, as in all the other cases considered in the items of our
sales conditions.
WATER SUPPLY CHARACTERISTICS
The system must be connected to a drinking water supply with the following characteristics. Failure to do so
automatically
invalidates the guarantee.
•
Total hardness: 0,5 to 5°F to prevent the build-up of lime-scale
•
Pressure: 50 to 250 kPa (0,5-2,5 bar).
•
Chlorine ion concentration (Cl-): not more than 10 ppm (acceptable value) to avoid damaging the internal
steel elements
•
pH: over 7
•
Electrical conductivity: 50 to 2000 μS/cm (20°C)
INSTRUCTIONS FOR INSTALLATION
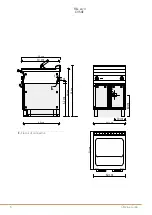
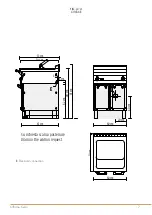
The data plate is on the side (see diagram in electric connection item) and has all the data necessary for the
connection.
LAWS, TECHNICAL RULES AND NORMS
Installation must be carried out observing the following norms:
- Safety prescription in force
- Installation prescription in force
11
Officine Gullo
INSTALLATION
When fitting, the appliance must be levelled using a spirit level; slight differences of level can be adjusted by screwing
or unscrewing the adjustable feet. The main switch or the socket must be near the appliance and easily accessible. It is
advisable to place the appliance under an extractor hood so that steam is extracted rapidly. If the appliance is placed
near walls, dividing panels, kitchen furniture, decorative finishing, etc. , these should be in flameproof material; otherwise
it is necessary to cover them with non-flammable material.
Above all, it is necessary to ensure that the fire prevention norms are observed.
The installation, starting up and maintenance of the appliance must be carried out by qualified personnel. All operations
done when installing must be carried out observing the norms in force.
The manufacturer declines all responsibility in the event of incorrect functioning due to wrong installation or installation
which does not comply with the norms.
Attention!
In accordance with international rules, when connecting the appliance, an automatic device enabling the
disconnection of all contacts from the mains, must be installed above it, this device must have a contacts opening of at
least 3 mm.
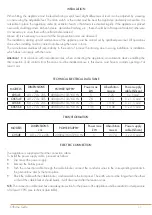
TECHNICAL ELECTRICAL DATA TABLE
MODELS
DIMENSIONS
cm
POWER SUPPLY
Power max
kW
Absorbition
max A
Power supply
cable (Silicon)
CVS4E
40 x 70 x 29h
400Vac3N 50/60 Hz
5
7,25
5 x 1 mm²
CVCS4E
40 x 70 x 90h
400Vac3N 50/60 Hz
7,8
11,3
5 x 1,5 mm²
CVS6E
60 x 70 x 29h
400Vac3N 50/60 Hz
7,5
10,87
5 x 1,5 mm²
CVCS6E
60 x 70 x 90h
400Vac3N 50/60 Hz
13,5
19,48
5 x 2,5 mm²
TRANSFORMATION
MODELS
DIMENSIONS
cm
POWER SUPPLY
Power max
kW
Absorbition
max A
Power supply
cable (Silicon)
CVS4E
40 x 70 x 29h
230Vac3N 50/60 Hz
5
21,74
3 x 2,5 mm²
ELECTRIC CONNECTION
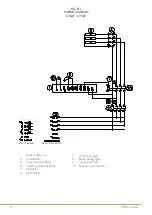
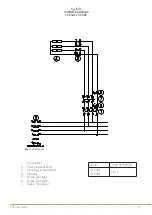
The appliance is supplied without the connection cable.
To install the power supply cable, proceed as follows:
•
Disconnect the power supply.
•
Remove the bottom panel.
•
Push the connection cable through the cable blocker, connect the conductor wires to the corresponding terminals in
the junction box and fix them into place.
•
Block the cable with the cable blocker, and reassemble the front panel. The earth wire must be longer than the others
so that if the cable blocker should break, it will disconnect after the tension wires.
N.B.
The connection cable must have an adequate section for the power of the appliance and be resistant to a temperature
of at least 150°C (see technical data table).


