background image

NORMAL COPYING

4-13

4

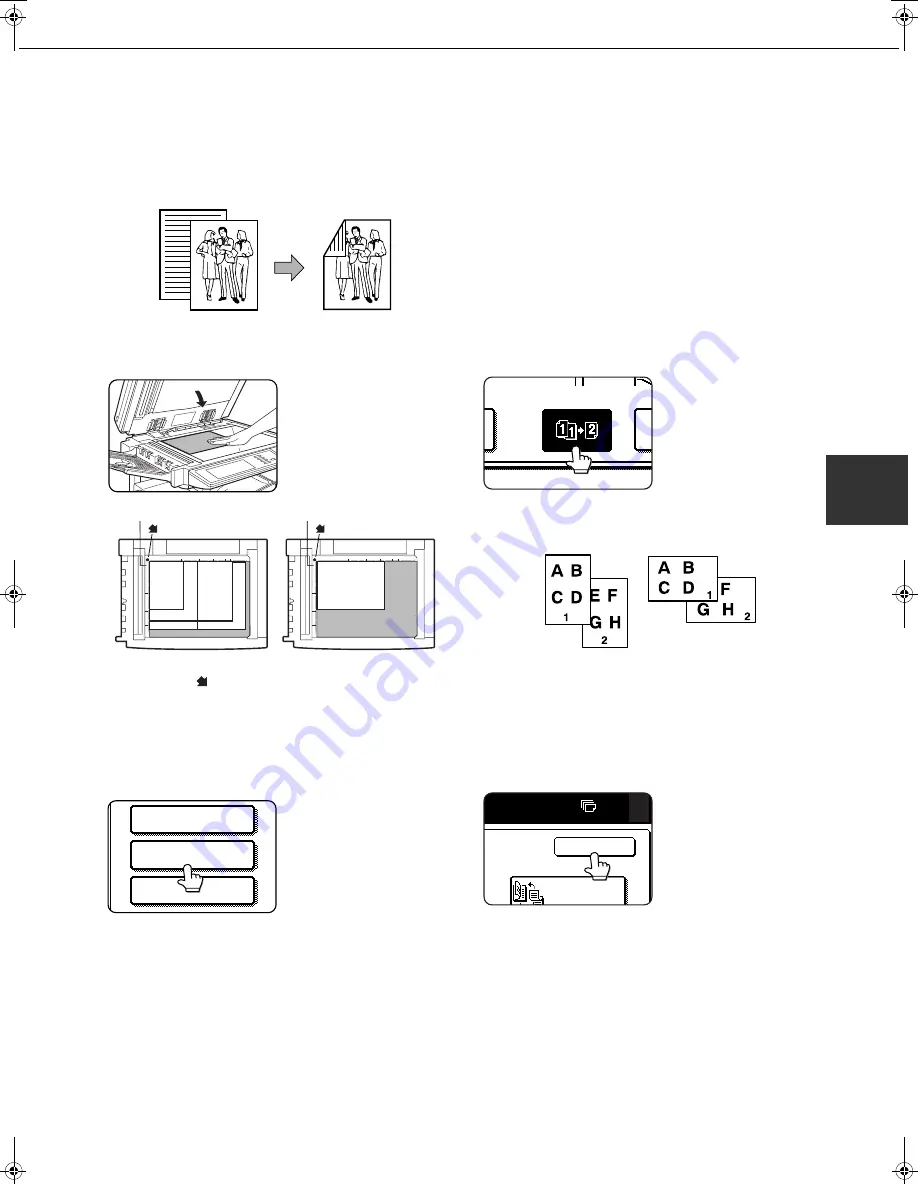
Automatic two-sided copying from the document glass

When the optional duplex module is installed, the following automatic two-sided copying can be performed. The
paper is automatically turned over during copying, allowing two-sided copies to be made with ease.

1

Place the original on the document glass.
(pages 4-3 to 4-6)

Align the corner of the original with the tip of the
arrow mark 

 on the document glass scale.

Place the original in the appropriate position for its
size as shown above.

2

Touch the [2-SIDED COPY] key.

3

Touch the [1-sided to 2-sided copy] key.

When making automatic two-sided copies of a
one-sided 11" x 17" (A3) or 8-1/2" x 14" (B4) size
portrait original, or when you wish to invert the top
and bottom of the back side of a two-sided original,
touch the [BI

N

DI

N

G CHA

N

GE] key.

4

Touch the [OK] key.

Perform steps 3 to 7 on pages 4-11 and 4-12.

Original

Copy

Original scale

mark

Original scale

mark

5½ x 8½

or A5

8½x11 or A4

11x17 or A3

8½x14
or B4

8½x11R or A4R

SPECIAL MODES

2-SIDED COPY

OUTPUT

Example of a 
portrait-oriented 
original

Example of a 
landscape-oriented 
original

OK

0

BINDING

Copy_SEC.book  13 ページ  2007年9月12日 水曜日 午後1時33分

Содержание im3512

Страница 1: ......

Страница 2: ...PXP SURGXFW SHUIRUPDQFH DQG TXDOLW 6XEVWLWXWLQJ RWKHU VXSSOLHV PD UHVXOW LQ LQIHULRU LPDJH TXDOLW DQG PDFKLQH PDOIXQFWLRQ 7R RUGHU VXSSOLHV FDOO WKH 2Fp 6XSSO LQH 86 1 8 6KRXOG RXU V VWHP GHYHORS D SUREOHP WKDW FDQQRW EH UHPHGLHG E XVLQJ WKH PDLQWHQDQFH RU WURXEOHVKRRWLQJ SURFHGXUHV RXWOLQHG LQ WKLV PDQXDO SOHDVH FRQWDFW 2Fp 7HFKQLFDO 6XSSRUW E FDOOLQJ 86 1 8 RU IDVWHU VHUYLFH SOHDVH KDYH RXU PDFK...

Страница 3: ...is device may not cause harmful interference and 2 this device must accept any interference received including interference that may cause undesired operation WARNING For users in the USA Note This equipment has been tested and found to comply with the limits for a Class A digital device pursuant to Part 15 of the FCC Rules These limits are designed to provide reasonable protection against harmful...

Страница 4: ...atent and Trademark Office and may be registered in certain jurisdictions Clarendon Eurostile Helvetica Optima Palatino Stempel Garamond Times and Univers are trademarks of Heidelberger Druckmaschinen AG which may be registered in certain jurisdictions exclusively licensed through Linotype Library GmbH a wholly owned subsidiary of Heidelberger Druckmaschinen AG Apple Chancery Chicago Geneva Monaco...

Страница 5: ...Part 1 General Information ...

Страница 6: ......

Страница 7: ...uct has undergone strict quality control and inspection procedures In the unlikely event that a defect or other problem is discovered please contact your dealer or nearest Océ Service Department Aside from instances provided for by law Océ is not responsible for failures occurring during use of the product or its options or failures due to incorrect operation of the product and its options or othe...

Страница 8: ...lace This guide explains administrator settings for machine management copying and document filing Administrator settings for the fax printer network scanner and Internet fax functions are explained in the manuals for those functions Software setup guide This manual mainly explains how to install and configure the software that allows the machine to be used as a printer Operation manual for printe...

Страница 9: ...n areas that are damp humid or very dusty exposed to direct sunlight poorly ventilated subject to extreme temperature or humidity changes e g near an air conditioner or heater 4 Be sure to allow the required space around the machine for servicing and proper ventilation A small amount of ozone is produced within the machine during operation The emission level is insufficient to cause any health haz...

Страница 10: ...Passports Driver s licenses The part indicated in the illustration is only to be handled by a service technician Absolutely do not touch this part Some models include the document filing function which stores document image data on the machine s hard disk Stored documents can be called up and printed or transmitted as needed If a hard disk failure occurs it will no longer be possible to call up th...

Страница 11: ... safety interlock switches Do not bypass any safety interlock by inserting wedges or other items into switch slots This product utilizes a CR coin Lithium battery which contains a Perchlorate material Special handling for this material may apply California residents See www dtsc ca gov hazardouswaste perchlorate Others consult local environmental officers CAUTION VORSICHT ADVARSEL ADVERSEL VARNING...

Страница 12: ...e transport area fusing area and exit area 2 18 Misfeed in the duplex module 2 19 Misfeed in the paper feed area 2 20 REMOVING AN ORIGINAL MISFEED 2 22 Removing a misfed original from the automatic document feeder 2 22 TROUBLESHOOTING 2 23 CHAPTER 3 PERIPHERAL DEVICES DUPLEX MODULE 3 2 Part names 3 2 Specifications 3 2 Loading paper in the bypass tray 3 3 Troubleshooting concerning the duplex modu...

Страница 13: ...INTENANCE 6 2 Cleaning the document glass and the automatic document feeder 6 2 TROUBLESHOOTING 6 3 CHAPTER 7 DOCUMENT FILING FUNCTION OVERVIEW 7 2 Document filing function 7 2 TO USE THE DOCUMENT FILING FUNCTION 7 4 A look at the operation panel 7 4 Saving files 7 4 Main screen of document filing 7 5 Document filing icons 7 5 SAVING A DOCUMENT IMAGE FILE 7 6 Quick File 7 6 Filing 7 7 Print jobs 7...

Страница 14: ......

Страница 15: ...ng the product Page INTRODUCTION 1 2 MAIN FEATURES 1 3 PART NAMES AND FUNCTIONS 1 9 Exterior 1 9 Interior 1 10 Part names and functions of peripheral devices 1 11 Operation panel 1 13 Touch panel 1 14 TURNING THE POWER ON AND OFF 1 17 AUDITING MODE 1 18 Using the machine when the auditing mode is enabled 1 18 ...

Страница 16: ...ws use of standard sizes in both the inch and AB systems These are shown in the tables below The meaning of R in original and paper size indications Some original and paper sizes can be placed in either the portrait or landscape orientations To differentiate between landscape and portrait the landscape orientation size indication will contain an R These are indicated as 8 1 2 x 11 R 5 1 2 x 8 1 2 ...

Страница 17: ... 6 Stamp See page 1 6 Page numbering See page 1 7 Text See page 1 7 Interrupting a copy run See page 1 7 Offset mode See page 1 7 When the Finisher or Saddle stitch finisher is installed Staple sort mode See page 1 7 When the Finisher or Saddle stitch finisher is installed Saddle stitch See page 1 7 When the Saddle stitch finisher is installed Hole punching See page 1 8 When the Saddle stitch fini...

Страница 18: ...pages of a book can be successively copied onto separate sheets Pamphlet Copy See page 5 6 One sided or two sided pamphlet style copies can be made Original Enlargement Reduction Copy Original Copy Image shifted to the right Image shifted to the left Margin Margin One sided copying Original Two sided copying Original Image shifted to the right Margin Image shifted to the left Margin Or Original Co...

Страница 19: ...nserted between transparencies Multi Shot See page 5 24 Multiple original pages can be copied onto a single sheet of paper in a uniform layout Book Copy See page 5 26 Books and other bound originals can be copied pamphlet style 50 sheets 100 sheets 50 sheets 100 sets of copies 50 sets of copies 50 sets of copies When the network function has been added Front cover Back cover Originals Insert sheet...

Страница 20: ...ogram saves you the trouble of selecting those settings each time you wish to use them Mirror Image See page 5 29 A mirror image copy can be made B W Reverse See page 5 29 White and black can be inverted on a copy to produce a negative image Date See page 5 33 The date can be added to copies Stamp See page 5 34 Reverse text can be added to copies stamp Original Example Portrait 8 1 2 x 11 A4 size ...

Страница 21: ... 8 3 16 Sets of copies can be automatically stapled Saddle stitch See page 3 14 When a saddle stitch finisher is installed copies can be automatically folded in half and stapled at the fold Use with the pamphlet function see page 5 6 or book copy function see page 5 26 Meeting AUTO AUTO AUTO A4 ORIGINA EXPOSUR INTERRUPT ORIGINAL 8 x11 1 2 Offset mode Non Offset mode When the Finisher or Saddle sti...

Страница 22: ...he second level of power reduction In this mode power is shut off to the fusing unit and the touch panel In this state more energy is saved than in the preheat mode but the time to recover to the ready condition will be longer The preset time to enter this mode can be set by a administrator setting When this product is used as a printer and either of the above modes is active the mode will be deac...

Страница 23: ...power on and off 10 Paper tray 1 11 Stand 3 x 500 sheet paper drawer 12 Stand MPD 2000 sheet paper drawer See page 2 11 13 Multi purpose drawer See page 2 8 The upper tray of the stand 3 x 500 sheet paper drawer and stand MPD 2000 sheet paper drawer Up to 500 sheets of plain paper from a maximum size of 11 x 17 A3 to a minimum size of 5 1 2 x 8 1 2 A5R can be loaded Certain types of special paper ...

Страница 24: ...has occurred in the main unit 17 Toner cartridge drum toner cartridge The toner cartridge must be replaced when indicated on the operation panel See page 2 15 18 Photoconductive drum Images are formed on the photoconductive drum 19 Cartridge lock lever When replacing the drum toner or developer cartridge turn down this lever and pull it out 14 15 16 17 18 19 CAUTION The fusing unit is hot Take car...

Страница 25: ...prints will be sent to the top tray and not into the mail bins 4 Stand MPD 2000 sheet paper drawer 9292 This paper feed unit contains an upper multi purpose drawer see item 13 on page 1 9 and a lower drawer which can hold a maximum of 2000 sheets of 20 lbs 80 g m2 paper 5 Stand 3 x 500 sheet paper drawer 9291 This paper feed unit contains an upper multi purpose drawer see item 13 on page 1 9 and t...

Страница 26: ...provides compatibility of PostScript level 3 to the printer Facsimile expansion kit ZB3500590 This kit is required to add fax function Additional fax memory 8MB ZB3500060 Network scanner expansion kit ZB3500960 This kit is required to add the network scanning feature To add the network scanner function the network expansion kit is required Internet fax expansion kit CM2510040 This kit is required ...

Страница 27: ...EM SETTINGS key This is used to store edit and delete user names and folder names for the document filing function 1 and to configure the administrator settings and printer configuration settings See page 7 24 6 Numeric keys Use to enter numeric values for various settings 7 key LOGOUT key This key is used in copy mode document filing mode 1 network scanner mode 2 fax mode 3 and Internet fax mode ...

Страница 28: ...ghted in a setting screen at the time the screen appears the OK key can be pressed to store the selection without further operation Example 2 A function in the special functions screen is selected by touching the key so that it is highlighted To cancel the selection touch the highlighted key once again Example 3 A corresponding icon representing the feature will appear on the touch panel and on th...

Страница 29: ...Other jobs will not be printed if the paper runs out during printing If you need to change the paper size because the specified paper size is not available touch the current job key to select it and then touch the DETAIL key described in 10 2 Mode select key This switches the job list display between JOB QUEUE and COMPLETE JOB QUEUE Shows stored jobs and the job in progress COMPLETE Shows finished...

Страница 30: ...t be canceled or deleted 9 PRIORITY key Touch this key after selecting a stored job in this JOB QUEUE list to print the job ahead of the other jobs Note that a job in progress cannot be interrupted if it is an interrupt copy job or if it is a list print job 10 DETAIL key This shows detailed information on the selected job Files saved using the FILE 2 and QUICK FILE 2 functions and finished broadca...

Страница 31: ...power switch or unplugging the power cord while the lights are blinking may damage the hard disk and cause the data being stored or received to be lost NOTES Turn both switches off and unplug the power cord if you suspect a machine failure if there is a bad thunderstorm nearby or when you are moving the machine If the fax function has been added always keep the fax power switch turned on Faxes can...

Страница 32: ...d Check the number in the display and touch the OK key 2 Follow the appropriate steps to perform the copy job When copying is begun the following message will appear To perform an interrupt copy job page 5 44 touch the INTERRUPT key and then enter your account number as explained in step 1 The following message will appear 3 When the copy job is finished press the key LOGOUT key NOTES When auditin...

Страница 33: ...ns multi purpose drawer the upper tray of the stand 3 x 500 sheet paper drawer or stand MPD 2000 sheet paper drawer 2 10 Loading paper in the stand 3 x 500 sheet paper drawer 2 10 Specifications stand 3 x 500 sheet paper drawer 2 10 Loading paper in the stand MPD 2000 sheet paper drawer 2 11 Specifications stand MPD 2000 sheet paper drawer 2 11 SYSTEM SETTINGS 2 12 General procedure for system set...

Страница 34: ...ngth and width of the paper The guide plates A and B are slidable Adjust them to the paper size to be loaded while squeezing their lock levers 3 Load paper into the tray 4 Gently push tray 1 into the machine Push the tray firmly all the way into the machine 5 Set the paper size Be sure to set the paper size and paper type referring to Setting the paper type and paper size page 2 5 If this is not d...

Страница 35: ...paper size page 2 5 the following paper sizes can be used with the automatic detection function 8 1 2 x 11 8 1 2 x 11 R If AUTO AB is selected in setting the paper type and paper size page 2 5 the following paper sizes can be used with the automatic detection function A4 A4R B5 B5R Non standard sizes See the remarks for special paper on the next page Postcard Japanese official postcard Envelopes c...

Страница 36: ... 2 x 11 or A4 thick paper ranging from 16 to 28 lbs or 60 to 105 g m2 can be used Other thick papers Index stock 65 lbs or 176 g m2 can be used Cover stock 110 lbs or 200 to 205 g m2 can be used but only for 8 1 2 x 11 A4 paper in the portrait orientation For 5 1 2 x 8 1 2 or A5 paper the orientation must be landscape Transparency film labels and tracing paper Use Océ recommended paper Do not use ...

Страница 37: ...dit a user type name or set tray attributes see Programming and editing paper types on page 2 7 NOTE To automatically switch to a tray with the same size and type of paper if there is one in the event that the paper tray runs out of paper display the last screen with the key and select AUTO TRAY SWITCHING PY JOB STATUS SYSTEM SETTINGS PAPER TRAY SETTINGS ATA ORWARD RINT PRINTER CONDITION TRAY SETT...

Страница 38: ...the paper type and paper size See above AUTO INCH key Select when you have loaded an inch based size of paper AUTO AB key Select when you have loaded an AB size of paper SIZE INPUT key Select to directly enter a paper size see below NON STANDARD SIZE checkbox Select when you have loaded a non standard size of paper see below POST key Select this when you have loaded postcards NOTE Sizes that can b...

Страница 39: ...SER USER FIXED PAPER SIDE TYPE NAME PAPER TYPE REGISTRATION No 01 USER TYPE 1 DISABLE STAPLE DISAB DISAB FIXED PAPER SIDE TYPE NAME PAPER TYPE REGISTRATION No 01 USER TYPE 1 DISABLE STAPLE DISAB DISAB FIXED PAPER SIDE Select when paper is to be loaded print side down in the tray Make sure a checkmark does not appear when paper is to be loaded print side up If the two sided function is prohibited i...

Страница 40: ...rientation shown below Loading postcards Load postcards print side up to the rear left of the tray as shown Loading envelopes Envelopes can only be printed on the address side Be sure to place envelopes with the address side up and the top of the envelope to the rear Printing onto envelopes or postcards Attempting to print onto both sides of envelopes or postcards may result in misfeeds or poor pr...

Страница 41: ...rawer or stand MPD 2000 sheet paper drawer damage to the envelopes or smudges on prints may occur even if envelopes within specification are used In this case the problem may be reduced by shifting the fusing unit pressure adjusting levers from the normal position to the lower pressure position Follow the procedure below 1 Unlatch the duplex module and slide it to the left Unlatch the module and g...

Страница 42: ... trays The method of loading paper is the same as for paper tray 1 in the main unit See the description page 2 2 Specifications stand 3 x 500 sheet paper drawer Name Multi purpose drawer the upper tray of the stand 3 x 500 sheet paper drawer or stand MPD 2000 sheet paper drawer Paper size weight See specifications of paper trays on page 2 3 Paper capacity 500 sheets 20 lbs 80 g m2 of paper 40 enve...

Страница 43: ...table holds approximately 800 sheets After loading paper be sure to return the paper guide 3 Gently push the large capacity paper tray into the machine Push the tray firmly all the way into the machine 4 Set the paper type If you have changed the paper size from the AB system to the inch system or vice versa select the relevant type referring to Setting the paper type and paper size on page 2 5 5 ...

Страница 44: ...tings These are items that are used by the administrator of the machine to configure machine settings A key appears for these settings in the system settings menu screen For information on these settings see the administrator settings guide 1 These settings can be configured in a system where the facsimile network scanner or Internet fax function is available 2 These settings can be configured in ...

Страница 45: ...2010 04 04 SUN 11 30 DD MM YYYY AME ON OK T 12 HOUR SYSTEM SETTINGS LIST PRINT FAX DATA RECEIVE FORWARD PAPER TRAY SETTINGS EXIT DEFAULT SETTINGS SENDER CONTROL ADMINISTRATOR SETTINGS ADDRESS CONTROL TOTAL COUNT DOCUMENT FILING CONTROL PRINTER CONDITION More information on setting procedures In the following type of screen a setting is selected by touching the key so that a checkmark appears The s...

Страница 46: ...on Keyboard 2 AZERTY configuration Keyboard 3 ABCDEF configuration The default setting is Keyboard 1 Example Character entry screen when Keyboard 3 is selected List print This is used to print lists of machine settings and a test page to check resident fonts The following lists and pages are available All custom setting list Shows the hardware status software status printer configuration settings ...

Страница 47: ...cartridge lock lever 8 Close the front cover NOTE To view the approximate amount of toner remaining hold down the COPY key during printing or when the machine is on standby The percentage of toner remaining will appear in the display while you hold down the key When the percentage falls to 25 0 obtain a new toner cartridge and keep it ready for replacement NOTE Shake the toner cartridge well to en...

Страница 48: ...gineered and tested to maximize the life and performance of Océ products Proper storage 1 Store the supplies in a location that is clean and dry at a stable temperature not exposed to direct sunlight 2 Store paper in the wrapper and lying flat 3 Paper stored in packages standing up or out of the wrapper may curl or become damp resulting in paper misfeeds 4 Store a new toner cartridge box horizonta...

Страница 49: ... the stand MPD 2000 sheet paper drawer page 2 21 Misfeed in the stand 3 x 500 sheet paper drawer page 2 21 Misfeed in the document feeder page 2 22 Misfeed in the finisher page 3 12 Misfeed in the duplex module page 2 19 Misfeed in the bypass tray page 2 19 Misfeed in the saddle stitch finisher page 3 22 Misfeed in the multi purpose drawer page 2 21 Misfeed in the mail bin stacker page 3 6 NOTE Pr...

Страница 50: ...open tab to open the fusing unit and remove the misfed paper If paper is misfed in the exit area remove it as shown while taking care not to tear the paper If the duplex module is equipped with an exit tray and paper is misfed in the exit area remove the misfed paper as shown in the illustration 3 Gently close the duplex module If the machine is not equipped with a duplex module close the side cov...

Страница 51: ...g care not to tear the paper If paper is misfed at the lower part of the duplex module gently remove it while taking care not to tear the paper 4 Close the cover of the duplex module and lower the exit tray 5 Gently close the duplex module After closing the duplex module confirm that the misfeed message is cleared and the normal display appears Misfeed in the bypass tray 1 Unlatch the duplex modul...

Страница 52: ...cking the partially fed paper may tear and leave torn pieces in the machine increasing the difficulty of removal NOTE The paper may not be extending out far from inside the machine but must be removed if it is possible to grasp it If it is not possible to grasp it go to the next step NOTE If paper drops beyond the rear side of the paper tray that has been pulled out remove the paper tray and then ...

Страница 53: ...er tray follow the procedure of Misfeed in the multi purpose drawer shown to the left to remove the misfed paper Misfeed in the stand MPD 2000 sheet paper drawer For misfeed removal in the upper tray follow the procedure of Misfeed in the multi purpose drawer shown to the left to remove the misfed paper For misfeed removal in the lower large capacity tray follow the procedure below 1 Follow steps ...

Страница 54: ...pen the document feeder and turn the green rotating knob in the direction of the arrow to remove any misfed originals 2 Open and close the document feeder Opening and closing the cover clears the misfeed display Copying cannot be resumed until this step is performed However this step is not necessary after a misfeed is removed from location B A message may appear indicating the number of originals...

Страница 55: ...s occurred that requires service In this event stop using the machine unplug the power cord and contact your Océ dealer Note Letters and numbers appear in When you contact your Océ dealer please tell your dealer what letters and numbers appear Problem Check Solution or cause The machine does not operate Machine plugged in Plug the machine into a grounded outlet The power switch are not turned on T...

Страница 56: ... When using a special size of paper set the correct paper size as explained in Setting the paper type and paper size on page 2 5 If the paper size setting is not correct part of the image may be cut off or the image may not be printed Paper misfeeds frequently Is paper other than Océ recommended paper being used Use Océ recommended paper Page 2 16 Paper curled or damp Do not use curled or crimped ...

Страница 57: ...e wrong side of the paper The paper is loaded in the tray with the print side face down Face up if the paper type is PRE PRINTED PRE PUNCHED or LETTER HEAD Load paper in the tray with the print side face up However if the paper type is PRE PRINTED PRE PUNCHED or LETTER HEAD load the paper with the print side face down If the two sided function has been prohibited using DISABLING OF DUPLEX in the a...

Страница 58: ......

Страница 59: ...ications 3 5 Misfeed in the mail bin stacker 3 6 FINISHER 3 7 Part names 3 7 Specifications 3 7 Finisher functions 3 8 Using the finisher functions 3 9 Staple cartridge replacement 3 10 Misfeed in the finisher 3 12 Troubleshooting finisher problems 3 13 SADDLE STITCH FINISHER 3 14 Part names 3 14 Specifications 3 14 Saddle stitch finisher functions 3 15 Using the saddle stitch finisher 3 18 Staple...

Страница 60: ... weight for duplex copy 1 16 to 28 lbs or 60 to 105 g m2 Reference paper position Center Bypass tray paper capacity 2 100 sheets 8 1 2 x 11 or A4 size 20 lbs or 80 g m2 Dimensions Duplex module 4 17 32 W x 16 15 64 D x 16 25 64 H 115 mm W x 412 mm D x 416 mm H Duplex module bypass tray 3 17 23 64 W x 17 11 64 D x 16 25 64 H 441 mm W x 436 mm D x 416 mm H Weight Duplex module Approx 11 1 lbs 5 kg D...

Страница 61: ... NOTES When using 5 1 2 x 8 1 2 paper A5 paper or postcards be sure to load them with their shorter edge into the feed slot as shown in the illustration When loading plain paper other than Océ standard paper special media other than postcards Océ recommended transparency film or paper to be printed on the back the paper must be loaded one sheet at a time Loading more than one sheet at a time will ...

Страница 62: ...ass tray are skewed Does the number of sheets exceed the limit Set paper within the allowable range Paper guides properly set Set the paper guides properly to the paper size A paper misfeed occurs in the bypass tray Paper size and type set properly When using non standard size paper or special paper be sure to set the paper size and type See pages 2 3 to 2 5 Does the number of sheets exceed the li...

Страница 63: ...f trays 8 Top tray and seven mail bins Paper output Print face down Tray type Top tray normal tray Mail bins mail bin tray Tray capacity Top tray 250 sheets 8 1 2 x 11 or A4 size 20 lbs or 80 g m2 Mail bins 100 sheets each 8 1 2 x 11 or A4 size 20 lbs or 80 g m2 Paper sizes Top tray same as the specifications of paper for feeding in the main unit Mail bins 11 x 17 8 1 2 x 14 8 1 2 x 13 8 1 2 x 11 ...

Страница 64: ...l not to tear the misfed paper during removal After removing the paper press down on the top cover to close it 3 If the misfed paper is not found in step 2 open the front cover 4 Turn the roller rotating knob in the direction of the arrow to remove the misfed paper 5 Open the paper guide Unlatch the paper guide and open it in the direction of the arrow 6 Remove the misfed paper Be careful not to t...

Страница 65: ...ame as the specifications of paper for feeding in the main unit Lower tray Max 8 1 2 x 11 or A4 Min B5 Paper weight Top tray same as the specifications of paper for feeding in the main unit Lower tray 16 to 34 lbs or 60 to 128 g m2 Paper types Top tray same as the specifications of paper for feeding in the main unit Lower tray plain paper only Tray full detection Provided in both the top tray and ...

Страница 66: ...ze for stapling and stapling capacity are shown below Original Printouts Offset mode Non offset mode Original Printouts Stapling positions Top left corner of printouts Center left two positions of printouts Lower left corner of printouts Portrait orientation Landscape orientation Available paper sizes 8 1 2 x 11 A4 and B5 Stapling capacity Up to 30 sheets for any available sizes Same as above Same...

Страница 67: ... delivered 4 Icon display An icon representing a selected function sort staple sort or group is displayed 5 OFFSET key See page 3 8 If Offset is checked offset is enabled If not checked offset will not function If staple sort is selected the check mark of offset will be automatically canceled If the staple sort function is selected the checkmark in the offset checkbox is automatically removed 6 OF...

Страница 68: ...he arrow of the staple cartridge with that of the staple box When reinstalling the staple box push it in until it clicks into place 6 Remove the tape from the staple cartridge by pulling it straight 7 Reinstall the staple box Push the staple box in until it clicks into place 8 While pushing the staple unit release lever to the left rotate the staple unit to face down 9 Close the front cover NOTES ...

Страница 69: ...it to face up 6 Pull the release lever for the staple box and remove the box 7 Raise the lever at the end of the staple box Remove the top staple if it is bent If bent staples remain a staple jam will occur again 8 Return the lever to its original position 9 Reinstall the staple box Push the staple box in until it clicks into place 10While pushing the staple unit release lever to the left rotate t...

Страница 70: ...he tab in the direction of the arrow as shown in the illustration to open the top cover 3 Remove the misfed paper Be careful not to tear the misfed paper during removal After removing the paper press down on the top cover to close it 4 Open the finisher compiler Release the latch to open the finisher compiler 5 Raise the paper guide and remove the misfed paper Be careful not to tear the misfed pap...

Страница 71: ...piler Stapling cannot be performed Is a CHECK THE STAPLER UNIT or CHECK STAPLER POSITION OR STAPLER JAM message displayed Check the staple unit See page 3 11 Is a message ADD STAPLES displayed Replace the staple cartridge See page 3 10 Different size paper included Stapling cannot be performed onto different size paper Stapled sets are not stacked correctly or some sheets in a set are not stapled ...

Страница 72: ...ax 30 stapled sets and max 500 sheets for 8 1 2 x 13 or B4 or larger sizes 20 lbs or 80 g m2 Lower tray Stapled print capacity is 6 10 sheets x 10 sets or 1 5 sheets x 20 sets Paper size Upper tray 11 x 17 8 1 2 x 14 8 1 2 x 13 8 1 2 x 11 8 1 2 x 11 R 7 1 4 x 10 1 2 5 1 2 x 8 1 2 R A3 B4 A4 A4R B5 B5R A5R Lower tray max 11 x 17 8 1 2 x 11 R A3 B4 A4R Paper weight Upper tray 16 to 54 lbs or 60 to 2...

Страница 73: ...ed sets will not be offset Stapling capacity 8 1 2 x 11 or A4 or smaller size 50 sheets 20 lbs or 80 g m2 8 1 2 x 14 or B4 or larger size 25 sheets 20 lbs or 80 g m2 Up to two sheets of 34 lbs or 128 g m2 paper can be included as covers Staples Upper tray Single staple can be placed in the top left or lower left corners or two staples can be centered on the left side Lower tray 4 47 64 120 mm pitc...

Страница 74: ...rientation Available paper sizes 8 1 2 x 11 A4 and B5 Stapling capacity Up to 50 sheets for any sizes Same as above Same as above Available paper sizes 11 x 17 8 1 2 x 14 8 1 2 x 13 8 1 2 x 11 R A3 B4 and A4R Stapling capacity Up to 50 sheets for 8 1 2 x 11 R A4R and B5R and up to 25 sheets for other sizes Available paper sizes 11 x 17 8 1 2 x 14 8 1 2 x 13 8 1 2 x 11 R A3 B4 and A4R Stapling capa...

Страница 75: ...ng function is used Two or three holes can be punched depending on the paper size See paper sizes for hole punching on page 4 4 If the punching function is enabled for a paper size that cannot be punched the paper will be output without being punched For paper sizes that can be punched see the specifications on page 3 15 When using the punching function in copy mode place the original with the top...

Страница 76: ...t will be enabled If not checked the offset will not function If the staple sort is selected the check mark of offset will be automatically selected 6 CENTER TRAY key If the center tray is selected output paper will be delivered to the exit tray 7 OK key Press to close the OUTPUT screen and to return to the main screen 8 OFFSET key See page 3 15 When the offset tray is selected copies will be deli...

Страница 77: ... unlock the staple box cover and remove the staple cartridge 6 Insert a new staple cartridge into the staple box After inserting the staple cartridge press down on the staple box cover to lock the cartridge in place 7 Remove the tape from the staple cartridge by pulling it straight 8 Insert the staple box Push the staple box in until it clicks into place 9 Push the stapler section back into the fi...

Страница 78: ... shown in the illustration until the blue indication is seen 4 Remove the paper from the stapler compiler 5 If saddle stitch was selected open the saddle stitch section cover 6 Remove the misfed paper Be careful not to tear the misfed paper during removal 7 Close the saddle stitch section cover 8 Open the front cover and pull out the stapler unit Roller rotating knob C Blue ...

Страница 79: ...ace 14Push the stapler section back into the finisher 15Close the front cover 16Push the saddle stitch finisher back against the machine Disposal of hole punch scrap 1 Unlatch the saddle stitch finisher and slide it away from the machine 2 Pull out the punch scrap collecting container and empty it Empty the punch debris into a plastic bag or other container for disposal taking care not to spill an...

Страница 80: ... rotate it Only when an optional punch unit is installed Rotating roller rotating knob B releases the caught paper 4 Open the top cover 5 Remove the misfed paper Remove the paper gently taking care not to tear it 6 Close the top cover 7 Remove any misfed paper from the stapler compiler Remove the paper gently taking care not to tear it 8 Open the cover of the saddle stitch section 9 Remove the mis...

Страница 81: ... in the direction of the arrow 12Remove any misfed paper from the saddle stitch tray Remove the paper gently taking care not to tear it 13Close the cover of the saddle stitch section 14Close the front cover 15Push the saddle stitch finisher back onto the machine Roller rotating knob D ...

Страница 82: ...20 Different size paper included Stapling cannot be performed onto different size paper Stapled sets are not stacked correctly or some sheets in a set are not stapled Paper heavily curled Paper may be curled heavily depending on the paper type and quality Remove paper from the paper tray or the bypass tray turn it upside down and load it again Punching does not take place in the correct positions ...

Страница 83: ...Part 2 Copier Operation ...

Страница 84: ......

Страница 85: ... size 4 5 STORING DELETING AND USING ORIGINAL SIZES 4 6 Storing or deleting an original size 4 6 NORMAL COPYING 4 7 Making copies with the automatic document feeder 4 7 Automatic two sided copying using the automatic document feeder 4 10 Copying from the document glass 4 11 Automatic two sided copying from the document glass 4 13 ADJUSTING THE EXPOSURE 4 14 REDUCTION ENLARGEMENT ZOOM 4 15 Automati...

Страница 86: ...e specified range may cause an original misfeed Before loading originals into the document feeder tray be sure to remove any staples or paper clips If originals have damp spots from correction fluid ink or glue from pasteups be sure they are dried before they are fed If not the interior of the document feeder or the document glass may be soiled Do not use the following originals These originals ma...

Страница 87: ...the original be sure to close the document cover If left open parts outside of the original will be copied black causing excessive use of toner Do not place any objects under the original size detector because they may damage it or the original size may not be detected properly Original size detector Original scale mark Original scale mark 5 x 8 or A5 8 x11 or A4 11x17 or A3 8 x14 or B4 8 x11R or ...

Страница 88: ...omatically rotated 90 and copied When an image is rotated a message will be displayed If a function is selected that is not suitable for rotation such as enlarging the copy to greater than 8 1 2 x 11 A4 size or staple sorting with the saddle stitch finisher rotation will not be possible Example This function operates in both the auto paper select or auto image mode Rotation copy setting can be dis...

Страница 89: ...is placed in the document feeder or on the document glass touch the SIZE INPUT tab and then enter the X width and Y length dimensions of the original X is initially selected Enter the X dimension width and then touch the Y key and enter the Y dimension length X can be from 2 1 2 to 17 inch and Y can be from 2 1 2 to 11 5 8 inch If you frequently use originals that are the same non standard size yo...

Страница 90: ...nitially selected Enter X and then touch the key to enter Y A width of 2 1 2 to 17 inches can be entered in X and a length of 2 1 2 to 11 5 8 inches can be entered in Y 6 Touch the OK key The original size entered in step 5 is stored in the key selected in step 4 To exit touch the ORIGINAL key 7 When you touch a key that shows an original size in step 4 a message screen appears that contains the k...

Страница 91: ...ars load paper in a paper tray with paper of the required size Even if the message above appears copying can be performed onto the currently selected paper The following requirements must be satisfied Originals of a standard size 11 x 17 8 1 2 x 14 8 1 2 x 11 8 1 2 x 11 R or 5 1 2 x 8 1 2R A3 B4 A4 A4R B5 B5R or A5 are set and the auto paper select function is enabled If originals of a size other ...

Страница 92: ...ade 9 Press the START key If the C key is pressed while originals are being scanned scanning will stop If copying had already started copying and scanning will stop after the original in progress is output to the original exit area In these cases the copy quantity will be reset to 0 2 SIDED COPY OUTPUT FILE LOGOUT NOTES The 1 sided to 1 sided copying mode is set as the default in the initial setti...

Страница 93: ... saddle stitch finisher is installed The screen that appears when a finisher is installed is slightly different SPECIAL MODES 2 SIDED COPY OUTPUT LOGOUT OUTPUT SORT GROUP Original Press the START key Set the number of copies 5 Touch the OUTPUT key Touch the SORT key Five sets of copies When using the automatic document feeder sorting is automatically selected when the original is placed in the doc...

Страница 94: ...cument feeder tray pages 4 3 to 4 6 2 Touch the 2 SIDED COPY key 3 Select the desired copy mode The display will vary depending on the equipment installed When making automatic two sided copies of a one sided 11 x 17 A3 or 8 1 2 x 14 B4 size portrait original or when you wish to invert the top and bottom of the back side of a two sided original touch the BINDING CHANGE key 4 Touch the OK key Perfo...

Страница 95: ...ar If the message appears load paper in a paper tray with paper of the required size Even if the message above is displayed copying can be performed onto the currently selected paper The following requirements must be satisfied Originals of a standard size 11 x 17 8 1 2 x 14 8 1 2 x 11 8 1 2 x 11 R or 5 1 2 x 8 1 2 R A3 B4 A4 A4R B5 B5R or A5 are set and the auto paper select function is enabled I...

Страница 96: ...C clear key to cancel an entry if a mistake has been made 6 Press the START key Replace the original with the next original and press the START key Repeat this operation until all originals have been scanned If you selected Sort for the output mode in step 4 and pressed the START key it is necessary to touch the READ END key 7 Touch the READ END key 2 SIDED COPY OUTPUT FILE LOGOUT To cancel copyin...

Страница 97: ...in the appropriate position for its size as shown above 2 Touch the 2 SIDED COPY key 3 Touch the 1 sided to 2 sided copy key When making automatic two sided copies of a one sided 11 x 17 A3 or 8 1 2 x 14 B4 size portrait original or when you wish to invert the top and bottom of the back side of a two sided original touch the BINDING CHANGE key 4 Touch the OK key Perform steps 3 to 7 on pages 4 11 ...

Страница 98: ...ackground TEXT PHOTO This provides the best balance for copying an original which contains both text and photos This mode is also useful for copying printed photographs PHOTO This mode provides the best copies of photographs with fine details AUTO AUTO 8 x11 ORIGINAL PAPER SELECT EXPOSURE 1 2 ORIGINAL IMAGE TYPE TEXT AUTO MANUAL 5 3 1 OK TEXT PHOTO PHOTO AUTO AUTO 8 x11 100 ORIGINAL PAPER SELECT C...

Страница 99: ...ess the START key If you placed the original on the document glass set the output mode to Sort and pressed the START key you must touch the READ END key after all pages of the original have been scanned Step 7 on page 4 12 NOTE Automatic ratio adjustment can only be used for the following original and paper sizes It cannot be used for other sizes However in the case of non standard original and pa...

Страница 100: ... 25 to 400 can be set in 1 increments Touch the key to increase the ratio or the key to decrease the ratio If you continue to touch the key the ratio will change automatically After 3 seconds the ratio will change rapidly 5 Touch the OK key NOTE When the original is placed in the document feeder the ratio can be set from 25 to 200 AUTO 100 8 X11 2 PAPER SELECT COPY RATIO AUTO AUTO AUTO 8 x11 ORIGI...

Страница 101: ...the START key If you placed the original on the document glass set the output to Sort and pressed the START key you must touch the READ END key after all pages of the original have been scanned Step 7 on page 4 12 NOTE If the auto paper select display does not appear a tray with the correct size of paper for the selected ratio will not be automatically selected To return the ratio to 100 To return...

Страница 102: ...ecome highlighted when touched Zoom ratios Any ratio from 25 to 400 can be set in 1 increments Touch the key to increase the ratio or the key to decrease the ratio If you continue to touch the key the ratio will change automatically After 3 seconds the ratio will change rapidly 6 Touch the Y key Original Copy NOTE When the original is placed in the document feeder the ratio can be set from 25 to 2...

Страница 103: ...CT key and select the paper size If the AUTO PAPER SELECT mode is on the appropriate copy paper size will have been automatically selected based on the original size and selected copy ratios 10Select any desired copy settings such as the exposure or number of copies and then press the START key ZOOM 50 50 70 Y X 64 77 XY ZOOM CANCEL ZOOM 50 77 Y A OK PA 400 200 100 129 0 AUTO ORIGINAL AUTO EXPOSUR...

Страница 104: ...type 2 The Y key shows the size of paper loaded in the bypass tray 3 To change the displayed paper type touch the X key before touching the Y key When loading paper if you changed the paper size from an inch size to an AB size or from an AB size to an inch size or if you changed the paper type be sure to change the paper type and size settings as explained in steps 5 to 6 on page 2 5 and steps 7 t...

Страница 105: ... using special functions 5 2 Margin shift 5 3 Erase 5 4 Dual page copy 5 5 Pamphlet copy 5 6 Job build 5 8 Tandem copy 5 10 Covers inserts 5 12 Transparency film with insert sheets 5 23 Multi shot 5 24 Book copy 5 26 Card shot 5 27 Mirror image 5 29 B W reverse 5 29 Print menu 5 30 STORING USING AND DELETING JOB PROGRAMS 5 42 Storing a job program 5 42 Calling up a job program 5 43 Deleting a stor...

Страница 106: ... functions can be selected in the 3rd screen 3 3 B W reverse page 5 29 Print menu page 5 30 General procedure for using special functions 1 Touch the SPECIAL MODES key 2 Touch the key for the desired special mode Example Selecting the margin shift function To select a special function in one of the other two screens use the keys to change the screen SPECIAL MODES MARGIN SHIFT PAMPHLET COPY ERASE O...

Страница 107: ...NOTES The initial setting for the margin width can be changed in the administrator settings to any value from 0 to 1 0 to 20 mm Page 17 of the administrator settings guide When margin shift is selected rotating copying will not operate even if the condition for rotate copying is met Image shifted to the right Image shifted to the left Margin Margin Original Two sided copying Image shifted to the r...

Страница 108: ... the amount of erase and touch the OK key Use the and keys to set the erase width to any value from 0 to 1 in increments of 1 8 0 to 10 mm in 1 mm 4 Touch the OK key on the special modes screen You will return to the main screen of copy mode NOTE The initial setting for the erasure width can be changed in the administrator settings to any value from 0 to 1 0 to 20 mm Page 17 of the administrator s...

Страница 109: ... 1 2 x 11 A4 size paper is selected If 8 1 2 x 11 A4 size paper is not selected touch the PAPER SELECT key to select 8 1 2 x 11 A4 size paper The dual page copy function can be used only when copying from the document glass The automatic document feeder cannot be used with this function Only 8 1 2 x 11 A4 paper can be used Book original Dual page copy To display the special modes screen See Genera...

Страница 110: ...l appear The pamphlet copy icon etc will also appear in the upper left corner of the screen to indicate that the function is turned on 2 Designate the type of originals to be copied 1 sided or 2 sided Select the 2 SIDED key if you wish to scan a two sided original using the automatic document feeder 3 Select the binding position left binding or right binding If you wish to insert a different type ...

Страница 111: ...ave been scanned The next step is not needed When using the document glass Replace the original with the next original and press the START key Repeat this operation until all originals have been scanned and then touch the READ END key NOTES Two sided copying is not possible on label sheets and transparency film When copying on a cover do not select a tray that has one of these types of paper Selec...

Страница 112: ...ess the START key Scanning of originals will start After scanning of the first set of originals A in the example above is completed remove the scanned originals place the next set of originals set B in the example and press the START key Repeat this operation until all sets of originals have been scanned If you wish to adjust the copy settings each time you place a set of originals see Changing th...

Страница 113: ...14 1 2 x11 2 1 8 x11 1 2 EXPOSURE PAPER SELECT 100 AUTO AUTO 8 x11 ORIGINAL 8 x11 1 2 1 2 2 8 x11 1 2 READ END PLACE NEXT ORIGINAL PRESS START TO CHANGE COPY SETTINGS PRESS CHANGE INTERRUPT CHANGE 4 11x17 ORIGINAL 8 x11 1 2 ES C NOTES If the original size was set manually at the beginning of the job build procedure it will not be possible to change the original size setting If the automatic origin...

Страница 114: ... this setting do not change it The tandem settings should be configured by your network administrator If the server and client machines will alternate server and client roles the IP address of the server machine must also be entered in the client machine The same port number can be set in both machines 1 Touch the TANDEM COPY key on the special modes screen The TANDEM COPY key will be highlighted ...

Страница 115: ...s set to 999 and Non staple is selected tandem copying will take place 2 If tandem copying is executed for a two sided copy job with the number of copies set to 999 and Staple is selected tandem copying will not take place because the client machine does not have a finisher After the START key is pressed if the client machine cannot print because it is out of paper or other reason the server machi...

Страница 116: ...eparations for using covers and inserts Load the cover insert paper in the tray before using the cover insert function Use the same size of paper for the covers inserts as for the copies For the procedures for loading paper see pages 2 2 to 2 7 Before selecting the cover insert function place the originals in the document feeder select one sided or two sided copying and select the number of copies...

Страница 117: ...to the front cover paper When the back cover paper is selected the selection only applies to the back cover paper 3 The Z key shows the tray selected for the front cover paper in step 3 and the paper size and type 6 Touch the OK key in the screen of step 5 You will return to the screen of step 2 When you return to the screen of step 2 the FRONT COVER key will be highlighted 7 To insert back cover ...

Страница 118: ... YES key of X has been selected The one sided two sided selection made here only applies to insertion type A paper When insertion type B is selected the selection only applies to insertion type B paper The 2 SIDED key appears when the duplex module is installed 3 The Z key shows the tray selected for insertion type A in step 3 and the paper size and type 6 Touch the OK key in the screen of step 5 ...

Страница 119: ... is highlighted the insert settings apply to INSERTION TYPE B SETTING 10Touch the OK key in the screen of step 9 You will return to the screen of step 2 11If you wish to insert a different paper with the INSERTION TYPE B SETTING key repeat steps 2 through 6 Use the INSERTION TYPE B SETTING key instead of the INSERTION TYPE A SETTING key and the INSERTION TYPE B key instead of the INSERTION TYPE A ...

Страница 120: ...e key of the insert that you wish to edit or delete in the page layout screen When the key is touched the CANCEL DELETE or AMEND keys appear To cancel touch the CANCEL key To delete an inserted page touch the DELETE key To edit an inserted page touch the AMEND key The screen of step 9 on page 5 15 appears Edit the insertion page in the screen that appears 4 To edit or delete a cover page touch the...

Страница 121: ...ng on the settings Type Symbol Meaning Icon appearing in display Type Symbol Meaning Icon appearing in display Front cover Front cover when not copied on Inserts Insert when not copied on Front cover after one sided copying Insert after one sided copying Front cover after one sided copying of a two sided original One page is not copied on Insert after one sided copying of a two sided original One ...

Страница 122: ...ng copies Front cover Back cover No copying No copying One sided copying No copying Two sided copying No copying No copying One sided copying No copying Two sided copying One sided copying One sided copying One sided copying Two sided copying Two sided copying One sided copying Two sided copying Two sided copying 1 2 3 4 5 6 1 2 3 4 5 6 1 2 3 4 5 6 1 2 3 4 5 6 1 2 3 4 6 5 1 2 3 4 5 6 1 2 3 4 6 5 1...

Страница 123: ...ing copies Front cover Back cover No copying No copying One sided copying No copying Two sided copying No copying No copying One sided copying No copying Two sided copying One sided copying One sided copying One sided copying Two sided copying Two sided copying One sided copying Two sided copying Two sided copying 1 2 3 4 5 6 1 2 3 4 5 6 1 2 3 4 5 6 1 2 3 4 5 6 1 2 3 4 6 5 1 2 3 4 5 6 1 2 3 4 6 5 ...

Страница 124: ...t cover Back cover No copying No copying One sided copying No copying Two sided copying No copying No copying One sided copying No copying Two sided copying One sided copying One sided copying One sided copying Two sided copying Two sided copying One sided copying Two sided copying Two sided copying 1 2 3 4 5 6 1 2 3 4 5 6 1 2 3 4 5 6 1 2 3 4 5 6 1 2 3 4 6 5 1 2 3 4 5 6 1 2 3 4 6 5 1 2 3 4 5 6 1 2...

Страница 125: ...es Front cover Back cover No copying No copying One sided copying No copying Two sided copying No copying No copying One sided copying No copying Two sided copying One sided copying One sided copying One sided copying Two sided copying Two sided copying One sided copying Two sided copying Two sided copying 1 2 3 4 5 6 1 3 4 5 6 1 2 3 4 5 6 1 2 3 4 6 1 2 3 4 6 5 1 3 4 6 1 3 4 6 5 1 2 3 4 6 1 2 3 4 ...

Страница 126: ...page of the insert is set to page 3 1st page 2nd page 3rd page 4th page 5th page 6th page 1 2 3 4 5 6 Copying on insert Resulting copies one sided copying Resulting copies two sided copying No copying One sided copying Two sided copying 1 2 3 4 5 6 1 2 3 4 5 6 1 2 3 4 5 6 1 2 3 4 5 6 1 2 3 4 5 6 1 2 3 4 5 6 1st page 2nd page 3rd page 1 2 3 4 5 6 Copying on insert Resulting copies one sided copying...

Страница 127: ...NGS key 5 Touch the key to display the tray settings screen of tray 2 6 Touch the TYPE SIZE key 7 Touch the TRANSPARENCY key 8 Touch the OK key If the paper size was changed from an inch size to an AB size or from an AB size to an inch size be sure to set the paper type and size as explained on steps 5 to 6 on page 2 5 and steps 7 to 10 on page 2 6 Insert sheets Example Inserting insert sheets bet...

Страница 128: ...he next page When using the multi shot function place the originals select the desired paper size and select the copying mode before selecting the multi shot function on the special modes screen When using the multi shot function the appropriate copy ratio will be automatically set based on the original size paper size and the number of originals to be copied onto one sheet The minimum reduction r...

Страница 129: ...ons in which the images are arranged 4 Touch the OK key inside OK key on the multi shot setting screen You will return to the special modes screen 5 Touch the OK key in the special modes screen You will return to the main screen of copy mode To display the special modes screen See General procedure for using special functions on page 5 2 TRANSPARENCY INSERTS MULTI SHOT MIRROR IMAGE CARD SHOT SPECI...

Страница 130: ...e book copy setting screen You will return to the special modes screen 3 Select any desired cover settings If you wish to use a different type of paper for the cover perform steps 4 to 12 on pages 5 6 to 5 7 If you do not wish to use a different type of paper continue from step 4 4 Touch the OK key in the special modes screen You will return to the main screen of copy mode 5 Place the originals on...

Страница 131: ...s X width is initially selected Enter X and then touch the Y key to enter Y To return the X and Y values to the initial settings configured in the administrator settings touch the SIZE RESET key See CARD SHOT SETTINGS on page 17 of the administrator settings guide To have the images enlarged or reduced by a suitable ratio based on the entered original size so that the front and back sides fit into...

Страница 132: ... 7 Press the START key The front side of the card is scanned 8 Place the back side of the original face down on the document glass see step 5 9 Press the START key The back side of the card is scanned 10Touch the READ END key SIZE RESET CANCEL OK OK FIT TO PAGE NOTE The original must be placed on the document glass The document feeder automatic document feeder cannot be used To cancel the card sho...

Страница 133: ... display the special modes screen See General procedure for using special functions on page 5 2 TRANSPARENCY INSERTS MULTI SHOT MIRROR IMAGE CARD SHOT About the steps that follow If an automatic document feeder is being used see pages 4 7 through 4 10 If the document glass is being used see pages 4 11 through 4 13 To cancel the mirror image function touch the MIRROR IMAGE key in the special modes ...

Страница 134: ...ing Top left Top right Top center Bottom left Bottom right Bottom center Print menu Printing area Maximum number of settings DATE A One position only STAMP B 6 positions PAGE NUMBERING A One position only TEXT A 6 positions NOTES A part that overlaps the printed text will not be copied If the set text content overlaps the print content of another position the central print content will be moved to...

Страница 135: ...ge 5 2 Not selected print menu setting has not been selected Selected during selection of the print menu setting Not selected print menu setting has already been selected PRINT MENU B W REVERSE SPECIAL MODES PRINT MENU LAYOU N OK OK CANCEL LAYOUT DATE STAMP TEXT PAGE NUMBERING 1 2 NOTES If the DATE PAGE NUMBERING or TEXT key is touched when other than a STAMP print menu setting has been selected f...

Страница 136: ...document glass is being used see pages 4 11 through 4 13 2 OK OK LAYOUT CANCEL S WHEN COPYING ON COVERS INSERTS 2 SIDED ORIGINAL TYPE NOTE To cancel print menu Touch the CANCEL key in the screen of step 3 Special modes Printing operation Margin shift Like the copy image the printed contents are shifted in accordance with the set margin Dual page copy The print content is printed on each copy sheet...

Страница 137: ...ear month or day that needs to be changed and then adjust the number with the or key When finished touch the OK key 5 Select the pages to be printed on Select whether to print on only the first page or all pages The touched key is highlighted 6 Touch the OK key 7 Continue from step 4 of Common operation procedure for using the print menu page 5 31 NOTE The date must be previously set in the system...

Страница 138: ...ARGER is initially selected To make the stamp smaller touch the LARGER SMALLER key Smaller is selected when SMALLER is highlighted 6 Select the pages to be printed on Select whether to print on only the first page or all pages The touched key is highlighted 7 Touch the OK key 8 Continue from step 4 of Common operation procedure for using the print menu page 5 31 CONFIDENTIAL PRIORITY PRELIMINARY F...

Страница 139: ...blank it will not be included in the total pages However if COUNT BACK COVER is selected the last page will be counted See step 7 When used in combination with Dual page copy Multi shot or Card shot the number of copied images is the total pages When used in combination with Pamphlet copy or Book copy the number of pages in the book is the total pages PAGE NUMBERING OK OK CANCEL LAYOUT STAMP DATE ...

Страница 140: ... NOTE To cancel a page number setting Touch the CANCEL key in the page number selection screen The screen of step 10 OK LAST NUMBER AUTO COVERS INSERTS COUNTING CANCEL OK TOTAL PAGE AUTO MANUAL PAGE NUMBER NOTES Copying in group mode is not possible when page number printing is selected The mode will automatically switch to sort mode When the page number print position is set to the left or right ...

Страница 141: ... 13 11 15 12 15 13 15 Not printed Not printed PRINTING STARTS FROM SHEET 3 Not printed Not printed 1 3 2 3 3 3 A 1 5 B 2 5 C 3 5 D 4 5 E 5 5 Setting Value 1st page 2nd page 3rd page 4th page 5th page Front Back Front Back Front Back Front Back Front Back TOTAL PAGE AUTO FIRST NUMBER 1 LAST NUMBER AUTO PRINTING STARTS FROM SHEET 1 Printedcontents when settings are changed as follows PRINTING STARTS...

Страница 142: ...ARTS FROM SHEET 3 Not printed count Not printed count Not printed Not printed 1 6 2 6 3 6 4 6 5 6 6 6 A B 1 8 C 2 8 D 3 8 E 4 8 F 5 8 G 6 8 H 7 8 I 8 8 Setting Value 1st page 2nd page 3rd page insert 4th page 5th page TOTAL PAGE AUTO FIRST NUMBER 1 LAST NUMBER AUTO PRINTING STARTS FROM SHEET 1 COUNT INSERTS Not selected Printed contents when copying on inserts and settings are changed as follows P...

Страница 143: ...entire text sequence will appear in each key When 6 keys are displayed up to 22 characters appear in each key 5 Touch the OK key To edit the selected text sequence touch the DIRECT ENTRY key to display the character entry screen The selected text sequence is entered For information on entering characters see page 7 29 When finished touch the OK key to close the character entry screen 6 Select the ...

Страница 144: ...t the text touch the AMEND key To delete the text touch the DELETE key When the AMEND key is touched the character entry screen appears The selected text sequence is entered For information on entering characters see page 7 29 When finished touch the OK key to close the character entry screen If you touch the DELETE key the text will be deleted and you will return to the screen of step 4 To cancel...

Страница 145: ...content to a position that already has print content set a message will appear asking you if you wish to overwrite the previously set content To overwrite the content touch the YES key To cancel the move and return to the condition before the OK key was touched touch the NO key 6 Touch the OK key NOTE Up to 14 characters of the print text appears in the key OK OK CANCEL STAMP TEXT 1 LAYOUT DATE PA...

Страница 146: ...eys in which job programs are already stored are highlighted 4 Select the copy settings that you wish to store in the job program The number of copies cannot be stored 5 Touch the OK key The selected settings will be stored in the number key selected in step 3 If a number key is selected in step 3 that has already been programmed A setting confirmation screen will appear To replace the existing pr...

Страница 147: ...ored is selected the screen will change to the screen of step 4 on the previous page for storing a job program 4 Touch the DELETE key The selected program is deleted and you return to the screen of step 3 To return to the screen of step 3 without deleting the job program touch the CANCEL key In both cases touch the EXIT key displayed in the screen of step 3 to exit the job program mode LOGOUT JOB ...

Страница 148: ...re mode paper size number of copies and any other copy settings as needed and then press the START key 4 The previous copy job automatically resumes after the interrupt job finishes NOTES If you touch the INTERRUPT key when auditing mode is enabled the display will prompt you to enter your account number Enter your account number with the numeric keys The copies you make will be added to the count...

Страница 149: ...HINE MAINTENANCE FOR COPYING This chapter explains procedures for cleaning the machine and troubleshooting Page USER MAINTENANCE 6 2 Cleaning the document glass and the automatic document feeder 6 2 TROUBLESHOOTING 6 3 ...

Страница 150: ...t of neutral detergent When finished wipe dry with a clean cloth When cleaning do not use thinner benzene or similar volatile cleaning agents If black or white stripes appear on printed images of originals that were fed through the automatic document feeder wipe the long narrow glasses in the scanning unit A and B in the illustration A B CAUTION Do not use flammable spray to clean the machine If g...

Страница 151: ...not clear on a copy An appropriate exposure mode for the original has not been selected Change the exposure mode to TEXT See page 4 14 Smudges appear on copies Document glass or document cover dirty Clean regularly See page 6 2 Black lines appear on copies when the automatic document feeder is used Clean the original scanning area See page 6 2 Original smudged or blotchy Use a clean original Image...

Страница 152: ......

Страница 153: ...nt filing 7 5 Document filing icons 7 5 SAVING A DOCUMENT IMAGE FILE 7 6 Quick File 7 6 Filing 7 7 Print jobs 7 9 Scan Save 7 10 CALLING UP AND USING A FILE 7 13 Searching for and calling up a saved file 7 13 Calling up and using a saved file 7 15 File selection screen 7 16 SYSTEM SETTINGS 7 24 Creating editing and deleting user names and folders 7 24 ENTERING CHARACTERS 7 29 TROUBLESHOOTING 7 31 ...

Страница 154: ...in copy mode or fax image send mode Data flow File 1 File 2 QUICK FILE FOLDER File 1 File 2 MAIN FOLDER CUSTOM FOLDER A password can be set A password can be set A password can be set Folder 1 Folder 2 Folder 3 File 1 File 2 Machine hard disk Machine hard disk Print Save to machine s hard disk HDD and Send facsimile or image send function must be required Printing in copy mode Quick File saving pa...

Страница 155: ...This prevents a file from being moved or automatically or manually deleted Three attributes are available for saved files SHARING PROTECT and CONFIDENTIAL When saved with the SHARING attribute a file is not protected When saved with the PROTECT or CONFIDENTIAL attribute a file is protected Files saved to the Quick File folder are all SHARING When saving a file to the main folder or a custom folder...

Страница 156: ... this key if you make a mistake when entering a password or numeric setting This key is also used to cancel scanning of a document 6 CA key Clear all key Use this key to cancel a setting procedure and return to the main screen The key is also used to cancel a special function 7 SYSTEM SETTINGS key Use this key to store edit or delete a user name or custom folder Saving files To save files to the m...

Страница 157: ...ile folder When the key is touched the files in the Quick File folder appear 5 SEARCH key Touch to search for a file by user name file name or folder name 6 HDD STATUS key Touch to check the use of the machine s hard disk Document filing icons The following icons may appear added to a main icon or alone HDD STATUS SEARCH SCAN TO HDD FILE FOLDER QUICK FILE FOLDER FILE RETRIEVE FILE STORE GLOBAL ACC...

Страница 158: ... the save touch the QUICK FILE key after touching the OK key so that the QUICK FILE key is no longer highlighted 3 Press the START key on the operation panel To prevent accidental saving of the document the warning THE SCANNED DATA IS STORED IN THE QUICK FILE FOLDER appears for 6 seconds after the START key is pressed When copying begins the image is saved 4 The saved image can be called up from t...

Страница 159: ... maximum of 30 characters See page 7 29 to enter characters 7 Touch the STORED TO key 8 Touch the desired folder name in the list of folder names that appears Folder names must be previously stored Creating a custom folder on page 7 27 If a password has been set for the folder a password entry screen will appear Enter the 5 digit password for the folder NOTE As an example the procedure for using t...

Страница 160: ...rn to the screen of step 10 The set password is displayed with 15Touch the OK key You will return to the main screen 16Press the START key on the operation panel When copying begins the image is saved 17The saved image can be called up using the file name folder name or user name or from the filing folder To call up the image by entering the file name folder name or user name see Searching for and...

Страница 161: ...r Go to step 4 3 Touch the key of the folder that contains the desired file If a password is set for the selected folder a password entry screen will appear Enter the 5 digit password with the numeric keys 4 Touch the printer icon tab and then touch the key of the desired file The following screen appears if the QUICK FILE FOLDER key is touched in step 2 Touch the key of the file that you wish to ...

Страница 162: ...o 10 To set the resolution perform steps 11 to 13 on page 7 11 To select the exposure perform steps 14 to 16 on page 7 11 If you no not wish to select any of the above settings go to step 17 on page 7 11 7 Touch the ORIGINAL key 8 To set the original size see Manually setting the scanning size on page 4 5 9 If the original is two sided touch the 2 SIDED BOOKLET key or the 2 SIDED TABLET key depend...

Страница 163: ...re using the document glass touch the READ END key after all pages have been scanned 18The saved image can be called up using the file name folder name or user name or from the filing folder To call up the image by entering the file name folder name or user name see Searching for and calling up a saved file on page 7 13 To call up the image from the filing folder see Calling up and using a saved f...

Страница 164: ...tion manual and operation manual for image send functions This also corresponds to the Multi shot function in copy mode however only 2in1 is possible for scan save This function reduces two original pages and arranges the images on a single page in a uniform layout 4 JOB BUILD key see page 5 8 When you have more pages than can be placed in the document feeder at once this function allows you to sc...

Страница 165: ...OLDER NAME To search by user name follow steps 3 to 6 To search by file name or folder name perform step 8 To stop searching touch the CANCEL key Searching by user name 3 Touch the USER NAME key 4 Touch the one touch key of the user name that you wish to use to search for the file If you wish to directly enter the user name touch the DIRECT ENTRY key The selected user name is highlighted If you se...

Страница 166: ...29 to enter characters 9 Touch the START SEARCH key 10The results of the file or folder name search appear Touch the desired file name or folder name See page 7 5 for a list of the document filing icons When a file name is touched the operation selection screen appears To perform an operation using the file go to step 5 on page 7 16 When a folder name is touched all files in the folder are display...

Страница 167: ...y and open the correct folder If the desired file is saved in the main folder go to step 4 If the desired file is saved in a custom folder go to step 3 If you touched the QUICK FILE FOLDER key the files in the Quick File folder appear Go to step 4 3 Touch the key of the folder that contains the desired file If there are more custom folder keys than can appear in one screen touch the or keys to cha...

Страница 168: ...le Name key or User Name key the files appear by file name or user name in ascending order When appears in the Date key the files appear in order from the oldest date When appears in the File Name key or User Name key the files appear by file name or user name in descending order When appears in the Date key the files appear in order from the most recent date 3 Back key Touch this key to return to...

Страница 169: ...one sided printing will take place To perform two sided printing the optional duplex module is necessary 4 TANDEM PRINT key If the conditions for tandem printing are met page 5 10 touch this key to enable tandem printing See page 5 10 for more information When printing a file that was saved in copy mode this key changes to the SPECIAL MODES key The SPECIAL MODES include PRINT MENU and TANDEM PRINT...

Страница 170: ...number of copies stored with each file go to step 9 6 Touch the APPLY THE NUMBER FROM STORED SETTING OF EACH JOB checkbox to remove the checkmark 7 Set the number of copies with the keys The number of copies can be also set with the numeric keys NOTE When SELECTION OF ALL USERS IS NOT ALLOWED checkbox and SELECTION OF USER UNKNOWN IS NOT ALLOWED checkbox are disabled in the administrator settings ...

Страница 171: ...will be saved after printing If there are no files that match the search conditions you will return to the file list screen CANCEL OK PRINT AND DELETE THE DATA PRINT AND SAVE THE DATA NOTES If Auditing mode is enabled in the administrator settings for copy mode print mode or document filing mode it will not be possible to perform batch printing of ALL FILES To display the job tab of a mode for whi...

Страница 172: ...ES key Touch this key to display the special function menu The functions that can be selected vary depending on the transmission mode Scan to E mail FTP Network Folder TIMER The transmission time can be specified FAX TIMER The transmission time can be specified FAX OWN ADDRESS SENDING Your sender s information can be included on the fax pages printed out by the receiving machine TRANSACTION REPORT...

Страница 173: ...nging the attribute A file that is set to SHARING can be changed to PROTECT or CONFIDENTIAL However a SHARING file that is saved in the Quick File folder can only be changed to PROTECT A file that is set to PROTECT can be changed to SHARING or CONFIDENTIAL However a PROTECT file that is saved in the Quick File folder can only be changed to SHARING A file that is saved in the Quick File folder cann...

Страница 174: ...eration is used to delete the selected file Touch the DELETE key in the operation select screen A message asking you to confirm the deletion will appear Touch the YES key to delete the file Only SHARING or CONFIDENTIAL files can be deleted A PROTECT file can be deleted by first using PROPERTY CHANGE to change the attribute to SHARING Detail This operation is used to show detailed information on th...

Страница 175: ... the file touch the DETAIL key Use the keys to change screens When you are finished touch the OK key to return to the screen of step 3 5 Touch the CALL key The operation selection screen appears Select and perform the desired operation as explained in Calling up and using a saved file page 7 15 AGE SEND COPY JOB STATUS SYSTEM SETTINGS DATA JOB QUEUE DETAIL 1 8 COMPLETE JOBS COMPLETED Suzuki7890123...

Страница 176: ...ou wish to perform Go to the page indicated below for the selected operation 1 USER NAME REGISTRATION key Program a user name See the next page 2 AMEND DELETE USER NAME key Edit or delete a user name See page 7 26 3 CUSTOM FOLDER REGISTRATION key Create a custom folder See page 7 27 4 AMEND DELETE CUSTOM FOLDER key Edit or delete a custom folder See page 7 28 NOTES A previously stored name cannot ...

Страница 177: ...o create a new folder or if no folders have been created touch the ADD NEW key If you touched the ADD NEW key program a name for the folder as explained on page 7 27 The user name programmed in step 1 is selected as the user name of the folder 8 Touch the EXIT key You will return to the USER NAME REGISTRATION screen REGISTRATION IS COMPLETED will appear highlighted next to No 9 To exit touch the E...

Страница 178: ...key in the screen of step 2 Deleting 6 Touch the DELETE key 7 Touch the YES key You will return to the screen of step 2 To delete another user name repeat steps 2 3 and 6 To exit touch the EXIT key in the screen of step 2 OK AMEND DELETE USER NAME AMEND DELETE CUSTOM FOLDER USER NAME AMEND DELETE SELECT USER NAME TO AMEND DELETE Suzuki Ono Hasegawa Sasaki EXIT UVWXYZ OPQRST JKLMN EFGHI ABCD ALL US...

Страница 179: ... in step 1 5 Touch the OK key 6 Touch the USER NAME key You will select a user name that will be associated with the folder name you are programming Selection of a user name cannot be omitted 7 The programmed user names appear Touch the desired user name If you do not wish to use any of the user names that appear touch the ADD NEW key to program a new user name When you touch a user name a passwor...

Страница 180: ...ed to the right of No To stop using a password touch the PASSWORD key and then touch the OK key without entering anything for the password will appear and the password will be canceled 5 When you have finished editing the items touch the EXIT key To edit another folder repeat steps 2 to 5 Deleting 6 Touch the DELETE key 7 Touch the YES key You will return to the screen of step 2 To delete another ...

Страница 181: ...ter You can also press the AB ab 12 key during entry to enter a number or symbol 4 Touch the SPACE key The cursor moves forward and a space is entered 5 Touch the ÃÄÂ ãäâ key 6 Touch the ä key To switch between upper case and lower case touch the ÃÄÂ ãäâ key When ãäâ is highlighted lower case letters are entered 7 Touch the ÃÄÂ ãäâ key 8 Touch the Ä key You can press the ABC abc key during entry t...

Страница 182: ... characters You can also touch another character type selection key ÃÄÂ ãäâ key or AB ab 12 key to enter characters other than numbers and symbols 3 When you have finished entering characters touch the OK key You will exit the character entry screen and return to the programming screen If you touch the CANCEL key you will return to the programming screen without storing the entered characters NOTE...

Страница 183: ... the file was saved in the Quick File folder that name will be used However if the name is longer than the maximum name length of the Quick File folder 30 characters the excess characters will be discarded Resolution settings are not possible Was the file saved at low resolution A saved file cannot be transmitted at a resolution higher than the resolution at which it was saved A file name cannot b...

Страница 184: ......

Страница 185: ...8 1 CHAPTER 8 SPECIFICATIONS This chapter contains useful information about the machine Page SPECIFICATIONS 8 2 LIST OF COMBINATION OF PERIPHERAL DEVICES 8 4 INDEX 8 5 ...

Страница 186: ...nts total 376 steps Fixed presets 25 50 64 77 100 121 129 200 and 400 for inch system 25 50 70 81 86 100 115 122 141 200 and 400 for AB system Continuous copy 999 copies Dimensions 33 1 16 W x 26 11 64 D x 44 23 64 H 840 mm W x 665 mm D x 1127 mm H including automatic document feeder Weight Approx 241 0 lbs Approx 109 3 kg when the duplex module bypass tray is installed Overall dimensions 40 37 64...

Страница 187: ...45 copies min Center tray specifications Output method Face down output Maximum number of sheets 20lbs 80g m2 recommended paper 400 sheets Paper type Plain paper and special paper The maximum number of pages that can be held varies depending on ambient conditions in the installation location the type of paper and the storage conditions of the paper Acoustic Noise Emission measurement according to ...

Страница 188: ...MPD 2000 sheet paper drawer Saddle stitch finisher Finisher Mail bin stacker Exit tray Duplex module bypass tray Duplex module Stand 3 x 500 sheet paper drawer Stand MPD 2000 sheet paper drawer Duplex module bypass tray Duplex module Upper exit tray extension Saddle stitch finisher Finisher Exit tray Mail bin stacker Upper exit tray extension 1 1 1 1 1 1 1 Output units and must be installed togeth...

Страница 189: ... for service 2 23 CALL key 1 16 Calling up and using a file 7 13 Calling up and using a saved file 7 15 Delete 7 22 Detail 7 22 Move 7 22 Print 7 17 Property change 7 21 Send 7 20 Card shot 1 6 5 2 5 27 7 12 Cartridge lock lever 1 10 Center erase 5 4 Center tray 1 9 4 9 CENTER TRAY key 3 18 Changing the paper size in paper tray 2 2 Clear all key 1 13 7 4 Clear key 1 13 7 4 Clock 2 12 Confidential ...

Страница 190: ... drawer 2 8 Stand 3 x 500 sheet paper drawer 2 10 Stand MPD 2000 sheet paper drawer 2 11 Tray 1 2 2 M Mail bins 3 5 Mail bin stacker 1 11 3 5 Main features 1 3 to 1 8 Main folder 7 3 Main screen 5 2 Manual exposure adjustment 4 14 Manual selection 4 16 Margin shift 1 4 5 2 5 3 Meaning of R 1 2 Mirror image 1 6 5 2 5 28 Misfeed 2 17 to 2 22 3 6 3 12 3 22 to 3 23 Misfeed in the paper feed area 2 20 ...

Страница 191: ...9 Quick file 7 6 Scan save 7 10 to 7 11 SCAN TO key 1 16 SCAN TO HDD key 7 5 SEARCH key 7 5 Searching for a file 7 13 to 7 14 Selecting a function 1 14 Selecting the exposure level 4 14 Selecting the exposure mode 4 14 Selecting the output tray 4 9 Sender control 2 12 Sender control list 2 14 Sending address list 2 14 Setting the paper size 2 5 to 2 6 Setting the paper type 2 5 to 2 7 Sharing 7 3 ...

Страница 192: ... film 2 3 2 4 2 10 4 20 5 23 Transparency inserts 1 5 5 2 5 23 Tray 1 9 Troubleshooting Copier operation 6 3 Document filing function 7 31 Duplex module 3 4 Finisher 3 13 General information 2 23 to 2 25 Saddle stitch finisher 3 24 Types and sizes of paper 2 3 to 2 4 Types and sizes of paper that can be used 2 3 U Upper exit tray extension 1 9 1 11 Upper paper output area 1 9 User maintenance 6 2 ...

Страница 193: ......

Страница 194: ......

Страница 195: ......

Страница 196: ...PRINTED IN CHINA 2007K KS1 TINSE3943FCZ1 ...

Отзывы: