4
Specifying Settings Using Web Connection
4-26
cm2520
Specifying Settings
Using Web
C
o
nnection
Chapter 4
4.8
Program Registration
Click the Scan tab, and then click “Program”.
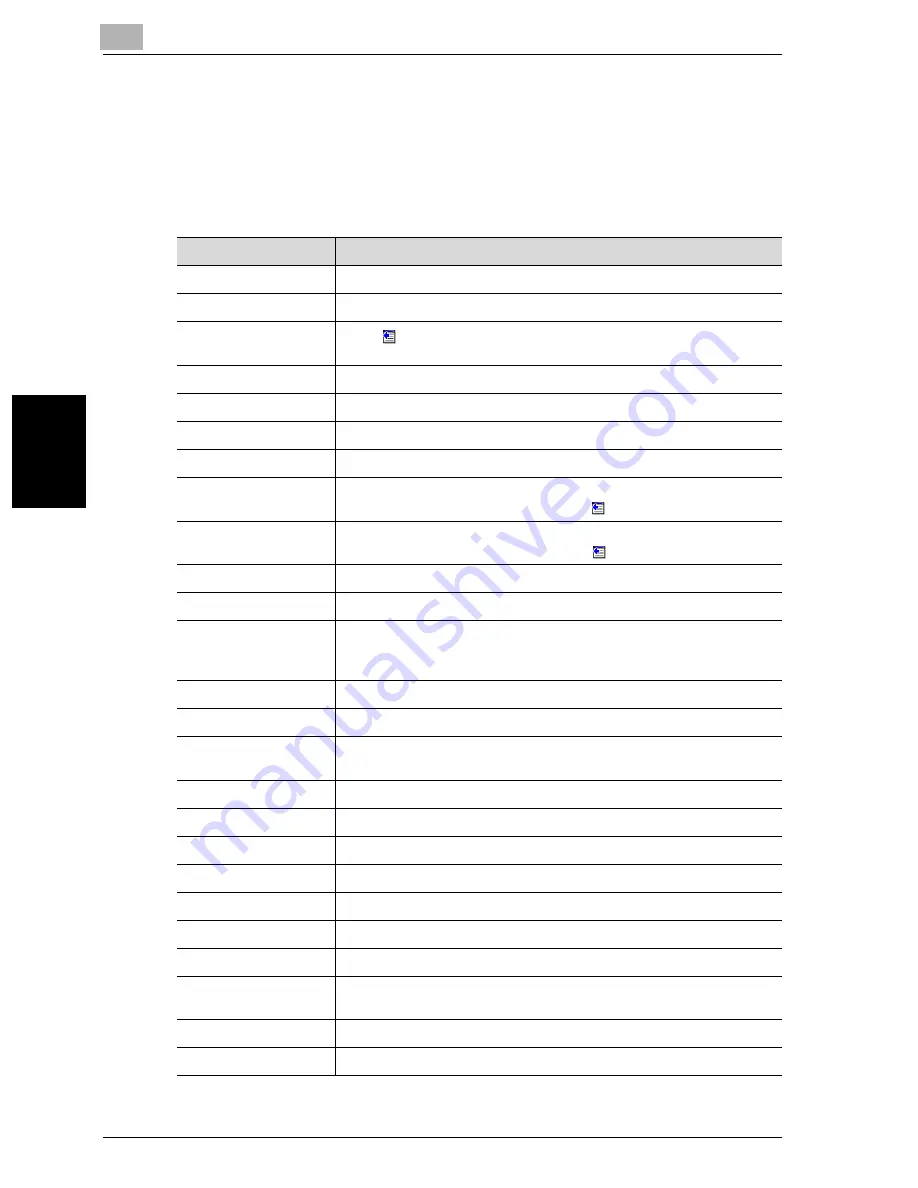
The information to be entered is as follows:
When “E-mail: Scan” is selected
Item
Description
No.
Enter the registration number.
Name
Enter the registration name (up to 24 characters).
Select from Address
Book
Click
, and then select the destination from the list to display the
one-touch lists.
E-Mail Address
Enter the destination e-mail address directly. (up to 320 characters).
Resolution
Select the resolution.
File Type
Select the file format.
Scan Setting
Select the unit of the data to be saved.
Subject
Specify the subject (Not Specified, 1 to 10). When “Not Specified” was
selected, the default title is used. Click
to check the contents.
Text
Specify the text (Not Specified, 1 to 10). When “Not Specified” was
selected, the default text is used. Click
to check the contents.
Simplex/Duplex
Select “1-Sided”, “2-Sided”, or “Cover + 2-Sided”.
Original Type
Select the quality of the original such as text or photo.
Color
Select the color mode. The file formats that can be saved may be
limited depending on the color settings. For details, refer to “File Type”
on page 2-43.
Separate Scan
Select “ON” or “OFF”.
Background Removal
Adjust the background darkness.
Scan Size
Select the original size (“Auto”, “Standard Size”, “Custom Size”).
For “Custom Size”, specify the horizontal and vertical scanning sizes.
File Name
Enter the file name (up to 30 characters).
Original Direction
Select the orientation of the original document.
Bind
Select the original binding position.
Special Original
Specify whether to specify a mixed original document.
Thick Original
Select whether to enable a thick original document.
Book Scanning
Select whether to enable book scanning.
Method
If book scanning is enabled, select the scanning method type.
Center Erase
When Book Copy is enabled, specify the width of the center of the
spread document to be erased.
Bind Direction
If book scanning is enabled, select the binding direction.
Erase
Specify the width of the perimeter of the document to be erased.
Содержание cm2520
Страница 1: ......
Страница 19: ...Introduction x 18 cm2520...
Страница 20: ...1 Before Using the Scan Functions Chapter 1 Before Using the Scan Functions...
Страница 33: ...1 Before Using the Scan Functions 1 14 cm2520 Before Using the Scan Functions Chapter 1...
Страница 34: ...2 Scanning Documents Chapter 2 Scanning Documents...
Страница 106: ...Scanning Documents 2 cm2520 2 73 Scanning Documents Chapter 2 4 Touch Yes to delete the job 5 Touch Close...
Страница 112: ...3 Specifying Settings From the Control Panel Chapter 3 Specifying Settings From the Control Panel...
Страница 259: ...3 Specifying Settings From the Control Panel 3 148 cm2520 Specifying Settings From the Control Panel Chapter 3...
Страница 260: ...4 Specifying Settings Using Web Connection Chapter 4 Specifying Settings Using Web Connection...
Страница 332: ...Specifying Settings Using Web Connection 4 cm2520 4 73 Specifying Settings Using Web Connection Chapter 4...
Страница 375: ...4 Specifying Settings Using Web Connection 4 116 cm2520 Specifying Settings Using Web Connection Chapter 4...
Страница 376: ...5 Scan Function Troubleshooting Chapter 5 Scan Function Troubleshooting...
Страница 378: ...6 Appendix Chapter 6 Appendix...
Страница 383: ...6 Appendix 6 6 cm2520 Appendix Chapter 6...
Страница 395: ...6 Appendix 6 18 cm2520 Appendix Chapter 6...
Страница 396: ......


