Specifying Settings From the Control Panel
3
cm2520
3-105
Sp
ec
ifyin
g
Set
tin
gs
F
ro
m
th
e
Co
nt
ro
l Pa
ne
l
Chapter 3
3.24
Status Notification Settings
Settings for notifying the administrator of the machine’s status by e-mail can
be specified. The status notification is sent if the e-mail address is entered
and if any of the notification conditions are selected.
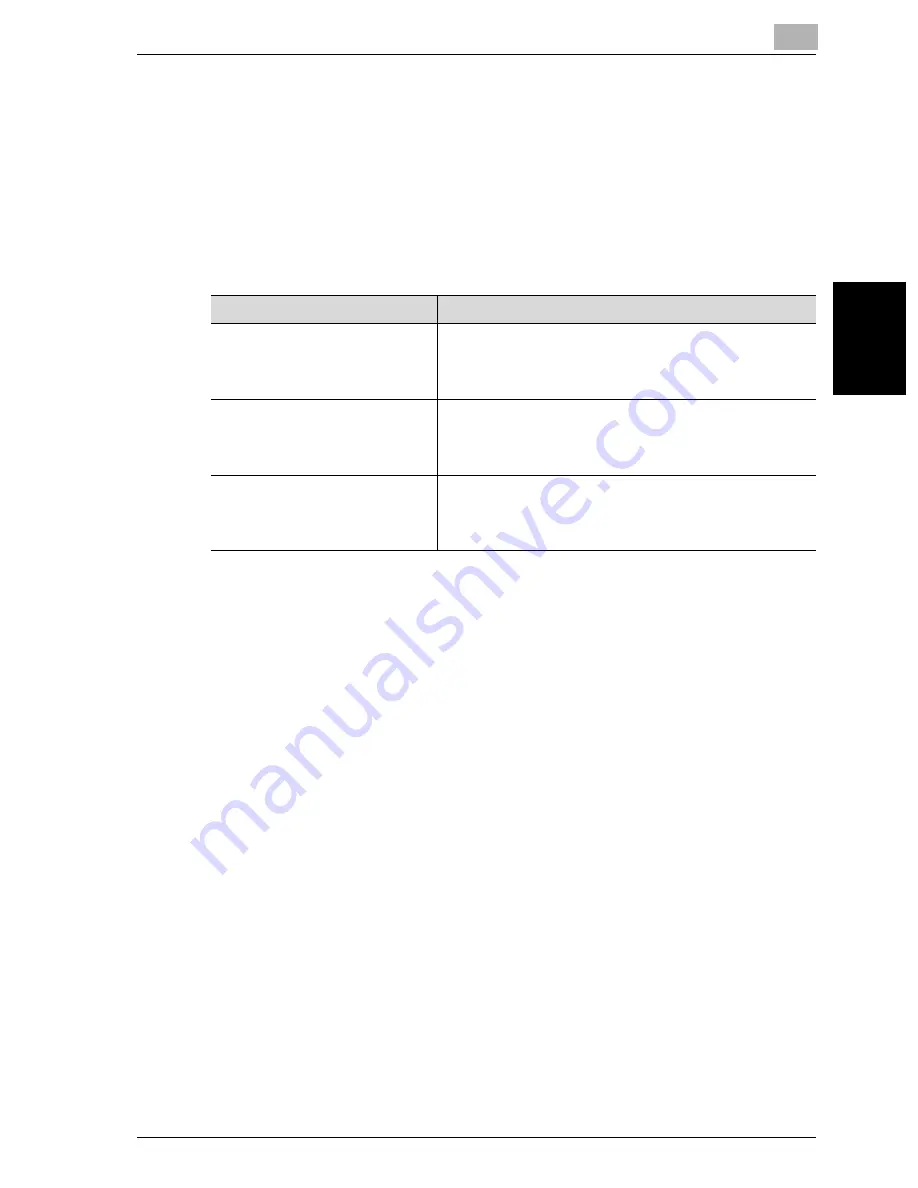
Status Notification Parameters
The status notification parameters are as follows:
Specify the “Printer Location” that is included in the e-mail text of the status
notification function in Web Connection. For details, refer to “IPP” on
page 4-82.
To specify status notification settings
1
In the Administrator Setting screen, touch [5 Network Setting]. (Refer to
page 3-8 for more details.)
2
In the Network Setting screen, touch [9 Detail Setting].
3
In the Detail Setting screen, touch [3 Status Notification Setting].
–
To quit specifying the Utility mode setting, touch [Exit] in the sub
display area. Otherwise, cancel the Utility mode by touching [Close]
in each screen until the screen for the Copy, Fax, Scan or Box mode
appears.
–
Refer to “E-Mail TX (SMTP) Parameters” on page 3-88 for more de-
tails.
The Status Notification Setting screen appears.
Item
Description
Notification Address Setting
Sets the e-mail address where notification of the machine’s
status is to be sent. Use the keyboard that appears in the
touch panel to type in the e-mail address (up to 320
characters).
Notification Item Setting
Sets the conditions under which notification of the ma-
chine’s status is to be sent by email. For details on specify-
ing the settings, refer to “Notification Item Setting” on
page 3-106.
Notification Time Setting
Sets the time when notification of the machine’s status is to
be sent. To change the value, press the [C] (clear) key, and
then use the keypad to type in the value (between 1 and 10
minutes).
Содержание cm2520
Страница 1: ......
Страница 19: ...Introduction x 18 cm2520...
Страница 20: ...1 Before Using the Scan Functions Chapter 1 Before Using the Scan Functions...
Страница 33: ...1 Before Using the Scan Functions 1 14 cm2520 Before Using the Scan Functions Chapter 1...
Страница 34: ...2 Scanning Documents Chapter 2 Scanning Documents...
Страница 106: ...Scanning Documents 2 cm2520 2 73 Scanning Documents Chapter 2 4 Touch Yes to delete the job 5 Touch Close...
Страница 112: ...3 Specifying Settings From the Control Panel Chapter 3 Specifying Settings From the Control Panel...
Страница 259: ...3 Specifying Settings From the Control Panel 3 148 cm2520 Specifying Settings From the Control Panel Chapter 3...
Страница 260: ...4 Specifying Settings Using Web Connection Chapter 4 Specifying Settings Using Web Connection...
Страница 332: ...Specifying Settings Using Web Connection 4 cm2520 4 73 Specifying Settings Using Web Connection Chapter 4...
Страница 375: ...4 Specifying Settings Using Web Connection 4 116 cm2520 Specifying Settings Using Web Connection Chapter 4...
Страница 376: ...5 Scan Function Troubleshooting Chapter 5 Scan Function Troubleshooting...
Страница 378: ...6 Appendix Chapter 6 Appendix...
Страница 383: ...6 Appendix 6 6 cm2520 Appendix Chapter 6...
Страница 395: ...6 Appendix 6 18 cm2520 Appendix Chapter 6...
Страница 396: ......


