background image

Instructions for Food sealer Handy model 7952

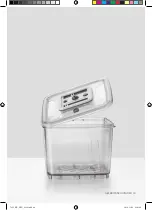
Vacuum sealing of a vacuum container

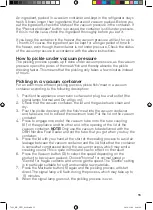
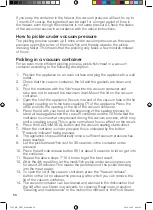
1.  Make sure that the appliance has been charged according to the 

instructions in “Charging of the appliance”.

2.  Check that the vacuum container, the lid and the gaskets are clean and 

dry.

3.  Put the ingredients in the vacuum container, but be careful not to exceed 

the maximum level. 

4.  Remove the outer housing (2) by turning it until the marking on the 

appliance is pointing against the open padlock icon.

5.  Press the inner sealing mouthpiece (3) against the valve of the container 

and make sure that it fits tightly  between the mouthpiece and the valve.

6.  Press the lid with your hand at the beginning of the sealing process to 

avoid air leakage between the vacuum container and the lid. Note that 

the container is somewhat compressed during the vacuum process, which 

may emit a creaking sound. This is quite normal and has no effect on the 

result.

7.  Press the on/off switch and the vacuum sealing starts. 

8.  Keep the on/off switch pressed for 1 minute to complete the vacuum 

sealing.

9.  Remove the appliance from the lid. 

10.  When the container is under pressure this is indicated by the button 

”Pressure indicator” being pressed.

11.  To test the vacuum sealing, try to lift the lid. 

12.  To open the lid of the vacuum container, press the ”Vacuum release” 

button on the lid to release the pressure, after which you can remove the 

lid of the vacuum container.

13.  Let the appliance rest for 1 minute between each process in order to 

avoid overheating.   

14.  The vacuum container can be cleaned and washed in the dishwasher (not 

the lid) after use. Never use solvents for cleaning. Read more in section 

”Cleaning and maintenance” in the instruction manual for the Food Sealer.

15.  If it looks as if dirt has penetrated under the white protection lid at the 

underside of the lid, you can remove the protection lid and hand wash it. 

Next, wipe the underside of the lid of the vacuum container with a damp 

cloth before you put the protection lid back on. Check that the protection 

lid fits correctly. Please note that only the white protection lid can be hand 

washed – not the entire lid

15. 

NOTE!

 The vacuum container and the lid must not be used in a 

microwave oven.

An ingredient, packed in a vacuum container and kept in the refrigerator stays 

fresh 5 times longer than ingredients that are not vacuum packed. Before you 

eat the ingredient, check the status of the vacuum pressure in the container. If 

the “Pressure Indicator” button is pressed, the container is still under pressure. 

If this is not the case, check the ingredient thoroughly before you eat it. 

62

63

7962_KK_UVN_0914.indd   63

2014-11-06   09:41:16

Содержание 7949

Страница 1: ...7962_KK_UVN_0914 indd 1 2014 11 06 09 41 06...

Страница 2: ...anvisning svenska sida 7 17 Brugsanvisning dansk side 18 29 Bruksanvisning norsk side 30 41 K ytt ohjeet suomi sivu 42 53 Instruction manual english page 54 65 2 7962_KK_UVN_0914 indd 2 2014 11 06 09...

Страница 3: ...Modell 7949 OBH Nordica Food Sealer Supreme 3 7962_KK_UVN_0914 indd 3 2014 11 06 09 41 07...

Страница 4: ...10 13 7 9 8 6 12 11 1 2 3 5 4 Modell 7950 OBH Nordica Food Sealer Fresh n easy 4 7962_KK_UVN_0914 indd 4 2014 11 06 09 41 10...

Страница 5: ...Modell 7951 OBH Nordica Food Sealer Prestige 11 10 9 8 7 6 12 13 14 1 2 3 5 4 5 7962_KK_UVN_0914 indd 5 2014 11 06 09 41 13...

Страница 6: ...Modell 7952 OBH Nordica Food Sealer Handy 6 7962_KK_UVN_0914 indd 6 2014 11 06 09 41 14...

Страница 7: ...k med handen p locket och dra ur vakuumslangen direkt n r apparaten st ngts av 10 N r beh llaren r under tryck indikeras detta genom att knappen Pressure Indicator r nertryckt 11 F r att testa resulta...

Страница 8: ...p locket i b rjan av f rslutningsprocessen f r att undvika luftl ckage mellan vakuumbeh llare och lock Notera att beh llaren komprimeras n got under vakuumprocessen vilket kan medf ra att ett knakande...

Страница 9: ...sa innan skyddslocket s tts tillbaka Kontrollera att skyddslocket sitter ordentligt p plats Notera att inte hela locket kan handdiskas utan enbart det vita skyddslocket 16 OBS Vakuumbeh llare och lock...

Страница 10: ...knappen p locket f r att sl ppa p trycket d refter kan vakuumbeh llarens lock lyftas bort 12 L t apparaten vila 1 minut mellan varje anv ndning f r att undvika verhettning 13 Vakuumbeh llaren kan ren...

Страница 11: ...rekt 7 N r beh llaren r under tryck indikeras detta genom att knappen Pressure indicator r nertryckt 8 Apparaten stoppar automatiskt n r tillr ckligt vakuumtryck uppn tts 9 L t det marinerade k ttet f...

Страница 12: ...Datummarkering P locket kan du enkelt st lla in f rpackningsdag och m nad genom att skjuta mark rerna till aktuellt datum 12 7962_KK_UVN_0914 indd 12 2014 11 06 09 41 14...

Страница 13: ...ppen Pressure indicator r nertryckt 10 F r att testa vakuumf rslutningen prova att lyfta p locket 11 F r att ppna vakuumbeh llarens lock tryck p Vacuum release knappen p locket f r att sl ppa p trycke...

Страница 14: ...uftl ckage mellan vakuumbeh llare och lock Notera att beh llaren komprimeras n got under vakuumprocessen vilket kan medf ra att ett knakande ljud uppst r Detta r normalt och inget som p verkar resulta...

Страница 15: ...a innan skyddslocket s tts tillbaka Kontrollera att skyddslocket sitter ordentligt p plats Notera att inte hela locket kan handdiskas utan enbart det vita skyddslocket 18 OBS Vakuumbeh llare och lock...

Страница 16: ...p Vacuum release knappen p locket f r att sl ppa p trycket d refter kan vakuumbeh llarens lock lyftas bort 13 L t apparaten vila 1 minut mellan varje process f r att undvika verhettning 14 Vakuumbeh l...

Страница 17: ...ar resultatet 7 Tryck p str mbrytaren och vakuumf rslutningen p b rjas 8 H ll str mbrytaren intryckt i 1 minut f r att fullf lja vakuumf rslutningen 9 N r beh llaren r under tryck indikeras detta geno...

Страница 18: ...vorved en knirkende lyd kan opst Dette er helt normalt og vil ikke p virke resultatet 8 Apparatet stopper automatisk n r der er opn et tilstr kkeligt vakuumtryk 9 Tryk med h nden p l get og tr k vakuu...

Страница 19: ...n overskrid ikke det anviste maks niveau S t l get p vakuumbeholderen 4 Tryk den ene ende af vakuumslangen fast p apparatets luftindsugning 8 Den anden ende trykkes ned i hullet p vakuumbeholderens l...

Страница 20: ...met snavs ind under det hvide beskyttelsesl g p l gets underside kan beskyttelsesl get tages af og vaskes i h nden T r derefter undersiden af vakuumbeholderens l g med en fugtig klus inden beskyttelse...

Страница 21: ...orefter l get kan l ftes af 12 Lad apparatet hvile 1 minut hver gang det har v ret i brug og inden det anvendes igen for herved at undg overophedning 13 Efter brug kan vakuumbeholderen reng res og vas...

Страница 22: ...en er under tryk vil Pressure indicator knappen v re trykket ned 8 Apparatet stopper automatisk n r der er opn et tilstr kkeligt vakuumtryk 9 Lad det marinerede k d fisk hvile i 30 sekunder i beholder...

Страница 23: ...Datomarkering Pakkedag og m ned kan nemt indstilles p l get ved at skubbe mark rerne hen til den aktuelle dato 23 7962_KK_UVN_0914 indd 23 2014 11 06 09 41 14...

Страница 24: ...e trykket ned 10 For at teste resultatet kan man fors ge at l fte l get 11 Vakuumbeholderens l g bnes ved at trykke p Vacuum release knappen for at lukke trykket ud hvorefter l get kan l ftes af 12 La...

Страница 25: ...eholder og l g Bem rk at luften i beholderen komprimeres under vakuumprocessen hvorved en knirkende lyd kan opst Dette er helt normalt og vil ikke p virke resultatet 6 Tryk p knappen placeret skr t ov...

Страница 26: ...gtig klus inden beskyttelsesl get s ttes tilbage p plads Kontroller at beskyttelsesl get sidder korrekt Bem rk at hele l get ikke kan vaskes kun det hvide beskyttelsesl g 17 OBS Vakuumbeholdere og l g...

Страница 27: ...efter l get kan l ftes af 13 Lad apparatet hvile 1 minut hver gang det har v ret i brug og inden det anvendes igen for herved at undg overophedning 14 Efter brug kan vakuumbeholderen reng res og vaske...

Страница 28: ...helt normalt og vil ikke p virke resultatet 7 Tryk p t nd sluk knappen hvorefter vakuumlukningen p begyndes 8 Hold t nd sluk knappen inde i 1 minut for at fuldf re vakuumlukningen 9 N r beholderen er...

Страница 29: ...Datomarkering Pakkedag og m ned kan nemt indstilles p l get ved at skubbe mark rerne hen til den aktuelle dato 29 7962_KK_UVN_0914 indd 29 2014 11 06 09 41 15...

Страница 30: ...tte er normalt og p virker ikke resultatet 8 Apparatet stopper automatisk n r riktig vakuumtrykk oppn s 9 Trykk med h nden p lokket og dra ut vakuumslangen med en gang apparatet stopper 10 N r boksen...

Страница 31: ...n i vakuumboksen men ikke overskrid maks niv et Sett lokket p vakuumboksen 4 Trykk fast den ene enden av vakuumslangen p apparatets tilkobling 8 og den andre enden i hullet p vakuumboksens lokk OBS Br...

Страница 32: ...lseslokket p undersiden p lokket da kan dette beskyttelseslokket tas av og vaskes i h nden T rk s av undersiden p vakuumboksens lokk med en fuktig klut f r beskytteleslokket settes p igjen Kontroller...

Страница 33: ...akuumboksen trykkes det p Vacuum release knappen p lokket for lette p trykket og deretter kan lokket p vakuumboksen tas bort 12 La apparatet hvile 1 minutt mellom hver vakuumering for unng overoppheti...

Страница 34: ...k 5 Trykk med h nden p lokket i begynnelsen for unng f luft mellom vakuumboksen og lokket Husk at boksen komprimerer noe under vakuumprosessen og dette kan medf re at man h rer en knitrende lyd Dette...

Страница 35: ...n fuktig klut f r beskytteleslokket settes p igjen Kontroller at beskyttelseslokket sitter riktig p plass Merk at det er bare er det hvite beskyttelseslokket som kan h ndvaskes og ikke hele lokket 16...

Страница 36: ...esultatet pr v og l ft p lokket 11 For pne lokket p vakuumboksen trykkes det p Vacuum release knappen p lokket for lette p trykket og deretter kan lokket p vakuumboksen tas bort 12 La apparatet hvile...

Страница 37: ...uft mellom vakuumboksen og lokket Husk at boksen komprimerer noe under vakuumprosessen og dette kan medf re at man h rer en knitrende lyd Dette er normalt og p virker ikke resultatet 6 Trykk p knappen...

Страница 38: ...n fuktig klut f r beskytteleslokket settes p igjen Kontroller at beskyttelseslokket sitter riktig p plass Merk at det er bare er det hvite beskyttelseslokket som kan h ndvaskes og ikke hele lokket 17...

Страница 39: ...lokket 12 For pne lokket p vakuumboksen trykkes det p Vacuum release knappen p lokket for lette p trykket og deretter kan lokket p vakuumboksen tas bort 13 La apparatet hvile 1 minutt mellom hver vaku...

Страница 40: ...ed lokket i begynnelsen for unng f luft mellom vakuumboksen og lokket Husk at boksen komprimerer noe under vakuumprosessen og dette kan medf re at man h rer en knitrende lyd Dette er normalt og p virk...

Страница 41: ...Vakuumboksen og lokket skal ikke brukes i mikrob lgeovn Datomerking P lokket kan du enkelt stille inn pakke dag og m ned ved skyve mark rene til aktuell dato 41 7962_KK_UVN_0914 indd 41 2014 11 06 09...

Страница 42: ...verran painetta mink seurauksena astia saattaa natista T m on aivan normaalia eik sill ole vaikutusta tyhji innin lopputulokseen 8 Laite pys htyy automaattisesti kun riitt v tyhji paine on saavutettu...

Страница 43: ...astiaan merkitty enimm ist ytt m r Kiinnit tyhji astian kansi 4 Paina tyhji letkun toinen p laitteen letkuliit nt n 8 ja toinen p tyhji astian kannessa olevaan reik n T RKE K yt ainoastaan OBH Nordic...

Страница 44: ...ssyt likaa t m suojakansi voidaan irrottaa ja pest k sin Pyyhi sen j lkeen tyhji astian kannen alapuoli kostealla liinalla ennen kuin asetat suojakannen takaisin paikalleen Varmista ett suojakansi on...

Страница 45: ...nostamalla varovasti astian kantta 11 Avaa tyhji astian kansi painamalla kannessa olevaa Vacuum release painiketta jolloin paine p see purkautumaan T m n j lkeen voit nostaa tyhji astian kannen irti...

Страница 46: ...ell tyhji intiprosessin alussa jotta tyhji astian ja kannen v list ei p se vuotamaan ilmaa Huomaa ett astiaan syntyy tyhji innin aikana jonkin verran painetta mink seurauksena astia saattaa natista T...

Страница 47: ...nen takaisin paikalleen Varmista ett suojakansi on kunnolla paikallaan Huomaa ett koko kantta ei voi pest k sin vaan vain valkoinen suojakansi voidaan pest k sin 16 T RKE Tyhji astiaa ja kantta ei saa...

Страница 48: ...on pohjassa 10 Kokeile tyhji innin lopputulosta nostamalla varovasti astian kantta 11 Avaa tyhji astian kansi painamalla kannessa olevaa Vacuum release painiketta jolloin paine p see purkautumaan T m...

Страница 49: ...stian kannessa olevaan reik n 5 Paina kantta k dell tyhji intiprosessin alussa jotta tyhji astian ja kannen v list ei p se vuotamaan ilmaa Huomaa ett astiaan syntyy tyhji innin aikana jonkin verran pa...

Страница 50: ...tietoja saat tyhji pakkauslaitteen k ytt ohjeen kohdasta Puhdistus ja hoito 16 T RKE Tyhji astiaa ja kantta ei saa k ytt mikroaaltouunissa P iv m r merkint Voit merkit tyhji innin ajankohdan eli p iv...

Страница 51: ...utulosta nostamalla varovasti astian kantta 12 Avaa tyhji astian kansi painamalla kannessa olevaa Vacuum release painiketta jolloin paine p see purkautumaan T m n j lkeen voit nostaa tyhji astian kann...

Страница 52: ...ippulukon kuvaketta kohti 5 Paina sisempi tyhji intisuutin 3 astian venttiili vasten ja varmista ett suuttimen ja venttiilin v linen liitos on tiivis 6 Paina kantta k dell tyhji intiprosessin alussa j...

Страница 53: ...nen takaisin paikalleen Varmista ett suojakansi on kunnolla paikallaan Huomaa ett koko kantta ei voi pest k sin vaan vain valkoinen suojakansi voidaan pest k sin 15 T RKE Tyhji astiaa ja kantta ei saa...

Страница 54: ...process which may emit a creaking sound This is quite normal and has no effect on the result 8 The appliance stops automatically once a sufficient vacuum pressure has been reached 9 Press the lid wit...

Страница 55: ...let the signal lamps Normal and Dry will go on 2 Check that the vacuum container the lid and the gaskets are clean and dry 3 Pour the pickle dressing with the fish meat into the vacuum container and t...

Страница 56: ...Never use solvents for cleaning Read more in section Cleaning and maintenance in the instruction manual for the Food Sealer 15 If it looks as if dirt has penetrated under the white protection lid at t...

Страница 57: ...pressed 10 To test the vacuum sealing try to lift the lid 11 To open the lid of the vacuum container press the Vacuum release button on the lid to release the pressure after which you can remove the l...

Страница 58: ...lid of the vacuum container 5 Press the lid with your hand at the beginning of the sealing process to avoid air leakage between the vacuum container and the lid Note that the container is somewhat com...

Страница 59: ...loth before you put the protection lid back on Check that the protection lid fits correctly Please note that only the white protection lid can be hand washed not the entire lid 16 Note The vacuum cont...

Страница 60: ...is is indicated by the button Pressure indicator being pressed 10 To test the vacuum sealing try to lift the lid 11 To open the lid of the vacuum container press the Vacuum release button on the lid t...

Страница 61: ...the other end into the opening of the lid of the vacuum container 6 Press the lid with your hand at the beginning of the sealing process to avoid air leakage between the vacuum container and the lid N...

Страница 62: ...he protection lid and hand wash it Next wipe the underside of the lid of the vacuum container with a damp cloth before you put the protection lid back on Check that the protection lid fits correctly P...

Страница 63: ...sealing try to lift the lid 12 To open the lid of the vacuum container press the Vacuum release button on the lid to release the pressure after which you can remove the lid of the vacuum container 13...

Страница 64: ...inst the open padlock icon 5 Press the inner sealing mouthpiece 3 against the valve of the container and make sure that it fits tightly between the mouthpiece and the valve 6 Press the lid with your h...

Страница 65: ...loth before you put the protection lid back on Check that the protection lid fits correctly Please note that only the white protection lid can be hand washed not the entire lid 16 NOTE The vacuum cont...

Страница 66: ...7962_KK_UVN_0914 indd 66 2014 11 06 09 41 16...

Страница 67: ...7962_KK_UVN_0914 indd 67 2014 11 06 09 41 16...

Страница 68: ...SE KK 7962 UVN 061114 7962_KK_UVN_0914 indd 68 2014 11 06 09 41 18...

Отзывы: