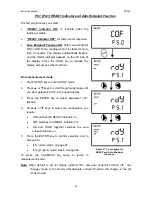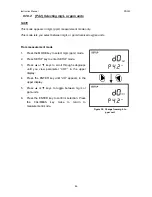
background image

Instruction Manual 


PD 300 

8.3 

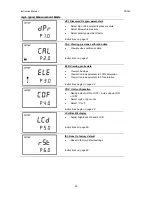
P2.0: Viewing pH electrode data 

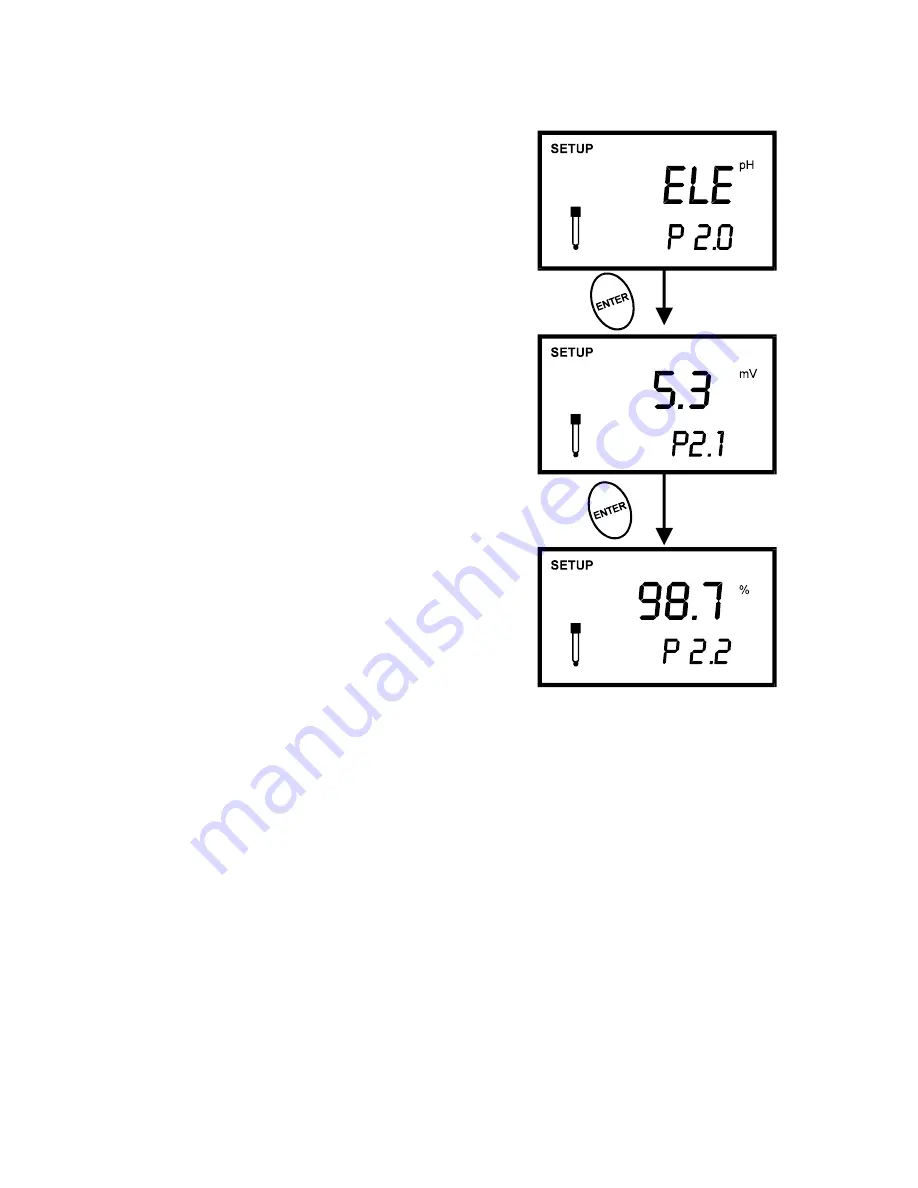
Program 2 has two “view only” options that let you 
check the electrode parameters for diagnostic 
purposes. It lets you view:  


P2.1 = Electrode offset 


P2.2 = Electrode slope 

From pH measurement mode 

1. Press 

the 

MODE

 key to select pH measurement 

mode.  

2. 

Press the SETUP key to enter Set Up mode.  

3. Press the 

 or 

 keys to scroll through 

subgroups until you view parameter P2.0.   

4. 

Press the ENTER key to select parameter 2.1. 

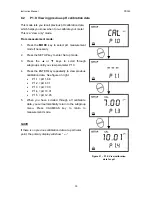
5.  The display shows the electrode offset value.  It is 

the mV offset at pH 7.00. If you have not 
calibrated at any buffer, the primary display shows 
0.00 mV.  

6. 

Press the ENTER key to proceed to P2.2.  

7.  The display shows electrode slope in percentage. 

Slope displayed is the average slope based on the 
pH calibrations. Default setting is 100.0. 

Figure 22: Viewing electrode's 

offset and slope status from pH 

measurement mode  

(The values shown above are for 

illustration purpose. Your meter may 

display different values depending 

on the settings & your 

environmental conditions) 

8.  At any point, you can press the CAL/MEAS key to 

return to measurement mode.  

See figure on right.  


31

Содержание PD 300

Страница 1: ...Instruction Manual PD 300 Waterproof Hand held pH Dissolved Oxygen Temperature Meter Technology Made Easy 68X248910 Rev 3 JUN 06 ...

Страница 2: ......

Страница 3: ... the PD 300 meter do not hesitate to contact the nearest Authorised Distributor Eutech Instruments Oakton Instruments cannot accept any responsibility for damage or malfunction to the meter caused by improper use of the instrument The information presented in this manual is subject to change without notice as improvements are made and does not represent a commitment on the part of Eutech Instrumen...

Страница 4: ...8 3 P2 0 Viewing pH electrode data 31 8 4 P3 0 pH Measurement configuration 32 8 5 P4 0 Resetting to factory default settings pH 36 8 6 P1 0 dPr Dissolved Oxygen Parameters 37 8 7 P2 0 OFS Offset for Saturation Measurement 40 8 8 P3 0 P2 0 CAL Previous Calibration Information Program numbers in are for setup in mg L ppm mode 41 8 9 P4 0 P3 0 ELE Electrode Properties 42 8 10 P5 0 P4 0 COF Unit Conf...

Страница 5: ...16 ADDENDUM 3 METER FACTORY DEFAULT SETTINGS 68 17 WARRANTY 69 18 RETURN OF ITEMS 70 ...

Страница 6: ...has many user friendly features all of which are completely accessible through the water resistant membrane keypad Your meter includes a pH electrode EC DA93506 03B 35805 23 dissolved oxygen electrode with integrated temperature sensor in a submersible cable EC DOHANDY 35640 50 maintenance kit and instruction manual These items are available in a hard plastic carrying case which makes it ideal for...

Страница 7: ...ypad functions and program functions See Figure 2 Figure 2 Full LCD Screen 1 SETUP mode indicator 7 Oxygen solubility indicator in mg L or ppm 13 Probe indicator 2 MEASurement mode indicator 8 Temperature indicator 14 Calibration indicator 3 CALibration indicator 9 pH buffer indicator 15 Function ON OFF indicator 4 pH indicator 10 Automatic Temperature Compensation indicator 16 HOLD indicator 5 sa...

Страница 8: ...ggle between pH or mg L or ppm calibration and temperature calibration refer to Section 4 2 in page 8 CAL MEAS Toggles between Calibration and Measurement mode 1 In pH measurement mode press CAL MEAS to enter pH calibration mode 2 In DO saturation measurement mode press CAL MEAS to enter DO saturation calibration mode 3 In DO mg L or ppm measurement mode press CAL MEAS to enter DO mg L or ppm cali...

Страница 9: ...ve the two screws holding the battery cover See Figure 3 below 2 Remove battery cover to expose batteries 3 Insert batteries Follow the diagram inside the cover for correct polarity 4 Replace the battery cover into its original position and secure into place using the two screws removed earlier Figure 3 Back panel of meter showing meter compartment 4 ...

Страница 10: ...n If you want to use a 3 in 1 pH probe with a built in temperature element or if you want to use a separate temperature probe you will need to disconnect the DO probe to allow for connection of the separate temperature sensor NOTE Keep connectors dry and clean Do not touch connector with soiled hands To connect the pH electrode 1 Slide the BNC connector of the probe over the BNC connector socket o...

Страница 11: ...e 4 2 To remove probe unscrew the metal locking ring by turning the ring counterclockwise and slide up the probe connector While holding onto metal sleeve pull probe away from the meter NOTE Do not substitute other DO probes For a replacement DO probe see the Accessories section Follow the same directions to connect an optional separate temperature element CAUTION Do not pull on the probe cord or ...

Страница 12: ...section page 30 saturation Program 3 0 in the SETUP section page 41 mg L ppm Program 2 0 in the SETUP section page 41 To completely recalibrate your meter or when you use replacement probes it is best to clear old calibration data by resetting the meter To reset the meter to its factory defaults pH Program 4 0 in the SETUP section page 36 saturation Program 7 0 in the SETUP section page 49 mg L pp...

Страница 13: ... temperature value 4 Compare the primary display reading to a NIST traceable thermometer or another thermometer known to be accurate 5 Press the or keys to adjust the primary display reading to agree with your temperature standard 6 Press the ENTER key to confirm temperature calibration and return to Measurement mode NOTE To exit from Temperature Calibration mode without confirming calibration DO ...

Страница 14: ... of the meter Select from the following buffer options pH 1 68 4 01 7 00 10 01 and 12 45 The meter automatically recognises and calibrates to these standard buffer values which makes pH calibration faster and easier Be sure to remove the protective electrode storage bottle or rubber cap of the electrode before calibration or measurement If the electrode has been stored dry hydrate the electrode in...

Страница 15: ...s sample NOTE The temperature element is in the DO electrode For temperature compensated readings dip the DO electrode into the calibration buffer as well 4 Press CAL MEAS to enter pH calibration mode The CAL indicator will be shown The primary display will show the measured reading while the smaller secondary display will indicate the pH standard buffer solution 5 Wait for the measured pH value t...

Страница 16: ...ibration DO NOT press ENTER in step 6 Press CAL MEAS instead If the selected buffer value is not within 1 0 pH from the measured pH value the electrode and buffer icon blink and the ERR annunciator appears in the lower left corner of the display See Figure 8 Figure 7 Next point calibration for pH 4 01 To limit the number of pH buffer values available during calibration see Setup Section 8 4 P3 2 S...

Страница 17: ...rations automatically override existing DO calibration data Figure 9 DO Probe guard Before Calibration Before starting calibration make sure you are in the correct measurement mode When you switch on the meter the meter starts up in the units last used either pH mg L ppm or air saturation For example if you shut off the meter in mg L units the meter will read mg L units when you switch the meter o...

Страница 18: ...aturation 1 Rinse the probe well with deionised rinse water Do not touch the membrane 2 Press the MODE key to select the saturation mode 3 Press the CAL key The CAL indicator will appear above the primary display The primary display shows the current value of the measurement and the secondary display will show 100 0 See figure on right and NOTE above 4 Hold the probe in the air Wait for the readin...

Страница 19: ...play shows the current value of the measurement and the secondary display will show 0 0 5 Wait for the reading to stabilise If the READY indicator feature is enabled it will appear when the reading is stable See page 45 for Ready indicator setup 6 Press the ENTER key The meter automatically calibrates to 0 0 air saturation and returns to Measurement mode See figure on right NOTE The reading in the...

Страница 20: ...on calibration To select between mg L and ppm units see page 46 NOTES ON MG L PPM MODE CALIBRATION During mg L ppm measurement and calibration the meter adjusts to the barometric pressure value that is programmed into the meter It also adjusts to the salinity value that is programmed into the meter You can change the barometric pressure value and salinity value in the mg L ppm SETUP mode see Secti...

Страница 21: ... stable 4 Press the MODE key to select the mg L ppm mode 5 Press the CAL key The CAL indicator will appear above the primary display The primary display shows the current value of the measurement and the secondary display shows the temperature 6 Press the and keys to adjust the reading 7 Press the ENTER key The meter automatically calibrates to the value you entered and returns to Measurement mode...

Страница 22: ...ter the default manual temperature setting is 25 C You can manually set the temperature to match your working conditions using a separate thermometer For automatic temperature compensation ATC simply plug the temperature probe into the meter see page 6 for directions The ATC indicator will light up on the LCD See figure on right Figure 13 Automatic Temperature Compensation NOTE The temperature sen...

Страница 23: ...ary display shows the current temperature setting and the secondary display shows the default value 25 C 4 Check the temperature of your sample using an accurate thermometer 5 Press the or keys to set the temperature to the measured value from step 4 6 Press ENTER to confirm the selected temperature and to return to the pH measurement mode See Figure 14 Figure 14 Manual temperature compensation Th...

Страница 24: ...CD The ATC indicator appears in the lower right hand corner to indicator Automatic Temperature Compensation NOTE For pH manual temperature compensation you must disconnect the DO electrode from the 6 pin connector The ATC indicator will disappear from the display You also need to set a manual temperature compensation value See Section 5 1 2 on page 18 to set Manual Temperature Compensation 4 Dip t...

Страница 25: ...appears and the reading holds until the measured value exceeds the tolerance Then the READY annunciator turns off Taking measurements with the auto endpoint feature selected on When a reading is stable for more than 5 seconds the auto endpoint feature will automatically HOLD the reading The HOLD indicator appears on the left side of the display Press the HOLD key to release the reading Switch the ...

Страница 26: ...with deionised rinse water or rinse solution Figure 16 Change measurement mode from saturation to mg L 2 Select the appropriate measurement mode Press the MODE key to toggle between modes z Saturation z mg L ppm z pH 3 Dip the probe into the sample Stir the probe gently to homogenise the sample Make sure that the sample is continuously flowing past the membrane sensor 4 Note the reading on the dis...

Страница 27: ...dicator selected on Figure 18 Auto endpoint feature When a reading is stable for more than 5 seconds the auto endpoint feature will automatically HOLD the reading The HOLD indicator appears on the left side of the display Press the HOLD key to release the reading To switch the Auto endpoint feature on or off in the SETUP program see Section 8 10 1 on page 45 for directions The values shown here ar...

Страница 28: ...ws a number and the lower display shows Hg or PA 5 Use the or keys to enter the barometric pressure The upper display will show the value you have entered 6 Press ENTER to confirm pressure value 7 Press CAL MEAS to return to Measurement mode or continue with step 4 on page 39 to make a salinity adjustment available in mg L ppm mode only 8 See section 8 6 1 P1 1 Pressure adjustment mode on page 37 ...

Страница 29: ...atically 20 minutes after the last key press If the meter is shut off either automatically or manually the HOLD value will be lost NOTE This meter has an auto endpoint feature When this feature is switched on the display will automatically HOLD a reading that has been stable for more than 5 seconds The HOLD indicator appears Press the HOLD key to release the reading To switch on or off the auto en...

Страница 30: ...ve batteries This adjustment is only available in the saturation or mg L ppm SETUP modes From the measurement mode 1 Press the MODE key to switch to saturation or mg L ppm mode 2 Press SETUP key to enter setup mode 3 Press the or keys to scroll through subgroups until you view parameters LCd in the upper display 4 Press the ENTER key A number 0 8 appears in the upper display and LCd appears in the...

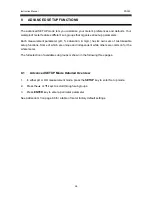
Страница 31: ...customisable setup functions Some of which are unique and independent while others are common for the whole meter The full selection of available sub groups is shown in the following three pages 8 1 Advanced SETUP Mode Detailed Overview 1 In either pH or DO measurement mode press the SETUP key to enter Set up mode 2 Press the or keys to scroll through sub groups 3 Press ENTER key to enter a partic...

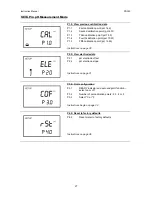
Страница 32: ...1 P1 5 Fifth calibration point pH 12 45 Instructions on page 30 P2 0 View electrode data P2 1 pH electrode offset P2 2 pH electrode slope Instructions on page 31 P3 0 Unit configuration P3 1 READY indicator and auto endpoint function select on or off P3 2 Number of pH calibration points 2 3 4 or 5 P3 3 Select C or F Instructions begin on page 32 P4 0 Reset to factory defaults P4 0 Reset meter to f...

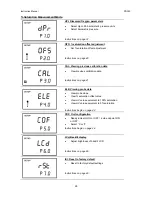
Страница 33: ...revious calibration data Instructions on page 41 ELE Viewing probe data View probe slope View saturation offset value View mV value equivalent to 100 saturation View mV value equivalent to 0 saturation Instructions begin on page 42 COF Unit configuration Ready indicator ON or OFF auto endpoint ON or OFF Select C or F Instructions begin on page 44 LCd Backlit display Adjust brightness of backlit LC...

Страница 34: ...structions on page 41 ELE Viewing probe data View probe slope View mV value equivalent to 100 saturation View mV value equivalent to 0 saturation Instructions begin on page 42 COF Unit configuration Ready indicator ON or OFF auto endpoint ON or OFF Select mg L or ppm units Select C or F Instructions begin on page 44 LCd Backlit display Adjust brightness of backlit LCD Instructions on page 48 rSt R...

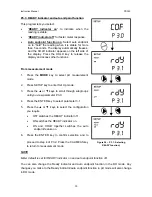
Страница 35: ...de 3 Press the or keys to scroll through subgroups until you view parameter P1 0 4 Press the ENTER key repeatedly to view previous calibration data See figure on right P1 1 pH 1 68 P1 2 pH 4 01 P1 3 pH 7 00 P1 4 pH 10 01 P1 5 pH 12 45 5 When you have scrolled through all calibration data you will automatically return to the subgroup menu Press CAL MEAS key to return to measurement mode NOTE If the...

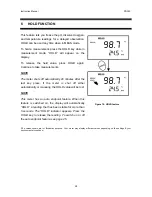
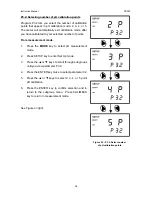
Страница 36: ... 2 1 5 The display shows the electrode offset value It is the mV offset at pH 7 00 If you have not calibrated at any buffer the primary display shows 0 00 mV 6 Press the ENTER key to proceed to P2 2 7 The display shows electrode slope in percentage Slope displayed is the average slope based on the pH calibrations Default setting is 100 0 Figure 22 Viewing electrode s offset and slope status from p...

Страница 37: ... meter to your specific needs You can program the meter to 1 Select READY indicator ON or OFF 2 Select the number of pH calibration points 3 Select between C and F units for temperature readings Figure on the right shows the setup sequence for this program subgroup Figure 23 P 3 0 Unit configuration program 32 ...

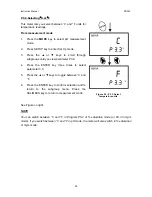
Страница 38: ...ect pH measurement mode 2 Press SETUP key to enter Set Up mode 3 Press the or keys to scroll through subgroups until you view parameter P3 0 4 Press the ENTER key to select parameter 3 1 5 Press the or keys to select the configuration you require OFF switches the READY indicator off ON switches the READY indicator on ON and HOLD together switches the auto endpoint feature on 6 Press the ENTER key ...

Страница 39: ...asurement mode 1 Press the MODE key to select pH measurement mode 2 Press SETUP key to enter Set Up mode 3 Press the or keys to scroll through subgroups until you view parameter P3 0 4 Press the ENTER key twice to select parameter 3 2 5 Press the or keys to select 2 3 4 or 5 point pH calibration 6 Press the ENTER key to confirm selection and to return to the subgroup menu Press CAL MEAS key to ret...

Страница 40: ...parameter P3 0 4 Press the ENTER key three times to select parameter 3 3 5 Press the or keys to toggle between C and F 6 Press the ENTER key to confirm selection and to return to the subgroup menu Press the CAL MEAS key to return to measurement mode Figure 26 P3 3 Select temperature units See Figure on right NOTE You can switch between C and F in Program P5 2 of saturation mode or P4 3 in mg L mod...

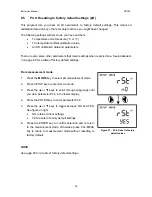
Страница 41: ...or a table of factory default settings From measurement mode Figure 27 P4 0 Reset to factory default values 1 Press the MODE key to select pH measurement mode 2 Press SETUP key to enter Set Up mode 3 Press the or keys to scroll through subgroups until you view parameter P4 0 in the lower display 4 Press the ENTER key to enter parameter P4 0 5 Press the or keys to toggle between NO and YES See figu...

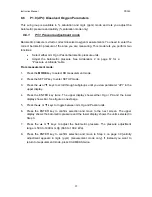
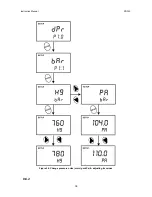
Страница 42: ...ment mode 2 Press the SETUP key to enter SETUP mode 3 Press the or keys to scroll through subgroups until you view parameter dPr in the upper display 4 Press the ENTER key twice The upper display shows either Hg or PA and the lower display shows bAr See figure on next page 5 Press the or keys to toggle between mm Hg and Pascal units 6 Press the ENTER key to confirm selection and move to the next s...

Страница 43: ...Instruction Manual PD 300 Figure 28 Change pressure units mm Hg or kPa adjusting its values 8 6 2 38 ...

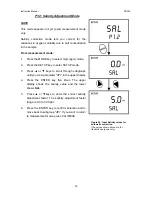
Страница 44: ...r keys to scroll through subgroups until you view parameter dPr in the upper display 4 Press the ENTER key five times The upper display shows the salinity value and the lower shows SAL 5 Press or keys to enter the correct salinity adjustment factor The salinity adjustment factor range is 0 0 to 50 0 ppt 6 Press the ENTER key to confirm selection and to move back to subgroup dPr If you want to retu...

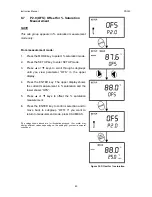
Страница 45: ...rough subgroups until you view parameter OFS in the upper display 4 Press the ENTER key The upper display shows the current measurement in saturation and the lower shows OFS 5 Press or keys to offset the saturation measurement 6 Press the ENTER key to confirm selection and to move back to subgroup OFS If you want to return to measurement mode press CAL MEAS The values shown above are for illustrat...

Страница 46: ...view or mg L ppm 2 Press the SETUP key to enter SETUP mode 3 Press or keys to scroll through subgroups until you view parameter CAL in the upper display 4 Press the ENTER key The upper display shows the calibration data 5 Press the ENTER key to move back to subgroup CAL If you want to return to measurement mode press CAL MEAS NOTE If you did not calibrate this meter in a particular mode the screen...

Страница 47: ...mV value Lets you view the sensor s mV output corresponding to 100 saturation D P4 4 P3 3 0 Saturation mV Value Lets you view the sensor s millivolt output corresponding to 0 saturation From measurement mode 1 Press the MODE key to select the measurement mode for the electrode properties you want to view or mg L ppm 2 Press the SETUP key to enter SETUP mode 3 Press or keys to scroll through subgro...

Страница 48: ...ows the 0 saturation mV value 8 Press the ENTER key to move back to subgroup ELE If you want to return to measurement mode press CAL MEAS The values shown above are for illustration purpose Your meter may display different values depending on the settings your environmental conditions Figure 34 View electrode properties from mg L ppm mode 43 ...

Страница 49: ...t the following parameters A P5 1 P4 1 READY indicator and auto endpoint function B P4 2 mg L or ppm units available in mg L or ppm mode only C P5 2 P4 3 Temperature in C or F 8 10 1 Figure 35 Unit configuration from saturation measurement mode Figure 36 Unit configuration from mg L measurement mode 44 ...

Страница 50: ...From measurement mode 1 Press SETUP key to enter SETUP mode 2 Press or keys to scroll through subgroups until you view parameter COF in the upper display 3 Press the ENTER key to select parameter rdY Ready 4 Press or keys to select the configuration you require ON switches the READY indicator on OFF switches the READY indicator off ON and HOLD together switches the auto endpoint feature on 5 Press...

Страница 51: ...the MODE key to select mg L ppm mode 2 Press SETUP key to enter SETUP mode 3 Press or keys to scroll through subgroups until you view parameter COF in the upper display 4 Press the ENTER key until dO appears in the upper display 5 Press or keys to toggle between mg L or ppm units 6 Press the ENTER key to confirm selection Press the CAL MEAS key twice to return to measurement mode Figure 38 Change ...

Страница 52: ...groups until you view parameter COF in the upper display 3 Press the ENTER key until C or F appears in the upper display 4 Press or keys to toggle between C and F 5 Press the ENTER key to confirm selection and to return to the subgroup menu Press the CAL MEAS key to return to measurement mode Figure 39 To change from units of measurement for temperature Note Any changes made to the temperature uni...

Страница 53: ...ment mode 1 Press SETUP key to enter SETUP mode 2 Press or keys to scroll through subgroups until you view parameter LCd in the upper display 3 Press the ENTER key A number 0 8 appears in the upper display and LCd appears in the lower display 4 Press or keys to select from level 0 dimmest light to level 8 brightest light 5 Press the ENTER key to confirm selection and to return to the subgroup menu...

Страница 54: ...alibration value All DO calibration data and parameters There are also some other parameters that retain settings when reset is done See Addendum 3 on page 68 for a table of factory default settings From measurement mode Figure 41 Reset to factory defaults 1 Press SETUP key to enter SETUP mode 2 Press or keys to scroll through subgroups until you view parameter rSt in the upper display 3 Press the...

Страница 55: ...the electrode as recommended above in pH electrode storage or as recommended by the electrode manufacturer 3 Prior to next use rinse the liquid junction with de ionised water and shake dry never wipe the electrode NOTE If this does not restore electrode to normal response see Reactivating the pH electrode section below pH electrode cleaning Salt deposits Dissolve the deposits by immersing the elec...

Страница 56: ...tilation and waste disposal Safety goggles and protective clothing must be worn while performing this procedure If possible replace with another electrode instead of performing this re activation procedure 1 Dip or stir the pH electrode in alcohol for 5 minutes 2 Leave the electrode in tap water for 15 minutes 3 Dip and stir the electrode in concentrate acid such as HCL or H2SO4 for five minutes 4...

Страница 57: ...lectrical current which flows through the cable to the meter The electric current produced is proportional to the oxygen that passes through the membrane and the layer of electrolyte This makes it possible to measure the partial pressure of oxygen in the sample at a given temperature Since the DO in the sample is consumed by the cathode it is essential that a new sample must flow past the membrane...

Страница 58: ...fusing through the membrane the membrane must be cleaned at regular intervals to assure maximum reliability After using the probe rinse the probe in clean water and wipe it with a soft cloth or paper to avoid any hardening of deposits If growth develops on the probe use a disinfecting chemical to clean NOTE Although the membrane is strong and not easily damaged wipe it gently while cleaning it If ...

Страница 59: ...o replace the membrane cap with pre installed membrane Replacement is much easier with single membrane housing Simply unscrew the old membrane cap housing add solution to the new housing and screw the new cap housing in place 1 Fill the membrane cap housing with electrolyte solution and inspect the bottom for leaks If the solution drops are leaking from the membrane use a new cap housing 2 If the ...

Страница 60: ...e probe 3 Hold the probe under hot running water and brush away the white oxide on the cylindrical anode with a stiff plastic brush do not use metal cleaning material 4 If the cathode has any deposits remove them with a light scouring powder Do not polish the cathode 5 Using the installation tool unscrew and remove the membrane lock from the membrane cap See Figure 44 6 Remove the membrane and O r...

Страница 61: ...eal the membrane on the O ring repeat steps 8 11 for membrane replacement only 13 If the assembly is leak free empty the water and fill the membrane cap with electrolyte to the brim 14 Tap the side of the housing gently to remove any air bubble that may be sticking to the membrane 15 Screw the cap onto the probe Excess electrolyte will drain out 16 Replace probe guard 17 Calibrate the probe see se...

Страница 62: ...will deplete on usage and will need to be replaced periodically Your new DO probe comes with accessories of one 50 ml replacement electrolyte solution and a spare membrane cap The replacement electrolyte comes premixed and ready to use To order more electrolyte solution see Accessories section 57 ...

Страница 63: ...cal or electronic problem with the probe Unscrew the membrane cap discard the electrolyte membrane and O ring Dry the internals of the probe especially the cathode with a soft cloth Switch the meter ON and observe the display If the display reads zero the probe and cable circuitry are alright Service probe and change membrane If the display does not read zero but some other value then there is pro...

Страница 64: ...er to tighten the nut under the anode before fitting a new anode If it is suspected that a deposit is coating the silver cathode clean the cathode with 400 grit wet dry emery paper or with some scouring powder The deposit is sometimes visible as a brownish stain on the surface of the cathode 4 Display values are erratic when membrane is lightly touched Membrane has bulged outwards The membrane has...

Страница 65: ...Probe not deep enough in sample e External noise pickup or induction caused by nearby electric motor f Broken probe a Fill probe with reference electrolyte b Tap probe to remove bubbles c Clean the probe and re calibrate d Make sure sample entirely covers the probe sensors e Move or switch off interfering motor f Replace probe OR or UR on upper display a Probe is shorted b Probe is in out of range...

Страница 66: ...value clean probe See Calibration or Probe Maintenance section Battery indicator blinks Low battery level Need new batteries or battery connection is bad Clean battery contacts Replace batteries with fresh ones noting polarity If an error message appears in the primary display the upper row of larger digits switching off the meter and switching it on again may eliminate the error message If error ...

Страница 67: ...nput DO Probe Galvanic with integral Temperature Sensor Response Time 40 seconds to achieve 93 of the reading No of DO Calibration Points Single point at 100 in saturated air or air saturated water Temperature Compensation Automatic or manual from 0 to 100 C pH Calibration Up to 5 points pH 1 68 4 01 7 00 10 01 12 45 pH Slope Offset Display Yes Operating Temperature Range 0 to 50 C HOLD function Y...

Страница 68: ...EW Submersible Gel filled pH combination electrode with 15 cm ABS guard single annular ceramic junction and 3 meter cable length EC DA93506 03B General Purpose Plastic body Gel Filled 3 in 1 pH Temp Combination Electrode 12x110mm BNC connector 1m cable length EC FE73528 01W Temperature probe for CyberScan PD 300 meter EC PHWP TEM01W pH Carrying kit set hard plastic carrying case comprises of 1 x p...

Страница 69: ...0 80 Submersible DO Temp electrode with 25 ft cable 35640 52 also includes 35640 80 Submersible DO Temp electrode with 50 ft cable 35640 54 also includes 35640 80 Submersible DO Temp electrode with 100 ft cable 35640 56 also includes 35640 80 Membrane cap assembly membrane o ring membrane lock bottom cap 35640 72 Maintenance kit for DO electrode Two membrane cap assemblies 35640 72 and a 30 mL bot...

Страница 70: ... 00 buffer sachets 20 ml x 20 pcs EC BU 7BS 35653 02 pH 10 01 buffer sachets 20 ml x 20 pcs EC BU 10BS 35653 03 pH De ionised water rinse sachets 20 ml x 20 pcs EC RIN WT 35653 00 pH sachet assortment pack 5 each of pH 4 01 pH 7 00 pH 10 01 and de ionised water sachets per box EC AST PK 35653 04 Protein cleaning solution for pH electrode EC DPC BT 00653 06 Storage solution for pH electrode EC RE 0...

Страница 71: ...factors water temperature salinity and atmospheric pressure 1 Amount of DO increases with decreasing temperature colder water holds more oxygen 2 Amount of DO increases with decreasing salinity freshwater holds more oxygen than saltwater does 3 Amount of DO decreases with decreasing atmospheric pressure amount of DO absorbed in water decreases as altitude increases The chart below shows the solubi...

Страница 72: ...tion value in air will automatically adjust to a value other than 100 see corrected saturation value column below The adjusted value is correct for the new barometric pressure setting See page 37 for information on how to adjust the barometric pressure Pressure vs Altitude ALTITUDE feet meters PRESSURE mm HG CORRECTED SATURATION VALUE 0 sea level 0 sea level 760 100 500 152 4 746 98 1 1000 304 8 7...

Страница 73: ...slope P2 2 100 0 No slope adjustment COF Ready indicator P3 1 Ready On Ready indicator on auto endpoint off pH calibration points P3 2 3 Selects number of calibration points Minimum 2 points C or F P3 3 No default C or F remains as selected rSt pH factory default P4 0 No Retains your current settings DO parameter dPr Barometric pressure inputs P1 1 Hg Hg or Pa 760 mm Hg Adjustable from 500 1499 mm...

Страница 74: ...period please return freight pre paid and correction will be made without charge Eutech Instruments Oakton Instruments will determine if the product problem is due to deviations or customer misuse Out of warranty products will be repaired on a charged basis Exclusions The warranty on your instrument shall not apply to defects resulting from Improper or inadequate maintenance by customer Unauthoris...

Страница 75: ...eason the items are to be returned For your protection items must be carefully packed to prevent damage in shipment and insured against possible damage or loss Eutech Instruments Oakton Instruments will not be responsible for damage resulting from careless or insufficient packing A restocking charge will be made on all unauthorised returns NOTE Eutech Instruments Pte Ltd Oakton Instruments reserve...

Страница 76: ...ow Oakton Instruments P O Box 5136 Vernon Hills IL 60061 USA Tel 1 888 462 5866 Fax 1 847 327 2984 E mail info 4oakton com Web site www 4oakton com Eutech Instruments Pte Ltd Blk 55 Ayer Rajah Crescent 04 16 24 Singapore 139949 Tel 65 6778 6876 Fax 65 6773 0836 E mail marketing eutechinst com Web site www eutechinst com Distributed by ...

Отзывы: