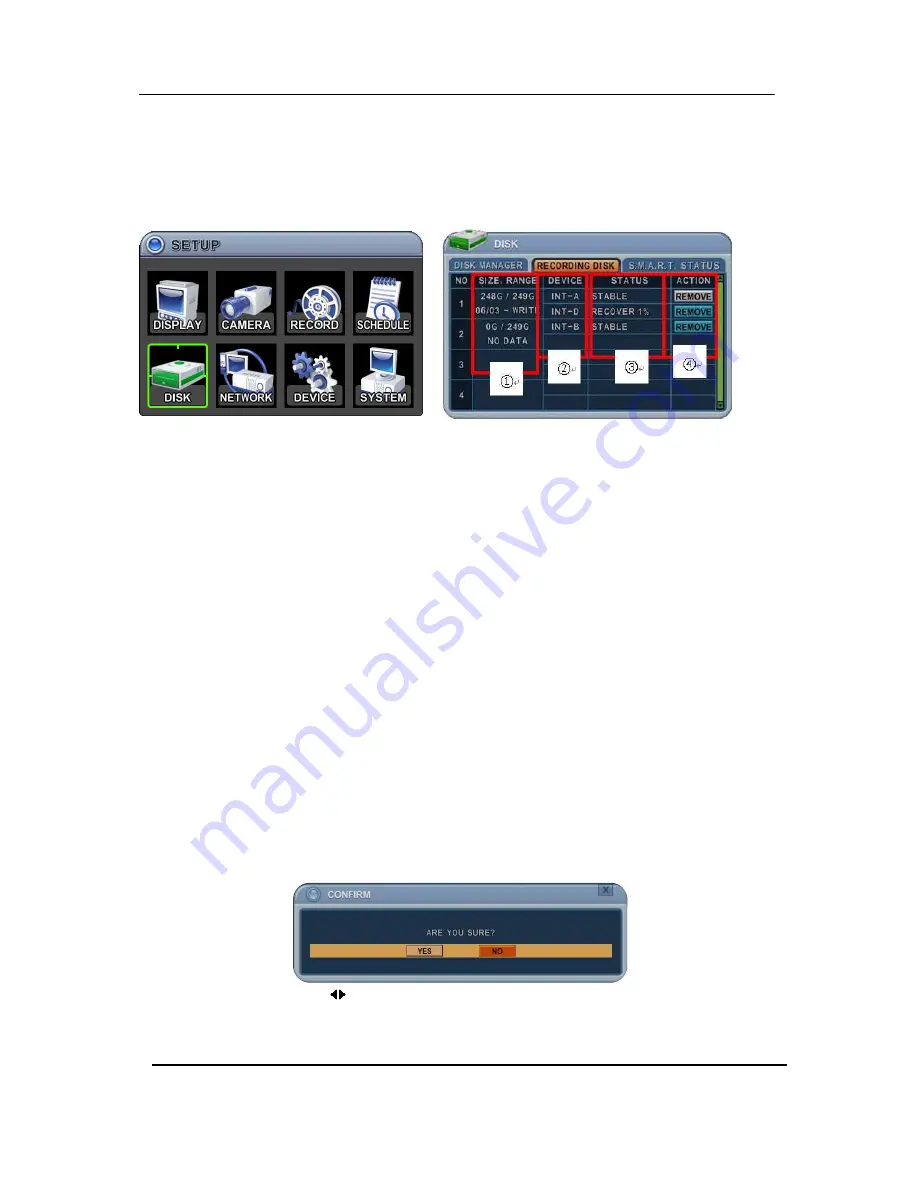
Nuvico HR-1600 Скачать руководство пользователя страница 44


43                                                         HR Series NVR 


5.2. Recording DISK  


This  information  lists  the  installed  drives,  how  the  NVR  records  video  and  their  respective 

capacities which are currently being used for recording. 


1.  Size, Range 

: This displays current recorded data size, HDD size and indicated stored data range, 

and where the writing progress is running  


2.  Device  

Displays logical Master and Slave device in mirroring. Upper device is the Master and 

the  other  is  used for  slave.  If the slave  HDD  reaches  100%  synchronisation,  Master 

HDD can be removed as well.  


3.  Status 

1) Stable: The HDD is in a stable condition.  

2)  Re-sync:  Force  all  pending  buffered  disk  writes  to  the  NEW  installed  disk. 

3) Recover: Recover all mismatched data between the mirrored disks.  


4.  Action: Remove HDD. 

The “Are you sure?” dialogue box opens.  


Press the up/down [

] buttons to YES or NO, then press the [-, +] button to select.  


Содержание HR-1600

Страница 1: ...0 HR Series NVR...

Страница 2: ...14 1 Camera Monitor Audio Alarm sensor and Power cord 14 2 Alarm inputs and Alarm outs 15 2 1 Connection of N O Normally Open 15 2 2 Connection of N C Normally Close 15 III QUICK START PAGE 16 IV LIV...

Страница 3: ...ecording 35 3 4 Continuous Event Motion Alarm Recording 37 4 SCHEDULE 38 4 1 CHART Setup 38 4 2 Holiday Setup 40 5 DISK 41 5 1 DISK Manager 41 5 2 Recording DISK 43 5 3 S M A R T STATUS 44 6 NETWORK 4...

Страница 4: ...h 71 2 1 Multi Channel Playback 71 2 2 Preview Search Single Channel Playback 72 2 3 Event Record Search 73 2 4 Event Source Search 74 2 5 Motion Area Search Single Channel Playback 75 3 Go to Search...

Страница 5: ...ediately at 866 523 1700 Features 4 8 16 channels Embedded Linux Operating System H W based true HD Display Quadruplex function simultaneous record playback network backup Recording compression method...

Страница 6: ...de blade or the third prong are provided for your safety If the provided plug does not fit into your outlet consult an electrician for replacement of the obsolete outlet Protect the power cord from be...

Страница 7: ...w Installation of the equipment in a rack should be such that the amount of air flow required for safe operation of the equipment is not compromised C Mechanical Loading Mounting of the equipment in t...

Страница 8: ...following the proper shut down procedure You may want to install a UPS system for safe operation in order to prevent damage caused by an unexpected power stoppage Any questions concerning UPS consult...

Страница 9: ...y your use of non or violation of instructions mentioned in this manual Prior to opening the case please consult a qualified technician first Whenever this is needed power cord must be removed from th...

Страница 10: ...PWR Power ON OFF status HDD Blinking if Recording in the HDD or Playback NET Network connection STATUS Responding with Buzzer 1 USB USB compliant port allows use of memory stick to backup video files...

Страница 11: ...RS 232C D SUB 9PIN For connecting to Debugging 7 e SATA connector For connecting e SATA compatible devices 8 USB 2 0 connector For connecting USB compatible devices 9 LAN Port For connecting to remot...

Страница 12: ...ich to operate Press the ID button and then press the number button within two seconds to select the system ID of the NVR If you set the System ID to Zero you can control multiple NVRs at the same tim...

Страница 13: ...tual keyboard or press the appropriate numeric button on the IR Remote or the front panel On IR Remote Controller No 1st 2nd 3rd 4th 5th 6th 1 a b 1 A B 1 2 c d 2 C D 2 3 e f 3 E F 3 4 g h 4 G H 4 5 i...

Страница 14: ...2 Right Button Right click anywhere on the screen to open main menu Double click to return 3 Scroll Wheel move the scroll wheel up or down to increase decrease the value of the selected menu option 5...

Страница 15: ...14 HR Series NVR II INSTALLATION CONNECTIONS 1 Camera Monitor Audio Alarm sensor and Power cord...

Страница 16: ...15 HR Series NVR 2 Alarm inputs and Alarm outs 2 1 Connection of N O Normally Open 2 2 Connection of N C Normally Close...

Страница 17: ...III QUICK START PAGE ADMIN and the The Default User name is 16 QUICK START PAGE and the default password is 000000 6 zeros name is admin and password is 000000 6 zeros HR Series NVR 6 zeros 6 zeros...

Страница 18: ...17 HR Series NVR Main Menu SETUP POS SEARCH BACKUP DISPLAY P T Z POWER ZOOM SYSTEM INFO PLAYBACK LOG EXT SEARCH TIME SEARCH...

Страница 19: ...n for the very first time the time and date are set as default to January 1 2009 Thursday 01 00 00 Before any other operation of the Network Video Recorder it is important to setup the time and the da...

Страница 20: ...rding 2 Yellow Continuous Recording 3 Black No Recording 2 Event Indicator 1 Indicate Alarm In terminal is triggered by an alarm sensor To appear Alarm window press UP button This button toggles betwe...

Страница 21: ...te Login or Locking status Click this ICON to toggle Log in and out 7 Indicate Audio Data is stored the selected time during playback and turn to blue color 8 It shows Number of Client which is connec...

Страница 22: ...wn below among your choice of SPLIT MODE 2 To start Auto Sequence press DISPLAY buttons for 2 seconds to begin full screen sequencing Click this ICON by Mouse and spot out button on the remote control...

Страница 23: ...ayed Note 6 4 8 10 13 split mode must be checked on Spit mode to use this function 3 2 Repositioning It is possible to reposition the camera from the bigger window with the one from a smaller one It i...

Страница 24: ...the camera you wish to zoom 2 Then press the ZOOM button on IR Remote controller Zoom area box pops up as shown below 3 Move the box to the desired position using Direction buttons 4 Press button to e...

Страница 25: ...Setup 1 Login 1 On the front panel or remote control press the power button 2 When the NVR is powered on it will start to scan NVR status 3 Live Viewing screen will appear after initialization about...

Страница 26: ...to select the menu and display Sub Menu Using the mouse double click 5 Use Left Right buttons to select on TAP menu Selected items changed into Orange color It is automatically saved changes when you...

Страница 27: ...R LINE Select Board Line between cameras GRAY WHITE BLUE BLACK DARK GRAY BACKGROUND Select Background color on NO VIDEO status GRAY WHITE BLUE BLACK DARK GRAY OSD ALIGNMNET The main video output can b...

Страница 28: ...mn A cursor highlighted menu can be moved using the Direction buttons Device It is set by Main monitor Dwell Time Select the interval that each camera or Multi screen mode is displayed button to chang...

Страница 29: ...meras on Main Monitor Press Spot button then Display for 2 seconds to start auto switch cameras on Spot Monitor 1 3 EVENT This menu will be activated when you select EVENT Mode for Switch Event menu w...

Страница 30: ...nnection LAN Port PROTOCOL Select camera type TITLE Put the camera name IP INFO Show camera brief information CONFIGURATION Set up details about camera PTZ Set up PTZ camera 2 2 Set up IP camera MANUA...

Страница 31: ...is selected the IR cut filter is on at all times When Night is selected the IR cut filter is removed at all times DNR Middle Improve picture performance in low light by reducing video noise Off Low Mi...

Страница 32: ...lear All Press OK to select Select specific Press OK to select The sensitivity settings are 1 Low sensitivity Level 20 High By default the level is set to 10 Save changed set up Save changed set up an...

Страница 33: ...s perfectly set through potable monitor HD monitor displays a blur image After Zooming in out the view will be automatically focused Advanced Setting To access more controlling of IP Camera please try...

Страница 34: ...ing when the HDD is full 4 Auto Delete Allows you to configure when the NVR automatically deletes all data from HDD It leaves the data for a selected duration from the current time NONE 12HOURS 1DAY 6...

Страница 35: ...ng are off The NVR records video data continuously over a 24 hour period Recording setup is for normal recording Different settings can be configured for each camera To copy the setting to another cha...

Страница 36: ...mera Determine whether Alarm Motion Video Loss is used for EVENT recording on the DAY EVENT tab 3 3 1 Alarm Recording One Alarm input can be configured to one channel One camera channel can be assigne...

Страница 37: ...wheel b indicates multiple alarm sources are selected c Please refer to CAMERA menu for Motion setup Note There may be cases when the recorder s built in motion detection function does not operate pr...

Страница 38: ...ent Motion Alarm Recording Continuous and Event recording can be set simultaneously The NVR records video continuously over a 24 hour period but if an Event occurs the recording speed and picture qual...

Страница 39: ...bled By selecting Schedule Use on Record setup Night Mode will be activated 4 1 CHART Setup The schedule chart shows a graphical representation of the defined record mode Night mode will be set by def...

Страница 40: ...s Mode Night Day No Rec BEGIN The time recording starts END The time recording ends The end time must not be before the starting time or the same as the starting time b Save changes and exit the menu...

Страница 41: ...dule the holiday schedule overrides the weekday schedule 1 A cursor highlighted menu can be moved using the directional buttons 2 Select each day to configure press OK or click the mouse button 3 Use...

Страница 42: ...but not used in current NVR c CD DVD CD or DVD is installed for back up use d Record Data HDD stored Recording data but not used in current NVR e Back Up Data HDD stored Back up data f Other Data Neit...

Страница 43: ...es C There should be no time duplication in the HDD Device ODD Media HDD CD DVD R CD DVD RW SATA USB Media can be formatted x o o x Device can be formatted on a PC using FAT 32 NTFS File system x x o...

Страница 44: ...2 Device Displays logical Master and Slave device in mirroring Upper device is the Master and the other is used for slave If the slave HDD reaches 100 synchronisation Master HDD can be removed as wel...

Страница 45: ...R T information has slight differences between depending on the HDD manufacturer We recommend changing the HDD if its status is in PRE FAIL NOTE Please refer to STATUS explanation Status Explanation...

Страница 46: ...to the commonly available service types to configure the NVR for the networking purposes 6 1 LAN Port 1 LAN PORT 1 Config Select IP address type 2 IP Address Enter the static IP address 3 Netmask Ent...

Страница 47: ...BPS 8 MBPS 3 Access Block 1 Ping Block No response to ping By default OFF 2 Scan Block No response to Auto Scan from EMS By default OFF 4 Access Host and Host List Allows you to access or deny specifi...

Страница 48: ...u can be moved using the directional buttons 1 USE Select the e mail notification ON or OFF The default is OFF Press the buttons to select Using the mouse click the option to select mail server 1 Defa...

Страница 49: ...ed when you check SMPT on EMAIL The following settings are only needed if you are NOT using the NVR mail server 1 Server Enter the e mail server name or IP address To set server name use the virtual k...

Страница 50: ...r highlighted menu can be moved using the directional buttons 1 USE Select one method among DDNS OFF Default DYNDNS and NO IP The default is OFF Press the buttons to select Using the mouse click the o...

Страница 51: ...are NOT using the default 1 Domain Name Enter the name you set for the DDNS web configuration 2 User ID Enter your user ID 3 Password Enter your password 4 Update Test Click the Update Test button to...

Страница 52: ...Port 110 are used To solve the firewall problem and let a visitor into the network the user instructs the router to allow traffic to pass through on a given port This is known as Port Forwarding as th...

Страница 53: ...address to configure the S W example http 124 137 23 72 6000 2 Description of Symbols Connected x Not able to connect There s some limitation depends on Router or Network connection Need to use Port...

Страница 54: ...nitor is not able to support high resolution NOTE In order to connect HDMI and VGA output to use both monitors please set up as the lowest resolution without selecting HDMI AUTO 2 Keypad Model Select...

Страница 55: ...ORD is incorrect it shows in live monitor But user cannot change IP camera s setting in camera menu 7 IP CAM SET UP After click in the menu user can upgrade all Camera which are connected with NVR A C...

Страница 56: ...ter 2 2 3 RELAY OUTPUT you can configure how the Relay Outputs are controlled automatic or manual 1 Use Change the output type 2 Inactive Select turn off method of Relay Out a Event Automatic Relay Ou...

Страница 57: ...ol Manual stops for relay output and buzzer 4 Buzzer 1 USE ON The Buzzer sounds if an alarm is triggered The buzzer sounds for the duration of the RECORD TIME This buzzer relates to Alarm Out Configur...

Страница 58: ...n event is detected 3 Inactive Select Camera position after the event duration expires 4 Event Edit Press OK to edit multiple events The menus are displayed with options in the left hand column and se...

Страница 59: ...43 etc Set the ID of IR controller on 00 to control multiple NVR s at the same time whatever the NVR ID is 2 Device Name Type a NVR name to distinguish its location when you have several NVR s on a Ne...

Страница 60: ...for recorded data When the Daylight Saving End date and time occurs the NVR s time goes back one hour 2 Date Format Select Date display format MM DD YYYY DD MM YYYY YYYY MM DD 3 NTP SYNC The internal...

Страница 61: ...then activate it by setting to ON a Name Length up to 10 characters b Characters A to Z numerals 0 to 9 2 Privilege Admin can define each user s Privilege such as PLAYBACK PTZ CONTROL BACKUP CONFIGURA...

Страница 62: ...sword Enter the 6 characters for the new password and then re enter the same password under the COMFIRM section An asterisk is displayed for each character entered 2 Save changes and exit the menu pre...

Страница 63: ...splayed If there are several valid update files please check the display for the correct one 5 Use the directional buttons to move to the Start button then press OK button to start updating While upda...

Страница 64: ...on the menu The system information is displayed SUMMARY It contains brief model information Mac Address and installed HDD status DISK It contains all DISK information including internal external HDDs...

Страница 65: ...troller Menu button is the guide anchor position for all other buttons When in PTZ interface mode all buttons used for the PTZ related operation To activate the Pan Tilt Control select the full screen...

Страница 66: ...nction 67 How to control PTZ by mouse PTZ camera by mouse controller instead of using direction button to move Press PTZ button on the virtual remote controller PTZ menu and control box is displayed l...

Страница 67: ...the range of Preset and press OK 68 To escape from PTZ mode press ESC button on PTZ controller button the outside of control box to have the virtual remote control Function Set preset position SPOT OU...

Страница 68: ...e are 4 programmable Tours Using the button to change the values Group 1 Group 2 Group 3 Group 4 3 This is sub menu of each Tour group The menus are displayed with options on the left hand column and...

Страница 69: ...ntroller PTZ custom function 2 ZOOM on remote controller PTZ custom function 3 P T Z on remote controller 4 Auto Pan Auto Tilt Power Button Function Auto Pan STOP on remote controller Auto Tilt REW on...

Страница 70: ...ck the NVR may be played back in reverse paused speed search up to 16 times the normal speed or move through picture by picture 2 Time Search 2 1 Multi Channel Playback 1 Press the Time Search button...

Страница 71: ...ess the time search table Day will be displayed 2 Choose the desired channel to review by pressing a numeric button or Click Channel number on the left Return button to chart 3 Use the button to navig...

Страница 72: ...u to search for recorded video by event The time search table displays time events As a default the TIME SEARCH CHART displays CONTINUOUS recording Yellow and EVENT recording Red TIME SEARCH CHART dis...

Страница 73: ...search feature allows you to search the recording data for ALARM MOTION and VLOSS events previously triggered on the NVR 1 Press button to select Event Source in search mode And select the event sourc...

Страница 74: ...ack to search the recording data that has motion in a specific area on a certain channel 2 Press the button to select the channel you want to search 3 Select the motion area you want to search Select...

Страница 75: ...76 HR Series NVR 3 Go to Search 1 Press the Time Search button for 2 second and the Time Input menu pops up 2 Set the date and time you wish to search 3 Press OK or Menu to start searching...

Страница 76: ...any point in time of the recorded data Alarm Motion Video Loss and system related logs can be searched and played back directly from To start an Event Search press the Log button on the IR Remote and...

Страница 77: ...r BACKUP 1 ALL Data Normal Recording Data 2 Event Only Event Recording Data 6 File format when saving is s AVI is not supported for CD DVD 7 Select the time range starting time and ending time 8 Enter...

Страница 78: ...ftware will simply auto run and does not require any software installation on your PC Note 1 Please Refer to LOCAL PLAYER section to read about backup devices Note 2 When you back up as Multi Section...

Страница 79: ...up start time and press the button to set the end Selected time changes to a Violet color Selected backup time is displayed on the backup range LOG IN OUT button is toggled for the range 2 Backup FTP...

Страница 80: ...he port that the FTP server will communicate through User ID Enter the user ID of FTP Server It is recognized as a small letter even it s displayed as a Capital Letter Password Enter the password It i...

Страница 81: ...p button to save log list to USB memory stick 1 Use button to select device 2 Select type of log list among ALL SYSTEM NETWORK EVENT and VLOSS 3 Select the time range starting time and ending time 4 P...

Страница 82: ...to the environment or human health from uncontrolled waste disposal please separate this from other types of wastes and recycle it responsibly to promote the sustainable reuse of material resources Ho...

Страница 83: ...Russia DST GMT 06 30 Standard GMT 07 00 Standard Russia DST GMT 08 00 Standard Russia DST GMT 09 00 Standard Russia DST GMT 09 30 Standard Australia DST GMT 10 00 Standard Russia DST Australia DST GM...

Страница 84: ...1 This page intentionally left blank...

Страница 85: ...2 This page intentionally left blank...

Страница 86: ...3...

Отзывы: