background image


73


OPERATING THE DVR 


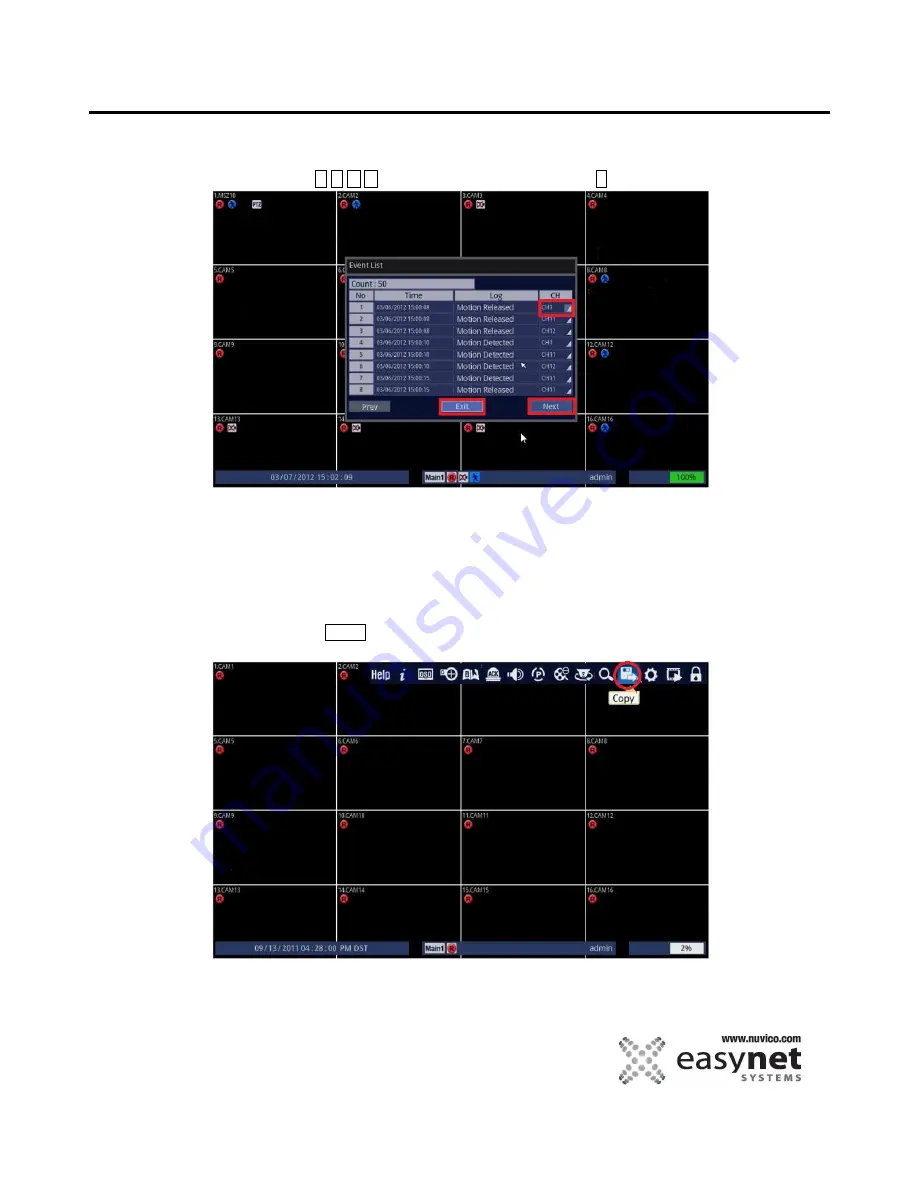
3. From the search list, you can start the playback. 

Using Mouse 


Highlight and click on any of the [CH] icon to start the playback. 

Using Front Panel/Remote


Use     


 to highlight any [CH] and press the 

 button to start the playback.                         


4. Video is played, for instruction on playback window, refer to page77. 
 

Copy  

To copy or backup an incident, click on this icon to copy the clips into CD/DVD or USB Thumbdrive. 
1. Follow the instructions below. 

Using Mouse


Click on the [Copy] icon.  

Using Front Panel/Remote


Press COPY button. 

Cannot execute on Front Panel of the ED-C Series DVRs. Use the Remote.   


Содержание EasyNet ED-P1600

Страница 1: ......

Страница 2: ...ecting Audio 22 Alarm Connection 23 Alarm Reset In 24 Panic Record In 24 Connecting to the RS485 RS422 Port 24 Connecting to the Controller Keyboard 25 Connecting to the USB Ports 25 Connecting to the...

Страница 3: ...Off 62 Search 67 Copy 73 Setup Menu 76 Playback 77 Log In or Log Out 78 QUICK SETUP 79 DATE TIME 80 GLOBAL RECORD 81 ADVANCED SETUP 84 SYSTEM 85 DATE TIME 87 Time 87 Holidays 87 SYSTEM LOG 88 STATUS...

Страница 4: ...6 MONITOR 117 COVERT 120 SEQUENCE 121 DEVICES 122 CAMERA 122 Camera 122 PTZ 123 AUDIO 124 SERIAL 125 SERIAL 125 NETWORK 126 INTERFACE 127 IP FILTER 128 CONFIGURATION 129 DDNS 130 NTP 131 NOTIFICATION...

Страница 5: ...A HDD bays Up to 12TB on ED U1600 model Watch dog power failure recovery RS 422 485 for PTZ speed dome and Controller Keyboard CK 1000 Support various PTZ protocols Time synchronization between multip...

Страница 6: ...blade or the third prong are provided for your safety if the provided plug does not fit into your outlet consult an electrician for replacement of the obsolete outlet Protect the power cord from bein...

Страница 7: ...acity 170mAh Continuous standard load 0 2mA Operating temperature 20 C 85 C 4 F 185 F DVR Shutdown Turning off the power while the product is in operation or undertaking improper actions may cause dam...

Страница 8: ...able protection against harmful interference when the is operated in a commercial environment This equipment generates uses and can radiate radio frequency energy and if not installed and us the instr...

Страница 9: ...9 OVERVIEW Part Names and Functions Front ED C400 ED C800 ED C1600 ED P400 ED P800 ED P1600...

Страница 10: ...10 OVERVIEW ED U1600...

Страница 11: ...mode Buttons 1 6 are used to control PTZ features when the DVR is at PTZ Control mode 5 REMOVABLE HDD BAYS DVR is capable of holding 6 SATA type HDDs 6 DIRECTIONAL REC PLAY ESC BUTTONS DIRECTIONAL Dir...

Страница 12: ...gging off Press it again and then apply appropriate password to deactivate the function PTZ This button is to access the PTZ control mode COPY This button is used to access the copying video menu B MA...

Страница 13: ...13 OVERVIEW Part Names and Functions Rear ED C400 ED C800 ED C1600...

Страница 14: ...14 OVERVIEW ED P400 ED P800 ED P1600...

Страница 15: ...15 OVERVIEW ED U1600...

Страница 16: ...ay Outputs on ED P1600 and ED U1600 7 ALARM SENSOR INPUTS Dry contacts for alarm sensor input for every camera inputs 8 RS 485 RS 422 Connectors to connect PTZ cameras 9 RJ11 Dedicated port for NUVICO...

Страница 17: ...17 OVERVIEW Remote Control...

Страница 18: ...rn on off the digital zoom mode 9 REC Press this button to start recording 10 ESC The ESC button is to exit from the main or each menu of the DVR 11 DIRECTIONAL ARROW BUTTONS Arrow buttons are used to...

Страница 19: ...ocus near within PTZ control mode 26 IRIS OPEN This button is used to open the IRIS within PTZ control mode 27 MON This button is used to select different main monitors to control After pressing this...

Страница 20: ...OT be turned on properly Once the DVR is not turned on after connecting the power cord disconnect the power cord and connect it again after 10 seconds by following the proper connection procedures to...

Страница 21: ...ce to another device you can use the Loop BNC connectors NOTE The Loop BNC connectors are auto terminated Do NOT connect a cable to the Loop BNC unless it is connected to a terminated device because i...

Страница 22: ...t is the user s responsibility to determine if local laws and regulations permit recording audio The DVR can record audio from up to 16 sources Connect the audio sources to Audio IN 1 Audio IN 2 Audio...

Страница 23: ...ct a wire press and hold the button above the wire and pull out the wire You can use external devices to signal the DVR to react to events Mechanical or electrical switches can be wired to the NUMBER...

Страница 24: ...e alarm menu of the event for configuring panic record input Connecting to the RS485 RS422 Port The DVR can control PTZ pan tilt zoom cameras In addition DVR can be controlled remotely by an external...

Страница 25: ...0 and ED U1600 models Connecting to the USB Ports FRONT REAR Four USB ports are provided to connect a mouse external flash drives for video clip copying or system upgrades Two USB ports are on the rea...

Страница 26: ...rked using the 100Mb 1Gb Ethernet connector Connect a Cat5 cable with an RJ 45 jack to the DVR connector See the NETWORK menu for configuring the Ethernet NOTE The network connector is not designed to...

Страница 27: ...LLATION ON ED U1600 How to mount the HDD to the DVR 1 When you unpack the DVR box locate the removable HDD tray shown below 2 The removable HDD tray shown below needs to be inserted into the empty slo...

Страница 28: ...28 HDD INSTALLATION ON ED U1600 3 With the latch pointing upwards slide the tray into the slot 4 Lock the tray in the slot by applying downward pressure to the latch...

Страница 29: ...00 5 Finally use the supplied tray key to lock the HDD tray into the chasis to prevent unauthorized removal 6 Refer to page 96 of this manual or quick setup manual that was included on the box to init...

Страница 30: ...emote Press the POWER button for 3 seconds Important Step If you are only using the BNC Monitor which is considered Main 2 on the DVR Using Mouse On Main 1 monitor move the mouse cursor towards the ri...

Страница 31: ...R Instruction on how to log in as admin refer to page 33 1 Locate and press the power button Using Mouse Not supported Using Front Panel Remote Press the POWER button 2 The shutdown confirmation windo...

Страница 32: ...highlight Keyboard and press button 4 On screen keyboard should now appear The default admin password for the DVR is 000000 Using Mouse Highlight 0 and click six times then highlight and click Using...

Страница 33: ...system has logged off for various reason follow these steps to log in to the DVR 1 Follow the instructions below Using Mouse Click on the Log In icon Using Front Panel Remote Press LOCK button Cannot...

Страница 34: ...six times then highlight and click Using Front Panel Remote Using these buttons highlight 0 then press button six times Then use these buttons to highlight and press button 4 Lastly when you select OK...

Страница 35: ...the DVR or the remote controller will have no effect To log out follow these instructions 1 Log out follow instructions below Using Mouse Click on the Log Out icon Using Front Panel Remote Press LOCK...

Страница 36: ...ick six times then highlight and click Using Front Panel Remote Using these buttons highlight 0 then press button six times Then use these buttons to highlight and press button 4 Lastly when you selec...

Страница 37: ...ording follow instructions below Using Mouse Click on the Record Off icon Using Front Panel Remote Press button 2 The DVR will verify that you have the permission to stop the recording by checking pas...

Страница 38: ...six times then highlight and click Using Front Panel Remote Using these buttons highlight 0 then press button six times Then use these buttons to highlight and press button 4 Lastly when you select O...

Страница 39: ...s if the DVR is in Record Mode or is not Recording 4 Indicates that there are Video Loss on the DVR 5 Indicates that there are Motion detected on the DVR 6 Indicates that there Alarm has been triggere...

Страница 40: ...e 3 Indicates if this channel is recording or is not recording 4 Indicates that this channel is recording on motion 5 Indicates that this channel is recording on alarm trigger 6 Indicates that this ch...

Страница 41: ...will appear back in Main 1 screen Using Front Panel Remote Press MON and 1 to control Main 1 monitor Press MON and 2 to control Main 2 monitor Cannot execute on Front Panel of the ED C Series DVRs Use...

Страница 42: ...e screen Freeze The DVR can pause the live image It is extremely useful when you want to pause a live image without having to go into the playback mode Using Mouse Highlight Freeze icon and click Usin...

Страница 43: ...In order to move onto the camera of your choice Keep pressing the icon until the camera of your choice displays Using Front Panel Remote Press DISP repeatedly until the DVR is in Full Screen mode In...

Страница 44: ...move onto the next set of 4 cameras of your choice keep pressing the icon until the camera of your choice displays Using Front Panel Remote Press DISP repeatedly until the DVR is in 4 Camera mode In o...

Страница 45: ...s Using Front Panel Remote Press DISP repeatedly until the DVR is in 16 Camera mode In order to move to the next set of 10 cameras press either until the camera of your choice displays 1 2 3 4 5 6 7 8...

Страница 46: ...ing Front Panel Remote Press SEQ and the DVR will go into Auto Sequence Mode Pressing the SEQ while in Auto Sequence is engaged will stop the Auto Sequence mode Cannot execute on Front Panel of the ED...

Страница 47: ...ck on the setting that you wish to change Since the click will be effective immediately there s no need to save or click OK Using Front Panel Remote Press SPOT button and press either 1 2 3 4 button t...

Страница 48: ...wish to change Since the click will be effective immediately there s no need to save or click OK Using Front Panel Remote Press SPOT button and press either 1 2 3 4 button to control your desired Spot...

Страница 49: ...49 OPERATING THE DVR Launcher Menu Launcher menu appears when you move your mouse towards the top of the screen You can move the mouse to the desired item in the Launcher menu...

Страница 50: ...elp Click on Help Icon and it displays explanation of the screen icons Using Mouse Highlight and click on Help ToolTip icon Using Front Panel Remote Not supported It will display explanation to the ic...

Страница 51: ...nished to exit Cannot execute on Front Panel of the ED C Series DVRs Use the Remote System Information displays 1 Model Number 2 Site Name or DVR Name 3 Firmware and Hardware Version 4 Time and Date o...

Страница 52: ...button There are 3 additional information pages Using Mouse Highlight Record Status and click Using Front Panel Remote Use and press either repeatedly to highlight Record Status then press button Pres...

Страница 53: ...ording Summary Using Mouse Highlight Health Information and click Using Front Panel Remote Use and press either repeatedly to highlight Health Information then press button Press ESC when finished to...

Страница 54: ...Name Channel Number DVR Status Bar Event Icon such as Motion Alarm Using Mouse Highlight OSD Screen Display and click until your desired on Screen Display is on the monitor Using Front Panel Remote P...

Страница 55: ...On Screen Display is on the monitor Cannot execute on Front Panel of the ED C Series DVRs Use the Remote 3 Hides the following on all channels Continuous Record Icon PTZ Icon Camera Name Channel Numb...

Страница 56: ...reen Cannot execute on Front Panel of the ED C Series DVRs Use the Remote 5 Hides the following on all channels Continuous Record Icon PTZ Icon Camera Name Channel Number DVR Status Bar Event Icon suc...

Страница 57: ...er Full Camera view Only works under Main 1 Monitor Yellow rectangle on the box indicates which area that is being digitally zoomed Using Mouse Click and drag the yellow rectangle on the box to view d...

Страница 58: ...mark the starting and ending Date Time into the clipboard so that it can be instantly located during copy mode Note It is a 2 step process You must click on Bookmark 1 st to mark the start time of the...

Страница 59: ...ouse Highlight ACK Alarm Off and click Using Front Panel Remote Press ACK button Audio Control This DVR offers 16 channels of audio recording Unlike video data that can be recorded at various recordin...

Страница 60: ...esent are played regardless of what channel mode that the user is in Using Front Panel Remote Press AUDIO button Using buttons and button to select or deselect your desired audio mode When finished hi...

Страница 61: ...deactivate the Panic Record press PANIC again Cannot execute on Front Panel of the ED C Series DVRs Use the Remote Record Off By factory default the DVR is in Record On mode Should you need to turn th...

Страница 62: ...s before proceeding to the next section 1 Define which COM Port that the PTZ camera is attached to This is done from the following menu DEVICES SERIAL in the setup menu Using Mouse Highlight and click...

Страница 63: ...Using Front Panel Remote Using these buttons buttons and button to modify or specify if the desired channel should be active for PTZ camera as well as specify PTZ camera s model and it s ID and the ba...

Страница 64: ...trol window display on the screen Using Mouse Highlight and click on the PTZ Mode On Off Using Front Panel Remote Press PTZ button 3 Highlight and press the icons on the control window to move the PTZ...

Страница 65: ...g Front Panel Remote Press PTZ button Explanation of icons on the control window 1 Movement Speed There are 6 settings Auto Speed 1 5 Auto adjusts automatically to the mouse click and the buttons from...

Страница 66: ...numbers that you wish to change 3 Minimize or close this advanced menu 4 Number input to be shown on 1 5 Shift or Enter button to execute the commands 6 You can execute Preset Scan Turbo Tour Pattern...

Страница 67: ...into the specific search mode Using Front Panel Remote Use to highlight the desired search criteria and buttons select deselect or to go into the specific search mode 1 You can choose the source such...

Страница 68: ...ut the exact date and time of your video 2 When finished start the video Using Mouse Highlight and click on the Start icon to start the playback Using Front Panel Remote Use to highlight Start and pre...

Страница 69: ...alue Using Front Panel Remote First use to highlight the desired search criteria and buttons to select deselect different search criteria Then Use to highlight Search and press the button to input you...

Страница 70: ...the playback Using Mouse Highlight and click on any of the CH icon to start the playback Using Front Panel Remote Use buttons to highlight any CH and press the button to start the playback 4 Video is...

Страница 71: ...sired month year Then use buttons to highlight the desired day and press button 2 Select your desired time of the day Using Mouse Click on the desired time of the day Your desired video will start pla...

Страница 72: ...alue Using Front Panel Remote First use to highlight the desired search criteria and buttons select deselect different search criteria Then Use to highlight Search and press the button to input your d...

Страница 73: ...H and press the button to start the playback 4 Video is played for instruction on playback window refer to page77 Copy To copy or backup an incident click on this icon to copy the clips into CD DVD or...

Страница 74: ...r your desired start and the end time of your video to be copied 5 Channel By factory default Select All is checked therefore all the channels or cameras will be copied However should you want to copy...

Страница 75: ...desired backup time then select START ESTIMATE provides the file size based on the selected cameras B Using USB Thumb Drive USB 1 Insert a USB thumb drive then set MEDIA as USB 2 If necessary select F...

Страница 76: ...device 3 To copy the desired one camera go down to CHANNEL LIST and press the number button associated with the camera number 4 Set the desired backup time then select START ESTIMATE provides the fil...

Страница 77: ...ay or press the Play button on the remote control or the front panel For data search refer to Search on the page before The selected data is played and the play launcher appears on the bottom of the s...

Страница 78: ...ewind 6 Reverse Play 7 Normal Play 8 Fast Forward 9 Step Reverse 10 Pause 11 Step Forward 12 Shuttle 13 Current Monitor Indicator 14 Current Date and Time 15 Current Playback Speed 16 Screen Control M...

Страница 79: ...79 SETUP MENU QUICK SETUP...

Страница 80: ...ake sure that you save the settings by highlighting Save and press the button DATE TIME Time Sync When this option is checked it will synchronize the time to its regional NTP Network Time Server Note...

Страница 81: ...e recording parameters to all cameras by User Defined option Picture Quality Priority and Frame Rate Priority are used to set the recording parameters by entering desired days of recording at the give...

Страница 82: ...ing RES For Resolution Best 4CIF stands for 704 x 480 NTSC 704 X 576 PAL Better 2CIF stands for 704 x 240 NTSC 704 X 288 PAL Good CIF stands for 352 x 240 NTSC 352 X 288 PAL PPS Pictures per second Pi...

Страница 83: ...hen press button to modify or to get into the sub menu to change its parameter When finished make sure that you save the settings by highlighting Save and press the button Frame Rate Set recording pri...

Страница 84: ...gs by clicking on Save Using Front Panel Remote First use buttons to highlight different parameters on the screen Then press button to modify or to get into the sub menu to change its parameter When f...

Страница 85: ...VR Unique ID is required if you have multiple DVRs at one location and since the remote control or the keyboard controller needs to know which DVR that it must control Languages Default language for t...

Страница 86: ...Any abnormality with recording of the unit Fan Fail Any abnormalities with the system s cooling fan HDD Fail Any abnormalities with DVR s recording HDD HDD Temperature Any abnormal temperatures with t...

Страница 87: ...en finished make sure that you save the settings by highlighting Save and press the button DATE TIME Time It s a duplicate of Date Time under the Quick Setup Tab For instructions refer to Date Time un...

Страница 88: ...ront Panel Remote First use buttons to highlight different parameters on the screen Then press button to modify or to get into the sub menu to change its parameter When finished make sure that you sav...

Страница 89: ...ake sure that you save the settings by highlighting Save and press the button STATUS System The status of the system informs you of the model name the user defined site name the Firmware version the l...

Страница 90: ...parameter When finished make sure that you save the settings by highlighting Save and press the button Record The status of the record informs you of the current recording status of the audio and the...

Страница 91: ...modify or to get into the sub menu to change its parameter When finished make sure that you save the settings by highlighting Save and press the button ACCOUNT The ACCOUNT allows you to create users a...

Страница 92: ...he sub menu to change its parameter When finished make sure that you save the settings by highlighting Save and press the button User The User setup screen displays the users and groups You can create...

Страница 93: ...hen press button to modify or to get into the sub menu to change its parameter When finished make sure that you save the settings by highlighting Save and press the button Group The Group setup screen...

Страница 94: ...ing Front Panel Remote First use buttons to highlight different parameters on the screen Then press button to modify or to get into the sub menu to change its parameter When finished make sure that yo...

Страница 95: ...Select USB Displays active device s that is connected You can select your device at this section Current F W Ver Displays current system firmware version New F W Ver If new firmware file is present on...

Страница 96: ...ive This screen will show how all the hard drives that are present on the DVR the model number of the hard drive free space and total space for the particular hard drive For the status refer to the di...

Страница 97: ...HDDs Overwrite By default the hard disk drive will overwrite from the beginning when it becomes full Auto Record on Boot When booting the DVR starts to record automatically JPEG Record During recordi...

Страница 98: ...y or to get into the sub menu to change its parameter When finished make sure that you save the settings by highlighting Save and press the button Service Remote management When checked admin or power...

Страница 99: ...hlight different parameters on the screen Then press button to modify or to get into the sub menu to change its parameter When finished make sure that you save the settings by highlighting Save and pr...

Страница 100: ...e the settings by highlighting Save and press the button Continuous Schedule Record If you wish to configure schedule check this option You can configure different recording parameters for Day Night a...

Страница 101: ...ghting Save and press the button Event MOTION When MOTION is checked DVR will record this camera when the motion is detected ALARM When ALARM is checked DVR will record this camera if DVR receives ala...

Страница 102: ...ORD may be used in case of emergency or if you feel that the event that you are watching is a high priority event The DVR will record all cameras according to the PANIC RECORD setting when the PANIC b...

Страница 103: ...hlighting Save and press the button Schedule Record When the schedule record is on users may define their own daytime nighttime as well as weekend record settings Day Select DAY to configure the time...

Страница 104: ...Then press button to modify or to get into the sub menu to change its parameter When finished make sure that you save the settings by highlighting Save and press the button Weekend Select WEEKEND to...

Страница 105: ...rst use buttons to highlight different parameters on the screen Then press button to modify or to get into the sub menu to change its parameter When finished make sure that you save the settings by hi...

Страница 106: ...ote First use buttons to highlight different parameters on the screen Then press button to modify or to get into the sub menu to change its parameter When finished make sure that you save the settings...

Страница 107: ...s to highlight different parameters on the screen Then press button to modify or to get into the sub menu to change its parameter When finished make sure that you save the settings by highlighting Sav...

Страница 108: ...the screen Then press button to modify or to get into the sub menu to change its parameter When finished make sure that you save the settings by highlighting Save and press the button EVENT Event menu...

Страница 109: ...d make sure that you save the settings by highlighting Save and press the button ZONE To enter the motion grid zone select zone field and press ENTER button for each channel POPUP When the popup is on...

Страница 110: ...settings by highlighting Save and press the button Relay You can trigger a relay when a motion is triggered VIDEO LOSS The video loss is detected this menu allows you set the popup the buzzer the e m...

Страница 111: ...First use buttons to highlight different parameters on the screen Then press button to modify or to get into the sub menu to change its parameter When finished make sure that you save the settings by...

Страница 112: ...for each camera You can use the external alarm signal to the alarm reset input or the panic record signal USE Enable or disable alarm input TYPE You can configure it as N O Normally Open or N C Normal...

Страница 113: ...Remote First use buttons to highlight different parameters on the screen Then press button to modify or to get into the sub menu to change its parameter When finished make sure that you save the setti...

Страница 114: ...e name of the text in device Point of Sale Cash Registers ATM etc the popup the buzzer the e mail and the action for each camera Event record Type Set the desired option as below Continuous is used fo...

Страница 115: ...mote First use buttons to highlight different parameters on the screen Then press button to modify or to get into the sub menu to change its parameter When finished make sure that you save the setting...

Страница 116: ...at you save the settings by clicking on Save Using Front Panel Remote First use buttons to highlight different parameters on the screen Then press button to modify or to get into the sub menu to chang...

Страница 117: ...ain1 This is for DVI HDMI and VGA output of the DVR Type Displays what type of output for the particular monitor Resolution Can be configured to match your monitor that you are using Make sure that yo...

Страница 118: ...the button Main 2 This is for COMPOSITE BNC output of the DVR Type Displays what type of output for the particular monitor Event Pop up Set the pop up of the camera with the event and the pop up time...

Страница 119: ...1 4 ED C Series DVRs do not have Spot2 Spot3 and Spot4 outputs ED P Series DVRs do not have Spot3 and Spot4 output This is for Spot output of the DVR This is COMPOSITE BNC output only Type Displays w...

Страница 120: ...its parameter When finished make sure that you save the settings by highlighting Save and press the button COVERT The covert menu allows you the camera to covert for each monitor Main1 Monitor Main2 M...

Страница 121: ...Spot2 Spot3 and Spot4 outputs ED P Series DVRs do not have Spot3 and Spot4 output In the default sequence mode without the user sequence list When in the live mode pressing the SEQ button displays liv...

Страница 122: ...ent parameters on the screen Then press button to modify or to get into the sub menu to change its parameter When finished make sure that you save the settings by highlighting Save and press the butto...

Страница 123: ...change its parameter When finished make sure that you save the settings by highlighting Save and press the button PTZ The PTZ menu allows you set the usage the port the protocol the ID the baud rate o...

Страница 124: ...make sure that you save the settings by highlighting Save and press the button AUDIO The AUDIO menu allows you set the usage the synchronized camera the audio recording and the selection of the monit...

Страница 125: ...n Then press button to modify or to get into the sub menu to change its parameter When finished make sure that you save the settings by highlighting Save and press the button SERIAL SERIAL The SERIAL...

Страница 126: ...at you save the settings by clicking on Save Using Front Panel Remote First use buttons to highlight different parameters on the screen Then press button to modify or to get into the sub menu to chang...

Страница 127: ...the values please contact the network administrator or Internet Service Provider DHCP Enable this if your network has DHCP server which give out IP addresses automatically IP Specify an unique IP add...

Страница 128: ...n finished make sure that you save the settings by highlighting Save and press the button IP FILTER Should want to prohibit or allow only certain IP address or IP address range to be accessing this DV...

Страница 129: ...use buttons to highlight different parameters on the screen Then press button to modify or to get into the sub menu to change its parameter When finished make sure that you save the settings by highl...

Страница 130: ...ovider DDNS Interval Enable or disable to use this feature and its interval where you can set how often the DVR should sync with NUVICO server Server Default is nuvicoconnect com If your network is co...

Страница 131: ...er the appropriate values NTP Server Enable this setting if you would like to sync the DVR to the NTP Server and test the connection Private NTP1 Set IP address of the NTP server if the time server is...

Страница 132: ...FICATION Receiver Address Enter the receiver s e mail address Sender Address Enter the sender s e mail address Interval Set the interval Image Attach If you want to attach the image of the event check...

Страница 133: ...server where single channel can be streamed to popular media player such as QuickTime or VLC Player If you have a web administrator or IT administrator they will be able to utilize this function effe...

Страница 134: ...134...

Страница 135: ...135...

Страница 136: ...136...

Отзывы: