background image

101 

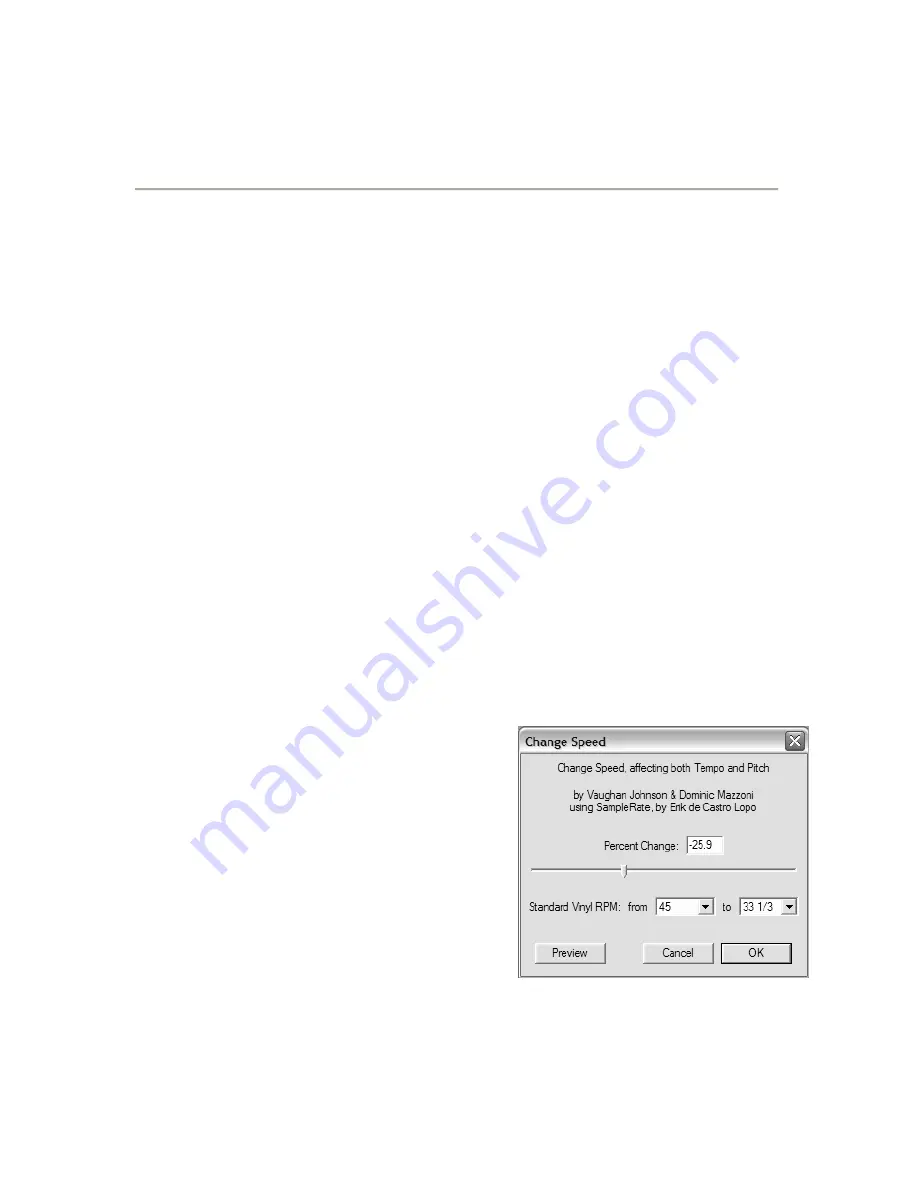
Bild 14: Geschwindigkeit 

verändern 

Schnelles Aufnehmen Ihrer Schallplatten 
(Optional)


Mit Hilfe der Audacity Software und dem USB turntable können 
Sie schnell Ihre 33 1/3 LPs in den Computer mit einer höheren 

Geschwindigkeit überspielen und am Computer die schnellere 
Wiedergabe zur normalen Wiedergabe korrigieren. Diese 

Vorgehensweise ist hilfreich, wenn es darum geht, mehrere LPs 
hintereinander aufzunehmen.  So können Sie beispielsweise das 
Überspielen eines 10 Minuten Titels auf 7 Minuten reduzieren, 

indem Sie diese mit 45RPM abspielen. 
 

Drei Minuten sind nun bei einer LP keine große Zeitersparnis, 
wenn Sie jedoch mehrere Schallplatten hintereinander 

überspielen wollen, können Sie beispielsweise 4 Stunden Musik in 
3 Stunden aufnehmen. 

 
Anleitung: 

1.


Nehmen Sie Ihre 33 1/3 RPM LPs mit 45RPM indem Sie 

den 45RPM Taster auf der Oberseite des USB turntable 
drücken.  

2.


Sie hören, dass das Audiosignal auf Grund der schnelleren 
Geschwindigkeit mit einer seltsamen Tonhöhe abgespielt 

wird.  

3.


Beenden Sie nach dem Titelende die Aufnahme. 

4.


Gehen Sie auf „Bearbeiten” 
und “Alles auswählen” (Figure 

5.


Wählen Sie unter „Effekt” das 
„Geschwindigkeit verändern” 

Menü. 

6.


Wählen Sie von „45” zu “33 

1/3” aus. Ihr Signal wird auf 
das neue Tempo umgerechnet 

(siehe Bild Figure


). Optional 

können Sie einen weiteren 
Prozentsatz zur Geschwindigkeitsverän-derung definieren.   

Содержание Audacity

Страница 1: ...AUDACITY Software Installation ENGLISH 1 21 Instalación del software ESPAŃOL 23 43 Installation du logiciel FRANÇAIS 45 65 Installazione software ITALIANO 67 87 Software Installation DEUTSCH 89 108 ...

Страница 2: ......

Страница 3: ...with the USB turntable 4 Audacity Configuration on PC 6 Configuring Audacity for Mac OS 10 4 and above 8 Recording into the Computer 10 Adjusting Your Audio Level Optional 11 Cleaning Your Audio Optional 12 High Speed Recording of your Vinyl Optional 15 Dividing Your Album into Tracks 16 Export Tracks to Separate Files 18 Listening and Exporting to WAV MP3 19 Recording 78RPM Records 19 ...

Страница 4: ...he General Public License GPL More information as well as open source code can be found on the CD included or on the web at http audacity sourceforge net Audacity works on both Windows 98 and greater as well as Mac OS X and 9 2 Software for Linux can be found on the Audacity website Go to http audacity sourceforge net help tutorials for additional tutorials The website also has information for sep...

Страница 5: ...onnect the USB port on the USB turntable to the USB port of your computer 2 Turn your computer on and allow it to boot fully if it is not on already 3 Turn on the power switch to your turntable 4 Your computer will say that Windows detects a new device and that it is available to use 5 Insert the CD that came with your USB turntable 6 Run the file install audacity win 1 2 3 exe 7 Optional install ...

Страница 6: ...work with the USB turntable 1 With no programs or windows open click on START Settings Control Panel 2 In the Control Panel double click on Sounds and Audio Devices 3 Ensure your computer s soundcard is shown in the Volume tab ...

Страница 7: ...mputer s soundcard is listed as the default Sound Playback Device and USB Audio Codec is listed as your default Sound Recording Device 6 If active press the Apply button and then press OK If the Apply button is not active simply press OK 7 Close the Sounds and Audio Device Properties window 8 Ensure your headphones or speakers are plugged into your computer s soundcard s output to monitor your rec...

Страница 8: ...6 Audacity Configuration on PC 1 Go to START All Programs Audacity to launch Audacity 2 Select the Edit menu and then Preferences Figure 1 Select Preferences ...

Страница 9: ...sure that your default sound card is selected in the Playback section Otherwise you will not be able to hear any audio output from the program Figure 2 Select USB Audio Device from Preferences If you would like to record in stereo click on the pull down tab next to Channels and select 2 Stereo Click OK Now that your preferences are set you are ready to record If you are still having difficulty fin...

Страница 10: ...Audacity is opened this reset will occur To work around this problem wait until Audacity opens and performs the erroneous format reset outlined above then you simply have to select the desired format settings manually in the AUDIO MIDI SETUP window 1 FIRST make ALL of your desired format settings in Audacity These are found under AUDACITY MENU PREFERENCES AUDIO I O Set Channels for 2 Stereo and pl...

Страница 11: ... basic rule is after Audacity is open use the AUDIO MIDI SETUP utility to manually select format settings that match the format settings in Audacity If you make any format changes in Audacity you need to also go back to the AUDIO MIDI SETUP window and make the same changes It is usually easiest to leave the AUDIO MIDI SETUP window open on the desktop A NOTE FOR INTEL BASED MAC USERS Please visit h...

Страница 12: ...rding You will hear the audio coming from the output of your computers soundcard No Audio go back to the preference menu Figure 2 and make sure you have Software Playthrough selected and the speaker volume up on your computer See troubleshooting at the end of this manual for more help 3 Play through the entire track album you desire to record 4 Press Stop 5 SAVE YOUR FILE NOW by clicking on File S...

Страница 13: ... section as well as on the web See Figure 5 b Normalize should be used to have the correct volume on the recording See Figure 6 Please note It is a good idea to place the needle on the record while it is stopped before you begin the recording and press Play on the turntable after you begin recording If you place the needle down while the record is spinning and after you have began recording there ...

Страница 14: ...e 8 3 Click Get Noise Profile The Noise Removal window will now close automatically 4 Select the entire track of audio you wish to remove noise from If you wish to clean up the entire recording use Select All under the Edit Menu See Figure 4 5 Repeat Step 2 to bring up the Noise Removal Window 6 Adjust the amount of audio that you would like to filter by moving the slider in the Noise Removal wind...

Страница 15: ...13 Figure 7 Selecting Noise in Track Figure 8 Noise Removal Window ...

Страница 16: ...file before you can remove the noise from a track If you select actual audio for the noise profile the computer may remove all of your audio See Step 1 Once the Noise Profile is set it will save the profile until you restart the application In other words the software must learn what the noise profile is only when you first start the software You do not need to get the noise profile for every reco...

Страница 17: ...ecord 4 hours of music in under 3 hours Instructions 1 Record your 33 1 3 RPM vinyl at 45RPM by pressing the 45RPM button on the top panel 2 You will hear the audio recording at an unusual pitch due to its high speed 3 When you finish recording stop the recording 4 Go to Edit and Select All See Figure 4 5 Go to Effect and then the Change Speed Menu 6 Select from 45 to 33 1 3 and your vinyl will be...

Страница 18: ...s by the gaps as shown with 1 2 3 below Figure 11 The next steps show how to label these tracks and export them to WAV CD quality format Figure 11 Identifying Separate Audio Tracks 3 Press the Skip to Start button to move to the beginning of the recording 4 Select the Project Menu and then select Add Label At Selection This will set the starting point of the first track 5 Type in the name of the f...

Страница 19: ...or the track Use the space bar to easily start and stop playback Note the label is placed at the START of the track For example in Figure 14 TRACK 1 is labeled at the beginning of audio recording Track 2 is the label between the first and second track You can also edit track names after they have been exported from Audacity In this three track example the final break up is shown in Figure 14 Figur...

Страница 20: ...te files 2 Select the File menu and then select Export Multiple as shown in Figure 15 3 The Export Multiple window will come up see Figure 16 a Select WAV as the export format and choose the Export location b Select the Export Location This is where you will save your files You may want to create a special folder on your Desktop with the Album Name to store the files c Select the Using Label Track...

Страница 21: ... are many free software applications that can play burn as well as convert WAV files to MP3 Once a file is in MP3 format it can be placed on any MP3 compatible mobile digital device Recording 78RPM Records If you want to record a 78 RPM album you can record it at 33 3 or 45 RPM and convert it to 78 RPM in the Audacity software After you have recorded the album open the Edit menu then click Select ...

Страница 22: ...recording device o If you can not hear the music but you do see the music on the screen open your preferences Figure 2 and make sure that your Playback Device is set to your internal computer soundcard o Power Cycle Close Audacity turn off the turntable unplug the USB Cable Then plug in the USB Cable turn on the turntable and reopen Audacity o Check the microphone slider to make sure that it is at...

Страница 23: ...to a source or not touching bare metal If you are experiencing noise through the USB you may have interference from the RCA plugs Ensure the USB cable is not touching or near any other cables o If you experience any odd sounds coming from the recording try closing all applications restarting the computer and only run Audacity while recording o If you are using the RCA plugs make sure that you have...

Страница 24: ...22 ...

Страница 25: ...l giradiscos USB 26 Configuración de Audacity en PC 28 Configuración de Audacity para Mac OS 10 4 y superiores 30 Grabación en la computadora 32 Ajuste del nivel de audio opcional 33 Limpieza del audio opcional 34 Grabación de su vinilo en alta velocidad opcional 37 División de su álbum en pistas 38 Exportación de pistas a archivos por separado 40 Escucha y exportación a WAV MP3 41 Grabación de di...

Страница 26: ...Public License Licencia pública general GPL Puede encontrar más información así como el código fuente abierto en el CD incluido o en la web en http audacity sourceforge net Audacity funciona tanto en Windows 98 y superiores como en Mac OS X y 9 2 El software para Linux se puede encontrar en el sitio web de Audacity Visite http audacity sourceforge net help tutorials para obtener tutoriales adicion...

Страница 27: ... el puerto USB del giradiscos USB al puerto USB de la computadora 2 Encienda la computadora y espere que arranque completamente si no estaba encendida de antemano 3 Conecte el interruptor de encendido del giradiscos 4 La computadora indicará que Windows detecta un nuevo dispositivo y que está disponible para usar 5 Inserte el CD que vino con su giradiscos USB 6 Ejecute el archivo install audacity ...

Страница 28: ...anas abiertas haga clic en START Settings Control Panel Inicio Configuración Panel de control 2 En el panel de control haga doble clic en Sounds and Audio Devices Dispositivos de sonido y audio 3 Asegúrese de que la tarjeta de sonido de la computadora aparezca en la ficha Volume Volumen ...

Страница 29: ...itivo de grabación de sonido por defecto 5 Haga clic en la ficha Voice Voz Asegúrese de que la tarjeta de sonido de la computadora esté enumerada como dispositivo de reproducción de sonido por defecto y que USB Audio Codec Códec de audio USB esté enumerado como su dispositivo de grabación de sonido por defecto 6 Si está activo pulse el botón Apply Aplicar y luego OK Aceptar Si el botón Apply no es...

Страница 30: ...tavoces estén enchufados a la salida de la tarjeta de sonido de la computadora para monitorear las grabaciones y ediciones Configuración de Audacity en PC 1 Vaya a START All Programs Audacity Inicio Todos los programas Audacity para lanzar Audacity 2 Seleccione el menú Edit Editar y luego Preferences Preferencias Figura 1 Selección de preferencias ...

Страница 31: ... depender del modelo y el sistema operativo de la computadora El 99 de las veces contendrá USB en el nombre Figura 2 Selección del dispositivo de audio USB entre las preferencias Si desea grabar en estéreo haga clic en la ficha desplegable que está junto a Channels Canales y seleccione 2 Stereo Estéreo Haga clic en OK Una vez configuradas sus preferencias está listo para grabar Si aún tiene dificu...

Страница 32: ...tros de formato de entradas y salidas cambian en la ventana AUDIO MIDI SETUP Estos parámetros son incorrectos y no le proporcionarán un funcionamiento adecuado del audio De hecho cada vez que se abra Audacity v 1 2 4 se producirá esta reiniciación Para soslayar este problema espere hasta que se abra Audacity y realice la reiniciación del formato erróneo arriba explicada y luego simplemente deberá ...

Страница 33: ...con los parámetros de formato existentes en Audacity En caso contrario Audacity realizará la misma rutina de reiniciación en la ventana AUDIO MIDI SETUP cuando usted active la función de grabación de dicho programa Si sus parámetros coinciden está listo para comenzar a grabar La regla básica es después de abrir Audacity usar la utilidad AUDIO MIDI SETUP para seleccionar manualmente los parámetros ...

Страница 34: ...tarjeta de sonido de la computadora No hay audio vuelva al menú de preferencias Figura 2 y asegúrese de tener seleccionado Software Playthrough y que el volumen del altavoz de la computadora esté alto Si necesita más ayuda vea la solución de problemas al final de este manual 3 Reproduzca la pista o álbum completo que desea grabar 4 Pulse Stop Parar 5 GUARDE SU ARCHIVO AHORA haciendo clic en File S...

Страница 35: ... más detalle en la sección de ayuda del software y en la web vea la Figure 5 b Debe usarse Normalize Normalizar para tener volumen correcto en la grabación Vea la Figure 6 Para tener en cuenta Es una buena idea colocar la púa en el disco mientras está detenido antes de comenzar a grabar y pulsar Play en el giradiscos después de comenzar a grabar Si baja la púa cuando el disco está girando y despué...

Страница 36: ...3 Haga clic en Get Noise Profile Obtener perfil de ruido La ventana Noise Removal se cierra automáticamente ahora Seleccione la pista completa de audio de la que desea eliminar el ruido Si desea limpiar la grabación completa use Select All bajo el menú Edit Vea la Figure 4 4 Repita el paso 2 para activar la ventana Noise Removal 5 Ajuste la cantidad de audio que desea filtrar moviendo el cursor en...

Страница 37: ...35 Figura 7 Selección del ruido en la pista Figura 8 Ventana de eliminación de ruido ...

Страница 38: ...uido para poder eliminar el ruido de una pista Si selecciona el audio real como perfil de ruido la computadora puede eliminar todo su audio Vea el paso 1 Una vez establecido Noise Profile Perfil de ruido la computadora lo guarda hasta que usted reinicie la aplicación En otras palabras el software debe aprender cuál es el perfil de ruido antes de que usted arranque el software por primera vez No es...

Страница 39: ...s de 3 horas Instrucciones 1 Grabe su disco de vinilo de 33 1 3 RPM a 45 RPM pulsando el botón de 45 RPM del panel superior 2 Oirá la grabación de audio con un pitch inusual debido a su alta velocidad 3 Cuando termine de grabar detenga la grabación 4 Vaya a Edit y Select All Vea la Figure 4 5 Vaya a Effect y luego al menú Change Speed Cambiar velocidad 6 Seleccione de 45 a 33 1 3 y su disco de vin...

Страница 40: ...radas en 1 2 y 3 de abajo Figura 11 En los próximos pasos se muestra cómo rotular estas pistas y exportarlas a formato WAV calidad de CD Figura 11 Identificación de las distintas pistas de audio 3 Pulse el botón Skip to Start Saltar al comienzo para moverse al comienzo de la grabación 4 Seleccione el menú Project y luego Add Label At Selection Agregar rótulo en la selección De esta forma se establ...

Страница 41: ...Use la barra espaciadora para arrancar y parar fácilmente la reproducción Nota el rótulo se coloca al COMIENZO de la pista Por ejemplo en la Figure 14 la PISTA 1 está rotulada al comienzo de la grabación de audio La pista 2 es el rótulo entre la primera y la segunda pista También es posible editar nombres de pistas después de haber sido exportados de Audacity En este ejemplo de tres pistas la divi...

Страница 42: ...le Exportación múltiple como se muestra en la Figure 15 3 Aparece la ventana Export multiple vea la Figure 16 a Seleccione WAV como formato de exportación y elija la ubicación Export Exportación b Seleccione la ubicación Export Aquí es donde guardará sus archivos Es conveniente crear una carpeta especial en su escritorio con el nombre del álbum donde guardará los archivos c Seleccione Using Label ...

Страница 43: ...atuitas de software que pueden reproducir grabar y convertir archivos WAV en MP3 Una vez que un archivo está en formato MP3 se puede colocar en cualquier dispositivo digital móvil compatible con MP3 Grabación de discos de 78 RPM Si desea grabar un álbum de 78 RPM puede hacerlo a 33 3 ó 45 RPM y convertirlo a 78 RPM en el software Audacity Después de grabar el álbum abra el menú Edit Editar haga cl...

Страница 44: ...o puede oír la música pero puede verla en la pantalla abra sus preferencias Figure 2 y asegúrese de que el Playback Device Dispositivo de reproducción esté configurado a la tarjeta de sonido interna de su computadora o Ciclo de encendido Cierre Audacity apague el giradiscos y desenchufe el cable USB Luego enchufe el cable USB encienda el giradiscos y vuelva a abrir Audacity o Verifique el cursor d...

Страница 45: ...nstalado aunque use la entrada de línea del dispositivo para evitar la realimentación o Asegúrese de que sus enchufes RCA estén enchufados a una fuente o que no toquen metal desnudo Si experimenta ruido a través del USB es posible que haya interferencias provenientes de los enchufes RCA Asegúrese de que el cable USB no toque ni esté cerca de ningún otro cable o Si experimenta sonidos anormales pro...

Страница 46: ...44 ...

Страница 47: ...uration du logiciel Audacity pour PC 50 Configuration du logiciel Audacity pour Mac OS 10 4 et versions supérieures 52 Enregistrement sur l ordinateur 54 Réglage du niveau de l audio facultatif 55 Nettoyage du signal audio facultatif 56 Enregistrement du vinyle à haute vitesse facultatif 59 Diviser l album en pistes 60 Exportation des pistes à différents fichiers 62 Faire l écoute et l exportation...

Страница 48: ...se Vous pouvez trouver plus d information en plus du code source sur le CD inclus ou sur le Web au http audacity sourceforge net Audacity fonctionne sous les systèmes d exploitation Windows 98 et ultérieure et Mac OS X 9 2 et ultérieure Le logiciel pour Linux est disponible sur le site de Audacity Allez au http audacity sourceforge net help tutorials pour des tutoriels supplémentaires Le site cont...

Страница 49: ...ateur sous tension et attendez que le système d exploitation soit complètement chargé 3 Mettez le tourne disque sous tension 4 L ordinateur vous avisera que Windows a détecté un nouvel appareil et qu il est prêt à l utilisation 5 Insérez le CD fourni avec le tourne disque USB 6 Exécutez le fichier install audacity win 1 2 3 exe 7 Option Vous pouvez installer la version d évaluation du logiciel Sou...

Страница 50: ...il ait de fenêtre ou de programme ouvert cliquez sur Démarrage Paramètres Panneau de configuration 2 Dans le Panneau de configuration double cliquez sur Sons et périphériques audio 3 Assurez vous que la carte de son de votre ordinateur soit affichée dans l onglet Volume ...

Страница 51: ... périphérique d enregistrement par défaut 5 Cliquez sur l onglet Voix Assurez vous que la carte de son soit sélectionnée comme périphérique de lecture par défaut et que le Codec audio USB soit sélectionné comme périphérique d enregistrement par défaut 6 S il est activé appuyez sur le bouton Appliquer et ensuite sur OK Si le bouton Appliquer n est pas activé appuyez sur OK ...

Страница 52: ...leurs soient branchés dans la sortie de la carte de son afin d entendre vos enregistrements et vos modifications Configuration du logiciel Audacity pour PC 3 Cliquez sur Démarrer Tous les programmes Audacity pour lancer le logiciel Audacity 4 Sélectionnez le menu Edit puis Preferences Figure 1 Sélection des préférences ...

Страница 53: ...ation Mais dans 99 des cas le nom contient le sigle USB Figure 2 Sélection de l appareil audio USB du menu des préférences Si vous désirez enregistrer en mode stéréo cliquez le bouton de déroulement du champ Channels et sélectionnez 2 Stereo Cliquez sur OK Une fois vos préférences configurées vous pouvez commencer à enregistrer Si le tourne disque USB ne se trouve pas dans les choix offerts ouvrez...

Страница 54: ...pour les entrées et les sorties changeront dans la fenêtre PARAMÈTRES MIDI Ces réglages seront erronés et vous offriront une piètre performance audio Malheureusement ceci se produira chaque fois que Audacity v 1 2 4 se chargera Pour contourner ce problème il faut que vous attendiez que Audacity s ouvre et effectue cette réinitialisation des réglages et qu ensuite vous modifiez manuellement les rég...

Страница 55: ...omme ceux des réglages format dans Audacity Sinon Audacity procédera à la réinitialisation de la fenêtre PARAMÈTRES MIDI lorsque vous activerez la fonction d enregistrement dans Audacity Si vous réglages sont identiques vous êtes prêt pour commencer l enregistrement La règle de base est que lorsque Audacity est ouvert utilisez l utilitaire PARAMÈTRE MIDI pour sélectionner manuellement le réglage f...

Страница 56: ...nt de la carte de son de votre ordinateur Aucun signal audio Si l application logicielle ne reçoit aucun son retournez au menu préférence Figure 2 et assurez vous que vous avez bien sélectionné l option Software Playthrough et que le volume des haut parleurs de votre ordinateur est au maximum Vous trouverez plus d information dans la section dépannage à la fin de ce guide 3 Faites la lecture compl...

Страница 57: ...s la section d aide du guide d utilisation du logiciel ou encore sur le Web Figure 5 b L effet Normalize devrait être utilisé pour corriger le volume de l enregistrement Figure 6 Remarque Il est préférable de placer l aiguille sur le disque lorsque celui ci est arrêté et d activer le tourne disque seulement après que l enregistrement soit lancé Si vous abaissez l aiguille lorsque le disque tourne ...

Страница 58: ...z sur Get Noise Profile La fenêtre Noise Removal devrait se fermer automatiquement 4 Sélectionnez entièrement la piste audio de laquelle vous désirez retirer le bruit Si vous désirez retirer le bruit sur tout l enregistrement sélectionnez Select All du menu Edit Menu Figure 4 5 Répétez l étape 2 pour faire apparaître la fenêtre Noise Removal 6 Ajustez le niveau d audio que vous désirez filtrer en ...

Страница 59: ...57 7 Cliquez sur Remove Noise Figure 7 Sélectionner le bruit parasite dans la piste Figure 8 Fenêtre Noise Removal ...

Страница 60: ...ou encore des sauts ou des stries Vous devez sélectionner le profil de bruit avant de pouvoir l éliminer de la piste Si vous sélectionnez l audio au lieu du bruit parasite comme profil de bruit l ordinateur pourrait éliminer tout le signal audio Voir l étape 1 Une fois le Noise Profile profil de bruit configuré le logiciel le gardera en mémoire C est à dire qu il faut programmer le logiciel lors d...

Страница 61: ...eurs cela commence à s additionner enregistrer 4 heures de musique en 3 heures cela compte Instructions 1 Enregistrez vos albums 33 1 3 t min à 45 t min en cliquant sur le bouton 45RPM situé su le panneau supérieur 2 Vous entendrez le signal audio s enregistrer à une hauteur tonale plus élevée en raison de la vitesse de lecture plus élevée 3 Lorsque vous aurez terminé l enregistrement appuyez sur ...

Страница 62: ...rez les espaces qui séparent les pistes indiquées ci dessous par 1 2 3 Figure 11 Les prochaines étapes montrent comment identifier et exporter les pistes en format WAV qualité CD Figure 11 Identification de chacune des pistes audio 3 Appuyez sur le bouton Skip to Start pour vous déplacez au début de l enregistrement 4 Sélectionnez le menu Project puis Add Label At Selection Ceci règle le point de ...

Страница 63: ...de lui mettre une étiquette Utilisez la barre d espace pour lancer et arrêter la lecture Remarque L étiquette est placée au DÉBUT de la piste Par exemple dans la Figure 14 l étiquette TRACK 1 est placée au début de l enregistrement audio L étiquette TRACK 2 est placée entre la première et la seconde piste Vous pouvez modifier le nom des pistes après les avoir exportées du logiciel Audacity Dans ce...

Страница 64: ...ctionnez le menu File puis Export Multiple tel qu indiqué dans la Figure 15 3 La fenêtre Export Multiple s ouvrira Figure 16 a Sélectionnez WAV comme format d exportation et sélectionnez la destination de sauvegarde b Sélectionnez la destination de sauvegarde C est dans ce dossier que vos fichiers seront sauvegardés Vous pourriez également créer un dossier spécial sur le bureau identifié avec le n...

Страница 65: ...ratuits qui peuvent faire la lecture graver et convertir les fichiers WAV en fichiers MP3 Une fois que le fichier est converti en format MP3 il peut être lu par tout appareil numérique portable compatible avec le format MP3 Enregistrement des disques 78 tours Si vous désirez enregistrer un album 78 tours vous pouvez l enregistrer à 33 3 t min ou à 45 t min puis le convertir à 78 t min ensuite avec...

Страница 66: ...endre la musique mais que vous pouvez la voir à l écran retournez au menu préférence Figure 2 et assurez vous que l option Playback Device soit bien réglée sur la carte de son de votre ordinateur o Période d alimentation Fermez Audacity mettez le tourne disque hors tension et débranchez le câble USB Rebranchez le câble USB mettez le tourne disque sous tension et relancez Audacity o Vérifiez les ni...

Страница 67: ... il y ait de la rétroaction o Assurez vous que les fiches RCA sont branchées correctement à une source et qu elles ne sont pas en contact avec du métal à nu Si vous avez du bruit parasite par le bus USB il se peut que les fiches RCA causent de l interférence Assurez vous que le câble USB n est pas près ou en contact avec d autres câbles o Si vous avez des sons bizarres provenant de vos enregistrem...

Страница 68: ...66 ...

Страница 69: ...giradischi USB 70 Configurazione Audacity su PC 72 Configurazione Audacity per Mac OS 10 4 e superiori 74 Registrazione su computer 76 Regolazione del livello audio Opzionale 77 Pulizia dell audio Opzionale 78 Registrazione ad alta velocità del vinile Opzionale 81 Suddivisione dell album in tracce 82 Esportare tracce in file distinti 84 Ascoltare ed esportare in WAV MP3 85 Registrazione di dischi ...

Страница 70: ...eral Public License ossia licenza pubblica generica Ulteriori informazioni oltre al codice open source si trovano nel CD incluso o in rete all indirizzo http audacity sourceforge net Audacity funziona sia con Windows 98 e superiori che con Mac OS X e 9 2 Software for Linux can be found on the Audacity website Recarsi alla pagina http audacity sourceforge net help tutorials per ulteriori tutorial I...

Страница 71: ...gare la porta USB del giradischi USB a quella del computer 2 Accendere il computer e farlo caricare completamente 3 Accendere il giradischi servendosi dell apposito interruttore 4 Il computer riferirà che Windows ha identificato un nuovo dispositivo e che questo è pronto all uso 5 Inserire il CD in dotazione con il giradischi USB 6 Eseguire il file install audacity win 1 2 3 exe 7 Opzionale instal...

Страница 72: ...adischi USB 1 Senza programmi o finestre aperti cliccare su START Impostazioni Pannello di controllo 2 In Pannello di controllo fare doppio clic su Suoni e periferiche audio 3 Verificare che la scheda audio del computer appaia nella linguetta Volume ...

Страница 73: ... la periferica predefinita per la registrazione suoni 5 Cliccare sulla linguetta Voce Verificare che la scheda audio del computer sia elencata come periferica predefinita per la riproduzione suoni e che USB Audio Codec sia la periferica predefinita per la registrazione suoni 6 Se attivo premere il tasto Applica quindi premere OK Se il tasto Applica non è attivo premere OK ...

Страница 74: ...altoparlanti siano collegati all uscita audio del computer per monitorare le registrazioni e le modifiche Configurazione Audacity su PC 1 Per lanciare Audacity recarsi su START Programmi Audacity 2 Selezionare il menu a discesa Edit e quindi Preferences Figura 1 selezionare Preferences ...

Страница 75: ... casi il nome conterrà la parola USB Figura 2 Selezionare USB Audio Device sotto Preferences Se si desidera registrare in stereo cliccare sulla linguetta del menu a cascata a fianco a Channels e selezionare 2 Stereo Cliccare su OK Ora che sono state predisposte le preferenze si è pronti a registrare Se ancora si hanno difficoltà nel localizzare il giradischi USB provare ad aprire le impostazioni d...

Страница 76: ... avrà luogo ogni volta che viene aperto Audacity v 1 2 4 Per aggirare il problema attendere l apertura di Audacity e l esecuzione del resettaggio erroneo di cui sopra quindi selezionare manualmente le impostazioni di formato desiderate nella finestra AUDIO MIDI SETUP 1 INNANZITUTTO procedere a TUTTE le impostazioni di formato desiderate in Audacity Queste si trovano in AUDACITY MENU PREFERENCES AU...

Страница 77: ...udacity Se le impostazioni corrispondono si può iniziare a registrare La regola fondamentale è dopo aver aperto Audacity servirsi della funzione AUDIO MIDI SETUP per selezionare manualmente le impostazioni di formato in Audacity Se si effettuano cambiamenti di formato in Audacity bisognerà tornare alla finestra AUDIO MIDI SETUP e procedere alle stesse modifiche Solitamente la cosa più facile è que...

Страница 78: ...ire dall uscita della scheda audio del computer Non c è audio tornare al menu preference Figura 2 e assicurarsi di aver spuntato l opzione Software Playthrough e che il volume del computer sia aperto Per ulteriori suggerimenti vedi il paragrafo relativo alla risoluzione di problemi in fondo al manuale 3 Riprodurre l intera traccia album che si desidera registrare 4 Premere Stop 5 SALVARE ORA IL FI...

Страница 79: ...ne di aiuto del software oltre che in rete vedi Figure 5 b Normalize normalizzare va usato per ottenere il giusto volume della registrazione Vedi Figure 6 Nota bene È una buona idea quella di porre la puntina sul disco mentre è fermo prima di iniziare la registrazione e premere Play sul giradischi dopo aver iniziato a registrare Appoggiando la puntina mentre il disco sta girando e dopo aver inizia...

Страница 80: ...oise Profile profilo rumore La finestra Noise Removal si chiuderà ora automaticamente 4 Selezionare l intera traccia audio da cui si desidera rimuovere rumore Se si desidera pulire l intera registrazione selezionare Select All nel menu Edit Vedi Figure 4 5 Ripetere la fase 2 per richiamare la finestra Noise Removal 6 Fissare la quantità di audio che si desidera filtrare spostando il cursore nella ...

Страница 81: ...79 Figura 7 selezione di rumore nella traccia Figura 8 finestra di rimozione dei rumori ...

Страница 82: ...a una traccia bisogna selezionare il profilo del rumore Se si seleziona actual audio per il profilo del rumore il computer potrebbe rimuovere l intero audio Vedi fase 1 Una volta impostato il Noise Profile profilo rumori il profilo verrà salvato fino a quando non si riavvia l applicazione In altre parole il software deve imparare il profilo rumori solo quando il software viene avviato Una volta im...

Страница 83: ... Istruzioni 1 Registrare il vinile a 33 1 3 giri a 45 giri premendo il tasto 45 giri 45RPM sul pannello superiore 2 Si sentirà l audio registrare ad un pitch insolito per via della sua alta velocità 3 Una volta finito di registrare interrompere la registrazione 4 Recarsi su Edit e Select All Vedi Figure 4 5 Recarsi su Effect e quindi al menu Change Speed cambia velocità 6 Selezionare da 45 a 33 1 ...

Страница 84: ...lustrato con 1 2 3 sotto Figura 11 I passi successivi mostrano come etichettare queste tracce ed esportarle in formato WAV qualità CD Figura 11 identificazione di tracce audio distinte 3 Premere il tasto Skip to Start per passare all inizio della registrazione 4 Selezionare il menu Project e quindi Add Label At Selection Questo imposterà il punto di partenza della traccia successiva 5 Digitare il ...

Страница 85: ...e di traccia prima di aggiungere l etichetta Servirsi della barra spaziatrice per avviare e fermare facilmente la riproduzione Nota l etichetta è posta all INIZIO della traccia Ad esempio in Figure 14 la TRACCIA 1 è etichettata all inizio della registrazione audio Traccia 2 è tra la prima e la seconda Si possono anche modificare i nomi delle tracce dopo averle esportate da Audacity In questo esemp...

Страница 86: ...2 Selezionare il menu File ed Export Multiple come illustrato in Figure 15 3 Apparirà la finestra Export Multiple vedi Figure 16 a Selezionare WAV come formato di esportazione e scegliere la destinazione b Selezionare la cartella di destinazione Qui è dove verranno salvati i file Si può creare una speciale cartella sul Desktop con il nome dell album per salvare i file c Selezionare Using Label Tra...

Страница 87: ...applicazioni software gratuite per riprodurre masterizzare o convertire i file WAV in MP3 Una volta in formato MP3 il file può essere inserito in qualsiasi dispositivo digitale portatile compatibile MP3 Registrazione di dischi a 78 giri Per registrare un album a 78 giri bisogna registrarlo a 33 3 o 45 giri e convertirlo a 78 con il software Audacity Dopo aver registrato l album aprire il menu Edit...

Страница 88: ...one o Se non si riesce a sentire la musica ma la si vede sullo schermo aprire le preferenze Figure 2 e assicurarsi che la Periferica di riproduzione sia impostata sulla scheda audio interna del computer o Ciclo di alimentazione chiudere Audacity spegnere il giradischi scollegare il cavo USB Quindi collegare il cavo USB accendere il giradischi e riaprire Audacity o Verificare il cursore del microfo...

Страница 89: ... anche quando si utilizza l ingresso di linea sul dispositivo per evitare ritorno o Assicurarsi che le spine RCA siano inserite in una sorgente o che non tocchino il metallo nudo In caso di rumore tramite l USB ci potrebbero essere interferenza tramite le spine RCA Verificare che il cavo USB non tocchi o non sia vicino ad altri cavi o Se si verificano suoni strani provenienti dalla registrazione p...

Страница 90: ...88 ...

Страница 91: ...ity Software 92 Konfiguration unter Mac OS 10 4 und neuer 94 Aufnahme auf dem Computer 96 Einstellen des Audiopegels Optional 97 Säubern des Audiosignals Optional 98 Schnelles Aufnehmen Ihrer Schallplatten 101 Trennen der Titel eines Albums 102 Titel in einzelne Dateien exportieren 105 Abhören und exportieren zu WAV MP3 106 Aufnahme von Schallplatten mit 78 RPM 106 Fehlerhilfe 107 ...

Страница 92: ...als auch unter Mac OS X und 9 2 eingesetzt werden Auf der Audacity Website ist Software für Linux Betriebssysteme zum Herunterladen verfügbar Unter http audacity sourceforge net help tutorials sind weitere Anleitungen erhältlich Die Website verfügt zudem über weitere Informationen zu Erweiterungen um die Leistungsfähigkeit und die Funktionsvielfalt von Audacity zu erhöhen HINWEIS Da die Audacity S...

Страница 93: ...n dies nicht bereits geschehen ist 3 Schalten Sie den Turntable ein 4 Ihr PC teilt Ihnen mit dass Windows ein neues Gerät gefunden hat und dass es nun verwendet werden kann 5 Legen Sie die dem USB turntable beiliegende CD in das CD Laufwerk Ihres Computers ein 6 Starten Sie die Datei install audacity win 1 2 3 exe 7 Starten Sie nach der Installation das Audacity Programm 8 Optional Installieren Si...

Страница 94: ...gen Bild 6 Auswahl Preferences Einstellungen HINWEIS Da die Audacity Software ständig weiterentwickelt wird um sie mit neuen Funktionen auszustatten kann es passieren dass sich einige Untermenüs in anderen Menüpunkten wiederfinden Das Untermenü Preferences zum Beispiel ist in einigen Softwareversionen unter dem Menüpunkt Datei und in anderen Softwareversionen unter Bearbeiten angesiedelt ...

Страница 95: ...gt werden Das hängt mit dem Computermodell und dem Betriebssystem zusammen In 99 aller Fälle sollte der Name USB enthalten Bild 7 Auswahl des USB Audiogerätes Wählen Sie unter Wiedergabe ihre bisherige Soundkarte aus Nun sind Sie bereit für die erste Aufnahme Wenn Sie Probleme beim Aufsuchen des USB Turntables haben öffnen Sie Ihre Systemsteuerung um die Einstellungen für den Audioeingang anzupass...

Страница 96: ... dass sich die Format Einstellungen für Ein und Ausgänge in der AUDIO MIDI KONFIGURATION ändern Diese Einstellungen sind jedoch falsch und ermöglichen keine ausreichende Audio Performance Jedes Mal wenn Sie v 1 2 4 starten werden diese Werte eingestellt Um diesem Problem zu begegnen warten Sie bis Audacity geöffnet ist und diese falschen Einstellungen gesetzt hat Wählen Sie DANACH einfach die rich...

Страница 97: ...Format Einstellungen in Audacity übereinstimmen Wenn nicht führt Audacity beim Aktivieren der Aufnahme den schon beschriebenen Reset Vorgang in der AUDIO MIDI KONFIGURATION durch Wenn alles übereinstimmt sind Sie jetzt fertig für die erste Aufnahme Die grundlegende Vorgehensweise ist also nach dem Starten von Audacity mit der AUDIO MIDI KONFIGURATION das Format manuell einzustellen welches den For...

Страница 98: ...diosignal vom USB Turntable Kein Signal Gehen Sie noch einmal in das Einstellungen Menü Figure und überprüfen Sie dass Sie Software Playthrough aktiviert haben und dass die Lautsprecher Ihres Computers eingeschaltet sind Siehe Fehlerhilfe am Ende dieser Anleitung 3 Lassen Sie den gesamten Titel oder das gesamte Album abspielen 4 Drücken Sie Stop 5 SPEICHERN SIE NUN IHRE AUFNAHME IDEM SIE AUF DAS D...

Страница 99: ...trg A PC oder APFEL A Mac verwenden 2 Gehen Sie in das Effekt Menü und wählen Sie den gewünschten Effekt a Es gibt verschiedene Effektarten die im Softwareabschnitt oder im Internet erklärt werden Siehe Figure b Der Effekt Normalisieren sollte für die richtige Lautstärkeeinstellung der Aufnahme verwendet werden Siehe Figure Bild 10 Effekt Klappmenü Bild 11 Normalisieren ...

Страница 100: ...us dem Effekt Menü Rauschentfernung um das Rauschentfernung Fenster anzeigen zu lassen Figure 3 Klicken Sie Rauschprofil ermitteln Das Rauschentfernungs Fenster schließt sich automatisch 4 Wählen Sie den gesamten Titel aus dem die Nebengeräusche entfernt werden sollen Wenn Sie die gesamte Aufnahme säubern wollen Wählen Sie Alles auswählen im Bearbeiten Menü Figure 5 Wiederholen Sie Schritt 2 zur A...

Страница 101: ...m Rauschentfernung Fenster die Stärke des Audiosignals welches gefiltert werden soll und klicken Sie auf Rauschentfernung Wir empfehlen für einen optimalen Sound diesen Effekt sehr gut dosiert einzusetzen Hinweis Sie können die Bearbeitung vorhören indem Sie den Vorhören Button drücken ...

Страница 102: ...chen aus einem Titel entfernen Wenn Sie kein Profil für Ihren Audiotitel verwenden könnte der Computer alle Audiodaten aus dem Titel löschen Beachten Sie Schritt 1 Wenn Sie das Rauschprofil definiert haben wird es solange gespeichert bis Sie die Anwendung neu starten Anders gesagt die Software muss wissen welches Profil anzuwenden ist wenn Sie die Software das erste Mal starten Sie müssen jedoch n...

Страница 103: ... einer LP keine große Zeitersparnis wenn Sie jedoch mehrere Schallplatten hintereinander überspielen wollen können Sie beispielsweise 4 Stunden Musik in 3 Stunden aufnehmen Anleitung 1 Nehmen Sie Ihre 33 1 3 RPM LPs mit 45RPM indem Sie den 45RPM Taster auf der Oberseite des USB turntable drücken 2 Sie hören dass das Audiosignal auf Grund der schnelleren Geschwindigkeit mit einer seltsamen Tonhöhe ...

Страница 104: ...eerstellen unterteilten Titel der LP siehe Bild 12 Titel 1 2 und 3 sehen Die nächsten Schritte beschreiben Wie Sie diese Tracks markieren und sie in das WAV Format CD Qualität exportieren Bild 16 Einzelne Titel erkennen 3 Drücken Sie die Skip to Start Taste um zum Anfang der Aufnahme zurückzuspringen 4 Wählen Sie im Projekt Menü den Eintrag Textmarke an Startposition hinzufügen Damit setzen Sie de...

Страница 105: ...men 9 Wiederholen Sie die Schritte um weitere Markierungen für alle Titel anzulegen Möglicherweise müssen Sie die Wellenformansicht vergrößern um Titel und Titel Unterteilungen besser erkennen zu können Außerdem wollen Sie ab und zu ein Stück des Titels hören bevor Sie dem Titel einen Namen geben Drücken Sie dazu die Leertaste damit die Wiedergabe startet oder stoppt Hinweis Der Name wird am Start...

Страница 106: ...weise Viele Wege führen zum fertigen Titel Das Teilen der Aufnahme in verschiedene Titel indem Sie Namen an bestimmten Markierungen vergeben ist nur eine Möglichkeit Bei einem fehlerhaften Bearbeitungsschritt können Sie diesen zurücknehmen und es dann erneut versuchen Vergessen Sie nie Ihre Datei regelmäßig zu speichern ...

Страница 107: ...iple wie im Figure 3 Das Mehrere Dateien exportieren Fenster öffnet sich siehe Figure a Wählen Sie WAV als Exportformat und wählen Sie ein Export Verzeichnis aus b Mit dem Export Verzeichnis legen Sie den Speicherplatz fest an dem Sie die einzelnen Titel später wieder finden Sie können einen speziellen Ordner mit individuellen Namen z B Künstler oder Album auf der Festplatte anlegen um die Übersic...

Страница 108: ... können spielen brennen und konvertieren WAV Dateien in das MP3 Format Eine MP3 Datei können Sie dann beispielsweise auf einen tragbaren MP3 Player überspielen oder Sie können eine MP3 CD brennen Aufnahme von Schallplatten mit 78 RPM Um eine Schallplatte mit 78 RPM zu digitalisieren nehmen Sie sie bei einer Geschwindigkeit von 33 3 oder 45 RPM auf und konvertieren Sie dann in Audacity die Aufnahme...

Страница 109: ...o Wenn Sie keine Musik hören aber etwas auf dem Bildschirm sehen öffnen Sie Ihre Preferences Figure und sehen Sie nach ob Ihre interne Soundkarte des Computers als Wiedergabe Gerät eingetragen ist o Neustart Schließen Sie Audacity schalten Sie den USB Turntable aus und ziehen Sie das USB Kabel ab Schließen Sie nach einem Moment das Kabel wieder an schalten Sie den USB turntable wieder ein und öffn...

Страница 110: ...des USB Turntables verwenden um Rückkopplungen zu vermeiden o Beachten Sie dass die RCA Stecker in ein anderes Gerät stecken und nicht blankes Metall berühren Wenn Sie Nebengeräusche über USB bemerken könnte es sich dabei um Einstreuungen von den RCA Steckern handeln o Wenn Sie Nebengeräusche hören die aus der Aufnahme stammen schließen Sie alle Programme starten Sie den Computer neu und lassen Si...

Страница 111: ......

Страница 112: ......

Отзывы: