background image

26

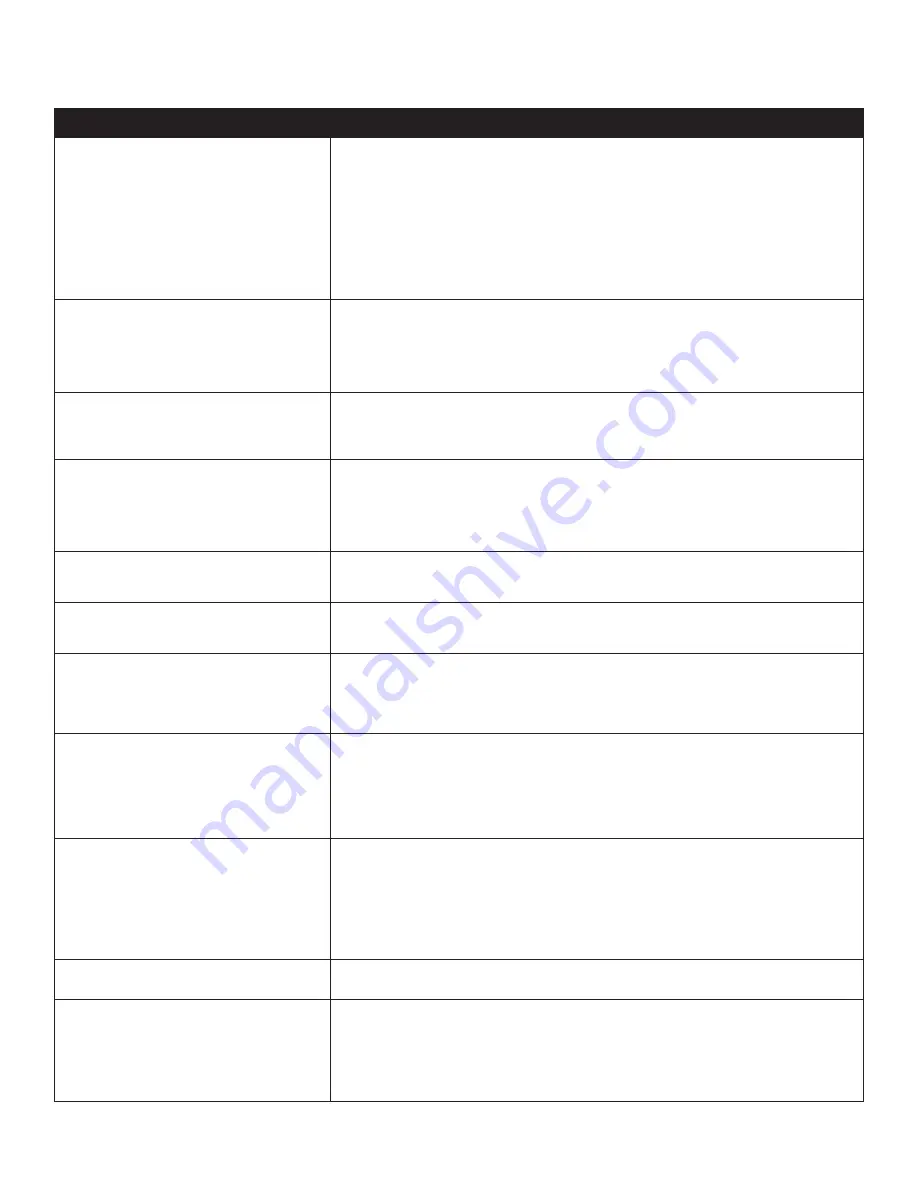
Problem

Possible Solutions

1. CONDITIONER DELIVERS UNTREATED  WATER


A. Bypass valve is open 
B. No salt in brine tank 
C. Injector or screen plugged 
D. Insufficient water flowing into brine tank 
E. Hot water tank hardness 
F. Leak at distributor tube 
G. Internal valve leak 
H. Flow meter jammed 
I. Flow meter cable disconnected or not plugged into meter cap 
J. Improper programming

A. Close bypass valve 
B. Add salt to brine tank and maintain salt level above water level 
C. Replace injectors and screen 
D. Check brine tank fill time and clean brine line flow tank control if plugged 
E. Make sure distributor tube is not cracked. Check O ring and tube pilot 
F. Make sure distributor tube is not cracked. Check O ring and tube pilot 
G. Replace seals and spacers and/or piston 
H. Remove obstruction from flow meter 
I. Check meter cable connection to timer and meter cap 
J. Reprogram the control to the proper regeneration type, inlet water hardness, capacity or flow meter size.

2. CONDITIONER FAILS TO REGENERATE


A. Electrical service to unit has been interrupted 
B. Timer is not operating properly 
C. Defective valve drive motor 
D. Improper programming 
E. Meter not metering

A. Assure permanent electrical service (check fuse, plug, chain or switch) 
B. Replace timer 
C. Replace drive motor 
D. Check programming and reset as needed 
E. Verify by opening faucet and checking current flow - if no flow replace bypass/meter assembly

3. UNIT USES TOO MUCH SALT


A. Improper salt setting 
B. Excessive water in brine tank 
C. Improper programming

A. Check salt usage and salt setting 
B. See #7 
C. Check programming and reset as needed

4. LOSS OF WATER PRESSURE


A. Iron build-up in line to water conditioner 
B. Iron build-up in water conditioner 
C. Inlet of control plugged due to foreign material broken loose from pipes 
by recent work done on plumbing system.
D. Parallel connectors plugged

A. Clean line to water conditioner 
B. Clean control and add resin cleaner to resin bed. Increase frequency of regeneration 
C. Remove piston and clean control
D. Inspect parallel connections and clean as required

5. LOSS OF RESIN THROUGH DRAIN LINE


A. Air in water system 
B. Drain line flow control is too large

A. Assure that well system has proper air eliminator control. Check for dry well condition. 
B. Ensure drain line flow control is sized

6. IRON IN CONDITIONED WATER


A. Fouled resin bed 
B. Iron content exceeds recommended parameters

A. Check backwash, brine draw and brine tank fill. Increase frequency of regeneration. Increase backwash time. 
B. Add iron removal conditioner system

7. EXCESSIVE WATER IN BRINE TANK


A. Plugged drain line flow control 
B. Brine valve failure 
C. Improper programming 
D. Not drawing brine

A. Clean flow control 
B. Replace brine valve 
C. Check programming and reset as needed 
D. See #8 - A 

8. SALT WATER IN SERVICE LINE


A. Plugged injector system 
B. Timer not operating properly 
C. Foreign material in brine valve 
D. Foreign material in brine line flow control 
E. Low water pressure 
F. Improper programming

A. Clean injector and replace screen 
B. Replace timer 
C. Clean or replace brine valve 
D. Clean brine line flow control 
E. Raise water pressure 
F. Check programming and reset as needed

9. CONDITIONER FAILS TO DRAW BRINE


A. Drain line flow control is plugged 
B. Injector is plugged 
C. Injector screen is plugged 
D. Line pressure is too low 
E. Internal control leak 
F. Improper programming 
G. Timer not operating properly

A. Clean drain line flow control 
B. Clean or replace injectors 
C. Replace screen 
D. Increase line pressure (line pressure must be at least 20 psi at all times) 
E. Change seals and spacers and/or piston assembly 
F. Check programming and reset as needed 
G. Replace timer

10. CONTROL CYCLES CONTINUOUSLY


A.Faulty hall sensor on circuit

A. Replace circuit board 

11. DRAIN FLOWS CONTINUOUSLY


A. Foreign material in control 
B. Internal control leak 
C. Control valve jammed in brine or backwash position 
D. Timer motor stopped or jammed teeth 
E. Timer not operating properly

A. Remove piston assembly and inspect bore. Remove foreign material and check control in various regeneration positions 
B. Replace seals and/or piston assembly 
C. Replace piston and seals and spacers 
D. Replace timer motor and check all gears for missing teeth 
E. Replace timer

TROUBLE SHOOTING

Содержание EcoSmart ECS Series

Страница 1: ...maintenance procedures for the continued proper operation of your unit These MUST be performed regularly for your warranty to remain valid 2 Read all instructions carefully before operation 3 Avoid p...

Страница 2: ......

Страница 3: ...TUP PROGRAMMING 11 PLUMBING SYSTEM CLEAN UP 16 MAINTENANCE INSTRUCTIONS AND SCHEDULE 17 REPLACING MEDIA 18 SERVICING VALVE 19 CLEAN INJECTOR ASSEMBLY 20 PISTON AND OR BRINE VALVE ASSEMBLY REPLACEMENT...

Страница 4: ...is recommended WARNING Do not use water that is microbiologically unsafe without adequate disinfection before or after this system This appliance is capable of operating at temperatures between 40 F a...

Страница 5: ...re min 20 max 120 psi Foot Print 13 inches wide x 18 inches long SYSTEM DIMENSIONS SPECIFICATION Working Temperature This unit must be operated at temperatures between 40 F and 110 F 4 C 43 C Working...

Страница 6: ...x To avoid loss of the small parts keep them in the parts bag until you are ready to use them What is included in the box For Models EFT20 EFT30 EFT40 you will expect the following 1 Control Valve 2 T...

Страница 7: ...ing Please record these numbers on the back page of this manual for future reference Valve Serial 17 8 9 9 69 9 1 7 7KLV 9DOYH LV 7HVWHG DQG HUWLILHG E 16 LQWHUQDWLRQDO DJDLQVW 16 16 6WDQGDUG IRU PDWH...

Страница 8: ...uired for Installation NOTE We recommend installation only be completed by a competent installer or plumbing professional to insure this product is installed in accordance with local plumbing codes s...

Страница 9: ...20 volt AC electrical outlet Subjecting the conditioner to freezing or temperatures above 43 C 110 F will void the warranty 2 Make sure the bypass is attached well to the control valve Connect the str...

Страница 10: ...ve or back flow prevention or vacuum breaker Connect Conditioner to the HousePlumbing Any solder joints near the valve must be done before connecting any piping to the valve Always leave at least 6 15...

Страница 11: ...unit The outlet of the bypass should remain closed to prevent any fines or debris from entering the plumbing system Allow all air to escape from the unit before turning the water on fully then allow...

Страница 12: ...SETTINGS for 3 seconds to unlock screen 2 The display will read Press SETTINGS key for 3 sec to unlock 3 After 3 seconds the display will beep confirming unlock 4 Press SETTINGS again and the hour val...

Страница 13: ...the month 19 Press MANUAL REGEN again to accept Flashing stops MONTH value is highlighted again PROCEEDTOSTEP3 17 Press MANUAL REGEN again Date value is accepted and theYEAR starts flashing 12 Press...

Страница 14: ...pt the value Highlight stops flashing STARTUP PROGRAMMING CONTINUED This value is the hardness value of your water in grains per gallon GPG If you have the reading in PPM or mg L simply divide that by...

Страница 15: ...ystem By selecting the vacation mode the normal display will show the following in sequence o Current date and time o Regeneration days 07 days o Remaining days __ Days o Regeneration time 2 00 AM o L...

Страница 16: ...PLUMBING SYSTEM CLEAN UP The following procedures are guidelines only but have proven successful in most instances Under no circumstances should any procedure outlined below be followed if contrary to...

Страница 17: ...rd If you suspect salt bridging carefully pound on the outside of the plastic brine tank or pour some warm water over the salt to break up the bridge This should always be followed up by allowing the...

Страница 18: ...separately makes filling the tank easier and neater Or an empty 1 gallon or 4 liter container with the bottom cut out makes a good funnel a b c Support Bed Gravel Resin Fill tank one quarter full of w...

Страница 19: ...11 Remove the top cone Before Servicing 1 Turn off water supply to conditioner a If the conditioner installation has a 3 valve bypass system first open the valve in the bypass line then close the valv...

Страница 20: ...back in 5 Replace piston assembly followed by timer assembly 6 Replace the piston assembly and reverse following steps in this section Remove 3 X Screws Brine Valve Assembly Piston Assembly Plate Sea...

Страница 21: ...llowing the steps in this section Piston Screw Washer 2 X Screws from Powerhead Powerhead Assembly Valve Body Assembly TIMER REPLACEMENT CAUTION Disassembly while under pressure can result in flooding...

Страница 22: ...ess MANUAL REGENT UP DOWN for 3 seconds to get to Factory Settings Or To enter the programming press and hold the MENU button for three seconds to unlock the screen When the screen is unlocked press a...

Страница 23: ...ve the drain line elbow and washer 2 Clean replace drain line washer 1 Loosen the brine line nut with wrench 2 Remove brine line elbow 3 Clean replace brine line washer Drain Line Elbow REPLACE BRINE...

Страница 24: ...LACING PCBS Remove cover Remove PCBs by removing the screws shown in the picture 1 Remove cover by removing two screws 2 Remove motor screws as shown and pull the motor REPLACE MOTOR 1 2 Motor Screws...

Страница 25: ...8 ControlValve Assembly CS6 1 16 13000410 Screw 3 9 9 5 2 15 07030068 High Cover CS6 1035 1 14 60010099 13000426 Piston Screw ST2 9 13 4 No Part Water group Part Canature Description Qty 13 05030025B...

Страница 26: ...parallel connections and clean as required 5 LOSS OF RESIN THROUGH DRAIN LINE A Air in water system B Drain line flow control is too large A Assure that well system has proper air eliminator control...

Страница 27: ...al notes ___________________________________________________________________ ___________________________________________________________________ _______________________________________________________...

Страница 28: ...80150343 20 12 19 TOLL FREE 1 877 288 9888 Regina SK Cambridge ON Carmel IN Pottstown PA Phoenix AZ Guadalajara MX...

Отзывы: