background image

07/02 Rev. 2.16-00

USER MANUAL

Setup, page 7

AP 3.4

 8. Turn on the printer and press FEED but-

ton.

 9. Labels will be separated from backing 

paper and fed out on H cover, while 
backing paper will come out from the slot 
under the H cover, and label will be fed 
out. 

 10.Close the top cover.

à

The "FEED" button will not drive the prin-
ter to peel. The peeling work can be exe-
cuted only when the software setting is 
ready.

Cutter Mode

m

For installing the cutter, please refer to 
the Service Manual, topic section „Ser-
vice“.

 1. Follow the common procedure of "Loa-

ding the Media" as described in 

Stan-

dard Mode

.

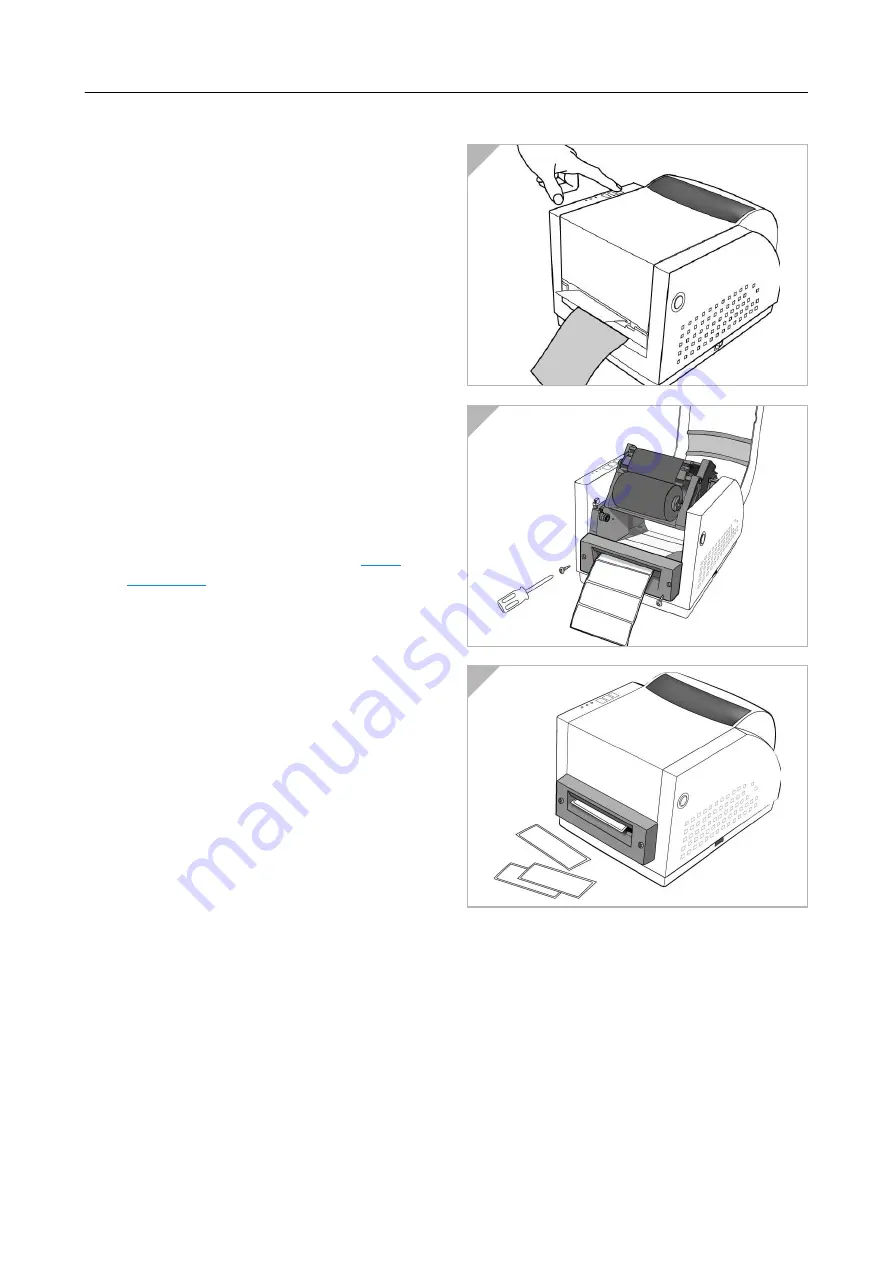
 2. Mount cutter on print head module by 

fastening with two screws (Fig. 2).

 3. Thread the media over the platen roller, 

and then route the media through the 
slot of the cutter module (Fig.  3).

 4. Press down the print head module firmly.

à

The "FEED" button will not drive the prin-
ter to cut.  The cutting work can be exe-
cuted only when the software setting is 
ready.

à

3

’’

 holder paper is available for 3

’’

 ID me-

dia roll.

1

2

3

Содержание AP 3.4

Страница 1: ...07 02 Rev 2 16 00 USER MANUAL Seite Page 1 AP 3 4 Setup Loading the Ribbon 2 Loading the Media 4 Standard Mode 4 Peel Off Mode 6 Cutter Mode 7 Performing Calibration 8 Index 9...

Страница 2: ...rd the rear Fig 1 2 Unlatch the print head module by pushing the two green release levers 2 on the sides toward the rear Fig 2 3 This allows print head module to rotate upward automatically and expose...

Страница 3: ...nd then insert the bare core into the pick up holder To do so first snap in the right side then the left side Fig 1 8 Turn the wheel 1 of the print head module to ensure the ribbon is tightly wound Fi...

Страница 4: ...In cutter mode the printer automatically cuts the label after it is printed m See paragraph Cutter Mode on page 7 Standard Mode 1 Press the push buttons 1 on both sides to swing the top cover toward...

Страница 5: ...d the media over the platen roller Fig 1 7 Turn back the print head module and then press it down firmly on both sides till you hear a snap Fig 2 8 Close the top cover and turn on the prin ter or pres...

Страница 6: ...approximate 6 long labels from the backing paper Fig 1 3 Trim the edge of label backing paper with scissors or knife Fig 2 4 Push down peeler switch 1 to ease the access packing paper 5 Lead the back...

Страница 7: ...is ready Cutter Mode m For installing the cutter please refer to the Service Manual topic section Ser vice 1 Follow the common procedure of Loa ding the Media as described in Stan dard Mode 2 Mount c...

Страница 8: ...2 Turn on the power 3 MEDIA indicators will blink at this point release Pause button 4 The printer will feed the labels for 12 inches 5 MEDIA indicators stop blinking and remain illuminated This proce...

Страница 9: ...07 02 Rev 2 16 00 USER MANUAL Setup page 9 AP 3 4 Index B Backing paper 6 C Calibration 8 Cutter Mode 7 M Media loading 4 P Peel Off Mode 6 R Ribbon core adapter 2 Ribbon loading 2 S Standard Mode 4...

Отзывы: