


1046
GroupWise 8 Administration Guide
n
ov
do
cx (e
n)
22
Ju
n
e 20
09
or
If your maps are all independent from each other, skip to
“Adding Agents to a Map” on
page 1047
.
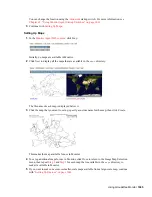
Setting Up Regions
If some of your maps are subsets of other maps, you can set up a large-scale map so that it links to
one or more smaller-scale maps. For example, a map of the world could have a region for each
continent or country, or a map of a city or country could have a region for each office where
GroupWise domains or post offices are located.
1
Set up at least two maps in Monitor, as described in
“Making Maps Available in Monitor” on
page 1044
.
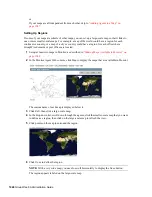
2
In the Monitor Agent Web console, click
Map
to display the maps that are available in Monitor.
The custom name of each map is displayed below it.
3
Click
Edit
, then click a large-scale map.
4
In the drop-down list, scroll down through the agents, click the smaller-scale map that you want
to define as a region, then click on the large-scale map to refresh the view.
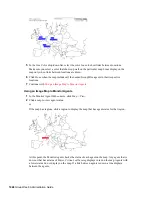
5
Click points on the map to surround the region.
6
Click
Done
to define the region.
NOTE:
With a very wide map, you need to scroll horizontally to display the
Done
button.
The region appears labeled on the large-scale map.