


1012
GroupWise 8 Administration Guide
n
ov
do
cx (e
n)
22
Ju
n
e 20
09
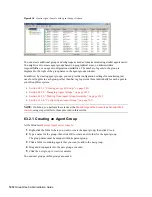
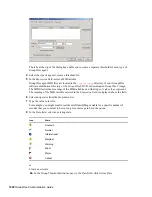
Figure 63-4
Monitor Agent Console with Agent Groups Defined
You can create additional groups and subgroups as needed to make monitoring similar agents easier.
You might want to create agent groups based on geographical areas, on administrative
responsibilities, or on agent configuration similarities. The number of agents in the group is
displayed to the right of the group name in the agent groups window.
In addition, by creating agent groups, you can provide configuration settings for monitoring just
once for all agents in each group, rather than having to provide them individually for each agent in
your GroupWise system.
Section 63.2.1, “Creating an Agent Group,” on page 1012
Section 63.2.2, “Managing Agent Groups,” on page 1013
Section 63.2.3, “Viewing Your Agent Group Hierarchy,” on page 1013
Section 63.2.4, “Configuring an Agent Group,” on page 1013
NOTE:
On Linux, you perform these tasks at the
Monitor Agent Web console
or
Monitor Web
console
, using steps similar to those provided in this section
63.2.1 Creating an Agent Group
At the Windows
Monitor Agent server console
:
1
Right-click the folder where you want to create the agent group, then click
Create
.
2
Type a name for the group, then click
OK
to create a new folder for the agent group.
The group name must be unique within its parent group.
3
Click a folder containing agents that you want to add to the new group.
4
Drag and drop agents into the new group as needed.
5
Click the new group to view its contents.
You can nest groups within groups as needed.