background image


- 2 - 

Introduction


The


Aquila


F3A


Pattern


airplane


was


born


out


of


the


need


for


high


quality


ARF


airplanes


capable


of


completing


the


Master's


pattern


with


ease


yet


be


able


to


be


flown


by


novice


F3A


pilots


effectively


in


the


Sportsman


class.


By


looking


at


the


industry


we


decided


to


build


this


airplane


around


two


different


power


plants.


The


first


power


plant


is


the


OS


1.20


AX


engine


with


the


stock


muffler.


This


engine


is


more


than


capable


of


flying


this


airplane


through


the


sequences


without


the


complexity


of


a


piped

engine


arrangement.


This


simplifies


the


design


and


maintenance


so


that


the


entry


level


F3A


pilot


can


easily


transition


from


his


Sport


airplane


to


an


F3A


capable


airplane.


Want


a


Pipe?


A


pipe


tunnel


is


hidden


beneath


the


Monokote


on


the


belly


of


the


Aquila.


So


if


a


standard


muffler


arrangement


is


not


to


your


liking,


or


you


just


want


more


power,


you


can


easily


add


your


pipe


to


this


airplane!


The


second


power


plant


is


the


AXI


5330/FAI


electric


motor.


Couple


this


motor


with


a


10S


pack


of


LiPo


batteries


and


you'll


have


an


electric


F3A


airplane


capable


of


completing


the


Master's


pattern


schedule


with


power


to


spare!


The


Aquila


has


received


the


benefit


of


2


years


development


and


design


and


was


designed


from


the


ground


up


to


be


a


thoroughbred


F3A


performer


and


not


a


sport


airplane


that


looks


like


a


pattern


ship.


Our


white


color

scheme


was


selected


after


lengthy


debates


and


is


designed


for


ease


of


visibility


during


all


aspects


of


flight


from


take

off,


maneuvers,


to


landing.


We


have


recently


added


a


Yellow


color

scheme


to


our


Aquila


F3A


ARFs.


We


cover


our


Aquila


ARFs


only


in


high


quality


Monokote


film.


Содержание 2M Aquila F3A

Страница 1: ...w Color Scheme Shown SPECIFICATIONS Engine Requirement 1 20 to 1 40 cu In 2C AXI 5330 FAI or equivalent Wing Span 70 in Wing Area 900 sq in Fuselage Length 77 in Weight Range 9 3 lbs Wing Loading range 21 9 oz sq ft 9 3 lbs Cubic Wing Loading 8 8 Radio Function Throttle Elevator Rudder Aileron Number of Servos 5 ...

Страница 2: ...unnel is hidden beneath the Monokote on the belly of the Aquila So if a standard muffler arrangement is not to your liking or you just want more power you can easily add your pipe to this airplane The second power plant is the AXI 5330 FAI electric motor Couple this motor with a 10S pack of LiPo batteries and you ll have an electric F3A airplane capable of completing the Master s pattern schedule ...

Страница 3: ...t for the color scheme design The hardware package is fairly complete however the hardware is metric size You ll need to add your radio gear engine etc Control horns are provided as are the wheels and other components including a fuel tank As always it is your responsibility to ensure the hardware you use in your airplane is satisfactory for the conditions you intend to fly in Please feel free to ...

Страница 4: ...tandard Sized High Precision Servos Digital Servos are preferred 22 AWG servo wire to support your servo installation 6 32 all thread rod for rudder control horn 4 40 or Heavy Duty Pull Pull system for Rudder 2 8 32 x 1 5 socket head bolts for axles 4 8 32 nylon insert nuts Pre Construction Aids Please inspect the kit upon arrival and familiarize yourself with all parts in the kit and the instruct...

Страница 5: ...of Cockpit Mounting hardware with 2 nylon bolts inside to hold the cockpit in place through the fuselage sides o 1 Pull Pull Rudder Cable set We recommend replacing this with a 4 40 heavy duty pull pull set o 1 Package of control horns This package also includes a set for use on the rudder however they will not fit the Aquila s rudder We recommend using 6 32 all thread rod for control horns o 1 Pa...

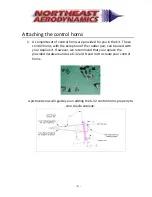
Страница 6: ...se control horns with the exception of the rudder pair can be used with your Aquila kit However we recommend that you replace the provided hardware and use 6 32 all thread rod to create your control horns A picture below will guide you in adding the 6 32 control horns properly to your Aquila airplane ...

Страница 7: ...for all of the aileron hinges 6 Align the aileron to the wing and gently insert all of the hinges into the wing while keeping the hinge half way in the aileron 7 Once the aileron is properly seated use 3 4 of drops of thin CA from the top of each hinge 8 Flip the wing over and add a couple of drops of thin CA to the bottom of the hinge and allow the CA to cure completely 9 Remove the pins and flex...

Страница 8: ... preferences Mounting the Horizontal Stabilizers 1 Attach your selected Elevator Control horns to the elevator halves 2 Using the stab tube provided attach each stabilizer half with the screw and washer provided into the 3mm T nuts buried in the fuselage Use a drop of medium hold thread locking compound you do want to be able to remove these bolts someday to secure the stab bolts in place 3 Since ...

Страница 9: ...ge 4 The push pull control rod system used in the Aquila is used in a great many pattern plane installations and should be familiar to many modelers Feel free to substitute your own instructions here if you feel they are better suited to your needs 5 Looking at the long CF rod you will notice that the manufacturer anticipated your needs and pre drilled holes in both ends for the wire pushrods to a...

Страница 10: ...lly remove the CF pushrod with the two wire pushrods still attached Mark the CF rod at the end where the two wire pushrods were attached and then remove all of the tape 12 Put a 1 4 L bend into the non threaded end of each pushrod Then measure 1 4 aft of the marks you made in step 11 Drill a 1 16 hole into the CF rod at the mark that you just made Place the wire pushrods along the CF pushrod and t...

Страница 11: ...to hold the part in place but too much glue might glue your CF elevator pushrod to the bearing 16 Release the tape or pins holding the elevator and manually move the elevators through the full range of motion needed both up and down and ensure nothing is binding and that you have free movement Adjust the setup as needed 17 With your elevator servo installed connect the wire pushrod to the elevator...

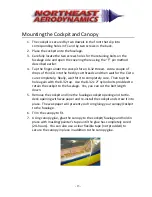
Страница 12: ...ge using the gray nylon bolts and washers supplied b An alternative method is to locate the hard point at the wing tube end on the underside of the wing This hard point can be drilled and tapped so that you can secure the wings to the outside edge of the tube If you use this method add a piece of hardwood inside the wing tube end first and allow it to be drilled and tapped when you add your hold d...

Страница 13: ...y Really wait for it to completely cure Then tap the hole again with the 8 32 tap Use the 8 32 x 2 nylon bolts provided to retain the cockpit to the fuselage Yes you can cut the bolt length down 5 Remove the cockpit and line the fuselage cockpit opening and turtle deck opening with wax paper and re install the cockpit and screw it into place The wax paper will prevent you from gluing your canopy c...

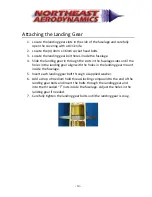
Страница 14: ...in the fuselage sides until the holes in the landing gear align with the holes in the landing gear mount inside the fuselage 5 Insert each landing gear bolt through a supplied washer 6 Add a drop of medium hold thread locking compound to the end of the landing gear bolts and insert the bolts through the landing gear and into the threaded T nuts inside the fuselage Adjust the holes in the landing g...

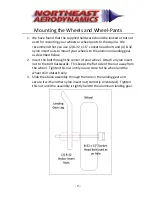
Страница 15: ...uminum landing gear as described below 2 Insert the bolt through the center of your wheel Attach a nylon insert nut to the bolt backwards This keeps the flat side of the nut away from the wheel Tighten this nut until you are close to the wheel and the wheel still rotates freely 3 Slide the above assembly through the hole in the landing gear and secure it with another nylon insert nut correctly ori...

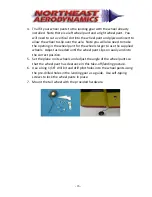
Страница 16: ...l pant for the wheels larger to use the supplied wheels Adjust as needed until the wheel pant slips on easily and into the correct position 5 Set the plane on its wheels and adjust the angle of the wheel pants so that the wheel pant has clearance in this take off landing posture 6 Use a long 1 16 drill bit and drill pilot holes into the wheel pants using the pre drilled holes in the landing gear a...

Страница 17: ...4 Enlarge the holes in the cowl slightly This will allow the screws to pass freely in and out of the cowl 5 Enlarge the holes in the plywood mounting tabs to allow a piece of yellow inner nyrod not supplied to fit into the holes snugly Glue the yellow nyrod into the holes with epoxy and ensure the nyrod is flush to the outside of the mounting tab this is the side that will come in contact with the...

Страница 18: ... 18 7 Reinstall the cowl and carefully seat the screws into the center of the nyrod and take care not to allow the screws to cut new holes in the plywood tabs 8 Remove the cowl ...

Страница 19: ...g a builder square or other square corner assemble and align parts A B and C Note to obtain the proper Right Thrust both sides must be square as shown 3 Glue the pieces together using epoxy and clamp in place until the epoxy has cured completely Then brace with the triangle stock provided ...

Страница 20: ...0 4 You might need to adjust the openings in the fuselage to allow the floating firewall to pass freely through the pre cut slots 5 Slide the floating firewall into the slots and install your engine mount ...

Страница 21: ... the fit is correct Remember that there are 1 5 degrees of right thrust and 2 5 degerees of down thrust pre built into the floating firewall that you will need to account for when placing the engine in the airplane 7 Once everything is situated properly glue the floating firewall in place inside the fuselage Brace with triangle stock 8 Trim off the excess floating firewall from behind the last bul...

Страница 22: ... airplane except fuel 3 Find the center of the wing tube and measure back 70mm approximately 2 75 This is your starting point for flight testing and is the CG location the test pilot preferred Once the plane is properly balanced the CG can be adjusted forward or aft as you see fit to match your flying style and how you want the airplane to present in the air The use of an in flight trimming method...

Страница 23: ... of work goes into a model and money invested could be lost in a moment of confusion and inexperienced pilot error The 2M Aquila F3A is a fully capable precision aerobatics airplane This is not a Sport airplane Care must be taken to fly the airplane properly Be certain that the controls move freely and in the proper directions before attempting flight Control movements to start with Surface Precis...

Страница 24: ...BILITY In the use of our products Northeast Aerodynamics only obligation shall be to replace such quantity of the product proven to be defective User shall determine the suitability of the product for his or her intended use and shall assume all risk and liability in connection therewith Good Luck Safe Flying is NO Accident ...

Страница 25: ... 25 Additional Pictures ...

Страница 26: ...OM KIT FABRICATION P O BOX 1054 HOLLIS NH 03049 603 465 6508 VISIT US ON THE WEB AT www ne aero com or Email info ne aero com After hours calls will be recorded on our answering machine for messages and orders ALL NORTHEAST AERODYNAMICS KITS CAN BE ORDERED DIRECT FROM THE MANUFACTURER ...

Отзывы: