background image

23

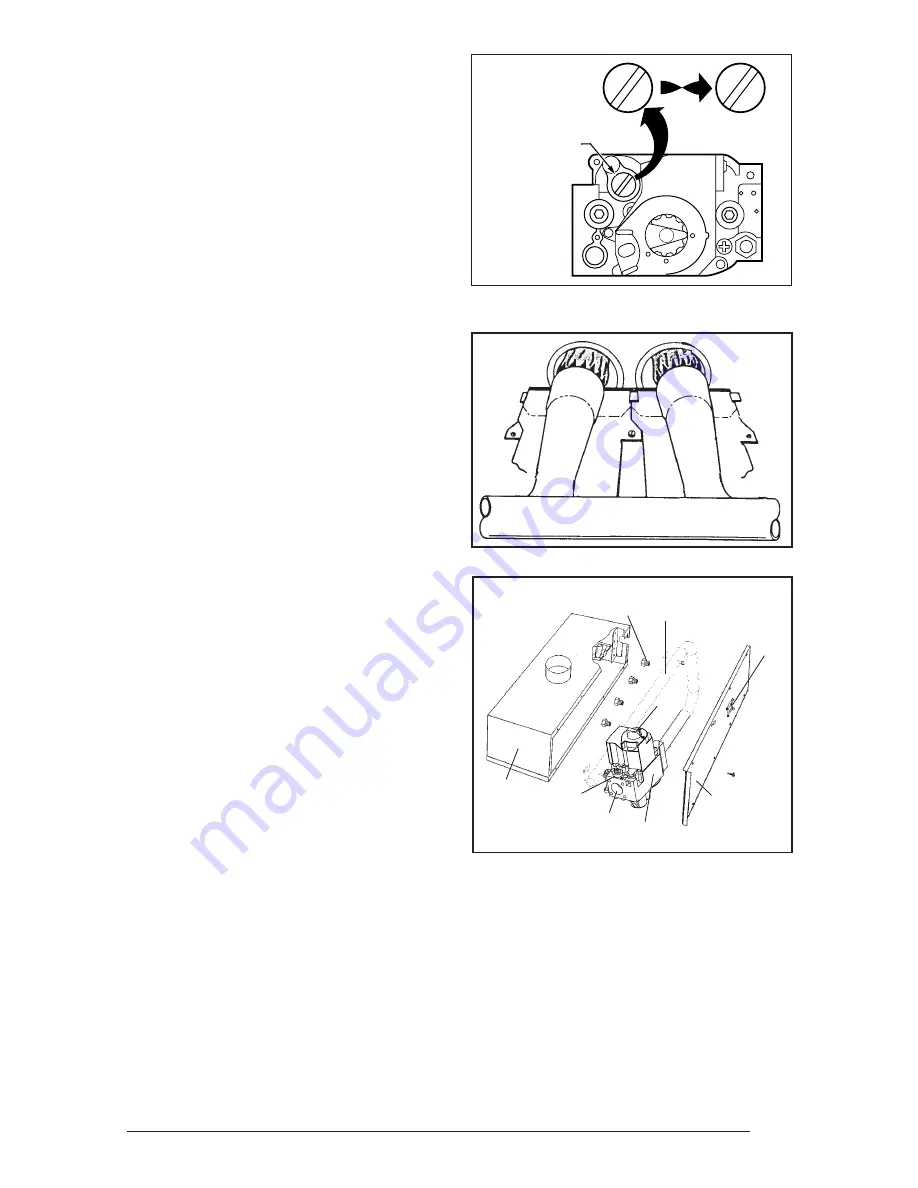
Figure 25.  Typical Installation For Sealed

Burner Box With Access Cover Plate

Burner 
Orifices

Gas
Manifold

Flame

Observation

Port

Gas
Valve

Access

Cover

Plate

Burner
Box

Inlet
Pressure
Tap

Inlet

On/Off 
Lever

Figure 24. Burner Inspection

Figure 23. Convertible Pressure

Regulator Cap

Honeywell
Valve

PRESSURE 
REGULATOR 
CAP

M11678

N

A

T N

A

T

L

P

L

P

N

A

T N

A

T

OR

OTHER SIDE
OF CAP

Reinstalling the Burner Assembly:

1.

Reinstall the gas manifold assembly to the
burner box with the four (4) fasteners,
which were removed earlier.

2.

Carefully reinstall the burner box into the
unit.  After installing the burner, inspect
the alignment of the burners with the heat
exchanger tubes.  The center of the burn-
ers should be aligned with the center of the
tubes.

3.

Reconnect the gas piping to the gas valve.

4.

Reconnect the wires to the gas valve  termi-
nals.

5.

Reconnect the rubber pressure tubes to the
gas valve and the burner box.  Reinstall the
burner access cover plate.

6.

Reconnect the ignitor at the 2 position
plug.

7.

Reconnect the flame sensor wire to the
burner box.

Pressure Gauge Installation

NOTE:  For natural gas installations, the in-
coming gas line pressure at the gas valve inlet
must be between 4.5” WC and 10.0” WC.  For
LP gas installations, the incoming gas line pres-
sure at the gas valve inlet must be between
11.0” WC and 14.0” WC.  This pressure can be
checked at the inlet end of the gas valve using
a pressure gauge or U-tube manometer, which
must be installed according to the
manufacturer’s supplied instructions.

LIGHTING AND ADJUSTMENT OF
THE APPLIANCE

1.

Turn ON the gas at the manual valve,
outside of the unit.

2.

Check all gas connections for leaks with
a soap and water solution. If the solution
bubbles there is a gas leak which must be
corrected. Do NOT use an open flame to
check for gas leaks.

3.

Turn ON the electrical power to the appli-
ance.

4.

Move the gas valve lever/knob to the “ON”
position. The lever/knob must be moved
to the end of its range of motion to insure
the valve is completely open.  Use only
your hand to push in or turn the gas control
valve.  Never use tools.

5.

Set the room thermostat to a point above
room temperature to begin the heating
cycle of the unit.

6.

Check that the unit ignites and operates
properly.  Refer to the installation instruc-
tions provided with your unit for the normal
operating sequence.

Содержание M3 RL-060

Страница 1: ...sup plier Ne pas entreposer ni utiliser de l essence ni d autres vapeurs ou liquides inflammables dans le voisinage de cet appareil ni de tout autre appareil QUE FAIRE S IL Y A UNE ODEUR DE GAZ Ne pa...

Страница 2: ...2...

Страница 3: ...nance 30 System Operation Information 30 Sequence of Operation 30 Furnace Fails to Operate 31 Location of Major Components 32 Wiring Diagram 33 Installation Performance Checklist 35 General 4 UnitDime...

Страница 4: ...2 Shipping Weight Table 3 Furnace Specifications Airflow Data GENERAL Note Data is for Operation with Filter Factory Wired Cooling Tap Factory Wired Heating Tap Furnace Specifications Airflow Data Fur...

Страница 5: ...s with an open flame Use a commercially available soap solution made specifically for the detection of leak to check all connections 6 Always install furnace to operate within the furnace s intended t...

Страница 6: ...ring problems in the electrical circuit supplying the furnace 4 Resetting circuit breakers blown fuses or other switches 5 Correcting problems due to improper gas supply pressure to the furnace 6 Prov...

Страница 7: ...OVE ALL MODELS Inches Inches Front 1 1 Back 0 0 Sides 0 0 Vent 0 0 Top 6 6 Duct Plenum w Coil Box 0 0 w o Coil Box 1 4 1 4 within 3 feet bustible material other than wood flooring The furnace may be i...

Страница 8: ...ast 400 sq in of free airflow area d The cross sectional area of the return duct system leading into the closet when located Figure 2 Non Platinum Supply Duct System A Single trunk duct B Dual trunk d...

Страница 9: ...e where it can be easily read when the closet door is open The marking shall read CAUTION HAZARD OF ASPHYXIATION Do not cover or restrict return air opening l Air conditioning systems may require more...

Страница 10: ...construction use the 14 round plenum p n 903896 NON PLATINUM SERIES a Determine depth of floor cavity from surface of floor to top of supply air duct See Figure 3 b Select appropriate model from Tabl...

Страница 11: ...duct connector at rear of the floor opening See Figure 9 INSTALLING PLATINUM SERIES 14 ROUND DUCT CONNECTOR a Place duct connector through the floor open ing See Figure 9 b Secure duct connector to fl...

Страница 12: ...oor open ing with bottom tabs extending through the duct opening See Figure 9 b Secure duct connector to floor c Bendbottomtabsunderanduptightlyagainst the supply air duct See Figure 10 NOTE The duct...

Страница 13: ...te tabs d Secure front with one 1 fastener at each corner See Figure 13 or 14 NOTE Additional fasteners may be used at rear sides or through door frame as desired to secure furnace to closet or alcove...

Страница 14: ...ckage or re striction leakage corrosion and other deficiencies which could cause an unsafe condition 3 So far as is practical close all building doors and windows and all doors between the space in wh...

Страница 15: ...30 cm B Clearance to window or door that may be opened 6 inches 15 cm for appliances 10 000 Btuh 3 kW 12 inches 30 cm for appliances 10 000 Btuh 3 kW and 100 00 Btuh 30 kW 36 inches 91 cm for applianc...

Страница 16: ...sive atmosphere The quality of outdoor air must also be considered Be sure that the combustion air intake is not located near a source of solvent fumes or other chemicals which can cause corrosion of...

Страница 17: ...t should be as close to furnace as possible Combustion Air Intake Pipe 5 Combustion Air Intake Pipe Vent Support System on Vertical Rise Below Joints 5 Avoid areas where condensate drainage may cause...

Страница 18: ...Extend the vent pipe through the wall approximately 1 and seal the area be tween the wall and pipe 3 Apply couplings to the vent pipe on the interior and exterior sides of the wall to insure the pipe...

Страница 19: ...the drainage hose of the furnace NOTE The condensate drain should be pro tected from freezing when in unheated spaces The furnace is supplied with an internal conden sate drain trap CAUTION Do not in...

Страница 20: ...y line and the entry hole in the furnace casing to avoid unwanted noise and or damage to the furnace All gas piping must be installed in compliance with local codes and utility regulations Some localr...

Страница 21: ...proved method High Altitude Derate The nameplate input rating for the furnaces apply for elevations up to 4 000 feet above sea level for US and Canada If the elevation for the furnace location is high...

Страница 22: ...emove the four 4 fasteners that secure the gas manifold to the burner box as shown in Figure 25 Carefully remove the gas manifold assembly from the burner box Note that the gas manifold assembly consi...

Страница 23: ...auge Installation NOTE For natural gas installations the in coming gas line pressure at the gas valve inlet must be between 4 5 WC and 10 0 WC For LP gas installations the incoming gas line pres sure...

Страница 24: ...operation CAUTION To avoid electric shock personal injury or death turn off the power at the disconnect or the main service panel before making any electrical connections ELECTRICAL WIRING General El...

Страница 25: ...XFMR Unused Motor Leads EAC Electronic Air Tap 5A 120 VAC Status Light Red Humidifier Tap 5A 120 VAC Connect Neutral Lead of Electronic Air Cleaner and or Humidifier Here Common Leads Blower Off Timin...

Страница 26: ...the require ments of all applicable local and federal codes For installation of the VentilAire III or IV follow the instructions provided with the VentilAire kit START UPANDADJUSTMENTS General Prior t...

Страница 27: ...in water column for use with natural gas Themanifoldpressuremustbesetat10 0in water column for use with LP gas Verifying and Adjusting Temperature Rise Verify that the temperature rise through the fur...

Страница 28: ...ould extend from each burner without lifting curling orfloating Afterverifyingignition setthe thermostat below room temperature and verify that the burner flame extinguishes completely Replace the fro...

Страница 29: ...ury or death turn off the power at the disconnect or the main service panel before performing any maintenance WARNING Holesintheventpipeorheatexchanger can cause products of combustion to enter the oc...

Страница 30: ...flammable vapors and liquids in the vicinity of the furnace Change or replace the air filters monthly during any period when the circulating blower is operating regularly Always replace the doors on t...

Страница 31: ...ately The blowers continue to operate until the limit closes When the limit closes the inducer blower is de energized immediately The circulating airblowercontinuestooperateforthespeci fied delay fact...

Страница 32: ...ollout Switch 7 J Trap Hard Tube 8 LowVoltageTransformer 9 In Line Drain Assembly 10 Junction Box 11 Vent Safety Switch Figure 29 Location of Major Components 12 Ignitor Assembly 13 Burner View Port 1...

Страница 33: ...L C WHITE RED ORANGE BLUE BLACK MOTOR PLUG 1 2 3 4 5 6 BLACK BLUE FLAME ROLL OUT SWITCH ALL MODELS PRESSURE SWITCH R Y G W C Y 180 120 90 60 Legend Field Wiring Factory Wiring Low Voltage High Voltag...

Страница 34: ...34...

Страница 35: ...r Temperature __________ F Return Air Temperature _________ F Temperature Rise ______________ F UNIT SERIAL NUMBER ________________ Are Flue Connections tight _____________ Is there Proper Draft _____...

Страница 36: ...O Fallon MO 708219D Replaces708219C Specificationsandillustrationssubjecttochangewithout noticeandwithoutincurringobligations Printedin U S A 04 04 7082197 708219D...

Отзывы: