30
FCC INFORMATION
This equipment has been tested and found to comply with the limits for a Class B digital device, pursuant to part
15 of the FCC Rules. These limits are designed to provide reasonable protection against harmful interference
in a residential installation. This equipment generates, uses, and can radiate radio frequency energy and, if not
installed and used in accordance with the instructions, may cause harmful interference to radio communications.
However, there is no guarantee that interference will not occur in a particular installation. If this equipment does
cause harmful interference to radio or television reception, which can be determined by turning the equipment off
and on, try to correct the interference by one or more of the following measures:
•
Reorient or relocate the receiving antenna.
•
Increase the separation between the equipment and the receiver.
•
Connect the equipment into an outlet on a circuit different from that to which the receiver is connected.
•
Consult the dealer or an experienced radio/TV technician for help.
FCC CAUTION: To assure continued compliance, use only shielded interface cables when connecting to
computer or peripheral devices. Changes or modifications not expressly approved by the party respon-
sible for compliance could void the user’s authority to operate this equipment.
IMPORTANT: To satisfy exposure compliance requirements, the antenna and transmitter in the console
must be at least 8 in. (20 cm) from all persons and must not be near or connected to any other antenna or
transmitter.
Note: The console contains FCC ID: OMC421914.
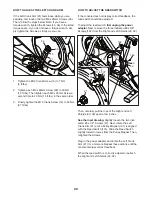
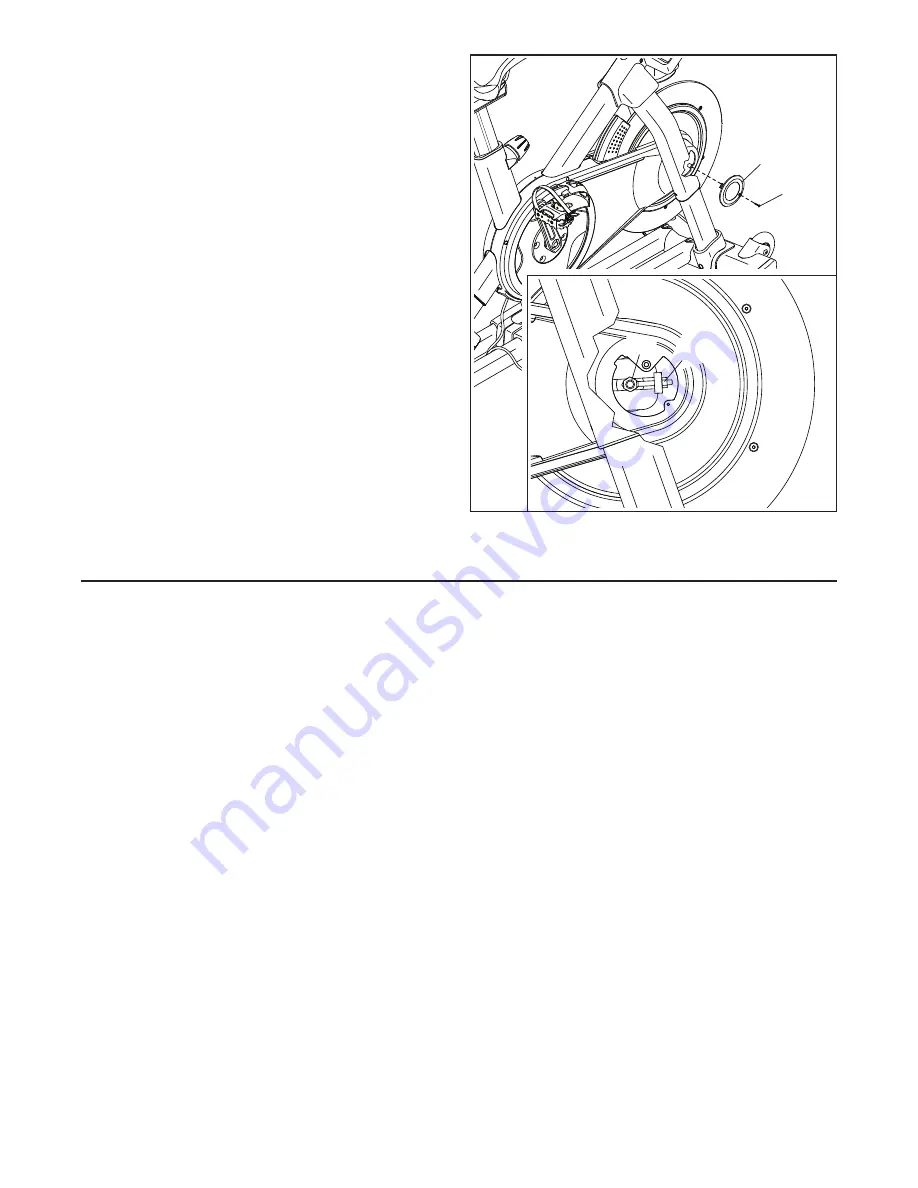
HOW TO ADJUST THE DRIVE BELT
If you can feel the pedals slip while you are pedaling,
even when the resistance is adjusted to the highest
setting, the drive belt may need to be adjusted.
To adjust the drive belt,
first unplug the power
adapter.
Then, follow the instructions below. Note: The
drawings show only the right side of the studio cycle.
Remove the indicated #8 x 5/8" Screw (152) and the
Shield Cover (31) from each side of the studio cycle.
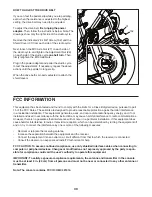
Next, loosen the M10 Axle Nut (27) on each side of
the studio cycle, and tighten the Adjustment Nut (26)
on each side of the studio cycle
one half turn.
Then,
firmly retighten the M10 Axle Nuts.
Plug in the power adapter and pedal the studio cycle
to test the adjustment. If necessary, repeat the above
actions until the pedals no longer slip.
When the drive belt is properly adjusted, reattach the
shield covers.
152
31
26
27
Содержание Commercial S22i Studio Cycle
Страница 4: ...4 STANDARD SERVICE PLANS...

