background image


36

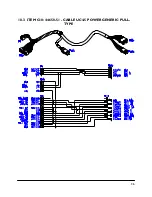
10.3


ITEM C10: 44650-51 - CABLE UC4.5 POWER GENERIC PULL-

TYPE 


Содержание UC4.5

Страница 1: ...Hardi Aftermarket New Navigator New Commander Installation Manual HD7 HD12 ...

Страница 2: ...ORAC Systems International Inc reserves the right to improve products and their specifications without notice and without the requirement to update products sold previously Every effort has been made to ensure the accuracy of the information contained in this manual The technical information in this manual was reviewed at the time of approval for publication ...

Страница 3: ...neral UC4 5 System Layout 2 3 Kit Parts 3 4 Existing System Check 10 5 Ultrasonic Sensor Installation 12 6 Roll Sensor Installation 16 7 Electrical Installation 20 8 Hydraulic Installation 23 9 Software Setup 33 10 Cable Drawings 34 ...

Страница 4: ...ting to install the system A thorough understanding of this manual will ensure that you receive the maximum benefit from the system Your input can help make us better If you find issues or have suggestions regarding the parts list or the installation procedure please don t hesitate to contact us Every effort has been made to ensure the accuracy of the information contained in this manual All parts...

Страница 5: ...2 2 General UC4 5 System Layout Figure 1 illustrates the general layout of the UC4 5 system components Figure 1 General UC4 5 System Layout ...

Страница 6: ...3 3 Kit Parts 3 1 Kit Overview Figure 2 HD7 System Parts ...

Страница 7: ...4 3 2 Hydraulic Plumbing Figure 3 Single Acting Force Boom Hydraulic Plumbing ...

Страница 8: ...5 Figure 4 Double Acting Eagle Boom Hydraulic Plumbing ...

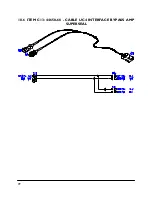
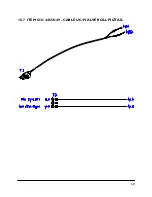
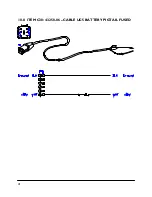
Страница 9: ...44658 42 CABLE UC4 INTERFACE AMP ML ONLY 1 C13 44658 60 CABLE UC4 INTERFACE BYPASS AMP SUPERSEAL 1 C16 44658 49 CABLE UC4 VALVE ROLL PIGTAIL 1 C30 43250 06 CABLE UC5 BATTERY PIGTAIL FUSED 5A 1 E01 45100 UC4 5 BOOM CONTROL PANEL 1 E03 43742 UC5 ROLL SENSOR W TEMPERATURE PROBE 1 E04 43741 UC5 ROLL SENSOR VER 2 1 E05 43750 UC5 ULTRASONIC SENSOR 2 E11 43765 UC5 NETWORK COUPLER 8 WAY 1 E12 43764 UC5 NE...

Страница 10: ...ic Fitting Kit Details P N 44865 63 Item Part Number Name Quantity Picture F01 44928 ORIFICE INSERT 047 IN ONE WAY 4 F02 103312 MALE ADAPTER 6MB 6MJ 6 F03 104369 PLUG 6MBP 2 F04 105431 4FBSPPX 6MJ 6 F05 105432 4MBSPPT 4FBSPPRX 6 6 M B 6 M OR X 90 SIZE IN 1 16TH S GENDER MALE OR FEMALE 90 ANGLE SWIVEL TYPE GENDER SIZE TYPE B ORB J JIC OR FLAT FACE P PIPE Fitting Name Example The 6MBP plugs F03 are ...

Страница 11: ...Kit Details P N 44865 78 Item Part Number Name Quantity Picture F01 44928 ORIFICE INSERT 047 IN ONE WAY 4 F02 44917 MALE ADAPTER 6MB 6MOR MACHINED ORB 6 F03 104369 PLUG 6MBP 2 F04 106703 FEMALE TO MALE ADAPTER 4FOR 6MOR 6 F05 104691 TEE ADAPTER 4FORXR 4MORT 6 6 M B 6 M OR X 90 SIZE IN 1 16TH S GENDER MALE OR FEMALE 90 ANGLE SWIVEL TYPE GENDER SIZE TYPE B ORB J JIC OR FLAT FACE P PIPE Fitting Name ...

Страница 12: ...N L 6FJX 8MB WITH QUICK COUPLER 2 103312 MALE ADAPTER 6MB 6MJ 2 Do not use high speed power tools drills when installing hardware The use of dielectric grease is not recommended on any NORAC electrical connections To ensure all stainless steel hardware does not gall or seize apply a light coating of the supplied Permatex Anti seize grease to all threaded parts upon installation Permatex Anti seize...

Страница 13: ...tting 4 Set boom suspension to be critically damped Figure 5 Adjust the boom damper accordingly a Unlock the pendulum and push boom tip down approximately 75 cm 30 inches b Hold the boom steady for a moment and release c Ensure the boom returns to its relaxed state as quickly as possible with little to no overshoot Figure 5 Boom Push Test Critically Damped 5 Unfold the sprayer over a flat unobstru...

Страница 14: ...om functions To ensure repeatable measurements take the average of 3 trials 9 Not all sprayers will have the functions listed below in Figure 6 Ensure the boom has sufficient travel so it does not contact the ground during these tests Figure 6 Pre Install Boom Speeds ...

Страница 15: ...he instructions below Figure 7 Breakaway Bracket Assembly 1 Compress the spring and insert it together with the collar into the base 2 Slide the tube through the assembled part 3 Using the bolt and nut tighten the collar to the tube with the sensor tube centered 4 Apply a small amount of grease to the rotating surfaces of the bracket ...

Страница 16: ...rial number on the left hand side and proceed to the largest serial number on the right hand side Each sensor has a serial number stamped on the sensor housing Apply a light coating of the supplied Permatex Anti seize grease to all threaded parts upon installation Figure 8 Sensor Serial Number Arrangement ...

Страница 17: ...re from the ground A 2 The centerline of the acoustic cone should be approximately vertical at normal operating heights A 3 The bottom of the sensor must be at least 9 inches in front of the spray nozzles and boom structure B This does not apply for the main lift sensor 4 The bottom of the sensor must be at least 9 inches above the spray nozzles C 5 Ensure there are no other obstructions with a 12...

Страница 18: ... ground as the boom folds backwards 4 Mount the NORAC ultrasonic sensor into the sensor bracket and run the sensor cable through the sensor tube A problem can arise if a sensor is not mounted correctly It is possible for the sensor to read off of the boom instead of the ground This may only become apparent once the control system is switched from soil to crop mode Also be careful that the sensor b...

Страница 19: ...s to 10 in lbs 1 1 Nm 2 The orientation of the mounted roll sensor to the roll sensor bracket will depend on the bracket mounting The roll sensor CANbus connector must be pointing towards the right side of the sprayer when looking from the rear of the sprayer Figure 11 Mounting Roll Sensor to Bracket Figure 12 Roll Sensor Orientation Connector Facing Right Wing ...

Страница 20: ...ensor and the pivot point B Figure 13 Roll Sensor Mounting on a Trapeze Suspended Boom 2 Ensure the roll sensors are relatively level when the sprayer boom and chassis are level 3 Both roll sensor cables should be pointing towards the right hand wing of the sprayer 4 Ensure both roll sensors are mounted adequately and that the cables provide enough slack to allow sufficient boom roll 6 3 Temperatu...

Страница 21: ...18 Figure 15 Chassis Roll Sensor Mounted on an FTZ Boom Figure 16 Boom Frame Roll Sensor Mounted on an FTZ Boom ...

Страница 22: ...19 Figure 17 Roll Sensors Mounted on an SPC Eagle Boom ...

Страница 23: ...r local outdoor store as a RAM mount part number RAM B 236 See http www ram mount com Figure 18 Cable Configurations C10 C11 and C30 2 Connect the UC4 5 power cable C10 to the UC4 5 control panel in the sprayer cab Ensure both plugs P16 and P4 are connected to the panel Cable tie C10 to the RAM mount to help provide strain relief Ensure the UC4 5 control panel s power is OFF for the remaining inst...

Страница 24: ...tions according to the labels on the wires 9 Connect the 3 pin tower T3 on the roll pigtail cable C16 to S3 on C11 10 Connect the wires labeled LEFT and RIGHT on C16 to the Hardi PCB Insert the NORAC wires under the screw terminals with the existing Brown HARDI wires Tilt L Black wire and Tilt R White wire as shown in Figure 20 C16 may have labels CW and CCW on it instead of LEFT and RIGHT respect...

Страница 25: ...T DOWN Cables labeled with UP go on the same side as the hydraulic hoses Figure 21 Valve Cable Connections 14 Fasten the 8 way coupler to the boom with cable ties Connect P6 on C11 to the 8 way coupler 15 Connect both roll sensors to the 8 way coupler 16 Connect two cables C05 to the 8 way coupler and route along the booms to the wing sensors Follow existing cables and hoses to be sure the cable w...

Страница 26: ...d technician perform the hydraulic installation Sprayers manufactured after 2012 may have either BSP or flat faced o ring fittings Before starting the installation compare the NORAC kit hydraulics to the sprayer hydraulics to be sure the correct fitting style is supplied When performing the hydraulic install be sure to follow the section for the correct style of fittings For sprayers using BSP fit...

Страница 27: ...nto the A ports on the NORAC block and tighten to 18 ft lbs 24 Nm Figure 22 Single Acting NORAC Valve Block Details From this point on in the installation the booms will be inoperative until the hydraulics are fully installed 6 Mount the NORAC valve as shown in Section 8 5 7 The plumbing for the hydraulic circuit is shown schematically in Figure 3 8 Install the 90 degree fittings on hoses H02 onto...

Страница 28: ...ing tilt cylinder between the hoses and the valve block Install the fittings that were removed from the valve block between the cylinders and tee fittings F05 14 Remove the pressure and tank hoses from the Hardi valve block and install the 4MBSPPT 4FBSPPRX tee F05 between the valve block and hoses Install the 4FBSPPX 6MJ fittings F04 onto hoses H01 Connect hoses H01 to each of the tee fittings and...

Страница 29: ...on the NORAC block Tighten to 18 ft lbs 24 Nm Figure 25 Double Acting NORAC Valve Block Details From this point on in the installation the booms will be inoperative until the hydraulics are fully installed 7 Mount the NORAC valve as shown in Section 8 5 8 The plumbing for the hydraulic circuit is shown schematically in Figure 4 9 Install the 90 degree fittings on hoses H02 onto the A and B ports o...

Страница 30: ...alve block 15 Install the restrictor that was removed from the wing tilt cylinder between the hoses and the valve block 16 Install the fittings that were removed from the valve block between the cylinders and tee fittings F05 17 Remove the pressure and tank hoses from the Hardi valve block and install the 4MBSPPT 4FBSPPRX tee F05 between the valve block and hoses Install the 4FBSPPX 6MJ fittings F...

Страница 31: ... to 18 ft lbs 24 Nm Figure 28 Single Acting NORAC Valve Block Details From this point on in the installation the booms will be inoperative until the hydraulics are fully installed 6 Mount the NORAC valve as shown in Section 8 5 7 The plumbing for the hydraulic circuit is shown schematically in Figure 3 8 Install the 90 degree fittings on hoses H02 onto the B ports on the NORAC valve block 9 Route ...

Страница 32: ...nstall the fittings that were removed from the valve block between the cylinders and tee fittings F05 14 Remove the pressure and tank hoses from the Hardi valve block and install the 4FORXR 4MORT tee F05 between the valve block and hoses Install the 4FOR 6MOR fittings F04 onto hoses H01 Connect hoses H01 to each of the tee fittings and route to the NORAC valve block Install the corresponding hose ...

Страница 33: ...the A ports on the NORAC block Tighten to 18 ft lbs 24 Nm Figure 31 Double Acting NORAC Valve Block Details From this point on in the installation the booms will be inoperative until the hydraulics are fully installed 7 Mount the NORAC valve as shown in Section 8 5 8 The plumbing for the hydraulic circuit is shown schematically in Figure 4 9 Install the 90 degree fittings on hoses H02 onto the A a...

Страница 34: ...ve block 15 Install the restrictor that was removed from the wing tilt cylinder between the hoses and the valve block 16 Install the fittings that were removed from the valve block between the cylinders and tee fittings F05 17 Remove the pressure and tank hoses from the Hardi valve block and install the 4FORXR 4MORT tee F05 between the valve block and hoses Install the 4FOR 6MOR fittings F04 onto ...

Страница 35: ...valve block 1 A suitable mounting location for the valve block is illustrated in Figure 34 2 Insert the threaded rod into the block and use a hex nut to hold the rod The block holes are 3 8 NC 1 deep If bolts are used instead of the threaded rod ensure the bolts thread in at least 3 8 3 Use the remaining hardware to secure the block to the sprayer 4 Cut off excess threaded rod if necessary Figure ...

Страница 36: ... and hoses are agreeable to the entire range of motion 2 If any functions do not work review the hydraulic and electrical portions of this manual to check for proper installation 3 Turn on the power for the UC4 5 Control Panel using the switch on the side of its chassis 4 The procedure for the installation of the UC4 5 Spray Height Control system is now complete Begin the AUTOMATIC SYSTEM SETUP pr...

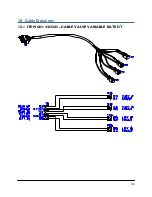
Страница 37: ...34 10 Cable Drawings 10 1 ITEM C03 44656D CABLE VALVE VARIABLE RATE DT ...

Страница 38: ...35 10 2 ITEM C05 43210 20 CABLE UC5 NETWORK 18 AWG 20M ...

Страница 39: ...36 10 3 ITEM C10 44650 51 CABLE UC4 5 POWER GENERIC PULL TYPE ...

Страница 40: ...37 10 4 ITEM C11 44651 50 CABLE UC4 5 EXTENSION VALVE GENERIC ...

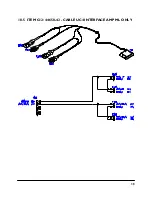
Страница 41: ...38 10 5 ITEM C12 44658 42 CABLE UC4 INTERFACE AMP ML ONLY ...

Страница 42: ...39 10 6 ITEM C13 44658 60 CABLE UC4 INTERFACE BYPASS AMP SUPERSEAL ...

Страница 43: ...40 10 7 ITEM C16 44658 49 CABLE UC4 VALVE ROLL PIGTAIL ...

Страница 44: ...41 10 8 ITEM C30 43250 06 CABLE UC5 BATTERY PIGTAIL FUSED ...

Страница 45: ...Saskatoon SK S7P 0A6 TOPCON Agriculture Americas W5527 Hwy 106 Fort Atkinson WI 53538 TOPCON Precision Agriculture Europe Avenida de la industria 35 Tres Cantos España Spain Support Phone 888 979 9509 E mail tasupportn topcon com Web www norac ca ...

Отзывы: