background image

[ 17 ]

Review the basics

4

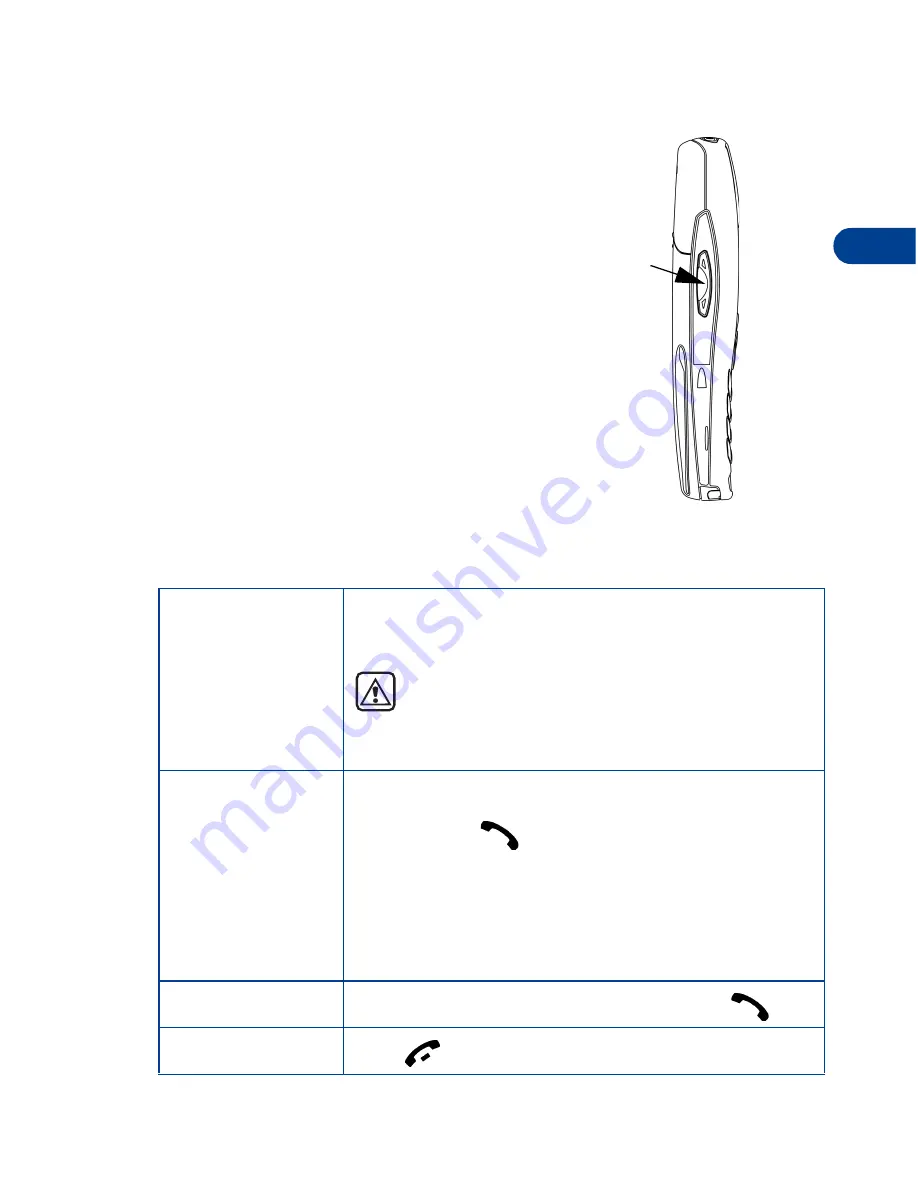
 • THE VOLUME KEY

With the phone facing you, the volume key is 
located on the left side of the phone.

Adjust earpiece volume

When you press the volume key, a bar chart 
appears in the display indicating the present 
volume level.

Press the top portion of the volume key to 
increase your call volume. 

Press the bottom portion of the volume key 
to decrease your call volume.

 • MAKE AND ANSWER CALLS

Use the following table as a quick guide for basic functions.

Switch the 
phone on

Press and hold the power key on top of the phone 
for 2 seconds.

Warning:

 Do not power-up the phone when 

wireless use is prohibited or when the phone 
may cause interference or danger.

Make a call

1

Enter the area code and phone number.

2

Press .

3

Hold the phone with the earpiece over 
your ear and microphone near your mouth, 
or connect and use the headset before 
entering the number.

Answer a call

When your phone rings or vibrates, press 

.

End a call

Press 

.

Volume

key

Front

of phone

Содержание 6340

Страница 1: ...User Guide ...

Страница 2: ...er Phone serial number ESN On back of your phone beneath the battery International Mobile Equipment Identifier IMEI Voicemail number Wireless provider Wireless provider customer care Wireless provider Message center number Wireless provider Default recipient number e mail gateway number Wireless provider ...

Страница 3: ...AL INCIDENTAL AND CONSEQUENTIAL OR INDIRECT DAMAGES HOWSOEVER CAUSED THE CONTENTS OF THIS DOCUMENT ARE PROVIDED AS IS EXCEPT AS REQUIRED BY APPLICABLE LAW NO WARRANTIES OF ANY KIND EITHER EXPRESS OR IMPLIED INCLUDING BUT NOT LIMITED TO THE IMPLIED WARRANTIES OF MERCHANTABILITY AND FITNESS FOR A PARTICULAR PURPOSE ARE MADE IN RELATION TO THE ACCURACY AND RELIABILITY OR CONTENTS OF THIS DOCUMENT NOK...

Страница 4: ...eypad The phone book Call log Use voicemail Advanced features Customize your phone Manage phone security Messages Your personal organizer Your phone and other devices The wireless Internet Fun and games Accessories Reference information Care and maintenance Frequently Asked Questions FAQ Glossary Technical information TOPICS Chapter ...

Страница 5: ...NOTES ...

Страница 6: ...at a glance 8 Remove the back cover 9 Install the SIM card 9 Install the battery 10 Charge the battery 10 Remove the battery 12 Remove the SIM card 12 Important battery information 13 Switch on the phone 13 The Start screen 14 Use the selection and scroll keys 16 The volume key 17 Make and answer calls 17 Help text 18 Navigate your phone s menus 18 Accessibility solutions 19 Full menu shortcuts 21...

Страница 7: ...42 Automate voicemail 43 9 Advanced features 45 In call options 45 Call waiting 47 Send own caller ID with next call 48 Call forwarding 48 Voice dial 50 Voice commands 52 Voice recorder 54 1 touch dialing 56 International dialing 57 10 Customize your phone 58 Set the display language 58 Profiles 58 Accessibility options 61 Optional headsets 64 Audio settings 65 Download a ringing tone 66 11 Manage...

Страница 8: ...ders 85 Erase messages 87 13 Your personal organizer 88 Calendar 88 Make a to do list 93 Wallet 94 Create a wallet card 96 Set the time and date 99 Alarm clock 101 Use the Calculator 102 14 Your phone and other devices 105 Infrared basics 105 Send and receive information 106 Business cards 106 PC Connectivity 108 15 The wireless Internet 109 The Services menu 109 WAP settings 110 Launch the browse...

Страница 9: ...ries 119 18 Reference information 122 Batteries and chargers 122 Important safety information 124 19 Care and maintenance 130 Troubleshooting 131 20 Frequently Asked Questions FAQ 132 21 Glossary 134 22 Technical information 138 Nokia One Year Limited Warranty 139 Index 144 ...

Страница 10: ...itals Follow any regulations or rules Switch your phone off near medical equipment Switch off while aboard aircraft Mobile phones can cause interference Using them on aircraft is illegal Switch off when refueling Do not use your phone at a refueling point Do not use it near fuel or chemicals Switch off near blasting Do not use your phone where blasting is in progress Observe restrictions and follo...

Страница 11: ...nnecessarily Use only qualified service personnel Equipment must be installed or repaired only by qualified service personnel Use approved accessories and batteries Use only approved accessories and batteries Do not connect incompatible products Read instructions before you connect to other devices When you connect your phone to any other device read the device s user guide for detailed safety ins...

Страница 12: ...r a pause write the message Press Options scroll to Send press Select enter the recipient s number press OK Send an E mail message Press Menu 01 1 and write your message Press Options scroll to Sending options press Select Scroll to Sending profile and press Select Highlight your e mail profile press Select Press Options Accept enter the e mail address press OK Read new message Press Show then pre...

Страница 13: ...ROFILES Normal 3 1 Silent 3 2 Meeting 3 3 Outdoor 3 4 Pager 3 5 4 SETTINGS Alarm clock 4 1 Time settings 4 2 Call settings 4 3 Phone settings 4 4 Tone settings 4 5 Accessory settings 4 6 Security settings 4 7 Restore factory settings 4 8 5 VOICE Voice recorder 5 1 Record 5 1 1 Recordings list 5 1 2 Voice commands 5 2 Profiles 5 2 1 Voice mailbox 5 2 2 Infrared 5 2 3 Recorder 5 2 4 6 ORGANIZER Cale...

Страница 14: ... graphic clues Icons appear throughout this guide to alert you of important information or to provide useful tips Tip Indicates a shortcut or alternate method of doing something Note Explains a feature or points out an important concept Important Indicates critical information on using a feature Caution Warns you when you may lose information Warning Helps to avoid injury and phone or property dam...

Страница 15: ...support of features Before you sign up make sure a wireless provider supports the features you need BEFORE YOU CONTACT NOKIA If you need help Nokia Customer Care is available for assistance Before calling however please read Frequently Asked Questions FAQ on page 132 We also recommend that you write down the following information on the inside cover of this guide and have it available if you call ...

Страница 16: ...ith the antenna affects call quality and may cause the phone to operate at a higher power level than necessary Nokia Customer Care Center USA Customer Interaction Center Canada Nokia Inc 7725 Woodland Center Boulevard Suite 150 Tampa Florida 33614 Tel 1 888 NOKIA 2U 1 888 665 4228 Fax 1 813 249 9619 TTY TDD Users Only 1 800 24 NOKIA 1 800 246 6542 Nokia Products Ltd 601 Westney Road South Ajax Ont...

Страница 17: ...40 AT A GLANCE FRONT Display screen Selection and Scroll keys End key Talk key Number keys Microphone Earphone LEFT SIDE BOTTOM END TOP Volume control Internal antenna Power key Headset TTY Data cable HDA 8 connector Charger jack IR port ...

Страница 18: ...inch until it stops Lift the cover to remove INSTALL THE SIM CARD The SIM slot is between the battery compartment and the bottom end of the phone If the battery is in the phone remove the battery before attempting to install the SIM card See Remove the battery on page 12 for instructions Slide the SIM card into the empty SIM slot beveled corner first and gold contacts facing down Cover release pre...

Страница 19: ...phone The battery label should be facing away from the phone 2 Insert the battery contact end first into the battery slot 3 Snap the other end of the battery into place 4 Replace the cover and slide it toward the top of the phone until it locks into place CHARGE THE BATTERY 1 With your phone on or off connect the plug from the charger to the bottom of the phone ...

Страница 20: ...o or three complete charge and discharge cycles Battery operation time may be less than the estimated times during the first charges This condition is normal You can use your phone while the battery is charging However if the battery is completely empty it may need to recharge a few minutes before you can make or receive calls or the battery indicator appears After the first charge you can make an...

Страница 21: ...our hands to remove the battery Don t use an object such as a coin or knife as either can damage both the phone and the battery REMOVE THE SIM CARD 1 Remove the back cover and battery as described on page 9 and page 12 2 Push the SIM card out of the slot as far as you can about 1 4 of an inch with your thumb Keep your thumb in place to prevent the SIM card from sliding back into the slot 3 Pull th...

Страница 22: ...l discharge before recharging SWITCH ON THE PHONE Press and hold the power key on top of the phone for 2 seconds Warning Don t power up the phone where wireless phone use is prohibited or where the use of the phone could cause interference or danger Set the time and date When you power up your phone for the first time or when you remove and replace the battery you ll be prompted to set the time an...

Страница 23: ... appear here Signal strength A higher bar indicates a stronger signal Battery charge level A higher bar indicates more power in the battery Menu Press the left selection key under Menu to enter the menu list Names Press the right selection key under Names to enter the Phone book Press one of the scroll keys at the Start screen to display any entries in your Phone book ...

Страница 24: ...ext entry mode predictive text off You are in sentence case text entry mode predictive text off You are in number entry mode Encryption is on An alarm is set A Memo note is in your Calendar A birthday note is in your Calendar A note is in your calendar to call someone You have a meeting scheduled in your Calendar Predictive text is on The highlighted entry in Phone book exists on the SIM card A me...

Страница 25: ...eys are used to navigate from within those items A selection key s function is always defined by the text that appears above it in the display For example press the leftselection key when Menu appears above it to show the first of numerous menus Page through the rest of the menus using the scroll keys Press the right selection key when Names appears above it to enter the Phone book Tip Press eithe...

Страница 26: ...olume MAKE AND ANSWER CALLS Use the following table as a quick guide for basic functions Switch the phone on Press and hold the power key on top of the phone for 2 seconds Warning Do not power up the phone when wireless use is prohibited or when the phone may cause interference or danger Make a call 1 Enter the area code and phone number 2 Press 3 Hold the phone with the earpiece over your ear and...

Страница 27: ...MENU NUMBER AND SCROLL BAR As you page through menus the menu number is indicated in the upper right corner of the display A scroll bar with a tab also appears on the right side of the display The tab moves up or down as you page through the menus 1 When the menu you want appears in the display press Select Turn Keyguard on Press Menu Keyguard prevents accidental calls Turn Keyguard off Press Unlo...

Страница 28: ...on to the feature in question In such cases the phone displays an error message If you wish to subscribe to a feature that is currently disabled contact your wireless provider ACCESSIBILITY SOLUTIONS Nokia is committed to pursuing accessibility solutions for all people including individuals with disabilities We maintain a site on the Internet that is dedicated to accessibility solutions For more i...

Страница 29: ... For more details refer to the booklet that comes with the LPS 1 Note The Loopset can be purchased separately as an accessory Other accessibility features Besides an intuitive interface and TTY TDD capabilities other accessibility features of the Nokia 6340 include A nib or raised dot on top of the five key for keypad reference Tactile feedback whenever you press a key The ability to send and rece...

Страница 30: ...aled 2 4 4 Call timers 2 5 Duration of last call 2 5 1 Duration of dialed calls 2 5 2 Duration of received calls 2 5 3 Duration of all calls 2 5 4 Clear timers 2 5 5 3 PROFILES Normal 3 1 Select 3 1 1 Customize 3 1 2 Ringing options 3 1 2 1 Ring 3 1 2 1 1 Ascending 3 1 2 1 2 Ring once 3 1 2 1 3 Beep once 3 1 2 1 4 Silent 3 1 2 1 5 Ringing tone 3 1 2 2 Ringing volume 3 1 2 3 Level 1 3 1 2 3 1 Level...

Страница 31: ...1 Cancel 4 3 1 1 2 Check status 4 3 1 1 3 Fwd if busy 4 3 1 2 Activate 4 3 1 2 1 Cancel 4 3 1 2 2 Check status 4 3 1 2 3 Fwd if not answered 4 3 1 3 Activate 4 3 1 3 1 Cancel 4 3 1 3 2 Check status 4 3 1 3 3 Fwd if out of reach 4 3 1 4 Activate 4 3 1 4 1 Cancel 4 3 1 4 2 Check status 4 3 1 4 3 Fwd when not able to take calls 4 3 1 5 Activate 4 3 1 5 1 Cancel 4 3 1 5 2 Set delay 4 3 1 5 3 10 sec 4 ...

Страница 32: ...ne 4 5 2 Ringing volume 4 5 3 Level 1 4 5 3 1 Level 2 4 5 3 2 Level 3 4 5 3 3 Level 4 4 5 3 4 Level 5 4 5 3 5 Vibrating alert 4 5 4 On 4 5 4 1 Off 4 5 4 2 Message alert tone 4 5 5 No tone 4 5 5 1 Standard 4 5 5 2 Special 4 5 5 3 Beep once 4 5 5 4 Ascending 4 5 5 5 Personal 4 5 5 6 Keypad tones 4 5 6 Off 4 5 6 1 Level 1 4 5 6 2 Level 2 4 5 6 3 Level 3 4 5 6 4 Warning tones 4 5 7 On 4 5 7 1 Off 4 5 ...

Страница 33: ... 2 Phone 4 7 3 3 Access codes 4 7 4 Change security code 4 7 4 1 Change PIN code 4 7 4 2 Change PIN2 code 4 7 4 3 Restore factory settings 4 8 5 VOICE Voice recorder 5 1 Record 5 1 1 Recordings list 5 1 2 Voice command 5 2 Profiles 5 2 1 Voice mailbox 5 2 2 Infrared 5 2 3 Recorder 5 2 4 6 ORGANIZER Calendar 6 1 To do list 6 2 Wallet 6 3 7 CALCULATOR 8 GAMES Select game 8 1 Snake II 8 1 1 Pass n Ru...

Страница 34: ...y modes ABC Any text you enter is capital letters Abc The first letter of each sentence is capitalized abc Any text you enter is lower case Enter text Press any key once to insert the first letter on the key twice for the second letter and so on When you pause the letter appearing in the display is accepted and your phone awaits the next entry Press to accept a word and enter a space Press to ente...

Страница 35: ...d a joystick Once a character is highlightedpress to insert the character into your message SWITCH BETWEEN ABC AND 123 MODES Press and hold until the icon in the upper left corner of the display switches from Abc to 123 or from 123 to Abc SWITCH BETWEEN UPPERCASE AND LOWERCASE TEXT Press to alternate between upper case ABC lower case abc and sentence case Abc while in text mode Available special c...

Страница 36: ...tivate an option or enter its submenu Phone book menu Find Search for a name in your Phone book or list the names and select from the list Add entry Add a new entry name and number to your Phone book Edit name Edit an existing name in your Phone book Add number Add a number to an existing entry in your Phone book Erase Erase names and numbers in your Phone book one by one or all at once Copy Copy ...

Страница 37: ...ore information 2 Ensure Save is highlighted and press Select 3 Enter a name for the number and press OK The name and number are saved to the memory in use Voice tags Show a list of voice dialing numbers if you ve assigned voice tags to any Phone book entries Service nos List the fax data and voice numbers saved to your SIM card by your wireless provider Own numbers Display the phone number assign...

Страница 38: ...d PC ASSIGN OR CHANGE A NUMBER TYPE 1 At the Start screen press one of the scroll keys to display your Phone book entries 2 Scroll to the entry containing the numbers you wish to change and press Details 3 Use the scroll keys to highlight the number you wish to change and press Options 4 Scroll to Change type and press Select 5 Scroll to the number type of your preference and press Select A confir...

Страница 39: ...t screen Tip Any entries which display the SIM card icon in the upper right corner of the display indicate that entry is saved to the SIM card Note Any entries which appear twice in the display as in this illustration indicate the entry is saved to both phone memory and SIM memory Search the Phone book quickly 1 At the Start screen press one of the scroll keys to display any entries in your Phone ...

Страница 40: ...ax As primary no Assign the number as your primary number See Assign a primary number on page 33 for more information Add number Add another number to the selected entry Add info Add an e mail address web address street address or note to the selected entry Caller groups Add the selected entry to one of the 5 available caller groups or select No group Send bus card Send a business card containing ...

Страница 41: ...s highlighted and press Select 3 Scroll to the entry you wish to erase and press Erase 4 Press OK again to confirm the erasure or Back to select another ERASE ALL NAMES AND NUMBERS 1 At the Start screen press Names scroll to Erase and press Select 2 Ensure Erase all is highlighted and press Select 3 Scroll to Phone or SIM card and press Erase 4 Press OK to confirm or Back to select from Phone or S...

Страница 42: ...ew the contents of your Phone book as a list or view each entry as a full display larger text 1 At the Start screen press Names scroll to Settings and press Select 2 Scroll until Phone book view appears in the display and press Select 3 Scroll to Name list or Name number and press Select Caller groups You can add Phone book entries to one of 5 caller groups and then assign a unique ringing tone or...

Страница 43: ... you d like to add the name and press Select A confirmation message appears in the display YOUR PHONE S MEMORY Your phone has three options for the use of its memory Phone SIM and Phone and SIM combined Only names and numbers saved to the memory in use will appear in the display Note With Phone and SIM memory selected entries saved to both memories appear in the display Therefore you may see the s...

Страница 44: ...e per name Up to 5 numbers per name stored in phone memory Can use Voice dialing Yes No Yes Can transfer names numbers to another phone Via IR or PC Suite Via IR PC Suite and SIM Via IR PC Suite and SIM Can store text in formation such as street address e mail address note Up to 4 text entries per name No Up to 4 text entries per name stored in phone memory Phone and SIM Data is saved to Phone mem...

Страница 45: ...press Select The entry is copied and you re returned to the list of Phone book entries 6 If you selected All or Primary nos in step 3 scroll to Keep original or Move original and press Select 7 Press OK to confirm your choice All entries are copied to the selected destination Press Back to return to the list of Phone book entries or press to exit and return to the Start screen Caution Select Keep ...

Страница 46: ...bers 1 At the Start screen press Names Scroll to Service nos and press Select A list of numbers if any are available appear in the display 2 To view details of a number scroll to the number and press Details Note This feature may not be supported by your SIM card If so contact your wireless provider if you wish to have it enabled ...

Страница 47: ... are viewing missed received or dialed calls each of the menu options will be the same Please refer to the following table regarding menu options for these features Missed received and dialed call options Call time Display the date and time of the call Send message Send a message to the number View number Display the number Edit number Edit the number and associate a name with the number Save Ente...

Страница 48: ...r a brief pause a list of missed calls appear in the display if any exist 2 Scroll to a number and press Options to display the options listed in the table on page 38 3 Scroll to an option press Select to activate the option or to enter its submenu View received calls Received calls are calls that have been answered 1 At the Start screen press Menu 2 2 Call log Received calls After a brief pause a...

Страница 49: ...e same number and view the time each call occurred Your clock must be set for this feature to work accurately See Set the time and date on page 99 for instructions on setting your clock 1 While viewing a missed or received call press Options scroll to Call time and press Select 2 The time that the last call occurred appears in the display 3 Press to view other call times from this number Press Bac...

Страница 50: ...s Menu 2 5 4 Call log Call timers Duration of all calls The duration of all calls missed dialed and received appears in the display Activate deactivate summary after call To show or not show the duration of each call after you hang up 1 At the Start screen press Menu 4 3 5 Settings Call settings Summary after call After a brief pause On and Off appear in the display 2 Scroll to On or Off and press...

Страница 51: ...ear in the display in step 2 Press OK to leave the number unchanged 1 At the Start screen press Menu 01 9 2 Messages Voice messages Voice mailbox number 2 After a brief pause the mailbox number screen appears in the display 3 If the box is empty enter the voice mailbox area code and number 4 Press OK Your phone confirms the number has been saved Tip Save yourself the trouble of entering the mailbo...

Страница 52: ...number to a 1 touch dialing location Dialing codes instruct the receiving system to pause wait bypass or accept the numbers that follow them in the dialing string Note Each voicemail service can vary The examples and steps that follow are for clarification Check with your wireless provider if you have specific questions about your voicemail service Write down some information 1 Write down your voi...

Страница 53: ...essary using the information that you wrote down earlier For example if you pause for 5 seconds after connecting to voicemail enter p twice after the voice mailbox number such as 2145551212pp 5 Enter any remaining pauses PIN codes and other information that allows you to listen to your messages then press OK 6 Enter a name such as Voicemail and press OK A message appears in the display confirming ...

Страница 54: ...ny of the following in call activities 2 Use your scroll keys to highlight an option 3 Press Select to activate an option or enter the option s submenu With one call active Record Record the current phone conversation Equalizer Select an equalizer set or create a custom set of your own End call Terminate the call New call Place a new call Touch tones Enter touch tones manually or recall a string f...

Страница 55: ...can hear the other person but they can t hear you Unhold Activates the held call With one call active and another on hold See Note regarding in call options Record Record the active phone conversation Equalizer Select an equalizer set or create a custom set of your own End call Terminate the active call End all calls End all calls Conference Connect all parties in a conversation Touch tones Enter ...

Страница 56: ...r to pick up the call The first caller is put on hold and Swapped appears in the display 3 If you don t pick up the call within 30 seconds the call is dropped Switch between calls Press Swap or End the active call Press End both calls Press Options scroll to End all calls and press OK Mute Mute the current call You can hear the other person but they can t hear you Swap Switch form the active call ...

Страница 57: ... OWN CALLER ID WITH NEXT CALL You can prevent your number from being displayed on the receiving party s caller ID This feature is network dependent and works on a call by call basis Contact your wireless provider for more information CALL FORWARDING Call forwarding tells your network to redirect incoming calls to another number Important Call forwarding is network dependent and may not work the sa...

Страница 58: ...hen the feature has been activated successfully Forward all voice calls Forward all calls to the number you specify Forward if busy Forward incoming calls when you re in a call Forward if not answered Forward incoming calls to another number if you re unable to answer You can also set a delay before forwarding takes place Forward if out of reach Forward incoming calls when your phone is off Forwar...

Страница 59: ...c redial 2 After a brief pause On and Off appear in the display Scroll to your choice and press Select VOICE DIAL You can select up to 10 entries in your Phone book to dial by voice Before you can do this you ll need to assign each entry a voice tag Notes about voice tags Voice tags can be no longer than 1 5 seconds You cannot use voice dial while in a call Press Quit to abort recording the voice ...

Страница 60: ...gain Press OK to try again or Back to exit Voice dial a number 1 At the Start screen press and hold Names The phone beeps and Please speak now appears in the display 2 Within 3 seconds pronounce the tag into the microphone Once the voice tag is recognized the tagged entry appears in the display replays through the earpiece and the number is dialed VOICE DIAL WITH THE HEADSET After you ve assigned ...

Страница 61: ... in the display then press Options 3 Scroll to Change or Erase and press Select VOICE COMMANDS You can command your phone to perform up to 5 different functions with your voice Voice commands work similar to voice dialing so you ll need to associate a voice tag with each command Note Voice commands cannot be used during a call or when the data cable is attached Add a voice tag for a command 1 At t...

Страница 62: ...COMMANDS WITH THE HEADSET After you ve associated a voice tag with a command you can also execute voice commands using the optional HDC 9P headset 1 At the Start screen press and hold the remote button on the headset The phone beeps and Please speak now appears in the display 2 Pronounce the tag for one of the 5 available commands Found command appears in the display and the command is performed T...

Страница 63: ...Voice Voice recorder record 2 After a brief pause your phone begins recording and a progress bar appears in the display to indicate recorded time versus time left 3 After you re finished recording press Stop enter a title for the recording and press OK View recorded memos At the Start screen press Menu 5 1 2 Voice Voice recorder Recordings list After a brief pause your oldest recorded memo appears...

Страница 64: ...ess Options 5 Scroll to Playback and press Select to play the memo Erase a memo 1 At the Start screen press Menu 5 1 2 Voice Voice recorder Recordings list 2 After a brief pause your oldest recorded memo appears in the display 3 Scroll until the memo you d like to erase appears in the display and press Options 4 Scroll to Erase and press Select You re asked to confirm the erasure 5 Press OK and th...

Страница 65: ...Press and hold the key to which an entry has been assigned or press the key to which an entry is assigned and press Your phone dials the entry assigned to the key CHANGE 1 TOUCH DIALING NUMBERS 1 At the Start screen press Names scroll to 1 touch dialing and press Select 2 Scroll to the 1 touch dialing location you wish to change and press Options 3 Scroll to Change and press Select 4 Enter the new...

Страница 66: ...home prefix by doing both of the following Save international numbers with a in front Save all international numbers with a in front For example a number to Finland from the U S would look as follows 358 123456789 Set the international prefix 1 Press Menu 4 3 3 Settings Call settings International prefix After a brief pause an entry box appears in the display 2 Enter the prefix specific to the cou...

Страница 67: ...he Language setting affects the time and date formats of the Clock Alarm clock and Calendar PROFILES Profiles define how your phone reacts when you receive a call or a message the sounds your keypad makes whenever you press a key and more Ringing options keypad tones and other settings for each of the 5 available profiles can be left at their default setting or customized to suit your needs Select...

Страница 68: ...u can customize any of the profiles a variety of ways 1 At the Start screen press Menu 3 Profiles After a brief pause the list of profiles appears in the display 2 Scroll to the profile you wish to customize and press Select 3 Scroll to Customize and press Select 4 Use the scroll keys to display each of the options in the following table Once you arrive at the option you d like to customize press ...

Страница 69: ...n advance 1 At the Start screen press Menu 3 Profiles After a brief pause the list of profiles appears in the display 2 Scroll to the profile you wish to activate and set for timed expiration then press Select 3 Scroll to Timed and press Select 4 Enter the time for the profile to expire and press OK The profile you ve set for expiration is now active and appears in the Start screen along with a sm...

Страница 70: ...tant The Nokia TTY adapter HDA 8 is for use with compatible TTY devices and headsets only Please check your TTY device or headset to ensure that the connection is compatible Nokia original headsets attach directly to the phone and do not require this adapter Nokia does not endorse warrant or authorize use of any accessories not manufactured or licensed by Nokia Select and customize an accessory pr...

Страница 71: ...g when a car kit is connected Scroll to On or Off and press Select Lights Choose to keep the phone lights always on or to shut off automatically after several seconds Scroll to On or Automatic and press Select IF YOU SELECTED LOOPSET The following options are available Scroll to the option of your choice and press Select to enter the option s submenu and modify its settings Use loopset Enable use ...

Страница 72: ...or on the bottom of your phone Make a call with TTY Note You must have a an accessory attached to your phone prior to selecting the accessory settings menu 1 At the Start screen press Menu 4 6 4 1 1 Settings Accessory settings TTY TDD Use TTY Yes After a brief pause a confirmation message appears in the display Note After selecting Yes this becomes the default and you won t have to do it again unl...

Страница 73: ...ss to end a call When in use the headset microphone hangs at the side of your head Although it may seem far from your mouth you can speak at normal volume VOICE DIAL A NUMBER WITH THE HDC 9P HEADSET Once you ve voice tagged entries in your Phone book you can make a call with the HDC 9P headset by simply pressing and holding the remote button on the microphone See Assign a voice tag on page 51 for ...

Страница 74: ...e list of sets Create a Custom equalizer set 1 At the Start screen press Menu 4 3 2 Settings Call settings Equalizer After a brief pause a list of equalizer sets appears in the display 2 Scroll to Set 1 or Set 2 and press Select 3 Scroll to Edit and press Select Set 1 appears in the display with the first bar highlighted 4 Press Adjust then use the scroll keys to adjust the setting When you re fin...

Страница 75: ...em sent to your phone via SMS You can also create ringing tones of your own and send them to your phone or other compatible phones using Nokia PC Suite For more information on PC Suite see the PC Connectivity Guide Note This function can be used only if it is supported by your network operator or wireless provider Only phones that offer download features can receive ringing tones Contact your wire...

Страница 76: ...ll the lock automatically reactivates LOCK THE KEYPAD At the Start screen press Menu Keys locked appears in the display UNLOCK THE KEYPAD At the Start screen press Unlock Keys unlocked appears in the display SECURITY LEVELS The security level determines your access to features when a non owner SIM card is used A non owner SIM card is one other than the original that is inserted after you power off...

Страница 77: ... by your wireless provider Set up and activate a fixed dialing list 1 At the Start screen press Menu 4 7 2 Settings Security Settings Fixed dialing The options in the following table appear in the display Note If you activate fixed dialing and the number list is empty all outgoing calls except for emergency numbers such as 911 require entry of the PIN2 code 2 Scroll to Number list and press Select...

Страница 78: ...rity Settings Fixed dialing 2 Scroll to Number list and press Select 3 You re prompted to enter the PIN2 code Enter the PIN2 code and press OK 4 Any numbers which you ve assigned to fixed dialing appear in the display 5 Scroll to a number and press Options 6 The options in the following table appear in the display Use the scroll keys to highlight an option Press Select to activate or enter an opti...

Страница 79: ...ergency number The security code The security code controls access to features such as the security level and is supplied with the phone The preset code is 12345 Note If you enter the wrong security code five times in succession you won t be able to enter a code for five minutes even if you power off the phone between incorrect entries CHANGE YOUR SECURITY CODE Once you change the security code fr...

Страница 80: ... 1 Settings Security settings PIN code request 2 After a brief pause you re prompted to enter the current PIN code Enter the PIN code and press OK 3 Scroll to On and press OK A message appears in the display confirming your selection CHANGE YOUR PIN CODE Before you can change your PIN code you ll need to enable PIN code request See PIN code request immediately preceding this section 1 Press Menu 4...

Страница 81: ...he new PIN2 code 3 Enter the new PIN2 code and press OK You re asked to verify the new PIN2 code by entering it again 4 Enter the new PIN2 code again and press OK A message appears in the display confirming you ve changed the PIN2 code Personal unblocking key PUK codes PUK and PUK2 codes are used to restore blocked PIN and PIN2 codes Both PUK and PUK2 codes are eight characters in length and canno...

Страница 82: ... receive messages You ll need the following to send and receive messages A messaging service through your wireless provider A message center number which must be saved to your phone if your wireless provider hasn t done so already Save your message center number Messages sent by your phone are routed through your wireless provider s message center Normally this number is saved to your phone by you...

Страница 83: ...e traditional multi tap method For each letter of the word that you re spelling you only need to press the corresponding key on your keypad once You can use predictive text to write a message create a calendar note make a to do list and more Activate deactivate predictive text At a text entry screen press and hold Options Predictive text is turned on or off depending on its previous mode OR 1 At a...

Страница 84: ... and hold to display special characters Press again to cycle through all available characters See Use special characters in the following section for more information on special characters Note Press to switch predictive text on or off and to use predictive text in various modes As you press the following icons not the descriptions appear in the upper left of the display Add new words to the dicti...

Страница 85: ... words to the dictionary When the dictionary is full the most recent addition replaces the first Use special characters While entering text press and hold to display the following special characters Press again to cycle through all available characters Use four way scrolling Navigate special characters using the 2 4 6 and 8 keys much as you would a joystick Once a character is highlighted press to...

Страница 86: ...to read the message or press Exit to move the message to your inbox 2 If you have more than one message scroll to the message of your choice and press Select to view the message Note When you have unopened messages in your inbox is shown in the upper left corner of the Start screen as a reminder 3 Use the scroll keys to view the whole message if necessary Tip Keep scrolling to view other informati...

Страница 87: ...recipient s phone number or press Find to retrieve a number from your Phone book 4 Press OK The message is forwarded E MAIL You can send e mail up to 160 characters in length to anyone with an e mail address First you ll need to setup an e mail profile and modify a few other settings It takes just a few minutes and you only need to do this once Reply options Empty screen Congrats Original text Hap...

Страница 88: ...e of numbers Write down your Message center number and Default recipient number also known as the e mail gateway number in the following table You may need these numbers when setting up your phone for e mail Next setup an e mail profile 1 At the Start screen press Menu Select and scroll until Message Settings appears in the display 2 Press Select scroll to Profile 2 and press Select again 3 Scroll...

Страница 89: ...profile such as e mail and press OK COMPOSE AND SEND E MAIL Note See Tips for composing a message on page 74 for ways to write messages faster 1 At the Start screen press Menu 01 1 Messages Write message After a brief pause the message entry screen appears in the display 2 Compose your message using the keypad and press Options Note Be sure and leave enough space in the total character count 160 f...

Страница 90: ...ported by your network operator or wireless provider Only phones that offer picture message features can receive and display picture messages Contact your wireless provider for details When you receive a picture message When you receive a picture message your phone beeps and Message received appears in the display as well as the unopened letter icon 1 Press Show to read the message or press Exit t...

Страница 91: ...art screen press Menu 01 1 Messages Write message After a brief pause the message edit screen appears in the display 2 Write a message using the keypad or enter nothing if you choose and press Options Tip Attach pictures before adding text You can then check remaining space for text in the upper right corner of the display 3 Scroll to Attach picture and press Select A list of pictures appear in th...

Страница 92: ...s are short pre written messages which can be recalled and sent as original messages or used as a quick reply when you re short on time You can also customize and save an existing template or create a new one of your own Templates are stored in the Templates folder Send a template message 1 At the Start screen press Menu 01 5 Messages Templates After a brief pause the templates folder opens to dis...

Страница 93: ...place original appears in the display d Press OK to save over the template or press No to save it as a new template to a folder of your choice 4 Enter the recipient s number or press Find to retrieve a number from your Phone book and press OK The template is sent Insert a template into a message You can also insert a template into a message that you re composing While composing a message press Opt...

Страница 94: ...reen press Menu 01 Messages After a brief pause Write message appears in the display 2 Scroll until the folder containing the message you wish to view appears in the display and press Select 3 Once the folder opens scroll to the message you wish to view and press Select Inbox folder Messages are automatically stored in the inbox after they ve been read or if you press when Message received appears...

Страница 95: ...e Inbox Outbox Archive and Template folders are protected When you delete a folder all messages in the folder are also deleted 1 At the Start screen press Menu 01 Messages After a brief pause Write message appears in the display 2 Scroll until My folders appears in the display and press Select 3 Any folders that you ve created appear in the display Scroll to the folder you wish to remove and press...

Страница 96: ...o erase and press Select A list of messages appears in the display 3 Scroll to the message you wish to erase and press Select The message opens 4 Press Options scroll to Erase and press Select 5 You re asked to confirm the erasure Press OK to erase the message Erase all messages in a folder 1 At the Start screen press Menu 01 Messages 2 After a brief pause Write message appears in the display 3 Sc...

Страница 97: ...one as a personal digital assistant CALENDAR The calendar keeps track of reminders calls you need to make meetings and birthdays It can even sound an alarm for any of these events Open the Calendar At the Start screen press Menu 6 1 Organizer Calendar After a brief pause the Monthly view appears in the display with the current date highlighted by a black box Use four way scrolling You can move the...

Страница 98: ... 12 15 2002 and press OK The monthly view appears in the display with the jump date highlighted Make a note for a specific date You can choose from four types of notes Meeting Call Birthday and Memo Your phone asks for further information depending on which note you choose You also have the option to set an alarm for any note that you select 1 Jump to a date as outlined in the previous section 2 F...

Страница 99: ...ar notes you can view them as follows 1 At the Start screen press Menu 6 1 Organizer Calendar After a brief pause the monthly view appears in the display with the current date highlighted Any dates that contain calendar notes will be in bold font 2 Jump or scroll to the date containing the notes you wish to view 3 Press Options scroll to View day and press Select Any notes you have for the day wil...

Страница 100: ...eive data via IR For more information on enabling the receiving device s IR refer to the user guide for the receiving device Erase Erase the note Edit Edit the note Move Move the note to another date on your calendar Repeat Enable the note to recur on a regular basis daily weekly bi weekly monthly and yearly Go to date Jump to another date on your calendar Send note Send the note to another device...

Страница 101: ...or press Find to retrieve a number from your Phone book and press OK The note is sent If you selected Send as text the note appears in the display 9 Press Options scroll to Send and press Select 10 Enter the number for the recipient or press Find to retrieve a number from your Phone book and press OK The note is sent RECEIVE CALENDAR NOTES FROM ANOTHER DEVICE When you receive a Calendar note your ...

Страница 102: ...use press Options If this is your first time to use the to do list Add is highlighted 3 Press Select enter your to do note and press Options 4 Scroll to Save and press Select 5 Scroll to High Medium or Low priority and press Select The to do note is saved Choose other to do options When you view a to do note you have the following options To do note options View View the selected note Add Create a...

Страница 103: ...n a Wallet personal note Security features such as a password and data encryption make it ideal for storing personal information such as PIN codes and other sensitive data See Compose a personal note on page 97 for more information about composing a personal note in Wallet Notes about wallet security To protect yourself against unauthorized purchases you can require a code to be entered each time ...

Страница 104: ...e and press OK Note Create a code that is unique yet easy to remember This will be your key to using Wallet s features in the future Also keep your wallet code in a secret place separate from your phone 3 Wallet prompts you to verify the code Enter the code again for verification and press OK A message appears in the display confirming you ve created a wallet code Change your wallet code 1 At the ...

Страница 105: ...set the wallet code If you forget the wallet code and wish to erase all the information stored in Wallet follow these steps Caution Once you reset the wallet code and clear the contents of Wallet you cannot restore this information 1 At the Start screen enter 3925538 A message appears in the display asking if you want to clear your wallet s content and code 2 If you want to permanently delete your...

Страница 106: ...t 4 Press Add new compose your note and press Options 5 Scroll to Save and press Select Card entry fields Card info Enter the card holder type number verification value expiration day expiration month and expiration year User info Enter your user name and password Shipping info Enter your first middle and last name company name and street address 1 street address 2 city state zip code and country ...

Страница 107: ...ghted to display the options in the following table 3 Use the scroll keys to highlight an option Use the selection keys to select an option or exit the list Options while composing a note if predictive text is on aSave Save the note Insert word Return to composing the note You can then edit the last word entered highlighted by underscore __ Insert symbol Display a list of special characters to ins...

Страница 108: ...ess Menu 4 2 1 2 Settings Time settings Clock Set the time Add new Compose and save a new note Sort Sort the list of notes by name or date Erase Erase the selected note Erase all Erase all notes Options while viewing a note Edit Edit the note Send as text Send the note to a compatible phone via SMS Copy to calendar Copy the note to any date on your calendar Use number Capture any numbers within th...

Страница 109: ...the display it will now be hidden from view Change the time format You can set the time format for am pm or 24 hour format military time 1 Press Menu 4 2 1 3 Settings Time settings Clock Time format After a brief pause 24 hour and am pm appear in the display 2 Scroll to 24 hour or am pm and press Select Set the date 1 Press Menu 6 1 Organizer Calendar After a brief pause the monthly view appears i...

Страница 110: ...enu 4 1 Settings Alarm clock IF AN ALARM HAS PREVIOUSLY BEEN SET After a brief pause On and Off appear in the display 2 Scroll to On and press Select You re prompted to set the alarm time 3 Enter the time for the alarm in hh mm format and press OK Alarm on appears briefly in the display Note also appears in the Start screen IF AN ALARM HAS NOT BEEN SET You re prompted to enter a time for the alarm...

Страница 111: ... display 2 Press Yes to power up the phone Press No to keep it switched off Warning Do not switch the phone on when wireless phone use is prohibited or when it may cause interference or danger Turn off an alarm 1 At the Start screen press Menu 4 1 Settings Alarm clock 2 After a brief pause On and Off appear in the display 3 Scroll to Off and press Select Alarm off appears briefly in the display US...

Страница 112: ...irectly from the Start screen 1 At the Start screen enter a currency amount to convert 2 Press Options scroll to one of the following and press Select Calculator options Equals Displays the sum of your calculation Add Adds numbers in the calculation Subtract Subtracts numbers in the calculation Multiply Multiplies numbers in the calculation Divide Divides numbers in the calculation Square Squares ...

Страница 113: ...lator screen appears in the display 2 Press Options Exchange rate is highlighted then press Select and scroll to highlight or display one of the following options 3 Press Select to edit your choice 4 Enter the exchange rate and press OK The exchange rate is saved Foreign units converted to home units Enter the number of home units it takes to make one unit of foreign currency Home units converted ...

Страница 114: ...uct Important The preferable distance between two devices in an infrared connection is from 3 inches to 3 feet There must be no obstructions between the two devices and both IR ports must be pointed at each other Enable infrared communications Before you can receive information business cards calendar or to do list notes or make an infrared connection to a PC or handheld device 1 Make sure that th...

Страница 115: ...mpatible IR equipped handheld devices BUSINESS CARDS Create a business card Business cards aren t stand alone entities stored in your phone they are actually Phone book entries that have been sent to a compatible device via IR or SMS Send a business card to another device First make sure the other phone or device is set to receive data via its IR port Refer to the user guide for the receiving devi...

Страница 116: ...Send note and press Select 3 Point the infrared ports at each other 4 Scroll to Send via IR and press Select to start data transfer Receive business cards and calendar notes You can receive business cards and calendar notes from another compatible phone or handheld device Before the user of the other phone or devices sends you a card 1 Point the two IR ports at each other 2 Press Menu 9 Infrared a...

Страница 117: ...yboard Phone Editor Create ringing tones and transfer them to your phone PC Composer Create caller group icons or pictures for use with picture messaging PC Graphics Synchronize the Phone book and reminders with PIM applications such as Microsoft Outlook Outlook Express and Lotus Organizer PC Sync Please refer to the Nokia PC Suite User Guide and PC PDA Connectivity Guide for installation and setu...

Страница 118: ...ince web pages are designed using Hyper Text Mark up Language HTML web pages cannot be viewed from your phone THE SERVICES MENU Use your WAP browser to get news weather reports access financial information and more WAP pages can be saved as bookmarks the same as web pages on the Internet Note You may need to subscribe to additional services before you can use the browser Also your wireless provide...

Страница 119: ... Once you arrive at your wireless provider s home page you should find links to a number of other WAP sites LAUNCH THE BROWSER 1 At the Start screen press Menu 10 Services After a brief pause a list of options appear in the display 2 Scroll to Home and press Select Tip To quickly launch the browser press and hold at the Start screen Your phone connects to the Internet and is directed to your wirel...

Страница 120: ...nk Highlighted Press Options to open the link Hyperlink Use this to navigate to other cards or sites Scroll to select the link and press Options Text Use the scroll keys to move through the text The cursor will automatically jump to the next hyperlink to activate it Selection list Text in brackets Press Options when highlighted to display additional choices or links Options Back Options displays a...

Страница 121: ...ing Press Options while browsing The following menus appear in the display Browser options off line Home Start the browser and go to your home page Bookmarks Display a list of saved bookmarks Service inbox View messages from your wireless provider regarding new services and options Settings Modify your connection settings appearance settings and security certificate Go to address Go to the address...

Страница 122: ...ld like to allow or not allow cookies to be placed in your browser s cache Use number Captures numbers longer than 3 digits You can save the number to your Phone book Send a message to the number or call the number directly Reload Refresh the page you re currently viewing Clear the cache Empty the browser s temporary memory Security info View details about the security information for the current ...

Страница 123: ...ders may limit access to this option Contact your wireless provider if you have questions regarding its use 1 At the Start screen press Menu 10 Services After a brief pause a list of options appear in the display 2 Scroll to Add bookmark and press Select 3 Enterthesite sInternetaddressusingthekeypad example my yahoo com and press OK Note It s unnecessary to enter http This is added automatically 4...

Страница 124: ... customizing a profile see Customize a profile on page 59 USE PC COMPOSER You can use PC Composer to create new ringing tones and send them to your phone For more information please refer to the Nokia PC Suite UserGuideandPC PDAConnectivityGuidefor your phone These documents can be downloaded from the U S Mobile Phone product section of www nokia com ON LINE PURCHASES Important On line purchases a...

Страница 125: ...ess Select 5 You re prompted to enter your wallet code Enter your wallet code and press OK 6 Scroll to Cards and press Select 7 Scroll to the wallet card you wish to use in this purchase if you have more than one and press Select At this point the on line service may ask which information on your wallet card you d like to provide all details only shipping details etc 8 Scroll to your choice and pr...

Страница 126: ...ntrol game sounds lights and shakes Note Game sounds only applies to games and doesn t affect other features in your phone Snake II Feed the snake with as many goodies as possible and watch it grow Use the and keys to maneuver the snake toward food The longer the snake s tail grows the higher your score You can choose from a clear field or select from five different mazes If the snake runs into it...

Страница 127: ...er for details Pairs II Reveal pictures to find pairs with as few tries as possible Use the and keys to move the cursor Press to reveal a picture In Time trial pair up all of the tiles before the dynamite fuse runs out START A GAME 1 At the Start screen press Menu 8 Games 2 After a brief pause the games menu appears in the display 3 Scroll to Select game and press Select 4 Scroll to the game you w...

Страница 128: ...ette Lighter Charger LCH 9 Quickly charges the phone s battery from your vehicle Compact Desktop Charging Stand DCH 8 Compact and stylish this stand provides a convenient spot in which to charge the phone Compatible with Standard Travel Charger ACP 7U Rapid Travel Charger ACP 8U Also available Connectivity Deskstand DCH 8D Handsfree Desktop Charging Stand DCH 12K Spare Battery Charger DDC 1 Lightw...

Страница 129: ... an answer end button located on the microphone It connects directly to the phone requiring no additional adapter Also available Headset HDE 1 Loopset LPS 1 With the Nokia Loopset people who use a T coil equipped hearing aid have the freedom to talk on a digital mobile phone The loopset goes around your neck so it can be worn comfortably and discreetly Also available Phone Adapter for TTY TDD and ...

Страница 130: ...patible with Connectivity Deskstand DCH 8D Complete Car Kit CARK 91H Provides handsfree use and connection to an external antenna Includes Privacy Handset HSU 1 for private conversations Also available Complete Car Kit without privacy handset CARK 91 Mobile Holder MBC 1 Holds phone securely in place while driving or during charging Can be used with Rapid Cigarette Lighter Charger LCH 9 Phone not i...

Страница 131: ...l invalidate any approval or warranty applying to the phone and could also be dangerous For availability of approved batteries chargers and accessories check with your dealer When the battery is fully charged the indicator will tell you that the battery is fully charged When you are not using a charger disconnect it from the power source Do not leave the battery connected to a charger for more tha...

Страница 132: ...winter conditions will reduce the capacity and lifetime of the battery Always try to keep the battery between 15 C and 25 C 59 F and 77 F A phone with a hot or cold battery might not work temporarily even if the battery is fully charged The performance of Li Ion batteries is particularly limited in temperatures below 0 C 32 F The following list provides guidelines that you can follow When the oper...

Страница 133: ...tting equipment users are advised to operate this equipment only in the normal operating position held to your ear with the antenna pointing over your shoulder Pacemakers Pacemaker manufacturers recommend a distance of 20 cm 6 inches be maintained between a hand held wireless phone and a pacemaker to avoid interference with the pacemaker These recommendations are consistent with independent resear...

Страница 134: ... radio frequency RF signals However certain electronic equipment may not be shielded against the RF signals emanating from your wireless phone Posted facilities Switch your phone off in any facility where posted notices so require Potentially explosive atmospheres Switch off your phone when in any area with a potentially explosive atmosphere and obey all signs and instructions Sparks in such areas...

Страница 135: ...cturer of any equipment that has been added to your vehicle Ensure all wireless phone equipment in your vehicle is mounted and operating properly Don t carry or store flammable liquids gases or explosive materials in the same compartment as the phone or its accessories For vehicles equipped with an air bag remember that an air bag inflates with great force Don t place any objects in the area over ...

Страница 136: ...RGENCY CALL 1 If the phone is not on switch it on Important Some networks may require that a valid SIM card be properly inserted in the phone 2 Press and hold to return to the Start screen 3 Enter the emergency number for your present location for example 911 or other official emergency number Emergency numbers vary by location 4 Press If certain features are in use Keyguard fixed dialing and so o...

Страница 137: ...ng standard operating positions accepted by the FCC with the phone transmitting at its highest certified power level in all tested frequency bands Although the SAR is determined at the highest certified power level the actual SAR level of the phone while operating can be well below the maximum value This is because the phone is designed to operate at multiple power levels so as to use only the pow...

Страница 138: ...RF exposure guidelines when used with the Nokia accessories supplied or designated for this product When carrying the phone while it is on place the phone in the specific carrying case that has been tested for compliance Use of other accessories may not ensure compliance with FCC RF exposure guidelines In the United States and Canada the SAR limit for mobile phones used by the public is 1 6 watts ...

Страница 139: ...on t store parts or accessories in cold areas When the phone warms up to its normal temperature moisture can form inside the phone which may damage electronic circuit boards Don t attempt to open Non expert handling could cause damage Don t drop knock or shake Rough handling can break internal circuit boards Don t use harsh chemicals cleaning solvents or strong detergents to clean parts or accesso...

Страница 140: ... move toward a window I can t listen to my voice messages You don t have voicemail service Call your wireless provider You haven t setup your voicemail service with your wireless provider Call your wireless provider You haven t saved your voicemail number to your phone See Call and setup your voicemail on page 42 You ve forgotten your password or are entering it incorrectly Call your wireless prov...

Страница 141: ... wireless provider Q How do I lock the keypad A Press Menu Q How do I unlock the keypad A Press Unlock Q How do I keep track of my calls A Use the Call log feature see page 38 Q How do I turn off the ringer when I m in a meeting or don t want to be disturbed A Briefly press the power key scroll to Silent and press Select You can also set a timed profile see Set a timed profile on page 60 Q How do ...

Страница 142: ...the information label which is on back of the phone under the battery Q How do I change the contrast on the display A The Nokia 6340 contrast is set for optimal performance at the factory and cannot be changed Q Can I replace the front cover A The front cover should only be removed or replaced by qualified service personnel Q How do I make purchases on line A Setup Wallet with the necessary credit...

Страница 143: ...ss Internet sites or information on a network such as the World Wide Web data call A call that is placed or received where your phone functions as a data fax modem connected to your PC via the DLR 3P cable or Infrared IR port delivery report A message from your messaging service regarding the delivery status of a message that you have sent earpiece The portion of your phone that contains the audio...

Страница 144: ...keypad tones The sounds you hear when a key on your phone s keypad is pressed message alert tone The sounds you hear upon receipt of a text or system message navigate To move from one Internet site to another or from one phone menu to another number keys The numbered keys on your phone s keypad power key The button on the top of the phone that allows you to turn the phone on or off It can also be ...

Страница 145: ...ight corners of your phone s display These keys are defined by the text above them inside the display SIM Subscriber Identity Module SMS Short Message Service A service whereby short messages typically around 160 characters can be sent and received via your phone URL Universal Resource Locator A specific address or location on the Internet such as www nokia com voice mail A system maintained by yo...

Страница 146: ...ternet designed specifically for mobile device users wireless network Your wireless provider s operating environment comprised of various types of hardware software and landline connections World Wide Web WWW A part of the Internet designed to allow easier navigation through theuse of graphicaluserinterfaces andhypertext links between different addresses also called Web Term Definition ...

Страница 147: ... Mhz Tx output power 1 W Max Battery voltage 3 6 vdc Talk Standby time GSM Up to 3 5 6 hours talk time Up to 10 25 days standby time TDMA Up to 2 5 4 hours talk time Up to 9 14 days standby time AMPS Up to 1 1 5 hours talk time Up to 1 2 days standby time Battery operation times Operation times are estimates only The operation time of the battery depends on conditions such as Transmitting power le...

Страница 148: ...iod Nokia will repair or replace at Nokia s sole option any defective parts or any parts that will not properly operate for their intended use with new or refurbished replacement items if such repair or replacement is needed because of product malfunction or failure during normal usage No charge will be made to the Consumer for any such parts Nokia will also pay for the labor charges incurred by N...

Страница 149: ...okia including damage caused by shipping b The Product has been damaged from external causes such as collision with an object or from fire flooding sand dirt windstorm lightning earthquake or damage from exposure to weather conditions an Act of God or battery leakage theft blown fuse or improper use of any electrical source damage caused by computer or internet viruses bugs worms Trojan Horses can...

Страница 150: ...on are not covered under this limited warranty d The Consumer will be billed for any parts or labor charges not covered by this limited warranty The Consumer will be responsible for any expenses related to reinstallation of the Product e Nokia will repair the Product under the limited warranty within 30 days after receipt of the Product If Nokia cannot perform repairs covered under this limited wa...

Страница 151: ...CHANTABILITY OR FITNESS FOR A PARTICULAR PURPOSE OR USE SHALL BE LIMITED TO THE DURATION OF THE FOREGOING LIMITED WRITTEN WARRANTY OTHERWISE THE FOREGOING LIMITED WARRANTY IS THE CONSUMER S SOLE AND EXCLUSIVE REMEDY AND IS IN LIEU OF ALL OTHER WARRANTIES EXPRESS OR IMPLIED NOKIA SHALL NOT BE LIABLE FOR SPECIAL INCIDENTAL PUNITIVE OR CONSEQUENTIAL DAMAGES INCLUDING BUT NOT LIMITED TO LOSS OF ANTICI...

Страница 152: ...etween the Nokia and the Consumer and supersedesallpriorandcontemporaneousagreementsorunderstandings oral or written relating to the Product and no representation promise or condition not contained herein shall modify these terms 14 This limited warranty allocates the risk of failure of the Product between the Consumer and Nokia The allocation is recognized by the Consumer and is reflected in the ...

Страница 153: ...21 desktop charging stand DCH 8 119 headset kit HDC 9P 120 leather carrying case CSL 17 CSL 27 120 121 loopset LPS 1 120 mobile holder MBC 1 121 rapid travel charger ACP 8U 120 spare battery charger DDC 1 119 accessory profiles 61 activate automatic redial 50 call forwarding 48 loopset 62 TTY TDD 61 voice command 52 voice recorder 54 adding folders 86 advanced features 45 alarm setting 101 snooze ...

Страница 154: ...ote 89 monthly view 89 note options 90 note types 89 opening 88 saving notes 89 send note 107 view notes 90 view received notes 92 call duration 41 viewing 41 call forwarding 48 activate 48 cancelling 50 definition 48 call log about 38 call duration 41 clear call lists 40 clear call timers 41 view call duration 41 view dialed calls 40 view missed calls 39 view received calls 39 call note 89 call t...

Страница 155: ...t 100 voice tags 52 charge the battery 10 charger connecting 10 information 122 clear call lists 40 clock alarm 101 set the date 100 show hide 100 time format 100 compose a picture message 82 compose e mail 80 connect TTY hardware 63 connecting to a PC 108 connectors illustrated 8 contacting Nokia 6 content copier PC suite 108 cover removing 9 currency converting 103 exchange rate 104 to foreign 1...

Страница 156: ...alizer 65 choose a set 65 customize 65 settings 65 while in a call 66 erase 1 touch dialing numbers 56 messages 87 voice memos 55 voice tags 52 ESN definition of 135 location on the phone 6 F FAQ 132 fixed dialing definition of 68 edit number list 69 emergency numbers 68 notes about 70 setup and activate 68 folders 85 adding 86 list of 85 removing 86 four way scrolling calendar 88 frequency range ...

Страница 157: ... loopset description 120 how it works 20 LPS 1 20 M meeting note 89 memo note 89 memory phone 35 phone and sim 35 select 35 SIM card 35 menu shortcuts 21 menus phone 18 messages erasing 87 folders 85 forwarding 78 message center number 73 message icons 73 moving 86 reading 77 replying to 77 save to folders 85 view saved 85 write and send 77 missed calls 39 mobile holder 121 mobile inductive loopse...

Страница 158: ...ame list 33 phone security access codes 70 fixed dialing 68 lock the keypad 67 security code 70 security levels 67 phone size 138 phone weight 138 picture messages compose and send 82 modifying 83 when received 81 PIN 2 code 72 PIN code changing 71 PIN code request 71 playback a voice memo 54 power on your phone 13 power transmit 138 predictive text add new words 75 primary number assigning 33 cop...

Страница 159: ...ode 70 security levels 67 selection keys how to use 16 sending calendar notes 91 e mail 78 messages 77 picture messages 81 template messages 83 set the display language 58 setup voicemail 42 your headset 64 shortcuts 19 21 call log menu 21 games menu 24 messages menu 21 organizer menu 24 profiles menu 21 settings menu 22 voice menu 24 show hide clock 100 SIM card capacity 35 copying entries 36 eme...

Страница 160: ...ad 67 updates to user guide 5 user guides alternate formats 19 updates to 5 V vibrating alert turn on or off 59 view calendar notes 90 call duration 41 clock on the Start screen 100 dialed numbers 40 fixed dialing numbers 69 missed calls 39 monthly view calendar 89 phone book 27 picture messages 81 received calendar notes 92 received calls 39 received messages 77 recorded memos 54 saved messages 8...

Страница 161: ...il automating 43 save mailbox number 42 setup 42 using 42 volume adjusting 17 W wallet code request 96 create a card 96 on line purchases 115 personal note options 98 personal notes 97 time out 95 wallet code 95 warning tones turn on or off 60 weight phone 138 wireless modem setup 108 wireless network services 6 wireless networks 138 write and send a message 77 Para obtener un manual del usuario e...

Отзывы: