34
35
Step 5
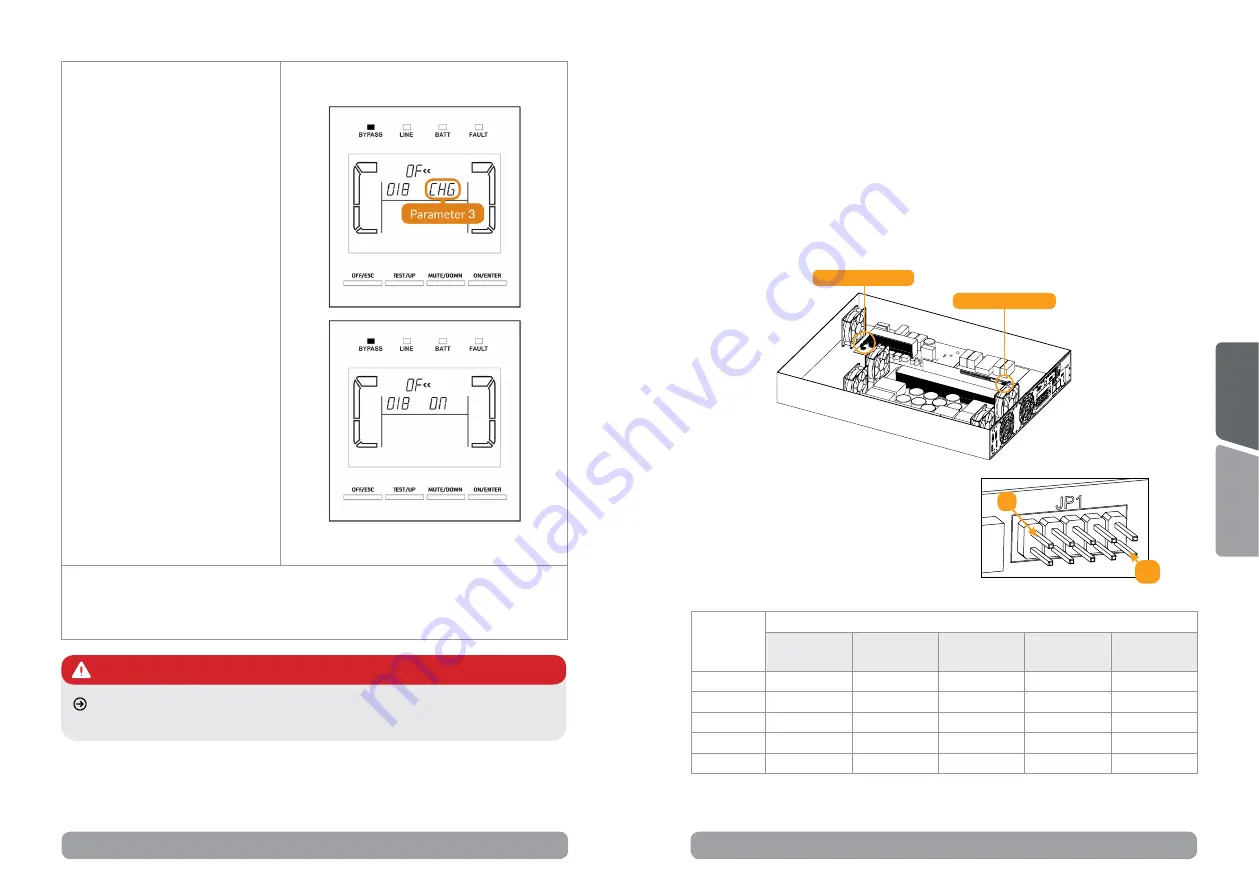
For exemple, to set the battery
number to 18, you need to do
the following:
Press
ENTER
to acces the
number of batteries; number
of batteries starts blinking;
you can change it with
UP
and
DOWN
keys; set number of
batteries to 18 and then press
ENTER
key
Now
CHG
is blinking (this is
Parameter 3
) and ON or OF
state is shown; make sure the
state of the CHG (charger) is set
to ON and then press
ENTER
key; now you completed the
process of setting the battery
number on paramenter 18.
NOTE!
You can change CHG parameter
if you press ENTER key while
CHG is blinking; CHG status
should be ON so the charger
is working and is charging the
batteries; otherwise the UPS is
not able to recharge the batteries.
Step 6
You can leave the settings menu by pressing
UP
and
DOWN
keys at the
same time for about 1 second.
6.9.2. Operation of changing battery numbers
Step 1.
This operation is only available for professional or qualified
technicians.
Step 2.
Turn off the UPS. If the load couldn’t be cut off, you should
remove the cover of maintenance bypass switch on the rear
panel and turn the maintenance switch to “BPS” position first.
Step 3.
Switch off the input breaker, and switch off the battery breaker.
Step 4.
Remove the cabinet cover and disconnect battery wire for
standard model.
Charging board
Control board
Step 5.
Then, modify the jumper on
the control board to set the battery
numbers as below table:
1
10
Jumpers on the control board
Battery
Number
in series
JP1 on the control board
pin1 & pin2
pin3 & pin4
Pin5 & pin6
pin7 & pin8
Pin9 &
pin10
16
X
X
1
0
0
17
X
X
0
1
1
18
X
X
0
1
0
19
X
X
0
0
1
20
X
X
0
0
0
NOTE!
0 = no jumper; 1 = connect with jumper; x = the pins are for other functions.
The parameter settings will be saved only when UPS shuts down
normally with battery connection.
WARNING!
NOTE!
For older batches it might be possible that changing battery number is not available
from the menu. In this case, please use the following procedure (page 35).
Содержание Balder 10000
Страница 43: ......


