background image

22

23

Engli

sh

Română

NCF:

 Setting UPS to normal mode (not CVCF 

mode).  If  selected,  the  output  frequency will 

synchronize  with  the  input  frequency  within 

46~54  Hz  at  50Hz  or  within  56~64  Hz  at 

60Hz according to setting in parameter 2. If 50 

Hz selected in parameter 2, UPS will transfer 

to  battery  mode  when  input  frequency  is 

not  within  46~54  Hz.  If  60Hz  selected  in 

parameter 2, UPS will transfer to battery mode 

when input frequency is not within 56~64 Hz. 

*If  Parameter  2  is ATO,  the  Parameter  3 will 

show the current frequency.

NOTE!


If the UPS is set to CVCF mode, the bypass function will be disabled automatically. 

When used in CVCF mode, the power of the UPS is de-rated to 60%.
But when a single UPS without parallel function is powered on with mains and 

before the UPS finished the startup, there will be a few seconds of voltage pulse 

(same as the input voltage) on the bypass output. For the UPS with parallel 

function, this pulse situation won’t happen.

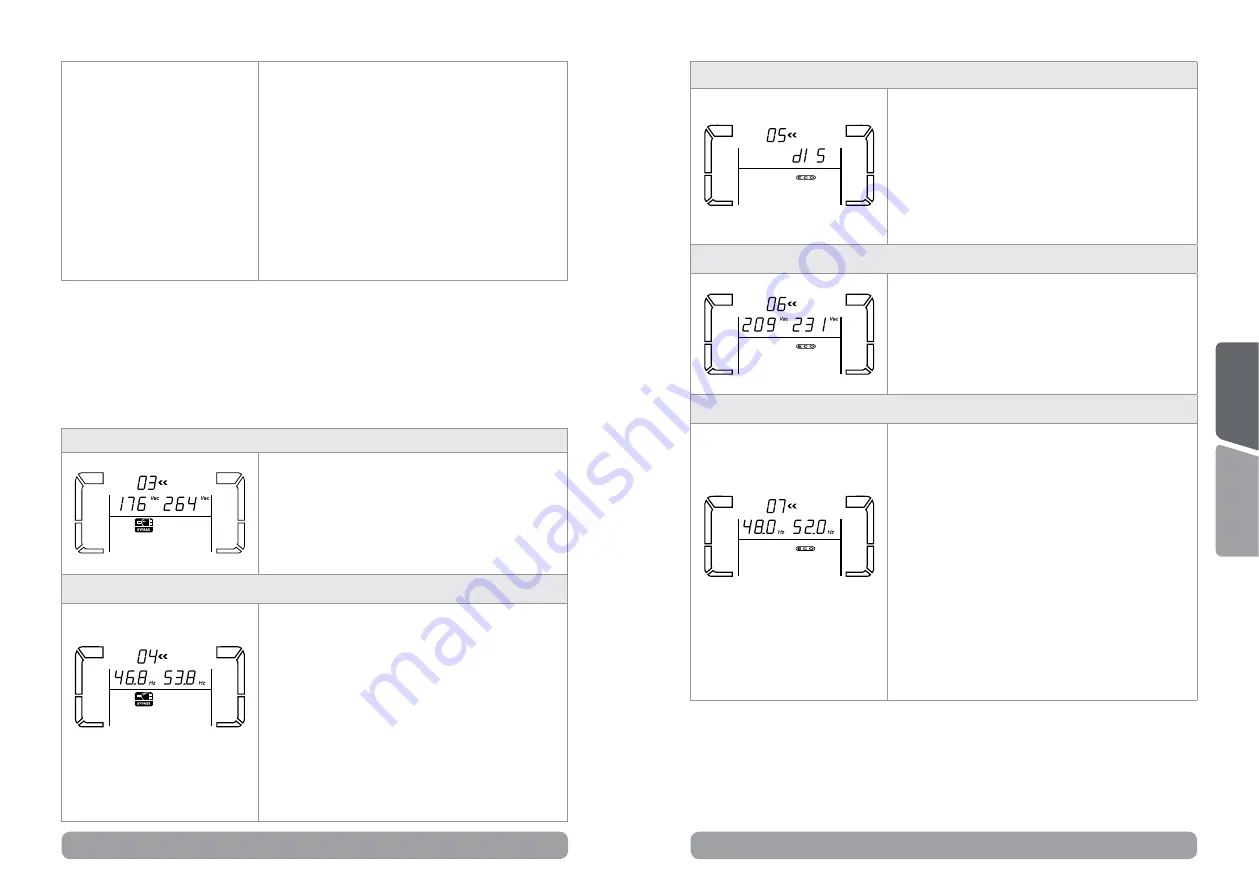
03: Voltage range for bypass 

Parameter 2:

 Set the acceptable low voltage for 

bypass. Setting range is from 110V to 209V and 

the default value is 110V.

Parameter 3:

 Set the acceptable high voltage for 

bypass. Setting range is from 231V to 276V and 

the default value is 264V.

04: Frequency range for bypass

Parameter 2:

 Set the acceptable low frequency 

for bypass. 

50 Hz system: Setting range is from 46.0Hz to 

49.0Hz.

60 Hz system: Setting range is from 56.0Hz to 

59.0Hz.

The default value is 46.0Hz/56.0Hz.

Parameter 3:

 Set the acceptable high frequency 

for bypass. 

50 Hz: Setting range is from 51.0Hz to 54.0 Hz. 

60 Hz: Setting range is from 61.0Hz to 64.0Hz.

The default value is 54.0Hz/64.0Hz.

05: ECO mode enable/disable

Parameter 3:

 Enable or disable ECO function. 

Available options:

DIS:

 disable ECO function 

ENA:

 enable ECO function 

If ECO function is disabled, voltage range and 

frequency range for ECO mode still can be set, 

but it is meaningless unless the ECO function 

is enabled.

06: Voltage range for ECO mode

Parameter 2:

 Low voltage point in ECO mode. 

The  setting  range  is  from  5%  to  10%  of  the 

nominal voltage.

Parameter 3:

 High voltage point in ECO mode. 

The  setting  range  is  from  5%  to  10%  of  the 

nominal voltage.

07: Frequency range for ECO mode

Parameter 2: 

Set low frequency point for ECO 

mode.

50 Hz system: Setting range is from 46.0Hz 

to 48.0Hz.

60 Hz system: Setting range is from 56.0Hz 

to 58.0Hz.

The default value is 48.0Hz/58.0Hz.

Parameter 3:

 Set high frequency point for 

ECO mode. 

50 Hz: Setting range is from 52.0Hz to 54.0 

Hz. 

60 Hz: Setting range is from 62.0Hz to 

64.0Hz.

The default value is 52.0Hz/62.0Hz.

Содержание Balder 10000

Страница 1: ...eries User manual Manual de utilizare Balder 6000 Balder 10000 PWUP OL06KBA AZ01B PWUP OL10KBA AZ01B Before using this product carefully read all product documentation and retain it for future referen...

Страница 2: ...ingbatterynumbersthroughLCDmenu 32 6 9 2 Operation of changing battery numbers 35 6 9 3 Operation of changing charging voltage 36 6 9 4 Operation of changing charging current 37 4 Troubleshooting 39 R...

Страница 3: ...LEDs on front panel to show the UPS working status Mode LED Bypass Line Battery Fault UPS Startup No Output mode m m m m Bypass mode m m m NOTE means LED is lighting and m means LED is faded AC mode...

Страница 4: ...system is moved directly from cold to warm environment The UPS system must be absolutely dry before being installed Please allow at least two hours for the UPS system to acclimate to the environment D...

Страница 5: ...the required precautionary measures may replace batteries and supervise operations Unauthorized persons must be kept well away from the batteries Caution risk of electric shock The battery circuit is...

Страница 6: ...R button the UPS will provide pure and stable AC power to the output The UPS will also charge the battery in the on line mode The UPS is simple to install and operate Please read the following steps b...

Страница 7: ...egulations Step 5 Remove the terminal block cover on the rear panel of UPS Then connect the wires according to the following terminal block diagrams Connect the ground wire first when making wire conn...

Страница 8: ...n cable one end to the USB RS 232 port and the other to the communication port of your PC With the monitoring software installed you can schedule UPS shutdown start up and monitor UPS status through P...

Страница 9: ...Mode operation information Indicates the UPS connects to the mains Indicates the battery is working Indicates the bypass circuit is working ECO Indicates the ECO mode is enabled Indicates the Inverte...

Страница 10: ...llowing diagram Parameter 1 For program alternatives There are 16 programs to set up Refer to the table below Parameter 2 and 3 The settings options or values for each program NOTE Most of Balder UPS...

Страница 11: ...208 presets output voltage is 208Vac 220 presets output voltage is 220Vac 230 presets output voltage is 230Vac 240 presets output voltage is 240Vac NOTE When the output voltage is set to 208V the powe...

Страница 12: ...m 231V to 276V and the default value is 264V 04 Frequency range for bypass Parameter 2 Set the acceptable low frequency for bypass 50 Hz system Setting range is from 46 0Hz to 49 0Hz 60 Hz system Sett...

Страница 13: ...r 2 HS H Enable or disable Hot standby function You may choose following two options in Parameter 3 YES Hot standby function is enabled It means that the current UPS is set to host of the hot standby...

Страница 14: ...point The calibrated formula is listed as below Setting charging current real measured current or value setting in parameter 3 For example if setting charging current is 4A but real current is detecte...

Страница 15: ...d alarm will beep every 4 seconds LCD display Bypass mode When the input voltage is beyond the acceptable range or power failure UPS will activate backup power from battery and alarm will beep every 4...

Страница 16: ...nges too fast 6c X SPS 12V abnormal 6e X 6 8 Warning indicator Warning Icon flashing Warning code Alarm Low Battery LOW BATT 08 Sounding every second Overload OVER LOAD 09 Sounding every 2 seconds Bat...

Страница 17: ...ly turn off the UPS you can connect the battery cabinet to the UPS Description LCD display Step 1 UPS should be in bypass mode Then press the ESC and UP keys for about 1 second at the same time You wi...

Страница 18: ...available for professional or qualified technicians Step 2 Turn off the UPS If the load couldn t be cut off you should remove the cover of maintenance bypass switch on the rear panel and turn the main...

Страница 19: ...l enter Bypass mode If the UPS is in maintenance Bypass mode turn the maintenance switch to UPS position and then turn on the UPS 6 9 4 Operation of changing charging current Step 1 This operation is...

Страница 20: ...E P flash on LCD display and alarm beeps every second EPO function is enabled Set the circuit in closed position to disable EPO function The icon and BATT FAULT flash on LCD display and alarm beeps ev...

Страница 21: ...teries are not fully charged Charge the batteries for at least 7 hours and then check capacity If the problem still persists consult your dealer Batteries defect Contact your dealer to replace the bat...

Страница 22: ...ul pachetului 1 Unitate UPS Manual de utilizare Certificat de garan ie Cablu USB Supor i pentru montarea n rack Supor i pentru montarea vertical uruburi Cablu pentru conectarea UPS ului cu cabinetul d...

Страница 23: ...privind sarcina pe ie ire 7 Operare f r difuzor mut 6 1 7 3 2 1 5 4 1 Port de curent partajat 2 Port pentru conectare in paralel 3 Conector baterie extern 4 Slot extensie inteligent 5 Port comunica ie...

Страница 24: ...al dispozitivelor conectate nu dep e te 3 5 mA Operare Nu deconecta i cablul de alimentare de la sistemul UPS sau de la priza cl dirii n timpul utiliz rii deoarece acest lucru ar anula mp m ntarea de...

Страница 25: ...tensiunea electric cum ar fi suprasarcini fluctua ii de tensiune c deri de tensiune i zgomotul de pe re ea C nd curentul este prezent la re eaua de alimentare i comutatorul ON Enter este pornit pozi...

Страница 26: ...e echipamentele naintea conect rii lor la UPS Pasul 4 Preg ti i i utiliza i conductori electrici conform tabelului Model Specifica ia cablurilor AWG sec iune transversal mm Intrare Ie ire Baterii Mas...

Страница 27: ...schimba i num rul pachetelor de baterii este important s modifica i simultan set rile n mod corespunz tor Conectarea sistemului la o tensiune a bateriilor incorect poate duce la distrugerea permanent...

Страница 28: ...acest buton pentru afi area op iunii anterioare n meniul de set ri Test Up Mute Down ine i ap sat aceast combina ie de butoane cel pu in 1 secund pentru intrarea sau ie irea din meniul de set ri 6 2...

Страница 29: ...terie Hz frecven a 6 3 Alarme sonore Stare UPS Alarm sonor Mod Bypass Sun o dat la 2 minute Mod baterie Sun o dat la 4 minute Eroare Sun continuu Avertizare Alarm sonor Suprasarcin Sun de dou ori la f...

Страница 30: ...Far ie ire AC ECO CVCF Baterie Baterie Test Tensiune ie ire 01 Y Frecven ie ire 02 Y Interval de tensiune pentru bypass 03 Y Interval de frecven pentru bypass 04 Y Activare dezactivare mod ECO 05 Y In...

Страница 31: ...tensiunea de intrare ntre 46 54 Hz la 50Hz sau ntre 56 64 Hz la 60Hz conform valorii parametrului 2 Dac s a selectat 50 Hz UPS ul se va comuta n mod baterie daca intrarea nu este n intervalul 46 54 H...

Страница 32: ...tervalul de valori ntre 52 0Hz i 54 0 Hz 60 Hz Intervalul de valori ntre 62 0Hz i 64 0Hz Valoarea implicit este 52 0Hz 62 0Hz 08 Setarea modului de bypass Parametrul 2 OPN Bypass permis La selectarea...

Страница 33: ...16 Calibrarea tensiunii de ie ire C nd valoarea tensiunii de ie ire este nedetectabil mai mic de 50V acest meniu va fi rezervat valoarea fiind afi at pentru parametrul 2 i 3 Parametrul 2 indic n perm...

Страница 34: ...i acest mod este selectat UPS ul va face bypass ul tensiunii de intrare c tre ie ire n vederea economisirii energiei Afi aj LCD Mod CVCF C nd frecven a tensiunii de intrare este ntre 46 i 64Hz UPS ul...

Страница 35: ...oare bus de pornire 01 X Supratensiune 02 X Subtensiune 03 X Dezechilibru 04 X Eroare pornire invertor 11 X Supratensiune invertor 12 X Subtensiune invertor 13 X Scurt la ie irea invertorului 14 SHORT...

Страница 36: ...tandard UPS ul Balder 6000 este setat s func ioneze cu cabinetul de baterii 2U care con ine 16 acumulatori de tip 12V7Ah sau 12V9AH 12V x 16 192V iar UPS ul Balder 10000 este setat standard s func ion...

Страница 37: ...sa num rul de baterii num rul bateriilor ncepe s clipeasc l pute i schimba cu tastele UP i DOWN seta i num rul de baterii la 18 i apoi ap sa i tasta ENTER Acum CHG clipe te acesta este Parametrul 3 i...

Страница 38: ...l NOT Majoritatea modelelor de UPS Balder nu necesit setarea tensiunii de nc rcare i a curentului de nc rcare aceasta f c ndu se automat v rug m urma i pa ii de mai jos doar dac UPS ul dumneavoastr ar...

Страница 39: ...ului de mai jos ATEN IE curentul de nc rcare nu trebuie s dep easc curentul maxim de nc rcare acceptat de baterii Conectori jumperi pe placa de nc rcare Curent de nc rcare A JP06 JP07 JP08 1A 0 0 1 2A...

Страница 40: ...at este 43 Pe afi aj apare icoana OVER LOAD i alarma sun ncontinuu UPS ul se afl n suprasarcin de prea mult timp i intr n modul eroare dup care se opre te automat ndep rta i sarcinile excesive de la i...

Страница 41: ...acest produs nu trebuie tratat ca pe un de eu menajer El trebuie predat punctelor de reciclare a echipamentelor electrice i electronice Asigur ndu v c acest produs este dezafectat n mod corect ve i a...

Страница 42: ...06 AC 2006 EN 61000 3 2 2014 EN61000 4 2 2009 EN61000 4 3 2006 A2 2010 EN61000 4 4 2012 EN61000 4 5 2006 EN61000 4 6 2014 EN61000 4 8 2010 EN61000 2 2 2002 EN62040 2 2006 AC 2006 EN 61000 3 2 2014 EN6...

Страница 43: ......

Отзывы: