background image

5

Powering The Camera

The dome requires either a 12V DC regulated power supply or 

a 24V AC power supply it draws a maximum current of around 

150mA @12V DC.

Connections are not polarity sensitive therefore the power can 

be connected either way round, the power terminals are easy 

to identify as they are 

marked in red

.

There are four easy ways to cable the camera:

1


RG59+2


No Balun required - easy and simple installation. 

2


RG59+4


No Balun required - extra cores allow a DVR with RS485  


to control the camera’s OSD.

3


CAT5+2 


Requires a balun at the remote end - heavy duty power  


cores can power multiple cameras. OSD control by 


DVR possible.

4


CAT5


Requires a balun at the remote end - uses the CAT5 cores  


for power (Powers single cameras only). OSD control by  


DVR possible.

24V AC is a good choice on long cable runs to power the 

camera as you get less voltage drop in the power cores, 

however if using 24V AC use only CAT5+2 or RG59+2 to avoid 

the AC signal interfering with the video signal.

Содержание CAM225

Страница 1: ...CAM225 High performance CCTV camera with built in Balun and internal connections for neat easy installation Handbook Instructions XCAM225 Maximum IR Sensitivity...

Страница 2: ...a clever internal connection PCB for neat and fast installation and stunning picture quality make the CAM220 a great first choice CCTV Dome camera for any installation Auto Digital Zoom Dual Voltage...

Страница 3: ...k Press down to bring up the OSD then navigate using the joystick Down again is select Conduit Entry 20mm blank supplied Cable entry also at rear through a grommet Connection Block Spring lock connect...

Страница 4: ...camera Prior to the end of the installation you need to additionally seal the grommet with a flexible silicone product This is because the rubber grommet may shrink or get stressed by cable movement...

Страница 5: ...easy and simple installation 2 RG59 4 No Balun required extra cores allow a DVR with RS485 to control the camera s OSD 3 CAT5 2 Requires a balun at the remote end heavy duty power cores can power mult...

Страница 6: ...6 RG59 2 Cable contains 1 co ax core 2 power cores To DVR or Monitor 12V DC or 24V AC PSU...

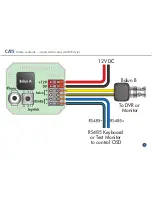
Страница 7: ...7 RG59 4 PTZ Combo Cable Cable contains 1 co ax core 2 power cores 2 data cores To DVR or Monitor 12V DC or 24V AC PSU RS485 Keyboard or Test Monitor to control OSD...

Страница 8: ...8 CAT5 2 Cable contains 4 pairs data cores CAT5E style 2 heavy duty power cores Balun B To DVR or Monitor 12V DC or 24V AC PSU RS485 Keyboard or Test Monitor to control OSD...

Страница 9: ...9 CAT5 Cable contains 4 pairs data cores CAT5E style Balun B To DVR or Monitor 12V DC RS485 Keyboard or Test Monitor to control OSD...

Страница 10: ...he camera and the DVR or monitor as shown Top right It s a very convenient way to access the camera s menu system as you can do this after the camera is installed and fine tune the camera whilst sitti...

Страница 11: ...FLK 100000 3 RETURN MANUAL 1 LEVEL x2 x256 1 50 60 100000 2 RETURN 2 AGC HIGH OFF DAY NIGHT COLOUR LOW MIDDLE HIGH 3 SENSUP AUTO x8 OFF AUTO AUTO 1 SENSUP x2 x256 2 RETURN 3 BACKLIGHT OFF OFF DWDR BL...

Страница 12: ...39 4 RETURN EXT 1 DELAY 0 15 2 RETURN B W 1 BURST ON OFF 2 IR SMART ON OFF 3 IR LED ON 4 RETURN 6 SMART 3D NR ON ON OFF ON 1 VALUE 1 200 2 SMART NR ON OFF 3 SMART LEVEL 1 200 4 SENSITIVITY 0 100 5 RET...

Страница 13: ...OFF ON TOP LEFT TOP RIGHT BTM LEFT BTM RIGHT POSITION 3 COLOUR 0 15 4 TRANSPAR 0 3 5 RETURN 3 D EFFECT 1 D ZOOM OFF ON OFF ON 1 RANGE x1 0 x32 0 2 PAN 100 100 3 TILT 100 100 4 RETURN 2 SMART D ZOOM O...

Страница 14: ...0 60 2 H CENTER 0 255 3 V CENTER 0 255 4 RETURN 4 DEFECT 1 SENSUP x4 x128 2 DIFF 0 3 3 THRESHOLD 0 4 4 START 5 RETURN 5 COMM ADJ 1 CAM TITLE OFF ON OFF ON CAM TITLE 2 PROTOCOL PELCO D PELCO D PELCO P...

Страница 15: ...This setting allows you to lock the camera in a colour or B W mode or have it automatically switch You can also adjust the smart IR function that limits IR glare Motion Allows the camera to display a...

Страница 16: ...Order Code BAL104 OSD Controller An easy way to access the camera s menu Connects in line and sends the control signals through the video co ax Comes with a BNC T Piece Order Code REM088 1ch Passive...

Страница 17: ...cores extra CSA for powering PTZ cameras Solid copper centre core for long runs Three cables in one saves time and money Glued foil sheath provides maximum protection against interference and prevent...

Страница 18: ...TV cameras Each output produces up to 1 Amp max 5A overall outputs to suit most cameras and housings Order Code POW400 A 24V AC PSU with a 6 amp output ideal for powering a number of 24V AC cameras su...

Страница 19: ...est in class 5 AutoPort Plug and Play for easy internet setup 6 Compact Space Saving Case slim modern design 7 Free Dynamic DNS Setup saves you time 8 Full Alarm Inputs 16 on the 16 way triggered how...

Страница 20: ...c Mini 3pc Includes Easy PTZ Testing Up to 6 Hours Battery Life Monitor Output Testing Check Video Signal Strength Cable Continuity Checker DC AC Voltage Tester Wrist Neck Strap Built in Speaker For m...

Страница 21: ...o signals to transmit them down 1 single co ax the other Mule then reconstructs the individual video signals at the remote end A low cost easy solution that offers huge installation benefits and oppor...

Страница 22: ...uses a handheld IR remote to be controlled from a different room or location without wires Simple effective and low cost the VideoMitter is an installer s dream product saving money on cabling and la...

Страница 23: ...ry voltage with a meter No picture The camera cannot function without the correct working power supply Step 1 Test that the camera has the correct voltage supplying it you must do this with the camera...

Страница 24: ...rivacy Masking On Off 8 Zone selectable 3D NR digital noise reduction On Off Selectable Sens up Frame Integration On Off Selectable limit 256x D Effect Freeze Mirror Gamma Neg Image Supplied voltage 1...

Отзывы: