background image

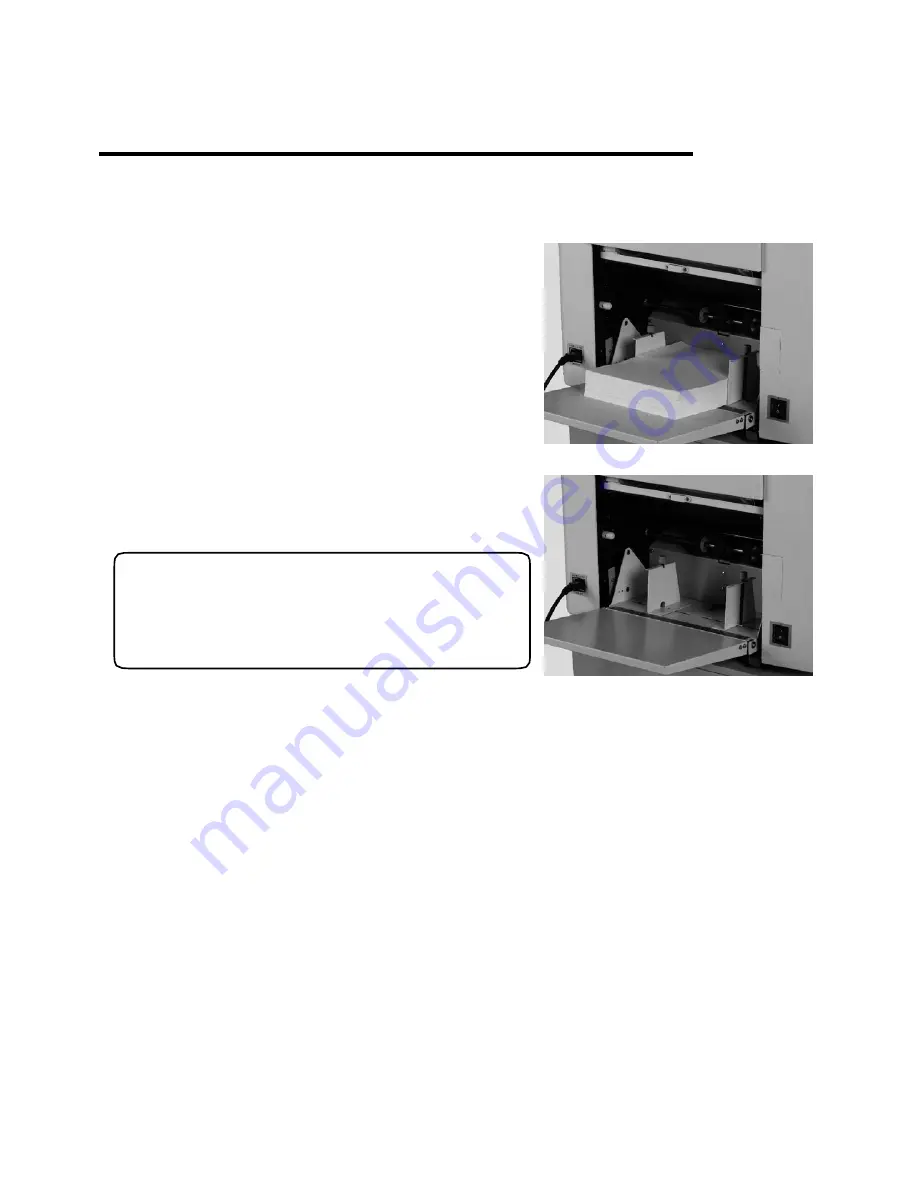
Print Paper Replacement (for  BPS 101/BPS 201) 

69


1. If the machine is in printing state please stop printing by pressing “Stop” button; 


2. Press down paper feeding tray switch, 

lift down the feeding paper tray; 


3. Take out paper; 


Notes 

Please take it out if paper is jamming on the feeding   

Roller. 


4. Replace print paper, feeding paper tray lifts up automatically after press “Start” key. 


Содержание BPS 101

Страница 1: ...Read all instruction before start up the machine MODE L S BPS 101 201 301 OPRATIN G MAN AUL BL UE PRIN T SOL UTION S Please save this instruction manual for later use...

Страница 2: ......

Страница 3: ...tional honors like National New Product National Torch Program National Technology Innovation fund etc Currently our digital duplicators have 2 registered brands RongDa and Caven including more than 3...

Страница 4: ...information please don t hesitate to contact the undersigned It is an exclusive brand that is only distributed by Bule Print Solutions and their Distributions Network are manufactured by R D C OFFICE...

Страница 5: ...Part 16 Master Disposal Box Part 17 Master Making Part 17 Operation Panel 18 Specified Original and Printing Paper 20 The Principles of Master Making and Printing 21 Capital 2 Basic Functions of Mast...

Страница 6: ...sting 43 Char Char Photo Photo Mode 44 Two in one Master Making 45 Book Mode 47 Chapter 4 Other Functions Counter Display Function 50 Printing Speed Adjustment 51 Printing Position Adjustment 52 Power...

Страница 7: ...Clean the Printing Roller 89 Replace the Paper Switch 88 Replace the Friction Pad 87 Maintenance 86 Specifications 85 Master Load Error 82 Master Ejection Error 80 Paper Jam 77 Paper Empty 76 5 Chapte...

Страница 8: ...may cause hurt by careless operation In some case it means a indication while in some case it means forbidden These are very serious safety guides which should be followed Warnings When sundries get...

Страница 9: ...rd Do not put heavy object on the power cord or tied the power cord Please do not insert or drop the metal tinder into the machine Or it may cause fire or short circuit Do not put vase cup or water co...

Страница 10: ...er plug please do not pull the power cord Or the power cord will be damaged which may cause fire or short circuit Please do not place the machine on an unsteady place In case the machine is overturned...

Страница 11: ...place Don t keep machines exposed to direct sun light or heating equipment like stoves otherwise the ink will be metamorphosed which will result in poor print quality Moreover direct sun light will re...

Страница 12: ...cover shall The machine needs cleaning at least once a week Make sure to cut off the power and take off the power plug before cleaning When cleaning the glass table please use soft cloth to wipe off t...

Страница 13: ...en stamped with Sample Notes currency and government stock which are valid abroad are forbidden to print Unused stamp and post card are forbidden to print without approval by the government Government...

Страница 14: ...ent of originals and print paper Part Name and Functions 13 Paper Feed Part 15 Drum Unit 16 Paper Receiving Part 16 Disposal Master Box Part 17 Master Making Part 17 Operation Panel 18 Specified Origi...

Страница 15: ...y Delivers and receives the original 3 Scan cover Original scan 4 Original guiding tray Feeds and locates the original 5 Paper receiving tray Receives and loads the printouts 6 Stand optional Machine...

Страница 16: ...supply socket Connect the power 4 Paper feed tray Paper loading 5 Power supply switch Turn on off power 6 Stand optional Machine location 7 Paper receiving tray Receives and loads the paper 8 Front d...

Страница 17: ...per detecting switch 5 Friction pad 6 Paper guide 7 Power supply socket 8 Feed tray lock lever 9 Paper guide adjusting knob 10 Paper feed pressure knob 11 Paper guide adjusting knob 12 Power supply so...

Страница 18: ...Drum lock switch 22 Drum 23 Ink chip device optional Paper Receiving Part 24 Disposal master box switch 25 Printing pressure adjusting lever 26 Blower 27 Central guide 28 Paper receiving guide 29 Pap...

Страница 19: ...cover 17 32 Cover switch 33 Disposal master full switch 34 Blower mouth 34 Master Making Part 35 Master guide board 36 Cutter switch 37 Thermal head release lever 38 Master core bracket 39 Master 40 C...

Страница 20: ...r 9 Test print key Print one sheet of test printout and main display is effective 10 Master making key Print it to start master making 11 LCD screen brightness adjust key Adjust the backlight brightne...

Страница 21: ...setting state 3 Energy saving indicator light Energy saving state 4 LCD main screen Machine state print sheet number machine setting error information etc 5 Err indicator light To indicate error on th...

Страница 22: ...rint Paper Specified Original Document feed mode Size Max257mm 364mm Book top mode Weight original paper or book not more than 10 kgs Size Max297mm 420mm Notes Following types of original can not be u...

Страница 23: ...or marked folds The paper which was violently curled Carbon backed paper Adhesive paper The Principles of Master Making and Printing Master Making First of all the disposal master box collects the pri...

Страница 24: ...parator pad Then the paper is delivered to the clearance between drum and pressure roller After ink distribution procedures the ink is seeped from the tiny mesh of the thermal master on the drum and t...

Страница 25: ...ter making and printing in standard mode 1 Turn on the Power 24 2 Placement of Printing Paper 25 3 Open the Paper Receiving Tray 26 4 Installation of Master 27 5 Installation of Ink 29 6 Placement of...

Страница 26: ...d 2 Turn the power switch to position 24 LCD screen displays Ready and the machine stays in standard mode The settings of standard mode is as listed below Printing number 0 Zoom rate 100 Photo mode Ch...

Страница 27: ...ets 70g 2 Placement of Printing Paper 1 Open the paper feed tray 25 2 Place the paper sheets and locate the paper guide Notes 3 Set feed pressure according to the thickness of paper sheets B P S 1 0 1...

Страница 28: ...3 Open the Paper Receiving Tray 1 Open the paper receiving tray 2 Open the paper receiving guide 3 Open the central guide 26...

Страница 29: ...receiving guide and central guide according to the paper size 5 Adjust the paper guide plate according to the print image size 4 Installation of Master 1 Open the original receive tray Press the scan...

Страница 30: ...the release lever to position Close Close the scan table and then master making can be started Way Put the thermal head release lever to Close position master mill finish adown put the master under mi...

Страница 31: ...r head piece until the whole cutting procedure is completed It s dangerous please be careful 5 Close the original receiving tray Close the scan flat 5 Installation of the Ink 1 Open the front door pre...

Страница 32: ...er tightened or else the air will be leaked in and the ink can not be well pumped in The nozzle can be adjusted by the adjusting bolt Notes Do not keep the opening ink in the air long time 4 Close the...

Страница 33: ...orizontal direction A3 and B4 original is normally functioned only in vertical palcement 31 Vertical placement Horizontal placement Put the original in the middle and close to the left glass flat The...

Страница 34: ...7 Choose Paper Size Choose original size and copy size eg choose original size A4 and copy size A4 operation details as below 1 Check and make sure automatic zoom rate indicator light is on if it isn...

Страница 35: ...ope Paper size A 1 B 1 A3 291mm 414mm A4 R 204mm 291mm A4 291mm 204mm B4 251mm 358mm A5 R 204mm 142mm A5 142mm 204mm B5 251mm 176mm B5 R 176mm 251mm When use the paper smaller than original size witho...

Страница 36: ...f test printout automatically follows 3 Check whether the print image is in the center of the printout if not please check if the original and the print paper are located in center Notes If print numb...

Страница 37: ...er 2 Press the start key and start to print The set print number decreases The printouts are delivered onto the receiving tray Test print Master making Start Stop 3 The machine stops automatically aft...

Страница 38: ...10 Turn off the power 1 Turn the switch to O position and turn off the power 36 B P S 1 0 1 2 0 1...

Страница 39: ...achine on all functions Enlargement and Reduction 38 Automatic Zoom 39 Free Zoom 41 Density Adjusting 42 Scanning Density Adjusting 42 Master making Density Adjusting 43 Printing Density Adjusting 43...

Страница 40: ...rgement and reduction according to the sizes required Automatic Zoom Rate Page 41 Machine choose the zoom rate automatically according to the size of original and copies B4 document A4 printout Free Z...

Страница 41: ...ct Correct 39 1 Set Automatic zoom rate light on If Free zoom light is on press conversion button to switch the Automatic zoom light on 2 Select original size by pressing Original document size button...

Страница 42: ...o return the settings back to standard zoom rate According the steps 1 2 above select B4 for original documents size and B4 for copy size Press Reset key All clear back to original setting mode Press...

Страница 43: ...is on Press Original document size button to select original paper size E g A4 2 Press Free zoom button to enter free zoom interface 50 200 100 100 0 0 3 Press cursor button and to set adjustment from...

Страница 44: ...ght while decrease the density if the original is too dark Choose density before master making Such as Set the density to light Press density adjusting buttons including density light button and densi...

Страница 45: ...ity 3 Back to select the scanning density after press density switch button then the indicator light of density switch is off Back to scanning density in standard settings Adjust according to step1 2...

Страница 46: ...h text and photo Original Original mixed with text and photo Note Select photo modes before master making For example when the original is letter file please choose char from the Photo Mode 1 Press Ph...

Страница 47: ...one Master Making Under Two in one master making mode 2 sheets of original can be plated into one sheet of master which is for book making 1 2 1 4 3 2 45 3 4 Documents even number Printout1 Printout2...

Страница 48: ...ze of 2 sheets of original Under zoom rate other than 100 please pay attention on the following points Make sure after zooming the combined size of the 2 sheets of original is same as the copy paper s...

Страница 49: ...ngs Press Master making button to start master making 47 Indications If the printout is incorrect please check below The direction of original document Original size paper size and zoom rate Book mode...

Страница 50: ...er adjustment of book middle shadow Press cursor keys to adjust the book middle show as showed below Press Confirm button to confirm Indications Back to standard mode setting Press File Mode to Single...

Страница 51: ...peed printing position adjustment energy save password computer connecting and other functions Counter Display Function 50 Printing Speed Adjustment 51 Printing Position Adjustment 52 Power Save Funct...

Страница 52: ...f the machine is printing please press Stop button to stop printing 2 Keep press Stop button the total count of printing and master making will be displayed See following figure Total count 123 Total...

Страница 53: ...the printing speed to solve this problem Under high speed printing printout is light while under low speed printout is dark The printing speed adjustment is effectual during printing process Reduce t...

Страница 54: ...s The printing position is not adjustable during the printing process Printing Position Adjustment 1 Press and keys indicated by the arrow as showed in the picture 100 0 10 Indications Two ways of set...

Страница 55: ...ut the password 1234 Press Confirm button and the main display shows Ready Remark If the user wants to change the password press set button input new password and then press Confirm button Without any...

Страница 56: ...teps 1 7 the basic print process Pages 24 33 1 Plug the USB cable into the digital duplicator and the computer 2 Connect the USB cable 3 Operate the print command according to the computer operation s...

Страница 57: ...install the driven procedures according to the following steps Step 1 Plug the USB cable into the printer and the computer Then Turn on the printer Step 2 The following dialog box appears Then click N...

Страница 58: ...Check the second option Then click Next Step 4 The screen now displays Hardware Type Select Printer then click Next Step 5 The following dialog box appears 56...

Страница 59: ...Click Have Disk Step 6 The following dialog box appears Click Browse Step 7 Browse the path of the driver The screen displays like following Select the file RDPrinter1 1 inf then click Open 57...

Страница 60: ...Step 8 The following dialog box appears Click OK Step 9 The screen displays the Printer Name Select the proper printer and then click Next Step 10 The following dialog box may appears 58...

Страница 61: ...Click Yes to continue installing the driver Step 11 The following dialog box appears Click Next Step 12 The following dialog box may appears 59...

Страница 62: ...Click Yes to continue the installation Step 13 The following dialog box appears Click Finish to complete the driver installation 60...

Страница 63: ...tion system and please just follow In case the installation fails please enter the printers in the control board cancel RDPrinter1 1 click right key of the Mouse on the blank and enter the server attr...

Страница 64: ...5 Consumables Replacement This chapter describes how to replenish supplies and dispose of them regularly Ink Replacement 63 Master Replacement 65 Taking out Disposal Master 67 Printing Paper Replaceme...

Страница 65: ...ied to this machine Ink Replacement LCD displays Ink over when the ink in the cartridge is used out Please replace ink as follows Notes 1 Open front cover 2 Press down the drum lock switch 3 Take out...

Страница 66: ...be the U mouth on the drum Notes Don t keep the opening ink exposed in the air for long 5 Support and push in the ink holder and lock it tightly The air is not allowed to leak into the ink pump otherw...

Страница 67: ...Press down the scan lock lever and push the scan flat for BPS 201 Master Replacement When the master roll is near to the end LCD displays Master on Error or Master over Please replace the master as fo...

Страница 68: ...e the master roll bracket remove the old master roll Take out remaining master jammed in the thermal head 4 Please install the new master roll onto the master bracket and put it onto the plating machi...

Страница 69: ...back and forth in cutting Please do not touch paper cutting to avoid danger 7 Close the original paper receiving tray and scanning flat Notes Don t take out warning sticker on the cutter cover Moving...

Страница 70: ...up 3 Grasp both ends of roll core to take it out and remove the disposal master from roll core Notes There is ink on the roll core please take care of your clothing 4 Put the roll core into disposal m...

Страница 71: ...lease stop printing by pressing Stop button 2 Press down paper feeding tray switch lift down the feeding paper tray 3 Take out paper Notes Please take it out if paper is jamming on the feeding Roller...

Страница 72: ...r Rongda machines Check the following information and the related items before calling your authorized service department No Currency 72 Master Making Printing Error 73 LCD Display Error and Simple So...

Страница 73: ...r please check as follows Whether the machine is switched on Whether the machine is connceted to the power source No Yes Connect to the power source Whether the power is switched on No Yes Switch on t...

Страница 74: ...If the machine can not proceed with master making printing please check as follows Whether there is indication from the indicator light No Yes Contact the Service Dept Refer to the indicated error in...

Страница 75: ...e Service Dept Cutter Motor Error Contact the Service Dept Fan Motor Error Contact the Service Dept Master off Motor Error Check disposal master box feeding mouth jams or not if not contact Service De...

Страница 76: ...paper feed tray and remove the jam paper Middle Paper Jam Press down the jog switch and take out the jam paper Master on Error scan table and clear th Sundries in Feed Part Master over Install the new...

Страница 77: ...75 Placement of Drum Clear errors as follows 1 Open front cover 2 Open drum lock switch take out drum 3 Insert it again then press the lock switch 4 Close front cover...

Страница 78: ...ty for BPS 101 BPS 201 76 Please add paper as below 1 Place the paper onto the feed tray when feed tray elevator stops descending 2 Press Start key to stat printing paper feed tray elevator lifts auto...

Страница 79: ...eed tray lifts automatically BPS 101 BPS 201 3 1 77 Paper Jam Left Paper Jam Please take out paper as below 2 Take out jammed paper on the paper feed roller Right Paper Jam Please take out jam paper a...

Страница 80: ...roller when press microswitch Don t put your hand into machine while the machine is running avoiding hurting 4 Please take out that paper as press that drum switch remove that err Notes Don t make you...

Страница 81: ...below 1 Press disposal master box switch and open that box to max 2 Press drum micro switch and take out paper jammed 3 Keep pressing drum microswith until warning stops which indicates drum is back...

Страница 82: ...ands and clothing may get stained moreover the drum surface may get damaged and the printout quality might be affected Be careful to locate the drum and make sure to place it onto the level and steady...

Страница 83: ...e your cloth dirty 5 Clear the master manually rotate drum to its stop position and make sure the block in the groove 6 Hold the drum flatly insert it into the machine and press down the drum lock swi...

Страница 84: ...82 Master Load Error for BPS 101 Please clear error as below 1 Open original paper receive tray 2 Clear extra master 3 Close original paper receive tray 4 Press master making key and make master again...

Страница 85: ...83 Master Load Error BPS 201 Please clear error as below 1 Press scan lock lever and push scan table 2 Clear extra master 3 Close scan table 4 Press master making key and make master again...

Страница 86: ...4 Chapter 7 Specifications and Maintenance Specifications 86 Maintenance 87 Replace the Friction Pad 88 Replace the Paper Switch 89 Replace Clean the Paper Printing Roller 90 Replace the Soft Screen 9...

Страница 87: ...ight 40g 210g 11 Feed tray capacity MAX 950sheets70g 950sheets70g 12 Print speed 55 120ppm 5 selections 55 70 85 105 120 13 Regular Zoom Rate Selection 70 81 87 94 100 standard 115 122 141 14 Zoom Rat...

Страница 88: ...ress the elevator s microswitch and the paper feed tray descends Remove the bolt on the connect knot on the right end of the paper rollers shaft 2 Move the paper rollers shaft until the paper roller c...

Страница 89: ...ot on the right end of the paper rollers shaft 2 Move the paper rollers and the shaft take out the old friction pad and install a new one 3 The clearance between the paper separation base unit and the...

Страница 90: ...er a number of paper printed and needs to be replaced 1 Take out the drum open the disposal box and the white paper switch is showed 2 Disassemble the bolt on the paper switch and remove the paper swi...

Страница 91: ...ould be cleaned or replaced when the print paper sheets reach a certain amount 1 Open the front door take out drum and you will see the print roller inside 2 Take hold of the print roller and draw it...

Страница 92: ...upper frame of screen 2 Remove lower frame of screen 3 Take out the soft screen from the drum and then remove upper and lower frames of soft screen Insert new screen from the front side 4 Install new...

Отзывы: