background image

ENGLISH

USER MANUAL

20

909 6752 000(3)2010-03 A

BA 551 - BA 551D - BA 551CD - BA 611D

Working with brush/pad-holder extra pressure function turned on

If the 

fl

 oor proves to be particularly dif

fi

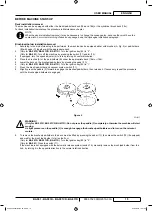
 cult to clean, it is possible to turn on the brush/pad-holder extra pressure function by 

pressing the pedal (11) to position (11c).

CAUTION!

When the cylindrical brush deck (18c) is installed, the extra pressure function is not enabled.

CAUTION!

In case of brush/pad-holder motor overload, due to foreign bodies which prevent them from turning, or to 
excessively aggressive 

fl

 oors/brushes, the safety system stops the motor after about one minute of continuous 

overload. 
The overload is shown by the three warning lights (81a, 81b, 81c) 

fl

 ashing simultaneously.

If the overload takes place when the extra pressure function is on (11c), press the pedal to position (11b). If the 
overload persists, the brush/pad-holder stops.
To start scrubbing again after a brush/pad-holder stop due to overload, stop the machine by turning the ignition 
key (80) to “0”. Turn on the machine by turning the ignition key (80) to “I”.

Battery discharge during operation

Until the green warning light (81a) stays on, the batteries allow the machine to work normally.
When the green warning light (81a) turns off, and the yellow warning light (81b) turns on, it is advisable to charge the batteries, 
because the residual autonomy will last for a few minutes (depending on battery characteristics and work to be performed).
When the red warning light (81c) turns on, the autonomy is over. After a few seconds, the brush/pad-holder is automatically tuned 
off, while the vacuum system and (only for 

BA 551D

BA 551CD

BA 611D

) the drive system stay on, to 

fi

 nish drying the 

fl

 oor and 

drive the machine to the appointed recharging area.

CAUTION!

Do not use the machine with discharged batteries, to avoid damaging the batteries and reducing the battery life.

TANK EMPTYING

An automatic 

fl

 oat shut-off system (36) turns off the vacuum system when the recovery tank (21) is full.

The vacuum system deactivation is signalled by a sudden increase in the vacuum system motor noise frequency, and the 

fl

 oor is 

not dried.

CAUTION!

If the vacuum system turns off accidentally (for example, when the 

fl

 oat is activated because of a sudden 

machine movement), to resume the operation: turn off the vacuum system by pressing the switch (73), then 
open the cover (22) and check that the 

fl

 oat inside the grid (36) has gone down to the water level. Then close the 

cover (22) and turn on the vacuum system by pressing the switch (73).

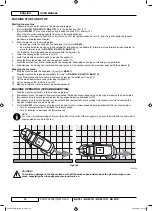
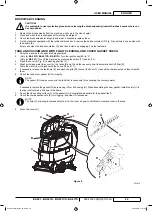
When the recovery tank (21) is full, empty it according to the following procedure.

Recovery tank emptying

Stop the machine.

1. 

Lift the brush/pad-holder deck by pressing the pedal (11).

2. 

Lift the squeegee (25) with the lever (10).

3. 

Drive the machine to the appointed disposal area.

4. 

Empty the recovery tank with the hose (16). Then, rinse the tank with clean water.

5. 

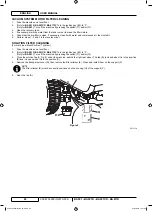
Solution/clean water tank emptying

Perform steps 1 to 4.

6. 

Empty the solution tank with the hose (17). Then, rinse the tank with clean water.

7. 

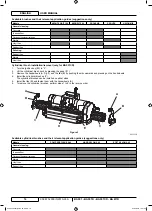
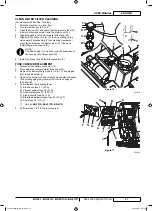
Cylindrical brush debris container emptying (only for cylindrical brush deck)

Stop the machine.

8. 

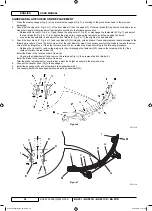
Lower the cylindrical brush deck and remove the debris container (D, Fig. 3) by pulling it on one side with the handle (E).

9. 

Empty and wash the debris container (D), and then install it by engaging it on the fasteners.

10. 

909 6752 000(3)2010-03 A.indb   20

909 6752 000(3)2010-03 A.indb   20

04/03/2010   15.01.27

04/03/2010   15.01.27

Содержание BA 551

Страница 1: ...6752 000 Edition 3 2010 03 Printed in Hungary BETRIEBSANLEITUNG ORIGINALANLEITUNG MANUEL D UTILISATION INSTRUCTIONS D ORIGINE USER MANUAL ORIGINAL INSTRUCTION GEBRUIKSAANWIJZING ORIGINELE INSTRUCTIES...

Страница 2: ...et de volgende richtlijnen en standaards A presente assinatura serve para declarar que os modelos supramencionados s o produtos em conformidade com as seguintes directivas e normas Ni ej podpisany za...

Страница 3: ...BATTERIEEINBAU UND EINSTELLUNG DES BATTERIETYPS WET ODER GEL 14 VOR DEM EINSCHALTEN DES GER TS 15 GER T EINSCHALTEN UND ABSTELLEN 18 GER T IN BETRIEB WASCHEN TROCKNEN 18 TANKS ENTLEEREN 20 NACH DER GE...

Страница 4: ...onen d rfen keine technischem Fachpersonal vorbehaltenen Arbeiten ausf hren Nilfisk haftet nicht f r Sch den die durch Nichteinhaltung dieses Verbots verursacht werden AUFBEWAHRUNG DER BETRIEBSANLEITU...

Страница 5: ...maten wurden f r die Reinigung Waschen und Trocknen von glatten und festen Fu b den im privaten und industriellen Bereich und die Bedienung durch Fachpersonal entwickelt und nach erfolgter Sicherheits...

Страница 6: ...artenwechsel Batterie trennen und Z ndschl ssel abziehen Dieses Ger t darf nur von angemessen geschulten Personen verwendet werden Die Ger tebedienung durch Kinder und Behinderte ist verboten Die Batt...

Страница 7: ...llen Getr nkehalter benutzen Das Ger t nur bei Temperaturen zwischen 0 C und 40 C verwenden Die Lagertemperatur des Ger ts muss zwischen 0 C und 40 C liegen Die Luftfeuchtigkeit muss zwischen 30 und 9...

Страница 8: ...enhalter optional 24 Sauglippe 25 Sterngriffe Sauglippenbefestigung 26 Sterngriff Sauglippeneinstellung 27 Sterngriff geradliniger Ger tevorschub 28 Sterngriff Ger tevorschubgeschwindigkeit 29 Schmutz...

Страница 9: ...a 14 22 24 23 1 2 3 4 5 6 7 8 10 9 11c 11b 11a 11 16 17 54 55 13 26 15 12 25 27 26 19b 18c 39 30b 38 37 35 36 34 31 32 33 30a 46 53 52 18b 19a 47 58 43 42 40 41 48 44 45 47 46 50 51 49 57 48 45 S31131...

Страница 10: ...sungsflusses 82 Schalter Waschwassermenge erh hen 82a Schalter Waschwassermenge verringern 82b Balkenanzeige Reinigungsl sungsfluss 82c Schalter EcoFlex 83 LED Schalter EcoFlex 84 LED leuchtet EcoFle...

Страница 11: ...BA 551 1 B rste Padhal ter ohne Antriebs anlage BA 551D 1 B rste Padhal ter mit Antriebs anlage BA 551CD 2 Zylinderb rsten mit Antriebsan lage BA 611D 2 B rsten Padhal ter mit Antriebs anlage Ger teh...

Страница 12: ...B rstenmotor 480 W 350 W B rstendrehzahl 153 U min 230 U min Anpressdruck Tellerb rste Padhalter bei ausgeschaltetem Extra Anpressdruck 20 5 kg Anpressdruck Tellerb rste Padhalter bei eingeschaltetem...

Страница 13: ...en ES2 Relais Ansauganlage EV1 Elektroventil Wasser F1 Sicherung B rstenkopf F2 Sicherung Ansauganlage F4 Sicherung Signalleitungen HM Stundenz hler optional M1 B rsten Padhaltermotor M2 Ansauganlagen...

Страница 14: ...nalleitungen F5 Sicherung B rsten Padhalter l sen F6 Sicherung Pumpen HM Stundenz hler optional K1 Z ndschl ssel M1 B rsten Padhaltermotor M2 Ansauganlagenmotor M3 Antriebsanlagenmotor M4 Wasserpumpe...

Страница 15: ...Leuchtet die gelbe 81b oder die rote Kontrollleuchte 81c auf m ssen die Batterien geladen werden siehe Kapitel Wartung In das Ger t eingebaute aber trockene Batterien WET d h Batterien ohne Elektrolyt...

Страница 16: ...lgendes berpr fen 1 Leuchtet die gr ne Kontrollleuchte 81a auf ist das Ger t auf GEL eingestellt Leuchtet die rote Kontrollleuchte 81c auf ist das Ger t auf WET eingestellt Muss die Einstellung ge nde...

Страница 17: ...B unter dem betreffenden Kopf an 18a o 18b positionieren 4 Den Kopf auf die B rste Padhalter mittels des Pedals 11 senken 5 Nur f r 6 BA 551D BA 551CD BA 611D Den Z ndschl ssel 80 auf I stellen Schalt...

Страница 18: ...A Abb 3 mit Kraft nach unten dr cken und Handr der und Klappen B entfernen 3 Die Zylinderb rsten C einf gen 4 Die Zylinderb rsten k nnen von beiden Seite eingeschoben werden Abdeckungen B montieren u...

Страница 19: ...gungsl sung stets die auf dem Etikett des verwendeten chemischen Produkts angegebenen Verd nnungshinweise beachten Die Temperatur der Reinigungsl sung darf 40 C nicht berschreiten HINWEIS Nur f r das...

Страница 20: ...r f r 9 BA 551 Bedienpult 3 loslassen und Ger t abstellen nur f r BA 551D BA 551CD BA 611D Schalter 71 und 73 bet tigen und B rsten und Ansauganlage ausschalten 10 Die B rsten Padhalterkopf mittels de...

Страница 21: ...n chsten auf der Anzeige C angegebenen Konzentration zu 3 gelangen Schalter sooft bet tigen bis die gew nschte Einstellung erreicht ist Warten bis die LED B aufh rt zu blinken Die neue Konzentration i...

Страница 22: ...BA 611D die Antriebsanlage in Betrieb damit noch feuchte Fu bodenabschnitte gegebenenfalls getrocknet und das Ger t zum Aufladen der Batterien gebracht werden kann HINWEIS Um die Batterien nicht zu be...

Страница 23: ...ten Batterien durchzuf hren Lesen Sie weiterhin sorgf ltig alle Anweisungen aus dem Kapitel Sicherheit bevor die Wartungsbearbeitungen auszuf hren Alle planm igen und au erordentlichen Wartungsarbeite...

Страница 24: ...r 16 1 entleeren Das Ger t in Batterieladebereich schieben 2 Nur f r 3 BA 551D BA 551CD BA 611D Den Z ndschl ssel 80 auf 0 stellen Nur f r BA 551 Schalter 71 und oder 73 bet tigen und Ger t abschalten...

Страница 25: ...anzahl der Betriebsstunden des Ger ts Waschen 2 Trocknen ablesen Den Schalter 73 wieder dr cken 3 Nur f r 4 BA 551D BA 551CD BA 611D Z ndschl ssel 80 in Stellung 0 drehen SAUGLIPPE REINIGEN ANMERKUNG...

Страница 26: ...r Risse 3 aufweisen ansonsten sie aus wie nachfolgend beschrieben wechseln berpr fen ob die Vorderkante J des hinteren Gummis verschlissen ist Gegebenenfalls Gummi umdrehen und eine der drei unversehr...

Страница 27: ...aschposition L bringen 3 Den Deckel A die Tanks B und C und das Ansauggitter mit automatischem Schwimmverschluss D mit klarem Wasser 4 reinigen und waschen Das Wasser aus den Tanks mit den R hren 16 u...

Страница 28: ...UNGSL SUNGSFILTER REINIGEN F r Ger te ohne EcoFlex Das Ger t auf ebenem Untergrund abstellen 1 Nur f r 2 BA 551D BA 551CD BA 611D Den Z ndschl ssel 80 auf 0 stellen Nur f r BA 551 Schalter 71 und oder...

Страница 29: ...ergruppe F wieder anbringen 6 SICHERUNGEN BERPR FEN AUSTAUSCHEN Batteriestecker 12 trennen 1 Schmutzwasserablassrohr 16 verschieben 2 Falls erforderlich das Kabel des Ladeger tes I Abb 11 3 vom Halter...

Страница 30: ...Padhalter wie es im entsprechenden Abschnitt beschrieben ist ausbauen Die Zylinderb rsten nicht entfernen 2 Den B rsten Padhalterkopf mittels des Pedals 11 senken 3 Falls vorhanden die Splinten B Abb...

Страница 31: ...alten 3 Schalter 77 bet tigen berpr fen ob die Kontrollleuchte 78 des Schalters aufleuchtet 4 Die Schalter 77 und 82a gleichzeitig dr cken bis dass die Kontrollleuchte 78 des Schalters zu blinken anf...

Страница 32: ...n oder die Dichtung ersetzen Es flie t zu wenig Reinigungsl sung zur B rste Reinigungsl sungs Frischwasserfilter verschmutzt Den Filter reinigen Tank schmutzig Verstopfung der Ablass ffnung Den Tank r...

Страница 33: ...U GEL 14 AVANT LA MISE EN MARCHE DE LA MACHINE 15 MISE EN MARCHE ET ARRET DE LA MACHINE 18 MACHINE AU TRAVAIL LAVAGE SECHAGE 18 VIDANGE DES RESERVOIRS 20 APRES L UTILISATION DE LA MACHINE 21 INACTIVIT...

Страница 34: ...rateurs ne doivent pas ex cuter les op rations r serv es aux techniciens qualifi s Nilfisk ne r pond pas des dommages dus l inobservance de cette interdiction CONSERVATION DU MANUEL Le Manuel op rateu...

Страница 35: ...ONNELLES Les autolaveuses sont con ues et fabriqu es pour le nettoyage lavage et s chage de sols lisses et solides en milieux civils et industriels en conditions de compl te s curit par un op rateur q...

Страница 36: ...s e uniquement par le personnel ad quatement form L utilisation de la machine est interdite aux enfants et aux personnes handicap es Tenir les tincelles les flammes et les mat riaux incandescents loig...

Страница 37: ...conteneurs de liquides sur la machine utiliser le porte boissons pr vu a cet effet La temp rature de travail de la machine doit tre comprise entre 0 C et 40 C La temp rature de stockage de la machine...

Страница 38: ...de r cup ration 22 Porte objets 23 Elastique porte documents optionnel 24 Embouchure 25 Boutons de fixation embouchure 26 Bouton de r glage embouchure 27 Bouton de r glage avance rectilin aire machin...

Страница 39: ...a 14 22 24 23 1 2 3 4 5 6 7 8 10 9 11c 11b 11a 11 16 17 54 55 13 26 15 12 25 27 26 19b 18c 39 30b 38 37 35 36 34 31 32 33 30a 46 53 52 18b 19a 47 58 43 42 40 41 48 44 45 47 46 50 51 49 57 48 45 S31131...

Страница 40: ...ge 81c Boutons poussoirs de r glage flux de solution 82 Bouton poussoir d augmentation flux 82a Bouton poussoir de r duction flux 82b Barre de visualisation flux de solution 82c Bouton poussoir syst m...

Страница 41: ...de traction BA 551D 1 brosse plateau support disque avec syst me de traction BA 551CD 2 brosses cylindri ques avec sys t me de traction BA 611D 2 brosses plateaux support disque avec sys t me de trac...

Страница 42: ...ance moteur brosse 480 W 350 W Vitesse de rotation brosses 153 tr mn 230 tr mn Pression brosse plateau support disque avec extra pression d sactiv e 20 5 kg Pression brosse plateau support disque avec...

Страница 43: ...ES2 Relais syst me d aspiration EV1 Electrovanne eau F1 Fusible t te F2 Fusible syst me d aspiration F4 Fusible circuits de signaux HM Compteur horaire optionnel M1 Moteur brosse plateau support disqu...

Страница 44: ...F5 Fusible d clenchement brosses plateaux support disque F6 Fusible pompes HM Compteur horaire optionnel K1 Cl de contact M1 Moteur brosse plateau support disque M2 Moteur syst me d aspiration M3 Mot...

Страница 45: ...t pr tes l utilisation Si les t moins lumineux jaune 81b ou rouge 81c s allument il est n cessaire de charger les batteries voir proc dure au chapitre Entretien Batteries WET install es sur la machine...

Страница 46: ...e la machine si le t moin lumineux vert 81a clignote la machine est configur e sur GEL si le t moin lumineux rouge 81c clignote la machine est configur e sur WET S il est n cessaire de changer la conf...

Страница 47: ...les brosses plateaux support disque en appuyant sur la p dale 11 5 Uniquement pour 6 BA 551D BA 551CD BA 611D positionner la cl de contact 80 sur I Appuyer sur le bouton poussoir de rotation brosses p...

Страница 48: ...oser les boutons A Fig 3 et les portillons B en les poussant vers le bas en exer ant une pression sur les boutons 3 Ins rer les brosses cylindriques C 4 Les brosses cylindriques peuvent tre install es...

Страница 49: ...it chimique utilis pour la solution La temp rature de la solution ne doit jamais tre sup rieure 40 C AVERTISSEMENT Utiliser exclusivement des d tergents liquides peu mousseux et non inflammables ad qu...

Страница 50: ...du guidon 2 seulement pour autolaveuses 9 BA 551 Arr ter la machine en rel chant le panneau 3 uniquement pour BA 551D BA 551CD BA 611D Arr ter les brosses et le syst me d aspiration en appuyant sur le...

Страница 51: ...passer au niveau successif 3 indiqu par l afficheur C r p ter la proc dure jusqu atteindre le niveau d sir Attendre jusqu ce que le DEL B arr te de clignoter la configuration du nouveau niveau est ter...

Страница 52: ...A 611D restent en fonction pour permettre d essuyer des endroits ventuels de sol mouill et d amener la machine dans le lieu de rechargement AVERTISSEMENT Ne pas insister utiliser la machine avec les b...

Страница 53: ...es d branch es En outre lire attentivement toutes les instructions du chapitre S curit avant d effectuer toute op ration d entretien Toutes les op rations d entretien programm ou extraordinaire doiven...

Страница 54: ...orter la machine dans la zone destin e au chargement des batteries 2 Uniquement pour 3 BA 551D BA 551CD BA 611D positionner la cl de contact 80 sur 0 Seulement pour autolaveuses BA 551 appuyer sur les...

Страница 55: ...de contact 80 sur I Appuyer sur l interrupteur 73 et lire sur le compteur horaire 79 le num ro total des heures de travail lavage s chage 2 effectu es par la machine Appuyer nouveau sur l interrupteur...

Страница 56: ...ent pas de coupures ou d chirures en cas contraire les remplacer en proc dant comme suit Contr ler que l ar te J de la lamelle en caoutchouc arri re n est pas us e en cas contraire tourner la lamelle...

Страница 57: ...ine Ouvrir le couvercle A Fig 8 et le porter dans la position de lavage L 3 Nettoyer et laver l eau propre le couvercle A les r servoirs B et C et la grille d aspiration avec fermeture automatique 4 f...

Страница 58: ...FILTRE DE LA SOLUTION Pour machines sans syst me EcoFlex Porter la machine sur un sol plat 1 Uniquement pour 2 BA 551D BA 551CD BA 611D positionner la cl de contact 80 sur 0 Seulement pour autolaveuse...

Страница 59: ...le tuyau A et le filtre F 6 CONTROLE REMPLACEMENT DES FUSIBLES D brancher le connecteur 12 des batteries 1 D placer le tuyau de vidange de l eau de r cup ration 2 16 Si quip d poser le c ble I Fig 11...

Страница 60: ...sses plateaux support disque en proc dant comme indiqu au paragraphe sp cifique Ne pas d poser les 2 brosses cylindriques Baisser la t te porte brosses plateaux support disque en appuyant sur la p dal...

Страница 61: ...tion I 3 Appuyer sur le bouton poussoir 77 Contr ler que le t moin lumineux 78 du bouton poussoir s allume 4 Appuyer en m me temps sur les boutons poussoirs 77 et 82a jusqu ce que le t moin lumineux 7...

Страница 62: ...nt le couvercle ou remplacer le joint Flux de solution la brosse insuffisant Filtre de la solution de l eau propre sale Nettoyer le filtre R servoir sale orifice de sortie obstru Nettoyer R servoir sy...

Страница 63: ...ON A NEW MACHINE 13 BATTERY INSTALLATION AND BATTERY TYPE SETTING WET OR GEL 14 BEFORE MACHINE START UP 15 MACHINE START AND STOP 18 MACHINE OPERATION SCRUBBING DRYING 18 TANK EMPTYING 20 AFTER USING...

Страница 64: ...eserved for qualified technicians Nilfisk will not be answerable for damages coming from the non observance of this prohibition HOW TO KEEP THIS MANUAL The User Manual must be kept near the machine in...

Страница 65: ...ION CAPABILITIES These scrubber dryers are used to clean scrubbing and drying smooth and solid floors in civil or industrial environment under safe operation conditions by a qualified operator The scr...

Страница 66: ...tery connector and remove the ignition key This machine must be used by properly trained operators only Children or disabled people cannot use this machine Keep the battery away from sparks flames and...

Страница 67: ...o not lean liquid containers on the machine use the relevant can holder The machine working temperature must be between 0 C and 40 C The machine storage temperature must be between 0 C and 40 C The hu...

Страница 68: ...der 23 Document fastener optional 24 Squeegee 25 Squeegee mounting handwheels 26 Squeegee adjusting handwheel 27 Machine straight forward movement adjusting handwheel 28 Machine forward speed adjustin...

Страница 69: ...4 22 24 23 1 2 3 4 5 6 7 8 10 9 11c 11b 11a 11 16 17 54 55 13 26 15 12 25 27 26 19b 18c 39 30b 38 37 35 36 34 31 32 33 30a 46 53 52 18b 19a 47 58 43 42 40 41 48 44 45 47 46 50 51 49 57 48 45 S311310 9...

Страница 70: ...2b Solution flow indicator 82c EcoFlex system switch 83 EcoFlex system switch led indicator 84 Led ON EcoFlex system ON Led flashing EcoFlex system override Detergent concentration level display 85 On...

Страница 71: ...brush pad holder with drive system BA 551CD 2 cylindrical brushes with drive system BA 611D 2 brushes pad holders with drive system Machine height 1 088 mm Solution clean water tank capacity 58 litre...

Страница 72: ...h motor power 480 W 350 W Brush speed 153 rpm 230 rpm Brush pad holder pressure with extra pressure function turned off 20 5 kg Brush pad holder pressure with extra pressure function turned on 27 8 kg...

Страница 73: ...omagnetic switches ES2 Vacuum system relay EV1 Water solenoid valve F1 Deck fuse F2 Vacuum system fuse F4 Signal circuit fuse HM Hour counter optional M1 Brush pad holder motor M2 Vacuum system motor...

Страница 74: ...se F4 Signal circuit fuse F5 Brush pad holder release fuse F6 Pump fuse HM Hour counter optional K1 Ignition key M1 Brush pad holder motor M2 Vacuum system motor M3 Drive system motor M4 Water pump op...

Страница 75: ...on the batteries are ready to be used If the yellow or red warning light 81b or 81c turns on the batteries must be charged see the procedure in Maintenance chapter Batteries WET installed on the mach...

Страница 76: ...of machine operation 1 If the green warning light 81a is flashing the machine is set to GEL If the red warning light 81c is flashing the machine is set to WET If the setting is to be changed perform t...

Страница 77: ...ate deck 18a or 18b 4 Lower the deck on the brushes pad holders by pressing the pedal 11 5 Only for 6 BA 551D BA 551CD BA 611D Turn the ignition key 80 to I Press the brush pad holder and vacuum syste...

Страница 78: ...e the handwheels A Fig 3 and the lids B by pushing them downwards and pressing on the handwheels 3 Install the cylindrical brushes C 4 The cylindrical brushes can be installed on either sides Install...

Страница 79: ...follow the dilution instructions on the label of the chemical product used to prepare the solution The solution temperature must not exceed 40 C CAUTION Use only low foam and non flammable detergents...

Страница 80: ...machine with the handlebar 2 only for 9 BA 551 Stop the machine by releasing the paddle 3 only for BA 551D BA 551CD BA 611D Turn off the brushes and the vacuum system by pressing the switches 71 and 7...

Страница 81: ...y to go to the next level shown by the display C repeat the operation until the 3 desired setting is reached Wait until the led indicator B stops flashing the new level is now set 4 NOTE Detergent per...

Страница 82: ...ly for BA 551D BA 551CD BA 611D the drive system stay on to finish drying the floor and drive the machine to the appointed recharging area CAUTION Do not use the machine with discharged batteries to a...

Страница 83: ...The procedures must be performed with the machine off and the battery disconnected Moreover read carefully the instructions in the Safety chapter before performing any maintenance procedure All schedu...

Страница 84: ...e drain hose 16 1 Drive the machine to the appointed recharging area 2 Only for 3 BA 551D BA 551CD BA 611D Turn the ignition key 80 to 0 Only for BA 551 Turn off the machine by pressing the switch 71...

Страница 85: ...51CD BA 611D Turn the ignition key 80 to I Press the switch 73 and read on the hour counter 79 the total number of working hours scrubbing drying performed by the 2 machine Press the switch 73 again 3...

Страница 86: ...ssary replace them according to the 3 following procedure Check the front corner J of the rear blade for wear if necessary overturn the blade to replace the worn corner with an integral one If the oth...

Страница 87: ...71 and or 73 Open the cover A Fig 8 to washing position L 3 Wash with clean water the cover A the tanks B and C and the vacuum grid with automatic shut off float D 4 Drain the water from the tanks wit...

Страница 88: ...ION FILTER CLEANING For machine without EcoFlex system Drive the machine on a level floor 1 Only for 2 BA 551D BA 551CD BA 611D Turn the ignition key 80 to 0 Only for BA 551 Turn off the machine by pr...

Страница 89: ...e support D Install the hoses A and the filter assembly F 6 FUSE CHECK REPLACEMENT Disconnect the battery connector 12 1 Move aside the recovery water drain hose 16 2 Remove the battery charger cable...

Страница 90: ...olders according to the procedure shown in the relevant paragraph Do not remove the cylindrical 2 brushes Lower the brush pad holder deck by pressing the pedal 11 3 If equipped remove the cotter pins...

Страница 91: ...machine by turning the ignition key 80 to I 3 Press the switch 77 Check that the switch warning light 78 turns on 4 Press the switches 77 and 82a at the same time until the switch warning light 78 st...

Страница 92: ...squeegee The tank cover is not properly closed or the gasket is damaged Close the cover properly or replace the gasket The solution flow is insufficient The solution clean water filter is dirty Clean...

Страница 93: ...EREN EN HET TYPE ACCU INSTELLEN WET OF GEL 14 VOOR HET STARTEN VAN DE MACHINE 15 DE MACHINE STARTEN EN STOPPEN 18 MACHINE IN GEBRUIK WASSEN DROGEN 18 DE TANKS LEGEN 20 NA GEBRUIK VAN DE MACHINE 21 LAN...

Страница 94: ...lingen uitvoeren die alleen door bevoegde monteurs uitgevoerd mogen worden Nilfisk is niet verantwoordelijk voor schade die is ontstaan uit het negeren van dit verbod OPBERGEN VAN DE HANDLEIDING De in...

Страница 95: ...keurd en uitgevoerd door Nilfisk BEDRIJFSCAPACITEIT Deze schrobmachines zijn ontwikkeld en gebouwd voor het reinigen wassen en drogen van gladde en solide vloeren in openbare en bedrijfsruimten onder...

Страница 96: ...moet de contactsleutel worden verwijderd Deze machine mag alleen worden gebruikt door personen die op de juiste manier zijn ge nstrueerd over het gebruik ervan De machine mag niet worden gebruikt door...

Страница 97: ...de kans bestaat dat er voorwerpen kunnen omvallen Zet geen vloeistoffen op de machine gebruik de beker en blikjeshouder De temperatuur moet bij gebruik van de machine tussen de 0 C en 40 C liggen De t...

Страница 98: ...documentenvakje optioneel 24 Trekker 25 Bevestigingswieltjes trekker 26 Stelwieltje van de trekker 27 Wiel voor regeling van recht naar voren bewegen machine 28 Wiel voor regeling voorwaartse snelheid...

Страница 99: ...19a 14 22 24 23 1 2 3 4 5 6 7 8 10 9 11c 11b 11a 11 16 17 54 55 13 26 15 12 25 27 26 19b 18c 39 30b 38 37 35 36 34 31 32 33 30a 46 53 52 18b 19a 47 58 43 42 40 41 48 44 45 47 46 50 51 49 57 48 45 S311...

Страница 100: ...evoer reinigingsmiddel 82 Schakelaar voor toenemen toevoer 82a Schakelaar voor afnemen toevoer 82b Indicator voor toevoer reinigingsmiddel 82c Schakelaar EcoFlex systeem 83 Led lampje schakelaar EcoFl...

Страница 101: ...551D 1 borstel padhou der met aandrijf systeem BA 551CD 2 cilindrische borstels met aandrijfsysteem BA 611D 2 borstels padhouder met aandrijfsysteem Hoogte machine 1 088 mm Capaciteit van tank met re...

Страница 102: ...W Draaisnelheid van borstels 153 toeren min 230 toeren min Druk van schijfborstel padhouder met extra druk uitgeschakeld 20 5 kg Druk van schijfborstel padhouder met extra druk ingeschakeld 27 8 kg Te...

Страница 103: ...n borstels ES2 Relais aanzuigsysteem EV1 Magneetklep water F1 Zekering schrobdek F2 Zekering aanzuigsysteem F4 Zekering signaleringscircuit HM Urenteller optioneel M1 Motor borstel padhouder M2 Motor...

Страница 104: ...ing signaleringscircuit F5 Zekering ontkoppeling borstels padhouder F6 Zekering pompen HM Urenteller optioneel K1 Contactsleutel M1 Motor borstel padhouder M2 Motor aanzuigsysteem M3 Motor aandrijfsys...

Страница 105: ...den zijn de accu s klaar voor gebruik Als het gele 81b of het rode lampje 81c gaat branden moeten de accu s worden opgeladen zie de procedure in het hoofdstuk Onderhoud De accu s WET zijn op de machin...

Страница 106: ...g treden van de machine gebeurt 1 Als het groene lampje 81a knippert is de machine ingesteld op GEL Als het rode lampje 81c knippert is de machine ingesteld op WET Als de instelling moet worden gewijz...

Страница 107: ...e schrobdek 18a of 18b 4 Breng het schrobdek op de borstels padhouder omlaag door het pedaal 11 in te drukken 5 Alleen voor 6 BA 551D BA 551CD BA 611D zet de contactsleutel 80 in de stand I Druk op de...

Страница 108: ...1 in te drukken 2 Verwijder de wieltjes A Afb 3 en de klepjes B door deze omlaag te drukken en druk uit te oefenen op de wieltjes 3 Steek de cilindrische borstels C naar binnen 4 De cilindrische borst...

Страница 109: ...het label van het chemische product van het reinigingsmiddel staan De temperatuur van het reinigingsmiddel mag niet hoger zijn dan 40 C WAARSCHUWING Gebruik alleen vloeibare reinigingsmiddelen die wei...

Страница 110: ...ppen Stop de machine met het stuur 2 alleen voor 9 BA 551 Stop de machine door het paneel 3 los te laten alleen voor BA 551D BA 551CD BA 611D Stop de borstels en het aanzuigsysteem door de schakelaars...

Страница 111: ...rt 2 Laat de schakelaar A los Houd deze opnieuw kort ingedrukt om naar het volgende niveau op het display C te gaan 3 herhaal de handeling totdat u de gewenste instelling bereikt Wacht totdat het led...

Страница 112: ...nen worden gedroogd en de machine naar een plaats kan worden gebracht waar de accu s kunnen worden opgeladen WAARSCHUWING Als de accu s bijna leeg zijn mag u niet door blijven werken om schade aan de...

Страница 113: ...pelde accu s Lees echter eerst aandachtig de instructies in het hoofdstuk Veiligheid door voordat u de onderhoudswerkzaamheden uitvoert Alle regelmatige of buitengewone onderhoudswerkzaamheden moeten...

Страница 114: ...g is Leeg deze anders met de aftapslang 16 1 Zet de machine op een plaats waar de accu s kunnen worden opgeladen 2 Alleen voor 3 BA 551D BA 551CD BA 611D zet de contactsleutel 80 in de stand 0 Alleen...

Страница 115: ...tand I Druk op de schakelaar 73 en lees op de urenteller 79 het totaal aantal bedrijfsuren reinigen drogen af dat door de 2 machine is uitgevoerd Druk nog een keer op de schakelaar 73 3 Alleen voor 4...

Страница 116: ...e worden vervangen Dat doet u als volgt Controleer ook of de voorste rand J van de achterste rubber niet is versleten Als dat wel het geval is kan de rubber zelf kapot gaan Vervang deze door een van d...

Страница 117: ...t te schakelen Open de afdekking A Afb 8 in de stand voor spoelen L 3 Reinig en spoel de afdekking A de tanks B en C en het aanzuigrooster met automatische sluiting met vlotter D met 4 schoon water Ve...

Страница 118: ...SMIDDEL Voor machines zonder EcoFlex systeem Zet de machine op een vlakke ondergrond 1 Alleen voor 2 BA 551D BA 551CD BA 611D zet de contactsleutel 80 in de stand 0 Alleen voor BA 551 druk op de schak...

Страница 119: ...eenheid F terug 6 CONTROLE VERVANGING VAN DE ZEKERINGEN Ontkoppel de stekker van de accu s 12 1 Verplaats de aftapslang van het vuile water 16 2 Verwijder waar van toepassing de kabel van de acculader...

Страница 120: ...borstels padhouders zoals in het betreffende deel wordt uitgelegd Verwijder de cilindrische borstels niet 2 Breng het schrobdek met de borstelhouder padhouder omlaag door het pedaal 11 in te drukken 3...

Страница 121: ...tsleutel 80 op I te zetten 3 Druk op de schakelaar 77 Controleer of het lampje 78 op de schakelaar brandt 4 Druk gelijktijdig de schakelaars 77 en 82a in totdat het lampje 78 van de schakelaar begint...

Страница 122: ...rvang de pakking Onvoldoende toevoer van reinigingsmiddel naar de borstel Filter voor reinigingsoplossing schoon water vuil Reinig het filter Tank vuil uitlaatopening verstopt Reinig Tank voor EcoFlex...

Страница 123: ...909 6752 000 3 2010 03 A indb 1 909 6752 000 3 2010 03 A indb 1 04 03 2010 15 01 45 04 03 2010 15 01 45...

Страница 124: ...rati 16 18 20121 Milano Administrative office Strada Comunale della Braglia n 18 26862 Guardamiglio Lodi Phone 39 0377 451124 Fax 39 0377 51443 www nilfisk com 909 6752 000 3 2010 03 A indb 2 909 6752...

Отзывы: