FORM NO. 56041431 / GW 4512, GW 6016 -
4
120VAC GROUNDING INSTRUCTIONS
This appliance must be grounded. If it should electrically malfunction, grounding provides a path of least resistance for electric current to reduce the risk of electric
shock. This appliance is equipped with a cord having an equipment-grounding conductor and grounding plug. The plug must be plugged into an appropriate outlet
that is properly installed and grounded in accordance with all local codes and ordinances.
DANGER!
Improper connection of the equipment-grounding conductor can result in a risk of electric shock. Check with a qualified electrician or
service person if you are in doubt as to whether the outlet is properly grounded. Do not modify the plug provided with the appliance.
If it will not fit the outlet, have a proper outlet installed by a qualified electrician.
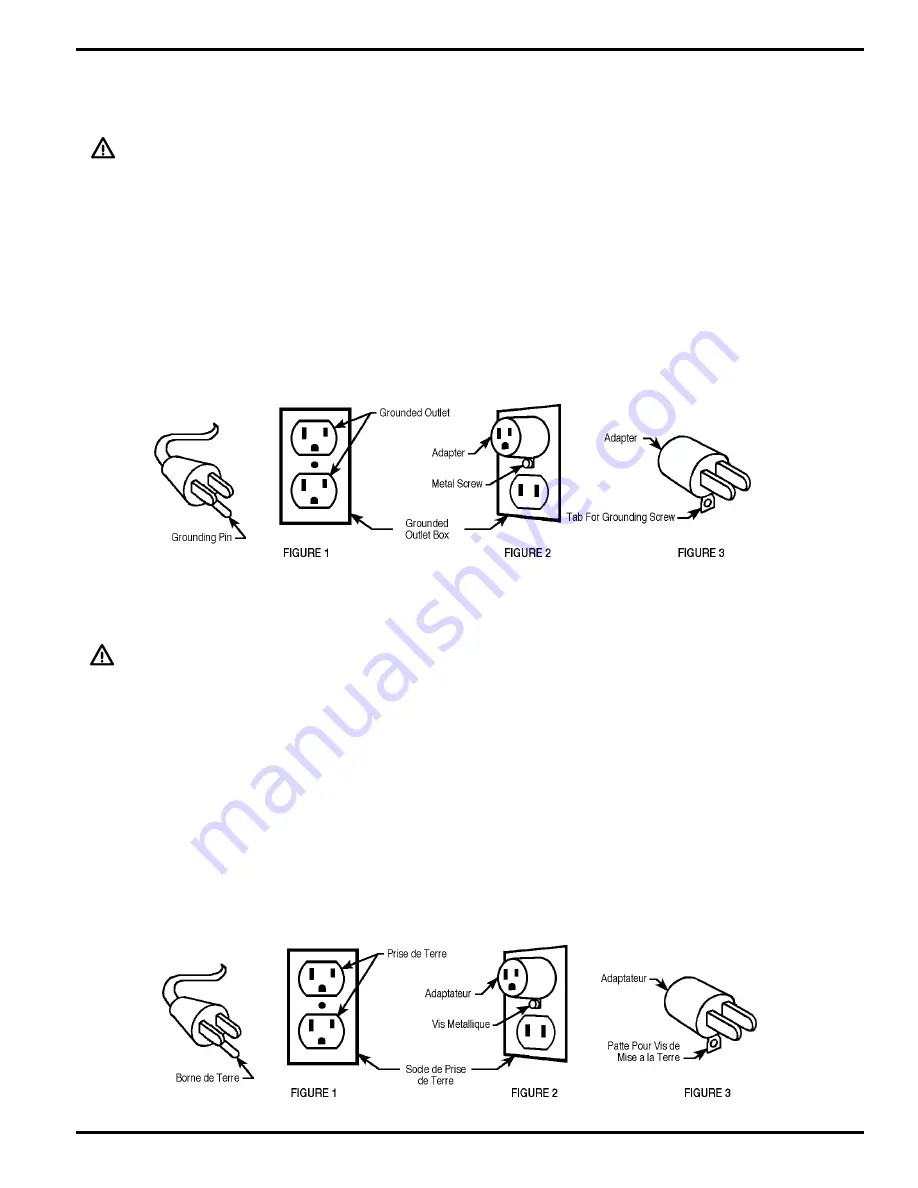
This appliance is for use on a nominal 120-volt circuit, and has a grounding plug that looks like the plug illustrated in Figure 1 below. A temporary adapter illustrated
in Figures 2 and 3 may be used to connect this plug to a 2-pole receptacle as shown in Figure 2 if a properly grounded outlet is not available. The temporary adapter
should be used only until a properly grounded outlet (Figure 1) can be installed by a qualified electrician. The green-colored rigid ear, tab, or the like extending from
the adapter must be connected to a permanent ground such as a properly grounded outlet box cover. Whenever the adapter is used, it must be held in place by a
metal screw. Grounding adapters are not approved for use in Canada.
Replace the plug if the grounding pin is damaged or broken.
The Green (or Green/Yellow) wire in the cord is the grounding wire. When replacing a plug, this wire must be attached to the grounding pin only.
Extension cords connected to this machine should be 12 gauge, three-wire cords with three-prong plugs and outlets. DO NOT use extension cords more than 50
feet (15 m) long.
PLEASE NOTE: FOR NORTH AMERICA ONLY
INSTRUCTIONS VISANT LA MISE À LA TERRE (120VAC)
Cet appareil doit être mis à la terre. En cas de défaillance ou de panne éventuelles, la mise a la terre fournit au courant un chemin de moindre résistance qui réduit
le risque de choc électrique. Cet appareil est pourvu d’un cordon muni d’un conducteur de terre et d’une fiche avec broche de terre. La fiche doit être branchée dans
une prise appropriee correctement installée et mise à la terre conformément aux règlements et ordonnances municipaux.
AVERTISSEMENT !
Un conducteur de terre mal raccordé peut entraîner un risque de choc électrique. Consulter un électricien ou un technicien d’entretien
qualifié si vous n’êtes pas certain que la prise est correctement mise à la terre. Ne pas modifier la fiche fournie avec l’appareil - si elle
ne peut être insérée dans la prise, faire installer une prise adéquate par un électricien qualifié.
Cet appareil est destiné à un circuit de 120 V et est muni d’une fiche de terre semblable à celle illustrée par le croquis 1. Un adaptateur temporaire semblable à
celui illustré par le croquis 2 et C peut être utilisé pour brancher cette fiche à une prise bipolaire comme l’illustre le croquis 2 si une prise avec mise à la terre n’est
pas disponible. L’adaptateur temporaire devrait etre utilisé seulement jusqu’à ce qu’une prise avec mise à la terre soit installée par un électricien qualifié. L’oreille
rigide ou le crochet ou autre dispositif semblable, de couleur verte, prolongeant l’adaptateur doit Iêtre raccordé à un élément correctement mis à la terre comme le
couvercle d’une boîte de sortie mise à la terre. L’adaptateur doit être fixé par une vis métallique.
Note:
Au Canada, I’utilisation d’un adaptateur temporaire n’est
pas autorisée par le
Code
canadien de l’électricité.
Remplacez la prise si la prise de terre est abîmée ou cassée.
Le fil Vert (ou Vert/Jaune) dans la ganse est le fil de terre. Lors du remplacement d´une prise, ce fil doit être raccordé à la prise de terre uniquement.
Les ralonges connectées à cette machine doivent avoir 12 mesures, trois ganses de fil ayant
trois fiches masculines féminines tree-prong plugs and outlets.
N´UTILISEZ PAS de ralonge de plus de 15 m (50 pieds) de long.
VEUILLEZ NOTER: CES INSTRUCTIONS CONCERNENT UNIQUEMENT L’AMÉRIQUE DU NORD


