


26 - 56043021
- 260, 32, 38, 320, 380
BRUSH DRIVE SYSTEM
________________________________________________________________________________________________________________________________________________________________________________________________________________________________________________________________________
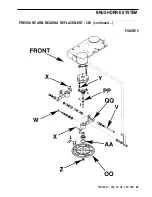
PRESSURE ARM BEARING REPLACEMENT - 32, 38, 320, 380
1
Drain the solution and recovery tanks and tip them to the sides of the machine.
2
Remove all of the battery cables and remove the batteries from the machine.
3
Tip the tanks back into position and tip the machine over onto its side (to prevent injury or damage, use
two people when tipping the machine over).
4
Remove the scrub brushes.
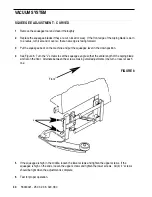
5
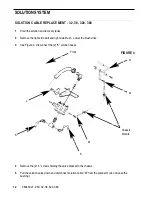
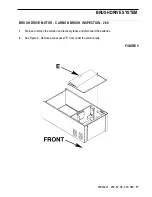
See Figure 10. Remove the (2) “BB” bolts, bushings and nuts.
6
Remove the (2) “CC” bolts, springs and washers.
7
Disconnect the solution hoses from the “DD” tubes.
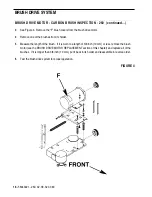
8
Remove the “EE” bolts and lift the pressure arm assemblies out of the machine.
9
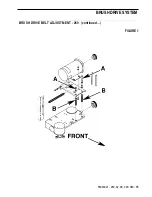
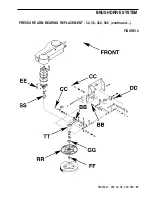
Remove the “FF” nuts.
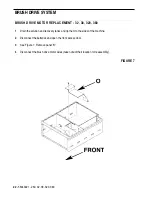
10
Use blocks of wood to support the brush holder “RR” and drive the pressure arm shaft “SS” out of the
brush holder and pressure arm “TT”.
Note: Hold a brass drift against the pressure arm shaft and hammer on the drift. Hammering directly
on the pressure arm shaft will damage the shaft, making it difficult to get apart. Do not use a
gear puller on the brush holders, they are cast aluminum and will break.
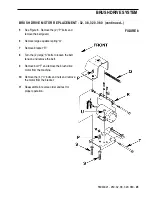
11
Remove the “GG” retaining rings and drive the bearings and spacer out of the pressure arm.
12
Install the new bearings and reassemble in reverse order.
Note: When installing the new bearings, make sure that the open side of each bearing is facing the
grease fitting, and the sealed side of the bearings are facing to the outside. Grease the bearings
after assembly.
13
Test for proper operation.