WSS100 - WST100
7
09/2014
GB
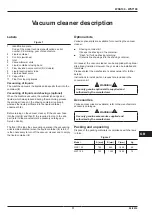
Emptying the shaving container (optional)
Figure 8
1
Shaving container
2
Container closing band
WARNING!
Before proceeding with these operations, turn off the
vacuum cleaner and remove the plug from the power
socket.
Lift the container with a suitable lifting device.
■ Open the container closing band (
2
) and lift the vacuum
cleaner motor head.
■ Sling the shaving container (
1
) and remove it.
■ Empty the container and clean it (see “Cleaning the
containers” paragraph).
■ Place the shaving container back in position, making
sure it is correctly positioned.
At the end of a cleaning session
■ Turn off the vacuum cleaner and remove the plug from
the socket.
■ Wind the electric connection cable.
■ Empty the container as described in the “Emptying
the containers” paragraph. Clean the vacuum cleaner
as described in the “Maintenance, cleaning and
decontamination” paragraph.
■ Store the vacuum cleaner in a dry place, out of reach of
unauthorised people.
Maintenance, cleaning and
decontamination
WARNING!
The precautions described below must be taken during
all the maintenance operations, including cleaning and
replacing of the safety filters.
■ To allow the user to carry out the maintenance
operations, the vacuum cleaner must be
disassembled, cleaned and overhauled as far as
is reasonably possible, without causing hazards
for the maintenance staff or other people. The
suitable precautions include decontamination
before disassembling the vacuum cleaner,
adequate filtered ventilation of the exhaust
air from the room in which it is disassembled,
cleaning of the maintenance area and suitable
personal protection.
Compartments that are not dust-tight must be opened
with suitable tools (screwdrivers, wrenches, etc.) and
thoroughly cleaned.
■ Carry out a technical inspection at least once a
year, for example: check the filters to find out
whether the air-tightness of the vacuum cleaner
has been impaired in any way and make sure
that the electric control panel operates correctly.
This inspection must be carried out by the
manufacturer or by a competent person.
WARNING!
Use only genuine spare parts supplied and authorized
by the manufacturer.
Содержание CFM WSS 100
Страница 2: ......
Страница 53: ...WSS100 WST100 1 09 2014 1 2 3 1 3 6 2 8 7 4 9 10 5 5 11 A B C B B WSS100 WST100 WST100 WSS100 A C 2 1 4 ...
Страница 54: ...09 2014 2 WSS100 WST100 7 5 8 1 6 1 A B 3 1 2 1 2 2 WST100 WSS100 5 6 4 3 4 3 ...
Страница 55: ...WSS100 WST100 3 09 2014 9 11 12 1 3 4 2 1 2 1 3 10 2 1 1 3 2 13 ...
Страница 56: ...09 2014 4 WSS100 WST100 14 1 2 2 6 3 4 5 7 5 4 3 6 2 2 1 ...
Страница 58: ...09 2014 6 WSS100 WST100 ...
Страница 59: ......

