background image

3

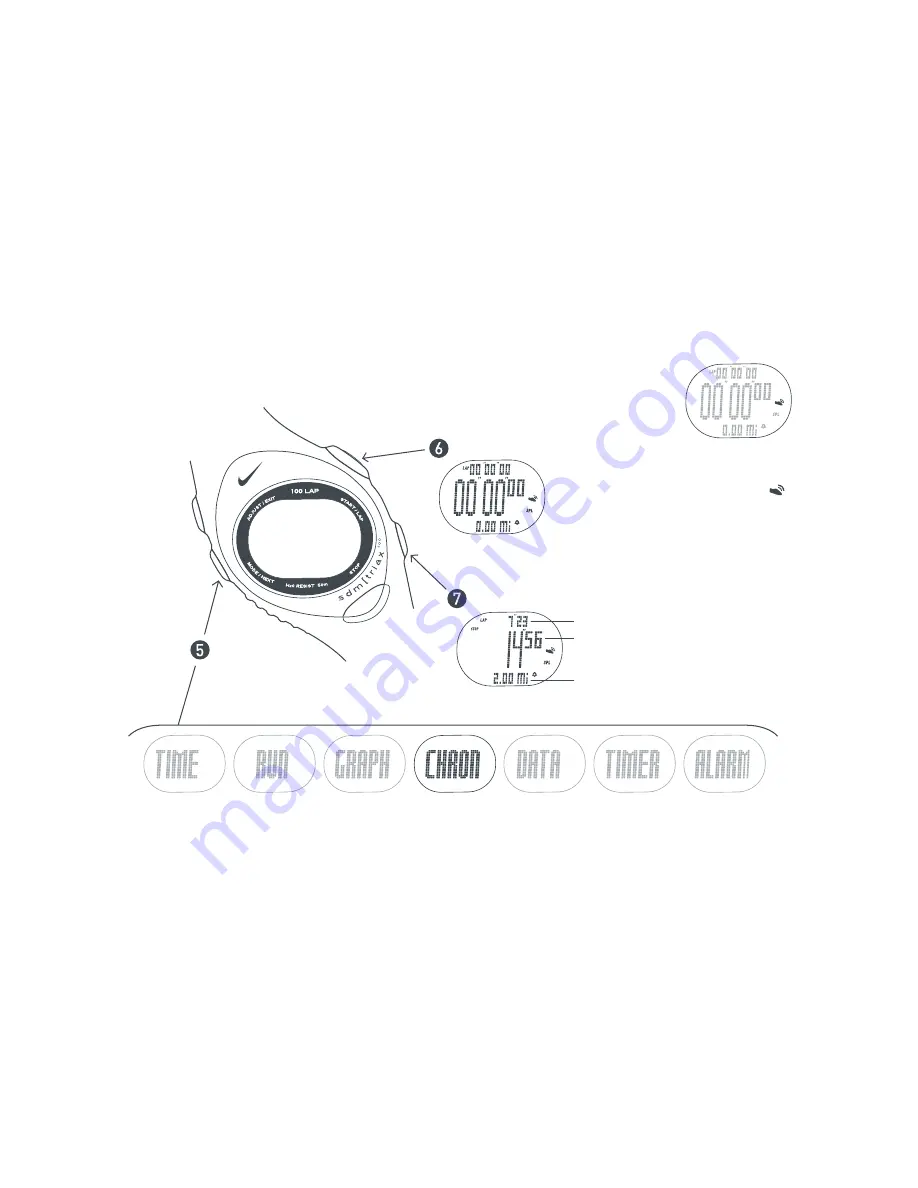
Start RUN

Stop RUN

Scroll to

CHRONOGRAPH 

mode

LAP time

TOTAL time

MILEAGE

No Mileage Displayed

Before you begin to run you should
see the shoe icon          in the display.
The icon signals that the pod and
watch are transmitting correctly.

If the icon is not visible make sure 
the pod is turned on or see page 18 

Troubleshooting

ID SENSOR

If your watch displays "ID sensor"
you will need to enable the watch to
recognize your SDM pod.

See page 19 

ID Sensor

Содержание SDM 100

Страница 1: ...Chronograph 10 Setting the Chronograph Auto Lap 12 Changing the Chronograph Display 13 DATA mode Review Stored Runs 14 TIMER mode Setting Training Intervals 15 ALARM mode Setting Audible Alarms 16 Ru...

Страница 2: ...d be secure enough to not move while running Turn SDM Pod ON Light will begin to blink Press and hold power button to turn SDM Pod off Remove the SDM Pod from holder Loosen shoe laces and slide yellow...

Страница 3: ...u should see the shoe icon in the display The icon signals that the pod and watch are transmitting correctly If the icon is not visible make sure the pod is turned on or see page 18 Troubleshooting ID...

Страница 4: ...Off Set hour Set minutes Set seconds Set day Set month Set year Choose 12 or 24 hour clock Show DAY or MONTH in display Chime On Off Chime sounds at the press of any button Switch Time Zones Hold 1 s...

Страница 5: ...teps through to view your current pace per mile km speed and mileage during a run PACE view SPEED view DISTANCE view Scroll to RUN mode View current time Displays current time in upper secondary field...

Страница 6: ...SDM Pod each time you replace the battery or the watch is reset by pressing and holding all four buttons at the same time see page 18 Watch display is frozen Follow steps through to automatically cali...

Страница 7: ...the accuracy of your SDM Pod To make small adjustments to the calibration use the manual Offset For example if the SDM is slightly under measuring distance increase the Offset number Follow steps thro...

Страница 8: ...tside of your pace zone Follow steps through to set a target pace zone Press button to select adjustable element When you fall below your pace zone the LO indicator arrow will appear in the display Sc...

Страница 9: ...based on a selected interval Follow steps through to set the sampling interval View Graph of Pace vs Time Scroll to GRAPH mode Press buttons to adjust interval 4 4 SEC EXIT Press button to move backwa...

Страница 10: ...ically saved in DATA mode See page 14 for DATA mode Follow steps through to use your chronograph Using the Chronograph LAP 1 TOTAL 1 Mark Laps Lap time is the time required to go once around a track o...

Страница 11: ...Run information is automatically entered into DATA mode Mark Lap Total 3 4 Mark Lap Total Clear Run Hold 4 sec to erase data for this run Next Run Hold 4 sec to save data from this run and move to ne...

Страница 12: ...uto Lap is activated Follow steps through to setup the Auto Lap feature Setting the Chronograph Auto Lap Press button to select adjustable element Scroll to CHRONOGRAPH mode 4 4 SEC EXIT Auto Lap ON O...

Страница 13: ...istance or Pace for your primary display and Lap Split or Distance for the two secondary fields Follow steps through to customize your Chronograph display Changing the Chronograph Display Scroll to CH...

Страница 14: ...best average lap and detailed lap information The memory can store up to 100 laps and multiple runs Follow steps through to view data stored for your runs Review Stored Runs Select Run Scroll to DATA...

Страница 15: ...elect adjustable element Segment 1 Set Hour Segment 1 Set Minutes Segment 1 Set Seconds Segment 2 Continue through desired segments Example In this example Segment 1 is set at 00 03 30 Segment 2 is se...

Страница 16: ...ll automatically stop after 20 seconds Follow steps through to set either alarm Setting Audible Alarms Press button to select adjustable element Set Hour AM PM will change upon scrolling through hour...

Страница 17: ...8 1 33 12 1 40 00 2 04 16 2 11 06 2 30 00 2 35 21 3 06 25 3 20 00 4 22 11 9 30 mi 5 54 km 19 00 28 30 29 31 33 15 47 30 57 00 59 02 1 28 33 1 35 00 1 58 04 2 04 32 2 22 30 2 27 35 2 57 05 3 10 00 4 09...

Страница 18: ...ame time This will erase the data in the memory and allow you to reset the watch to the factory settings Press and hold all four buttons at the same time to reset the watch to the factory settings Wat...

Страница 19: ...Stainless Steel Buckle Stainless Steel Bezel Stainless Steel Caseback Stainless Steel Strap Polyurethane ID Sensor If you change the battery in either the watch or SDM Pod you will have to re establi...

Страница 20: ...tery Type 2 AAA batteries Battery Life The battery is estimated to last 50 hours When not in use turn SDM Pod off to conserve battery Life Battery Replacement Follow the steps below to replace your SD...

Отзывы: