


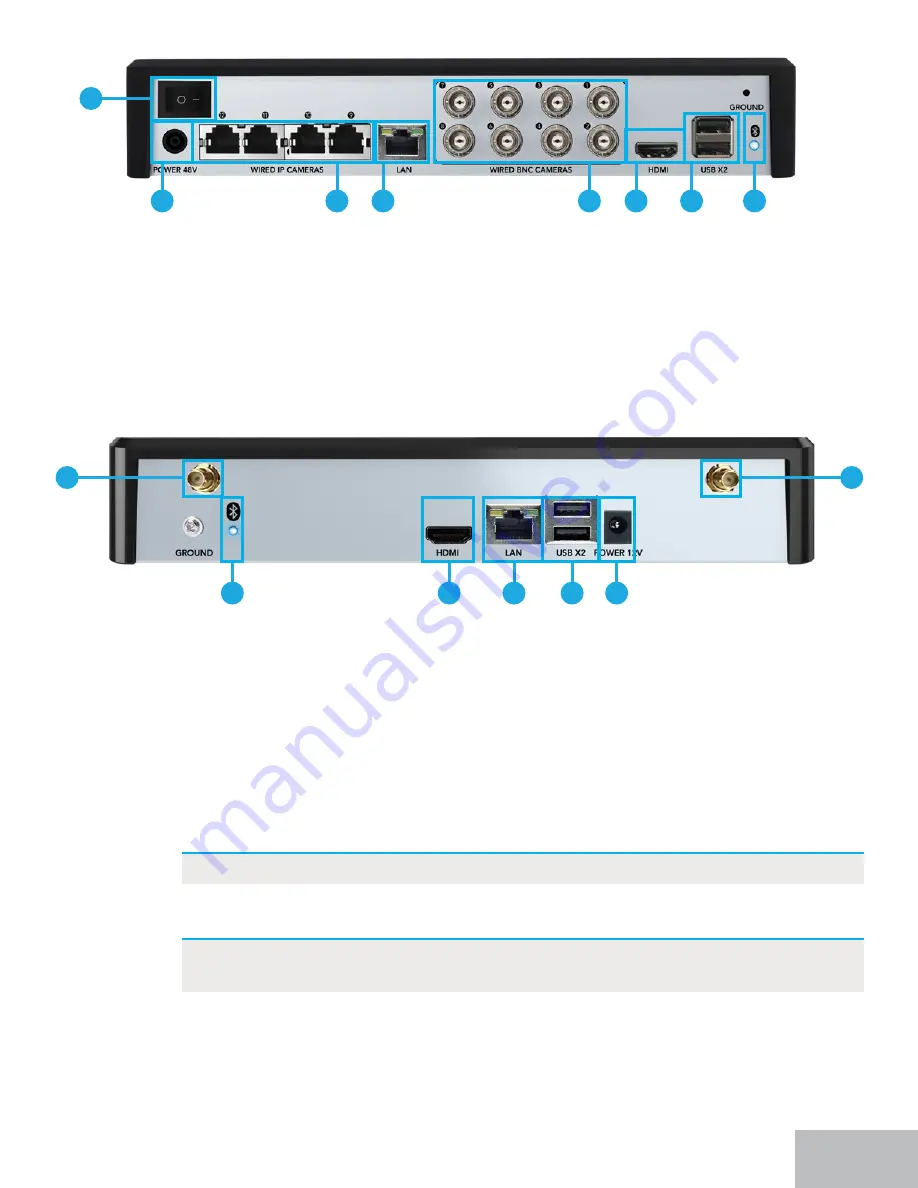
BTD8 Series Recorder Model # DVR-BTD-8-4POE-2 (ONLY)
7.
Video In (Wired IP Cameras):
In addition to 8 wired BNC cameras, this model can hold
XSWRZLUHGΖ3FDPHUDVWRWDOFDPHUDV<RXZRXOGFRQQHFWWKHZLUHGΖ3FDPHUDV
here using the provided Ethernet cabling.
8.
Power Switch:
This model has a power switch. Once you have connected the power
supply, ensure you turn the power switch to the ON position.
1
7
8
2
3
4
5
6
BTWN8 Series Recorder Description
1.
HDMI:
While not required, you may connect the recorder to a TV or monitor using the
S'0ΖFDEOHIRUYLHZLQJDQGV\VWHPDFFHVV
2.
LAN (Strongly Recommended):
Connect your recorder to the Internet using an
Ethernet cable. Again, while not required, this is strongly encouraged to get the full use
DQGEHQHȴWRI\RXUQHZV\VWHP<RXFDQFRQQHFWWKH(WKHUQHWFDEOHWRDQ\ZRUNLQJ
network access point.
3.
USB Ports:
Connect a USB mouse to a USB port to navigate the recorder’s settings
ZKHQFRQQHFWHGWRD79RUPRQLWRU2UFRQQHFWD86%ȵDVKGULYHWRD86%SRUWIRU
video backup.
NOTE:
'2127&211(&7WZR86%PLFHRUWZR86%ȵDVKGULYHVWRWKHUHFRUGHU
4.
Power Input:
Connect the recorder power adapter to this port to power the recorder.
NOTE:
&RQQHFWDQGWHVWDOOFDPHUDVORFDOO\EHIRUH\RXLQVWDOOLQWKHLUȴQDO
location to ensure that all components function properly.
5.
Wi-Fi Antenna Mounts:
Connect the two Wi-Fi NVR antennas to these ports. This is
how the Wi-Fi NVR wirelessly communicates with your cameras.
6.
Bluetooth
®
Indicator Light:
Once the recorder is powered on, this light should turn
blue to indicate that the recorder’s Bluetooth
®
LVUHDG\IRUXVH7KHOLJKWZLOOȵDVKEOXH
when no device is linked and turn solid blue when a device is paired to the recorder.
5
*Steps 1 through 6 on previous page
1
6
5
5
2
3
4


