Nexto Di NVS1501 Скачать руководство пользователя страница 12


17


       USING THE NVS2501 AS A HARD DRIVE

DATA BACKUP(COPY) AND VERIFY       

18

File    Edit    View    Favorites    Tools    Help

My Computer

내 컴퓨터

Search

Folders

Local Disk (C:)

My Computer

NEXTODI (G:)

Address

Go

Back

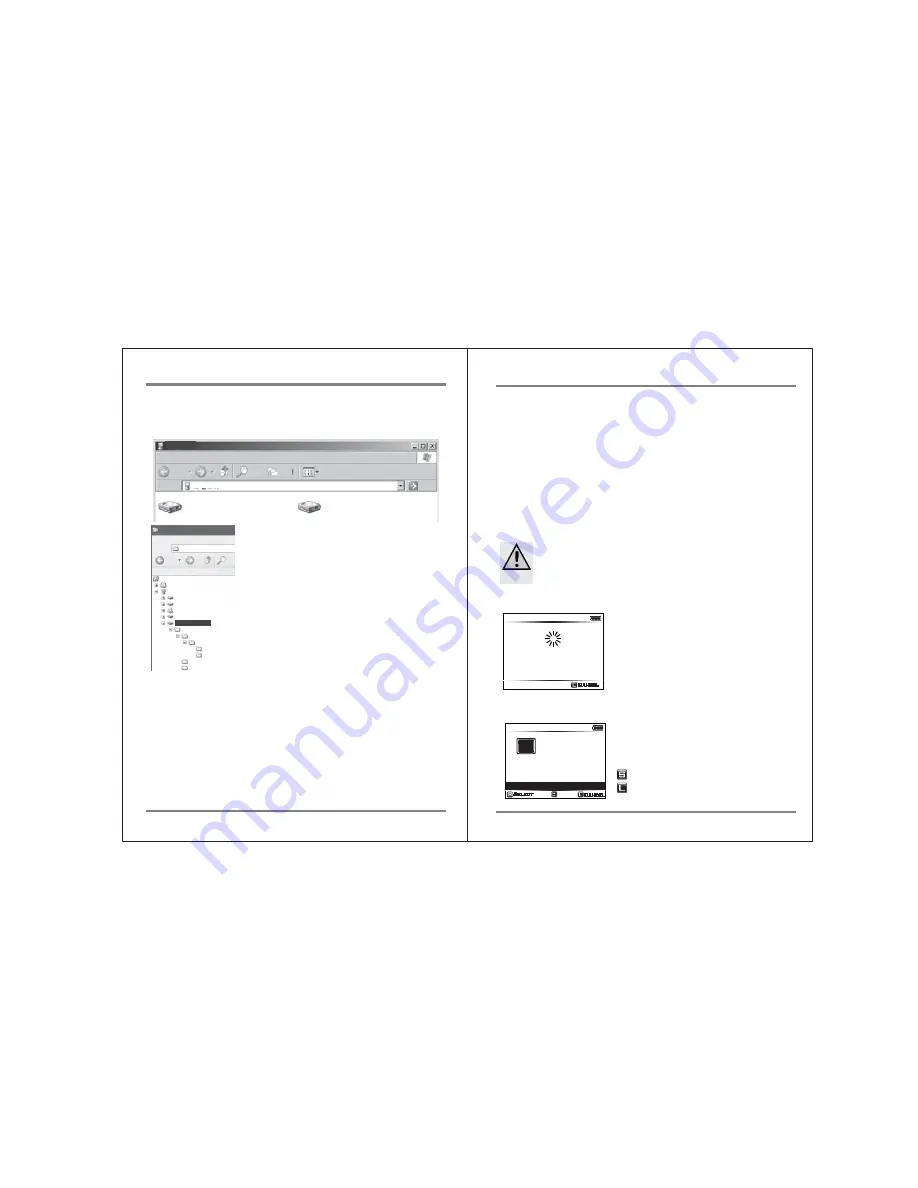
3. Browsing the contents of your hard drive

If your computer detects the NVS1501 correctly, a new drive named [NEXTODI] 

will appear on 'My Computer'.

4. Disconnecting the NVS1501 from Your Computer

For Windows

Right click the Storage device icon in the System Tray (lower right corner of 

your screen) and select “Safely Remove Hardware” or “Unplug” or “Eject 

Hardware”. Then disconnect the cable from your NVS1501 and your computer.

For MAC

Drag and drop the NEXTODI icon to the trash. Then disconnect the cable from 

your NVS1501 and your computer.

File     Edit     View      Favorit

G:\

back 

Address 

Control Panel

My Document
My Computer

Local Disk (C:)
Local Disk (D:)
DVD-RAM Drive (E:)

Skylark (F:)

NEXTODI (G:)

NVSPRO

20090601.000

CLPR

-01_002_01

-01_003_01

TMP.000
TMP.001

Search 

G:\

Back up data is stored in the "NVSPRO" folder. This 

folder is created automatically. The NVS1501 

generates a new folder for each memory card copy. 

The name of the folder is determined by the shooting 

date. 
For example, 20081112.000 means the last footage 

recorded on November 12, 2008.  (If you copy 

multiple items on a single day, the last three digits 

will be changed to indicate the download sequence – 

“000, 001,002, 003, etc.) The date code comes from 

the video cameras. If the date setting on the video 

camera is incorrect, the folder name of NVS1501 will 

also be incorrect.
If a copying failure occurs, the copy is stored on your 

computer as a TMP folder. The TMP folder contains 

the same file names, but the data may be abnormal. 

You may delete the TMP folder.

11. Data Backup(Copy) and Verify

This chapter represents the ‘Copy’ and ‘Verify’ functions.
Insert a memory card into the corresponding memory slot. 

The slot for CF/MD/SDHC/SDXC/MS is located on the top side of the NVS1501.  

The Ikegami GFPAK flash memory device can be connected via the “USB-Host” 

slot using the USB cable.
When copying from a memory card, the NVS1501 must not be connected to 

a computer. The NVS1501 can copy a memory card onto the internal hard disk via 

the built-in memory slot or via the "USB-Host" slot connector with a USB cable. 

After the backup, the copy procedure can be verified. The data 

on the memory card and the data on the hard disk are compared with one another. 

This ensures that the data has been copied properly (“Verify”). You can choose 

the “New Copy” or the “Verify” function according to whether the contents of 

the memory card have been copied before.


Do not connect more than one memory card or USB external HDD to 

the NVS1501. Only the first one connected will be detected.

● Insert the memory card carefully. The pin may get bent if you insert 

   incorrectly. 

102.3 GB

Cancel

CF Detected

Checking...   

1. Parsing the memory

2. Copy

 (1) If the memory card contains new data.

The NVS1501 will make a new folder on the hard 

disk and copy all the files and folders in the 

memory card onto the internal hard disk. The 

contents of the memory card will not be deleted.

     : To Copy, press the control key briefly.
     : To Cancel the copy, press the control key 

        for more than 2 seconds.

3.6 GB

16 Files

Copy CF?

Fast Copy

Copy & Verify

Safe Copy

105.9 GB

Cancel

Select

CF


The data on the memory card is compared with 

the data stored on the NVS1501 hard disk to 

determine whether it is new data or if the data or 

a portion of the data has already been stored on 

the NVS1501. According to the comparison result, 

the NVS1501 operates as follows:

Содержание NVS1501

Страница 1: ...Version 03 11 User Guide www nextodi com NextoDI Co Ltd Portable Storage for Professional Video Cameras VIDEO STORAGE...

Страница 2: ...NEXTO VIDEO STORAGE NVS1501 and X Copy are registered trademark or trademarks of NextoDI Co Ltd Windows is a trademark or registered trademarks of U S Microsoft Corporation in the USA and other countr...

Страница 3: ...RODUCT DESCRIPTION 2 CONTENTS OF THE NEXTO VIDEO STORAGE PRO 3 SYMBOLS USED IN THIS DOCUMENT 4 SAFETY INSTRUCTIONS 5 DEVICE DIAGRAM 6 ABOUT THE RECHARGEABLE BATTERY 7 CHARGING THE RECHARGEABLE BATTERY...

Страница 4: ...ync function see chapter 15 5 Computer connection The NVS1501 can be connected via USB2 0 FireWire 800 IEEE 1394b to a corresponding port on a computer in order to copy data For details of Computer Co...

Страница 5: ...nguages You can select a language from the menu of the NVS1501 For details see chapter 17 12 Buzzer on off The NVS1501 uses a buzzer to note the results of various operations A user can turn the buzze...

Страница 6: ...ays let the product get to room temperature before use or before connecting the AC power adapter unit This can take several hours Do not use in tropical climate conditions The AC power adapter unit co...

Страница 7: ...rged whenever you want Furthermore it has a higher energy content than conventional NiCd and NiMH rechargeable batteries Note these important instructions when handling the Li Poly rechargeable batter...

Страница 8: ...ys use the AC power adapter unit to charge the NVS1501 Notebooks may not deliver the necessary amount of current via USB The NVS1501 will operate for about two hours with a fully charged internal batt...

Страница 9: ...key to select the desired function from the menu Red indicates battery is being charged Green indicates power on Blinking red indicates that a data transfer is occurring 4 The LCD Display Remaining ca...

Страница 10: ...control key downward Press the control key once to select HDD Management Move the highlighted cursor to the Format menu option with the control key Press the control key once to select Format Select F...

Страница 11: ...your NVS1501 on Connect the NVS1501 USB slot via the USB cable with a free USB2 0 port on your computer A USB1 1 port can also be used Check the PC Connection on the NVS1501 s LCD display If your comp...

Страница 12: ...may delete the TMP folder 11 Data Backup Copy and Verify This chapter represents the Copy and Verify functions Insert a memory card into the corresponding memory slot The slot for CF MD SDHC SDXC MS i...

Страница 13: ...1501 verifies that its hard drive area is safe If a bad sector is detected a new safe area is found then copying Fast Copy will begin Fast Copy Verify Copy Same as Fast Copy but after copying the data...

Страница 14: ...he contents as shown in the figure below 20090601 000 Select Back 55 Files 528 MB Delete This Backup Show Video 4 Copy to External Device Show Image 0 1 1 720p_123 mxf Select Back Pause Back 1x 00 00...

Страница 15: ...lete This Backup Copy to External Device Reference See http www nextodi com manual for supporting preview format 3 Delete the backup data 20090629 000 Select Back 1 Files 1 4 GB 4 Video Files Delete 2...

Страница 16: ...rrent operation status is shown on the LCD display 1 Total number of files in the memory card versus the number of copied files 2 Size of files to be copied 3 Elapsed time If the operation completes s...

Страница 17: ...vice if the capacity of an inserted memory card is less than the size of a selected backup folder 5 Preview from an external device Select a Source Internal HDD External Device 149 0 GB Select Back Pr...

Страница 18: ...rd drive Reference The MCopy Sync is possible only when the capacity of the USB external hard drive is more than 128GB The wall power adapter should be connected to both the NVS1501 and the USB extern...

Страница 19: ...detects parses the contents of the memory card and asks you to confirm the mode of copy Three options are available as in the normal XCopy mode For details see chapter 11 Copy briefly press the key Ca...

Страница 20: ...f the NVS1501 but not in NEXTO folder of an external hard drive A user can select two modes of duplication fast copy or safe copy Highlight the desired mode using the up down key then briefly press to...

Страница 21: ...se areas are filled with dummy files so that the front back frames are usable for editing playing on an NLE system 2 3 20090701 000 20090630 000 20090601 000 Select Back 20090701 000 Select Back 55 Fi...

Страница 22: ...sound Factory setting is On Change the language setting Upgrade to new firmware with the firmware file stored in the internal hard drive or on a memory card 145 0 GB XCopy Ready Menu Off Press the co...

Страница 23: ...test is in progress This process takes several minutes 149 0 GB Cancel HDD Management HDD Info Self Test TMP Folders Format Select HDD Smart Test 149 0 GB Smart Test OK Off 5m 30s 149 0 GB This HDD m...

Страница 24: ...ocess will take about 2 3 hours The user can cancel the full test by pressing the control key for more than 2 seconds No errors found Caution The NVS1501 indicates the completion of the test using the...

Страница 25: ...or the internal hard drive Select In HDD hard disk drive if the firmware file is to be placed in the root directory of the internal hard drive Select In Memory Card if the firmware is in the root dire...

Страница 26: ...l appear on the LCD Press the control key briefly S to delete the TMP folders The LCD screen displays the message Deleting the TMP Folders 149 0 GB HDD Management HDD Info Self Test TMP Folders Format...

Страница 27: ...the folder for burning or press the key more than two seconds to unselect the folder 1 6 20090701 000 Select Back BD Burning 428 2MB 6 Video Files Select Ok Cancel 2 Burning the Blu ray Disc 149 0 GB...

Страница 28: ...lank Disc BD Play BD Burning 16 16 428 2MB 102 3 GB Cancel 9 1MB s BD Burn Success The LCD screen on the NVS1501 shows the completion of the Disc burning The USB cable can now be removed 2 3 20090701...

Страница 29: ...card 19 Examples of Basic Functions 102 3 GB Cancel Detected CF Checking Copying 4 16 20 1 GB 102 3 GB Cancel 0m30s CF 3 6 GB 16 Files Copy CF Fase Copy Copy Verify Safe Copy 105 9 GB Cancel Ok CF 1...

Страница 30: ...video footage Backup and index generation has successfully completed 149 0 GB Preview Select Back HDD Managemnet Sector Recovery Buzzer Off Sync Language Firmware Update Index AutoGen On When copying...

Страница 31: ...ow re insert the memory card and wait until your NVS1501 asks VERIFY A brief press of the power button will begin the Verify process Table of Contents 20100614 000 20100604 002 20100604 001 20100604 0...

Страница 32: ...edited on a computer the problem may be a bad sector on the hard drive The NVS1501 has a sector recovery function which may recover the video file For details on Sector recovery see chapter 16 Contro...

Страница 33: ...ful substances are marked with the following symbols Cd cadmium Hg mercury Pb lead You can return batteries rechargeable batteries free of charge to any authorized disposal station in your area in our...

Отзывы: