background image

25

How to Check your Dash Cam’s current Firmware Version

Within the Setup Menu, on page 3, select ‘System Info’. Here you will find information relating to your
Dash Cam, including what firmware version is currently active (i.e R05.3).

Ways to Update Firmware on your Dash Cam

Connect your Dash Cam’s SD Card to PC or Mac using a card reader. This will open a file explorer drive,
(e.g) Removable Disk (E:) and show the contents of your SD Card. Go to the ‘Support & Downloads’ page
on nextbase.com and download the newest firmware version (i.e R05.4); this will download as .bin file.
Drag and drop the .bin file to the SD Card explorer. 
Eject the SD card and insert it back into your Dash Cam. When you connect the power cable your Dash
Cam will turn on, and will automatically begin updating. While updating, both the Nextbase™ logo
beneath the screen and the red LED to the left of the screen will start flashing.

   
Once the update has been completed, the logo and LED will stop flashing, and your Dash Cam will
automatically restart.

If you have a PC, You can also update your Dash cam using the ‘

Update Dash Cam’

 function on

MyNextbase Player™. This function will NOT work on a Mac. Connect your Dash Cam to PC via USB, select

Firmware Update

’ and open up MyNextbase Player™ (available to download for free from nextbase.com).

Select ‘

Update Dash Cam

’. A pop-up will appear on your PC describing your current firmware, and the

latest version available. When you select update, your Dash Cam will automatically begin updating.
While the Dash Cam is updating, both the Nextbase™ Logo below the screen, and the red LED will flash.
Please note that an internet connection is required for the Dash Cam to be updated.

 If ‘Keep User Settings’ is turned ON in the Setup Menu, your Dash Cam will boot up normally,

Notes:

straight into video live view mode, ready to use. If ‘Keep User Settings’ is turned OFF, after the update is
complete, the Dash Cam will boot up into the First Time Use menu, which must be completed before the
Dash Cam can be used.
Be sure to externally back up any files you want to keep before updating the firmware.

Your Dash Cam will show the following message: “

Firmware Updating... Update takes

approx 2 mins. Do not disconnect power!

www.nextbase.com

Updating...

Firmware controls the basic functioning of the Dash Cam.
If your Dash Cam is not functioning correctly, you may
need to update the firmware.

Firmware updates may also be released to fix bugs, and
improve the general functionality of the Dash Cam.
In short, it’s important to keep the firmware on your
Dash Cam up to date so it can operate to it’s full capacity.
We recommend you regularly check for updates to get the
most from your new Dash Cam

Firmware Update Information

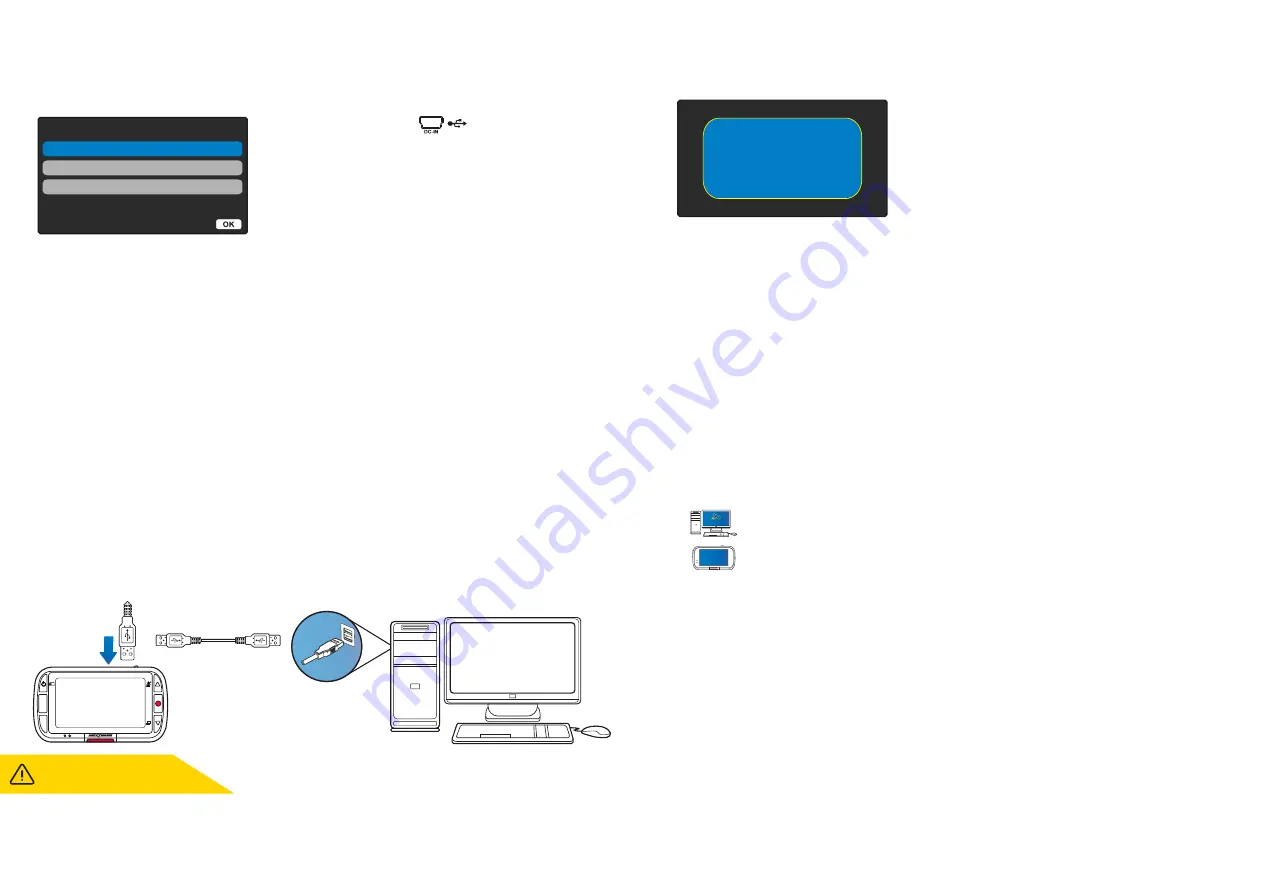
Use the supplied USB cable to connect the Dash Cam
directly to your PC via the                  socket on top of the
Dash Cam;
do NOT connect the USB cable to the Powered Mount. 

Once connected the Dash Cam will turn on with two options
available; ‘

Access Files

’ and ‘

 Power On

 ’, as described below.

Use the UP and DOWN buttons to select required function
and press OK to confirm selection.

Access Files (Windows)

When this option is selected, the Dash Cam will function as a card reader for your PC. An extra drive will
appear, e.g. NEXTBASE (D:) and you will be able to view / manage the stored files upon the MicroSD card
within the Dash Cam. You will be able to view your files using your system’s default media player.
The Dash Cam is a ‘read-only’ device, therefore uploading files to the SD card when in Mass Storage
mode is not possible. If you wish to add files to the SD card you can do this using a MicroSDcard reader.

Access Files (Mac)

When this option is selected, the Dash Cam will function as a card reader for your Mac. The 'Nextbase’
external USB disk icon will appear on your Mac and you will be able to view and/or manage stored files.
You will be able to view your files using your system’s default media player.
The Dash Cam is a ‘read-only’ device, therefore uploading files to the SD card when in Mass Storage
mode is not possible. If you wish to add files to the SD card you can do this using a MicroSd card reader.

Power On (Windows & Mac)

When this option is selected, the Dash Cam will power on with all functions available. This includes
charging of the internal battery; a full charge will take approximately 2 hours.

PC Connection

ALWAYS turn OFF the Dash Cam
before disconnecting from your PC/Mac.

Access Files

Power On

PC Connection

Firmware Update

MODE

MENU

OK

Enter

Firmware Update

Use ‘MyNextbase Player’ to

update your Dash Cam

Firmware, by selecting

‘’Update Dash Cam’’.

Содержание 222X

Страница 1: ...1 User Manual...

Страница 2: ...nce power is available In some vehicles this will be when connections are made for others the Dash Cam will power on once the ignition has been turned on When power is cut off or unavailable the Dash...

Страница 3: ...ACCESSORIES FIRST TIME USE MENUS VIDEO MODE PHOTO MODE PLAYBACK MODE PLAYBACK MODE MENUS PROTECT DELETE FUNCTIONS MYNEXTBASE PLAYER MYNEXTBASE CLOUD PC CONNECTION FIRMWARE UPDATE INFORMATION NEXTBASE...

Страница 4: ...vehicle and the Dash Cam itself 4 Only clean the Dash Cam with a soft dry cloth for tough dirt apply some neutral detergent diluted in 5 to 6 parts water to a soft cloth Please note that alcohol thinn...

Страница 5: ...ted in some countries or states Please adhere to these laws Vehicle Installation Warnings When installing the Dash Cam in a vehicle do not place the Dash Cam where it obstructs the driver s view of th...

Страница 6: ...ng the relevant authorities of who controls the data For use in a commercial environment in non UK countries please refer and adhere to local regulations and requirements For non UK operation specific...

Страница 7: ...alternative power source to replace the supplied car adaptor Front Camera 82 x 46 x 46 Front Camera 79g Model Number Name Power Requirements Power Supply Sensor Resolution Lens Type Angle Aperture Rec...

Страница 8: ...manually by pressing the protect button Individual files can also be protected when viewed within playback mode Automatic Start Stop Technology As soon as the vehicle ignition is turned on your Dash...

Страница 9: ...n the camera Video Mode Up button toggles audio recording On Off Down button toggles screen On Off Playback Mode Scroll through your videos photos Camera Parts and Controls See below to identify the p...

Страница 10: ...amera Connection Point Connect your Rear Facing Camera to the Dash Cam ALWAYS ensure your Dash Cam is powered OFF before connecting or disconnecting the Rear Facing Camera Camera Parts and Controls co...

Страница 11: ...e camera from the mount as required 2 3 1 5 Plug the power cable into the 12 24Vdc outlet of your vehicle The Dash Cam will automatically power on and start recording once power is available In some v...

Страница 12: ...r Dash Cam securely mounted ideally choose an area within the wiper zone to allowl clear recordings in all weather conditions 1 Use the wet wipe green pack to clean the windscreen in the target area 2...

Страница 13: ...irmly press the adhesive pad to the clean area of windscreen Press for 5 seconds to ensure a strong bond between the pad and windscreen Note When positioning the pad on the windscreen ensure that the...

Страница 14: ...d ensure that the road is clearly visible on the Dash Cam display Adjust the Rear Facing Camera to look out of the rear window of your vehicle Use both hands to steady the Rear View Camera Where possi...

Страница 15: ...nformation on how to position and use these products download the Nextbase Accessories Manual PDF at www nextbase com Positioning Your Dash Cam Please read and follow the notes below for the safe oper...

Страница 16: ...The First Time Use menu is in place to get you up and running quickly and smoothly The settings you choose during First Time Use can be changed at any later time in the setup menus First Time Use Use...

Страница 17: ...tered With a Rear Facing Camera attached you will be able to choose between 1080P or 720P recording for the Front Facing Dash Cam the Rear Facing Camera s recording resolution is fixed With a Rear Fac...

Страница 18: ...te the screen Options On and Off Default Off Setup Menu Options 1 2 3 4 Format SD Card Time Date Language Screen Saver Setup Menu Format SD Card Time Date Language Screen Saver Setup Menu MODE MENU OK...

Страница 19: ...fault Settings Resets your Dash Cam to the default settings 9 10 11 12 Recording History System Info Keep User Settings Default Settings Setup Menu Back Enter Device Sounds Turn On Off the beep that s...

Страница 20: ...isplayed on the screen when your Dash Cam is in Playback mode Video Mode The key below explains the various information displayed on the screen when your Dash Cam is in Video mode some icons will only...

Страница 21: ...ccessfully protect or unprotect a file a red padlock icon will be added or removed respectively This will be visible on the Playback display which you will be immediately diverted to following your se...

Страница 22: ...xtbase Cloud Settings Opens the settings tab for MyNextbase Player Options available include language speed units software update options map provider Google maps or Open Street Maps connection tips e...

Страница 23: ...e selected annotation When you have nished your annotation click Save and Close to return to the Add Annotation screen where more annotations can be added When you have nished adding annotations press...

Страница 24: ...co uk Remember my e mail address Continue NEXTBASE Secure Server Upload To NEXTBASE Secure Server Upload To Videos uploaded to the Nextbase Secure Server can be viewed by anyone you share the link wit...

Страница 25: ...Do not disconnect power www nextbase com Updating Firmware controls the basic functioning of the Dash Cam If your Dash Cam is not functioning correctly you may need to update the firmware Firmware up...

Страница 26: ...s still to Format the SD card occasionally for a heavy user this would be every two weeks for a light user this would be once a month Back Enter Back Enter Please wait Format successful Q A Q Why shou...

Страница 27: ...different PC Copy the recorded video files onto the PC Mac for playback directly rather than use the Dash Cam as a card reader as the USB system on your PC may be too slow for HD video playback The so...

Страница 28: ...ptor I get the message SD Card Error on screen The SD card has become unusable by the Dash Cam Back up useful files to your PC and then Format your SD card from within the Dash Cam setup menu I get th...

Страница 29: ...he Software or any part of it to be combined with or become incorporated in any other programs You agree not to export or re export the Software or Documentation to any country in violation of the exp...

Страница 30: ...In no event shall Nextbase be liable in a claim for breach of warranty for any incidental special indirect or consequential damages whether resulting from the use misuse or inability to use this produ...

Страница 31: ...evice may not cause harmful interference and 2 this device must accept any interference received including interference that may cause undesired operation Note This equipment has been tested and found...

Страница 32: ...32 Product Compliance Information...

Страница 33: ...c software Nextbase Services and Software Dash Cams Eyes on the Road Nextbase offers a wide range of Dash Cams to best suit your driving needs Rear View Cameras Ready for the Drive The new rear facing...

Страница 34: ...e Emergency Response Parking Mode Alexa Built in 5 0 4K 30 FPS 1440P 30 FPS 1440P 30 FPS Alexa Built in Alexa Built in Alexa Built in 1080P 60 FPS 1080P 30 FPS 720P 30 FPS Yes Front 4K 1440p 1080p Rea...

Страница 35: ...35 NBDVR222X ENG R14...

Отзывы: