background image


8


1. Tilt Position Lever 

-


This lever allows the user to adjust the tilt (angle) of the motor. Push tilt position lever, 

adjust tilt of motor, release lever.


2. 

Steering Direction Collar


-

To adjust the steering resistance, simply tighten or loosen the tension knob located 

on fron

t of the mount.


3. 

Height/Depth


Adjustment Collar 

-

The depth of the motor can be adjusted up and down by loosening the depth 

collar tension knob located on the column directly above the mount. The column can be adjusted and the motor 

can be positioned at the desired depth by retightenin

g the tension knob. 


4.  Transom  Screws 

-

The  transom  clamp  screws  allow  for  easy  motor  removal  and  installation.  Mount  your 

motor on the transom then tighten the transom clamp screws securely.


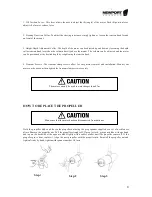
HOW TO REPLACE THE PROPELLER 


Hold the propeller blade and loosen the propeller nut using the prop spanner supplied or a set of needle nose 
pliers. Remove the propeller nut. Pull the propeller straight off. If prop is stuck, grasp one blade with one hand 
and tap on the backside of the opposite blade lightly with a rubber mallet, until the propeller comes off. If the 
propeller pin is bent, replace it. Align the new propeller with the propeller pin. Reinstall the propeller nut and 
tighten firmly by hand, tighten with spanner another 1/4 turn. 


Step

 1 

Step 2 

Step 3


The motor can only be used in water deeper than 0.7m.


Make sure that the motor has been disconnected from batteries. 


Содержание X-32lb

Страница 1: ...ELECTRIC TROLLING MOTOR X SERIES Owner s Manual Please read and retain this manual before using this product REACH RoHS ...

Страница 2: ...olt only 5 Battery Connection Method 24 Volt only 5 How to Control the Motor 6 Adjust the Angle of Handle 7 TRANSOM MOUNT INSTALLATION 7 HOW TO REPLACE THE PROPELLER 8 DAILY MAINTAINANCE 9 TROUBLE SHOOTING 9 Loss of Power 9 Motor Makes Excessive Noise or Vibration 9 Motor Fails To Run 10 Motor Loses One or More Speeds 10 FUNCTION OF THE CIRCUIT BREAKER 11 WARRANTY 12 LIABILITY FREE CLAUSE 12 Decla...

Страница 3: ... be difficult to give an accurate speed rating we give the speed for reference purposes Boat size 7 5ft Loading 200 lbs Quiet water WIRING AND BATTERY RECOMMENDATIONS Battery Type Recommended battery s 12 volt Deep Cycle battery or Marine battery battery should have at least 50 ampere hour rating or higher To extend running time either a larger capacity or an additional battery can be used See sec...

Страница 4: ... 6 inches and 12 inches below the waterline 5 When you are satisfied that the motor is at a safe depth and isn t too close or in danger of hitting the bottom of the lake river or other water ways you may proceed to tighten the Transom Mounting Screws 6 Once this is done it should be safe to connect the battery to the motor Ensure that the twist grip is in the neutral position and that the nuts are...

Страница 5: ...ositive lead Connection with two batteries in parallel 12V DC The red wire should connect to positive the black wire should connect to negative It is recommended install 50 amp circuit breaker in line with positive lead Battery Connection Method 24 Volt only Connection with two batteries in series 12V DC The red wire should connect to positive the black wire should connect to negative It is recomm...

Страница 6: ...e Motor It is recommended to disconnect the battery before carrying out this procedure to prevent accidental running of the motor To raise the motor out of the water push and hold the tilt lever and with the other hand push down on the end of the handle to bring the motor up and out of the water Then release the tilt lever to lock in place Lowering the Motor It is recommended to disconnect the bat...

Страница 7: ... the handle can move upwards and downwards freely 2 Keep the handle to the adequate angle that is suitable to control 3 Tight the button to finish the adjustment TRANSOM MOUNT INSTALLATION 1 2 3 4 Before the installation Make sure the area between column and bracket is clear Tight adjust button The angle adjustment range is 30 do NOT exceed this limit force to rotate the handle will cause the moto...

Страница 8: ...p screws allow for easy motor removal and installation Mount your motor on the transom then tighten the transom clamp screws securely HOW TO REPLACE THE PROPELLER Hold the propeller blade and loosen the propeller nut using the prop spanner supplied or a set of needle nose pliers Remove the propeller nut Pull the propeller straight off If prop is stuck grasp one blade with one hand and tap on the b...

Страница 9: ...s and screws 8 Recharge batteries after each use Follow the battery manufacture s recommendations for battery maintenance 9 During freezing temperatures when your electric motor is not being used it should be stored in an area where it will not freeze 10 Never connect the wire with wrong battery terminal You must disconnect the battery during maintenance TROUBLE SHOOTING Loss of Power Propeller ma...

Страница 10: ...peller Please DO NOT rise steps and increase the thrust of electric outboard motor to solve the problem or it may cause permanent damages to the electric outboard motor The characteristics between the electric outboard motor and gasoline outboard motor are different if the propeller of the motor gets stuck the gasoline outboard motor will only shut down and not cause any permanent damage to the mo...

Страница 11: ...forth the circuit breaker will cut off the power automatically to prevent the damage of the electrical parts If the circuit breaker cuts off the power please disconnect the battery first then check and clean any obstacles At last press the reset button on the circuit breaker and reconnect the battery the electric outboard motor is able to continue the work ...

Страница 12: ...raft Propulsion Engine with the requirements of Directive 89 392 EEC as amended by 89 336 EEC Engine type approved according to Directives 89 392 EEC 89 336 EE Description of Engine s and Essential Requirements Engine Type Outboard Engine Fuel Type Electric This declaration of conformity is issued under the sole responsibility of the manufacturer I declare on behalf of the manufacturer that the mo...

Страница 13: ...13 PARTS LIST ...

Отзывы: