background image

24

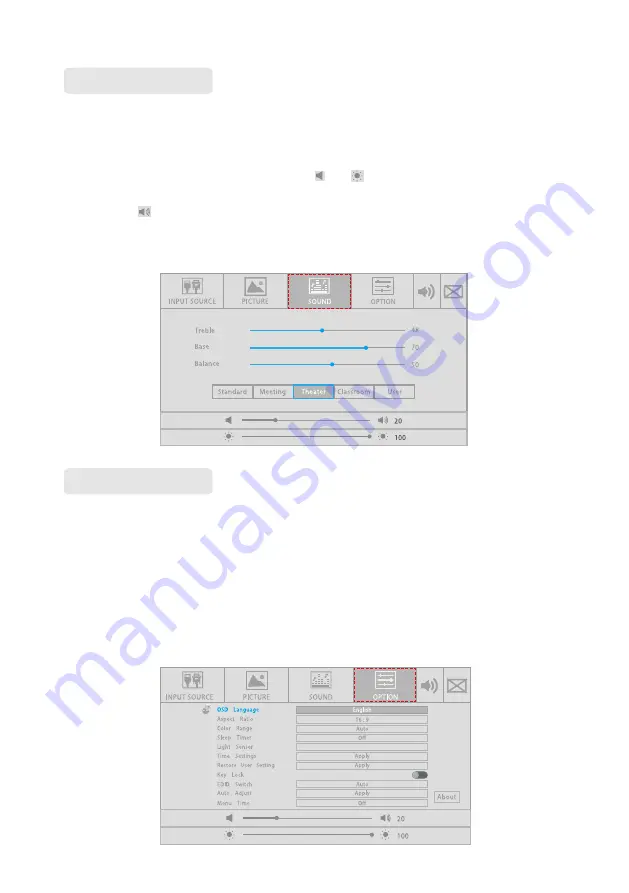
In the 

SOUND

 interface, you can select the 

Standard

Meeting

,

 Theater

Classroom

or 

User

 mode for sound setting. Only in the 

User

 mode, you can manually adjust the 

Treble

Bass

, and 

Balance

 values.

● 

Drag the sliders on the right sides of     and     to adjust the volume and brightness 

  respectively. 

● 

Click     in the upper right corner of the interface to mute the device. After the mute 

  setting, a mute icon will appear in the upper right corner of the screen. 

● 

Press 

Exit

 on the remote controller to exit the setting menu.

In the 

OPTION

 interface, you can set 

OSD Language

Aspect Ratio

Color Range

Sleep Timer

Light Sensor

Time Settings

Restore User Setting

Key Lock

EDID 

Switch

Auto Adjust

, and 

Menu Time

 options. 

● 

Directly click an option or press ▲/▼ on the remote controller to switch the option.

● 

Click an option, and then click ◄/► on the sides of the option or press ◄/► on the 

   remote controller to set the option value.

● 

Press 

Exit

 on the remote controller to exit the setting menu.

Sound Setting

Option Setting

Energy  saving

Содержание LED 75

Страница 1: ...Collaboration Touch Screen and Interactive Dispaly...

Страница 2: ...generates uses and can radiate radio frequency energy and if not installed and used in accordance with the instructions may cause harmful interference to radio communications However there is no guara...

Страница 3: ...lect Signal Source Picture Setting Sound Setting Option Setting Audio Only Function Multi Media Multi media File Type Select USB Flash Enter USB Flash ECO Mode Serial Port Control Specifications of PC...

Страница 4: ...symbols are defined as follows Provides additional information to supplement operation in the main text Provides tips for operation Indicates a potentially hazardous situation that if not avoided cou...

Страница 5: ...wer supply Then contact professional staff for solutions Pay attention to children when they are close to the product Put the product on a stable surface An unstable surface includes and is not limite...

Страница 6: ...dren Do not touch the power cable with wet hands Do not install the product in high temperature environments Do not install the product near a heat source such as a radiator a heat reservoir a stove o...

Страница 7: ...of the used battery based on your local regulations Do not damage the power cable Do not damage change twist bend or forcibly drag the power cable Do not put weights such as the product itself on the...

Страница 8: ...control as ideal apparatus for modern education Features Specially designed for teaching systems Adopt advanced infrared array scanning and sensing technology HID driver free meaning the product is ac...

Страница 9: ...6 Parts Front View 7 8 9 10 Rear View 3 3 6...

Страница 10: ...7 1 Speakers Power On Off 2 Front Ports Power Supply Plug 3 Front Ports Cover Power Switch Remote control receiver Internal PC Port OPS Front Buttons Rear Ports 6 4 5 9 10 7 8...

Страница 11: ...to the port please switch the signal source after the data reading is complete Otherwise the data or product may be damaged CAUTION Name Function Description USB 3 0 External USB port The port for tou...

Страница 12: ...signal which is used with the TOUCH 2 to operate a PC in the way of touch control TOUCH 2 The port for touch control signal VGA AUDIO IN The VGA AUDIO IN is used with the VGA port for an external PC V...

Страница 13: ...ocol in order to control the panel YPbPr The component video port which is used to connect to video devices such as the HD digital signal STB the satellite receiver DVD players and other HD displayers...

Страница 14: ...ller under sunlight or put it near overheated source WARNING Buttons Operations Functions Vol Short press Decrease the sound volume Long press for more than 1 second Decrease the sound volume continuo...

Страница 15: ...12 Enable Audio Only mode Reserve button Switch to HDMI 1 signal source Switch to display mode Standard Energy saving...

Страница 16: ...the area within an angle of 30 degrees from the vertical point to the left and the right The effective receiving area is about 3 meters with 30 angle from vertical point to the right The effective re...

Страница 17: ...14 Installation Environment Installation Direction Safety Precautions Installation Guide Do Not Install Tilted...

Страница 18: ...t bracket is beyond the scope of the product For any problem please contact our support desk Our company is not responsible for any damage or losses incurred by users if the users fails to follow the...

Страница 19: ...n Ensure adequate ventilation and or an air conditioned environment We recommend keeping certain distances from the side of the product to the wall or panels Ventilation requirements are shown in foll...

Страница 20: ...0 mm 31 50 x 15 75 in Use metric M8 screws with length of 10 mm to 15 mm 0 40 to 0 59 in to secure the touch screen with the mounting system Dimensions of themounting holes on the back panel are shown...

Страница 21: ...purchase the internal PC separately Perform the following steps to install the internal PC CAUTION Step 1 Unscrew the M3 screws by hand to remove the internal PC shielding cover Step 2 Push the inter...

Страница 22: ...tor into the side of the product Ensure the power supply is in the range of 100V to 240V with frequency at 50 Hz 60 Hz 5 The power current must be grounded Power On Turning On Off The power outlet sho...

Страница 23: ...uch point calibration is used to eliminate the deviation Calibration is required in the following scenarios The internal PC is used A computer is connected through the HDMI and VGA interface If the po...

Страница 24: ...21 Step 5 Select Touch input from the option and start calibration Step 4 Select in the Tablet PC Settings window...

Страница 25: ...n to close the tool Do not change your screen orientation until you have completed the calibration process Step 7 After the calibration is complete the Digitizer Calibration Tool dialog box will be di...

Страница 26: ...to enter the signal source selection menu In the INPUT SOURCE interface you can select the OPS HDMI DMP VGA Composite and YPbPr source via the remote controller or by touch operation In the PICTURE i...

Страница 27: ...pear in the upper right corner of the screen Press Exit on the remote controller to exit the setting menu In the OPTION interface you can set OSD Language Aspect Ratio Color Range Sleep Timer Light Se...

Страница 28: ...mware Restore User Setting Restores the system factory settings Key Lock Enables or disables the key lock function by the remote controller After this function is enabled keys on the interactive touch...

Страница 29: ...er or screen to select the file type Press OK on the remote controller or directly click the icon to enter the USB flash selection interface Press EXIT on the remote controller or click to return to t...

Страница 30: ...flash Press EXIT on the remote controller or click to return to the preview menu Press OK on the remote controller or directly click the folder icon to enter the corresponding folder Click Prev Page...

Страница 31: ...er save energy the automatic power off function is configured for the interactive touch screen and the default duration is 5 minutes If no operation is performed in 5 minutes the interactive touch scr...

Страница 32: ...on 7F 08 99 A2 B3 C4 02 FF 01 00 CF Power off 7F 08 99 A2 B3 C4 02 FF 01 01 CF Mute Unmute 7F 08 99 A2 B3 C4 02 FF 01 02 CF Sound mode 7F 08 99 A2 B3 C4 02 FF 01 05 CF Signal source 7F 08 99 A2 B3 C4...

Страница 33: ...FF 01 2B CF 0 7F 08 99 A2 B3 C4 02 FF 01 2A CF 7F 08 99 A2 B3 C4 02 FF 01 2D CF 7F 08 99 A2 B3 C4 02 FF 01 2C CF 7F 08 99 A2 B3 C4 02 FF 01 2F CF 7F 08 99 A2 B3 C4 02 FF 01 2E CF Freeze 7F 08 99 A2 B...

Страница 34: ...Sync Polarity TTL 1 VESA 1024x768 65 00 48 363 60 004 N N 2 VESA 1080x720 74 25 45 60 N P 3 VESA 1280x960 108 60 60 N P 4 VESA 1280x1024 108 63 981 60 020 P P 5 VESA 1360x768 85 50 47 712 60 015 P P 6...

Страница 35: ...32 Formats Supported by Multi media Media category Formats Photo Progressive JPEG Baseline JPEG Non Interlaced Interlaced Movie MPEG1 MPEG2 MPEG4 H 264 HEVC VC1 Music WMA MP3 AAC M4A AC 3 Text TXT...

Страница 36: ...power plug is inserted into the power outlet and whether the panel is powered on Check whether the rocker switch on the interactive touch screen is switched on Check whether the power button on the p...

Страница 37: ...ted applicable for models with computers Check whether the PC adapter is correctly connected and whether the PC is powered on Check whether the PC is connected correctly to the interactive touch scree...

Страница 38: ...d by dust cut off the power and then clean the panel using a dried cloth with a little of warm water Use a clean soft cloth to clean the LED of the panel Do not frequently switch on and off the produc...

Страница 39: ...net covering on the screen surface When a user touches the screen fingers or other opaque objects block the infrared rays that cross the touch point which helps the controller detect the coordinate po...

Страница 40: ...wer 300W Energy saving power without internal PC 150W Audio output Loudspeaker power output 15W 2 Touch screen material Tempered glass Sensing method Infrared Technical feature HID drive free Touch po...

Страница 41: ...herefore we may change product spec and information without notice Product pictures in the manual are for reference only please refer to actual products For More Information Please visit our website w...

Отзывы: