background image


10 


Chapter 3 Basics 

Introduction 

This chapter provides the basics of setting and using the N7. 


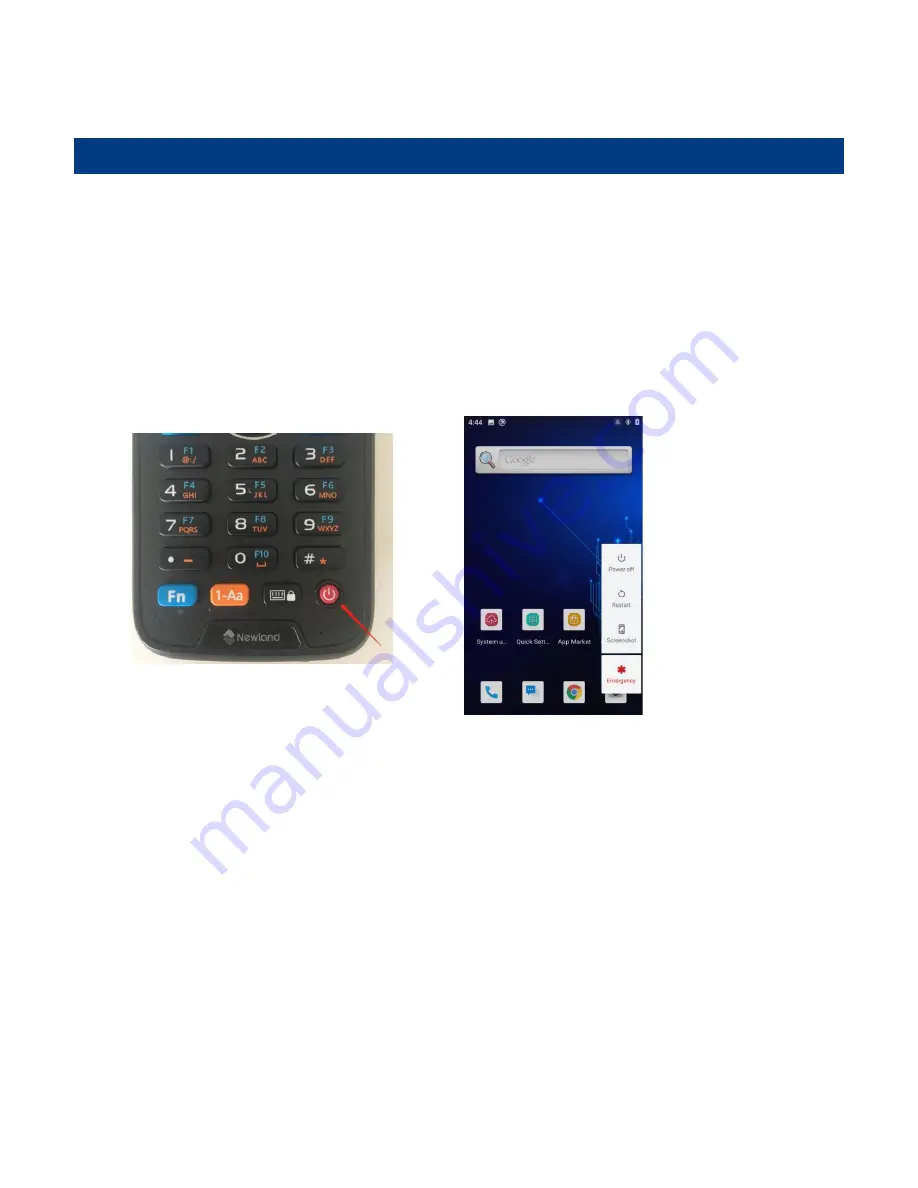
Power Key 


After installing the SIM card and battery and having the N7 fully charged, you may switch the terminal on. 

Switch the N7 on: 

Hold down the Power Key around 3 seconds until the Android logo is displayed. Note that the initialization 

is going to take some time before the N7 displays the Home screen. 

Reboot the N7: 

Hold down the Power key until the window below pops up, then tap “restart”. 

Switch the N7 off: 

Hold down the Power key until the window below pops up, then tap “Power off”. 

Screenshot the N7: 

Hold down the Power key until the window below pops up, then tap “Screenshot”. 

Lock the N7: 

Briefly press the Power key. If no operation is performed on the N7 for a preset period of time, the N7 locks 

automatically. You can change how long it takes for the N7 to lock. 

Unlock the N7: 

Briefly press the Power key. Then swipe home screen from bottom to top with one finger in one smooth motion     

                              to open.   

Force reboot the N7: I

f the terminal is stuck and unable to operate, press and hold the power key for more than 10 seconds 

to force the terminal to reboot. 

Содержание NLS-N7

Страница 1: ...NLS N7 Android 10 Portable Data Collector User Guide...

Страница 2: ...is manual may include software copyrighted by Newland Auto ID Tech Co Ltd or third party The user corporation or individual shall not duplicate in whole or in part distribute modify decompile disassem...

Страница 3: ...Revision History Version Description Date V1 0 0 Initial Release 2020 04 26...

Страница 4: ...y 7 Charging the Battery 8 LEDs on the N7 8 Installing the TF Card SIM Card 9 Removing the MicroSD Card SIM Card 9 Chapter 3 Basics 10 Introduction 10 Power Key 10 Home Screen 11 Status Icons 12 Notif...

Страница 5: ...32 Enable Scan 33 Output Mode 34 Scan Mode 35 Scan Trigger 36 Prefix Suffix 37 Good Read Indicator 38 Encoding 39 Data Edit 40 Symbologies 41 NFC Optional 43 Chapter 7 System Update 44 Introduction 44...

Страница 6: ...Traffic Safety 49 Storage Environment 49 Operating Environment 50 Cleaning and Maintenance 50 Battery Safety Guidelines 51 Repair 51 Troubleshooting 52 Chapter 9 System Customization and Software Deve...

Страница 7: ...ures Chapter 4 Scanning Barcodes Provides the instructions as to how to scan 1D 2D barcodes Chapter 5 Settings Provides Explain how to set the functionalities like Wi Fi Bluetooth Network Display GPS...

Страница 8: ...ime Unpacking Carefully remove all protective material from the pack and verify that the followings were received 1 x NLS N7 main unit 1 x USB cable 1 x AC adapter for the N7 1 x Li polymer battery 1...

Страница 9: ...nal near medical apparatus Do not put the terminal in a high temperature place or use it in a place with flammable gas such as a gas station Switch off the terminal before boarding an aircraft as it m...

Страница 10: ...ht Key 2 Scan Key 3 Home Key 4 Delete Key 5 Numeric Keys 6 Function Switch Key 7 Input Method Switch Key 8 Cradle Connector 9 Virtual Keyboard Screen Lock Key 10 Power Key 11 SIM TF Card Slot 12 Right...

Страница 11: ...5 15 Return Key 16 Left Scan Key 17 USB Port 18 LED 19 Earpiece 20 Scan Window 21 Speaker 22 Battery Cover Latch 23 Flashlight...

Страница 12: ...k position and remove the cover Step 2 Insert the battery as indicated into the battery compartment with its metal contacts facing down and lining up with the metal contacts on the inside of the termi...

Страница 13: ...Battery Remove Battery Step 1 Hold down the Power key for 2 seconds and then tap Power off to turn off the terminal Slide the battery cover latch to the unlock position and remove the cover Step 2 Rem...

Страница 14: ...when the battery is running out the terminal beeps and then shuts down automatically 2 If N7 battery is completely drained please press the power key to turn it on after 15 minutes of being charged LE...

Страница 15: ...Finally close the cover Note 1 N7 is equipped with dual card slots card slot 1 and card slot 2 which can support Nano SIM Nano SIM or Nano SIM TF card Nano SIM Size 12 3mm 8 8mm 0 7mm TF card is max t...

Страница 16: ...hen tap restart Switch the N7 off Hold down the Power key until the window below pops up then tap Power off Screenshot the N7 Hold down the Power key until the window below pops up then tap Screenshot...

Страница 17: ...icon to the Home screen swipe home screen from bottom to top with one finger in one smooth motion to show all app Tap and hold your desired app until it appears on the Home screen and then drag it int...

Страница 18: ...n about the N7 Status Icon Description Status Icon Description Signal strength Turn on Mobile Network Battery Status Call in the progress Data Transfer Mode Airplane Mode on Bluetooth on Uploading Sen...

Страница 19: ...er in one smooth motion to display the notification bar It is combined by shortcut list and USB options USB options Tap to turn on off USB debugging or set USB preference here Shortcut list Tap to tur...

Страница 20: ...f your computer and look for the newly added drive Double click it and you will be connected to the N7 Then you may handle the files on the terminal through your computer If you cannot find the drive...

Страница 21: ...Browse my computer for device software then Let me pick from a list of device drivers on my computer Select MTP USB Device from the list and then click on Next Wait for the installation to complete Th...

Страница 22: ...ard or PC and copy it to your terminal Then install it with File Manager 3 Install a new app using a mobile assistant such as Baidu Mobile Assistant installed on the PC Note If receiving the For secur...

Страница 23: ...using a mobile assistant such as Baidu Mobile Assistant installed on the PC Method 2 Swipe Home screen from bottom to top with one finger in one smooth motion to view all the app Tap and hold your des...

Страница 24: ...scanning tips and instructions for setting up the scanner Scanning 1D Barcode Adjust the scan angle or the distance between the N7 and the target barcode to ensure the length of laser beam is roughly...

Страница 25: ...the N7 and the target barcode to make them fall into the following ranges 1 Point the N7 s focus lamp at the center of the barcode 2 Move the N7 until you find the appropriate scan distance 3 Optimum...

Страница 26: ...Chapter 5 Settings Introduction This chapter provides introductions about how to set the functionalities like Wi Fi Bluetooth Time Language Display Apps Reset and System Upgrade etc in the settings a...

Страница 27: ...icon then Network Internet Wi Fi and turn Wi Fi on to find available Wi Fi networks If Wi Fi is already ON then the terminal will automatically scan for available networks 2 Tap a network and then en...

Страница 28: ...22 IP Settings To set the IP follow the first two steps of joining a Wi Fi network tap Advanced options then DHCP and select the desired option...

Страница 29: ...visible to the N7 2 Tap the app icon then Connected devices Connection Preferences Bluetooth and turn Bluetooth on to search for available Bluetooth devices 3 Select the device from the search results...

Страница 30: ...u can check the operator information or activate the SIM cards inserted in the card slot 1and 2 Preferred SIM card you can select either card 1 or card 2 for cellular data and they can be switched bet...

Страница 31: ...int Names 2 Tap in the top right corner of the screen or tap the carrier of your SIM card on the screen Then manually enter the APN settings You can contact your carrier or visit their website to get...

Страница 32: ...night light wallpaper and other parameters on the screen shown below as per your needs Apps Notifications Tap the app icon and then Apps notifications and set the force stop uninstall clear storage cl...

Страница 33: ...Location and then turn Location on Then you can use a third party app to obtain location information Screen lock Tap the app icon then Security Screen Lock and choose none swipe pattern pin password f...

Страница 34: ...guage and input method as per your needs Date Time Set the date and time Tap the app icon and then System Date time and set the date and time on the screen shown below as per your needs Note If need m...

Страница 35: ...use battery backup if you remove back cover and you can change main battery safely without worrying about losing data After you finish change battery and close the back cover system return to normal m...

Страница 36: ...ta factory reset erase all data After this operation the terminal will be reset to factory defaults and all the personal data on the internal storage such as music and photos will be deleted About pho...

Страница 37: ...on on the Home screen then Remap a key to another key or app After starting the Key map app select the key you want to remap and then tap keys and select enter the key or tap apps and select the app t...

Страница 38: ...ing and NFC Introduction This chapter provides introductions about how to programming scanner Programming Scanner Tap the app icon on the Home screen then Then configure the scanner parameters as per...

Страница 39: ...33 Enable Scan Check or uncheck the Enable scan item to enable or disable the scanning feature of the N7...

Страница 40: ...d data by receiving system broadcasts 3 Fill in EditText directly Output scanned data at the current cursor position in EditText Overwrite output Clear the text input box before sending the barcode cu...

Страница 41: ...continues until the decode session timeout expires 4 Delay mode Scan on release key Press and hold the scan trigger to aim at barcode then release it to start a decode session which continues until t...

Страница 42: ...r Enable or disable them as per your actual needs 1 SCAN key Use the Scan key on the front panel of the terminal as scan trigger 2 Left Right SCAN key Use the Scan key on the left right side of the te...

Страница 43: ...r the hexadecimal value of a desired prefix suffix and then tap OK For example if you want to add a Line Feed character after each barcode set the suffix to 0A if you want to add a Carriage Return cha...

Страница 44: ...n LED to indicate a good read Choose one or more options as per your actual needs 1 Sound The N7 issues a short beep to indicate a good read 2 Vibrating The N7 vibrates to indicate a good read 3 LED T...

Страница 45: ...put you may need to choose or enter a specific character encoding 2 UTF 8 Dominant Unicode encoding 3 GBK A character encoding for Chinese characters 4 ISO 8859 1 A common character encoding that cove...

Страница 46: ...ript You can take the barcodeEdit js script as a reference to make your version Tap load script and then select the desired script file on the terminal or scan the 2D barcode that contains a script to...

Страница 47: ...ensure that only the desired barcodes are read if multiple barcodes are placed closely together 2 Other Tap DETAIL to access the following parameter settings Noise reduction This feature is designed...

Страница 48: ...42...

Страница 49: ...tap the app icon Connected devices Connection preferences turn on NFC Then you can install an NFC writer on the N7 to read and write NFC tags Note The best NFC reading area of N7 is on the back of its...

Страница 50: ...s chapter introduces two methods to update the system software of the terminal Online update and local update Online Update Update the system online Tap system updates icon CHECK FOR UPDATES Note The...

Страница 51: ...one smooth motion to open the notification bar Tap USB for file transfer Then Select Transfer files 2 Copy the update zip file to the N7 drive or N7 s Micro SD card 3 Tap to access the System Update s...

Страница 52: ...pdate zip file Then select NEXTREBOOT or UPDATE Zip File to TF Card 1 Copy the update zip file to TF Card 2 Insert the TF card to the N7 and then power on the terminal 3 Tap to access the System Updat...

Страница 53: ...47 4 Tap in the top right corner of the System Update screen and then select Local Update External Storage 4 Select the update zip file Then select NEXTREBOOT or UPDATE...

Страница 54: ...nnect the AC adapter and contact your dealer or Newland customer service center Continued use in this case may result in fire or electric shock Drop Damage If the terminal is damaged due to a drop fro...

Страница 55: ...such as the bunk under the deck of a ship Device vehicle for transporting and storing fuels or chemical products Area with chemical substances and particles such as granule dust metal powder in the a...

Страница 56: ...he circuit may occur Do not turn on or off the terminal when it is near your ears to avoid negative impact on your health When carrying or using the terminal keep the antenna at least one inch 2 5 cen...

Страница 57: ...cluded battery and AC adapter Do not continue to charge a battery that is fully charged Overcharging will shorten battery lifespan If a fully charged battery is not used it will discharge slowly which...

Страница 58: ...roperly installed Will not charge 1 Check if AC adapter and or the USB port on the terminal are damaged 2 Replace the battery if it is faulty Shorter battery life between charges 1 Replace the battery...

Страница 59: ...roblem is due to a slow system that is caused by third party app s 2 Touch panel may be damaged Please contact the after sales service center to arrange a repair System Will not turn on 1 Check if thi...

Страница 60: ...stall business apps 4 Disable notification bar pull down 5 Restrict phone messaging functionalities 6 Third party app installation uninstallation privilege management 7 Business app exiting privilege...

Страница 61: ...g 1261 4 Kihung gu Yongin City Kyunggi do South Korea Tel 82 10 8990 4838 Fax 82 70 4369 0009 Email info nlscan com Web www newlandaidc com kor Newland India Add 814 Tower B NOIDA ONE business park B...

Отзывы: