background image

7 - MAINTENANCE

Consumables

Lubricant

Type and Description

Container Size

0.946 l

(

1 US qt

)

3.785 l

(

1 US gal

)

SAE 10W-30 CI-4 E

NGINE

O

IL

18.93 l

(

5 US gal

)

0.946 l

(

1 US qt

)

3.785 l

(

1 US gal

)

Engine Oil

SAE 15W-40 CI-4/CH-4 E

NGINE

O

IL

18.93 l

(

5 US gal

)

M

ULTI

G

RADE

134™ (SAE 10W-30)

18.93 l

(

5 US gal

)

Transmission/Hydraulic Oil

M

ULTI

-S

EASON

H

YDRAULIC

T

RANSMISSION

O

IL

SAE 0W-20

18.93 l

(

5 US gal

)

Front Axle/Gear Oil

H

YPOID

G

EAR

O

IL

EP SAE 80W-90

9.46 l

(

2.5 US gal

)

Grease

M

ULTI

-P

URPOSE

G

REASE

EP / AW /

NLGI 2

Tube

14 oz

Coolant

Ethylene Glycol Coolant Concentrate
(Optional)

E

XTENDED

L

IFE

OAT

C

OOLANT

/A

NTIFREEZE

3.785 l

(

1 US gal

)

9.46 l

(

2.5 US gal

)

3.785 l

(

1 US gal

)

7-7

Содержание Workmaster 25S

Страница 1: ...OPERATOR S MANUAL Part number 90396272 3rd edition English February 2021 Replaces part number 90441867 Workmaster 25S Tier 4B final Compact Tractor ORIGINAL INSTRUCTIONS ...

Страница 2: ...re ROPS 2 21 Safety signs Cab If equipped 2 29 Instructional signs Cab If equipped 2 37 3 CONTROLS AND INSTRUMENTS Access to operator s platform Access to operator s platform Roll Over Protective Structure ROPS 3 1 Access to operator s platform Cab If equipped 3 2 Using window controls Cab If equipped 3 3 Exiting the tractor Cab If equipped 3 4 Operator s seat Seat belt 3 5 Operator s seat Adjust ...

Страница 3: ...lve 3 31 Mid mount mower deck height adjustment knob 3 32 Differential lock pedal 3 33 Rear remote control valve Optional 3 34 Overhead controls Switches and work lights Cab If equipped 3 35 Window wiper switch Cab If equipped 3 36 Indoor light Cab If equipped 3 37 Air direction controls Cab If equipped 3 38 Exterior controls Hood release latch 3 39 4 OPERATING INSTRUCTIONS Commissioning the unit ...

Страница 4: ...hting Operating 6 1 Roll Over Protective Structure ROPS Fold up down 6 3 Ballasting the tractor 6 5 Tractor ballasting weights 6 6 Operator presence system 6 8 General field operation Hydraulic Power Lift HPL Operation 6 9 Rear three point hitch Overview 6 10 Attaching three point hitch equipment 6 11 Drawbar Operation 6 13 Power Take Off PTO Operation 6 14 7 MAINTENANCE General information Safety...

Страница 5: ...rvice brakes Check 7 21 Hydrostatic transmission HST neutral adjustment Check 7 22 Belt Check 7 23 Tire pressure Check 7 24 Front axle differential fluid level Check 7 25 Air cleaner Cleaning 7 26 Every 250 hours Engine Change fluid 7 27 Oil filter Replace 7 28 Oil filter Replace 7 29 Roll Over Protective Structure ROPS frame Check 7 30 Front wheels Tighten 7 31 Front wheels toe in Check 7 32 Air ...

Страница 6: ...oting 8 1 Mechanical service brakes Troubleshooting 8 2 Regulated Low pressure system Troubleshooting 8 2 Steering Troubleshooting 8 3 Hydrostatic transmission Troubleshooting 8 3 Electrical system Troubleshooting 8 4 9 SPECIFICATIONS Machine specifications and dimensions Cab If equipped 9 1 Dimension of complete vehicle Cab If equipped 9 3 Tractor general specifications 9 4 Tractor dimensions Rol...

Страница 7: ...tion section of this manual for the location of the model and product identification numbers of your machine PLEASE RECORD THE FOLLOWING INFORMATION Model Product Identification Number PIN Engine number Transmission number Purchase date This is the safety alert symbol It is used with and without signal words to alert you to potential personal injury hazards Obey all safety messages that follow thi...

Страница 8: ...tion and carrying capacity of bridges and ramps prior to engage Do not use the tractor without wearing the seat restraint system during activities where roll over or tip over hazards exist The Roll Over Protection Structure ROPS cab or ROPS structure will only be fully effective when the driver remains attached to his seat Do not use equipment mounted on the tractor which is not correctly matching...

Страница 9: ...ered to be contrary to the use specified by CNH INDUSTRIAL AMERICA LLC who cannot be held liable for damage to property or the machine or for personal injuries which may result Persons who risk improper use will therefore assume the responsibility for any consequences arising from such use Compliance with the instructions for use maintenance and repairs described in this manual are the essential p...

Страница 10: ...ation can reduce the structural integrity of the structure Any modification may cause an accident and subse quently cause death or serious injury and void the warranty Do not step on the fender for the maintenance of cabin 1 roof NHIL20CT01086AA 1 WARNING Roll over hazard After an accident fire tip over or roll over a qualified technician MUST replace the Roll Over Protec tive Structure ROPS befor...

Страница 11: ...to comply could result in death or serious injury W0100B Genuine Parts WARNING Avoid injury and or machine damage This component has a safety function Do not attempt to repair it unless you are totally familiar with it Only use new genuine parts Failure to comply could result in death or serious injury W1280A Orientation NOTE On this equipment left hand and right hand are determined by standing be...

Страница 12: ...e maximum power of emission equipment radio telephones etc must not exceed the limits imposed by the national authorities of the country where you use the machine The electro magnetic field generated by the add on system should not exceed 24 V m at any time and at any lo cation in the proximity of electronic components The add on equipment must not interfere with the functioning of the on board el...

Страница 13: ... is located on the forward end of the valve cover The numbers on the plate are important in the event your engine should require future service NHIL17CT01119AA 2 Transmission number The Product Identification Number PIN plate 3 for the transmission is located below the Power Take Off PTO shield The numbers on the plate are important in the event your transmission should require future service NHIL...

Страница 14: ...uipped The loader mount information plate 5 is located on the right hand side loader tower NHIL21CT00074AA 5 Roll Over Protective Structure ROPS infor mation plate with cab If equipped without loader The hard cab mount information plate 6 If equipped is located on the right hand side cab mount NHIL21CT00075AA 6 1 8 ...

Страница 15: ...TION Operator s manual storage on the machine The operator s manual must be stored in a compartment 1 located in the rear of the operator s seat back and be kept available for use by all operators NHIL17CT01221AA 1 1 9 ...

Страница 16: ...n this equipment left hand and right hand are determined by standing behind the unit looking in the direc tion of travel Left hand view NHIL17CT01343AA 1 Right hand view NHIL17CT01345AA 2 Rear view NHIL17CT01346AA 3 Front view NHIL17CT01344AA 4 1 10 ...

Страница 17: ...urs or two 2 years whichever comes first In the absence of a device to measure the hours of use the engine has a warranty period of two 2 years Constant speed 19 0 37 0 kW 25 8 50 3 Hp 3000 RPM or higher 1 500 hours or two 2 years whichever comes first In the absence of a device to measure the hours of use the engine has a warranty period of two 2 years Constant speed 19 0 37 0 kW 25 8 50 3 Hp Les...

Страница 18: ...t modification alteration tampering disconnection improper or inadequate maintenance or use of non recommended fuels and lubricating oils accident caused damage and replacement of expendable items made in connection with scheduled maintenance YANMAR disclaims any responsibility for incidental or consequential such as loss of time inconve nience loss of use of equipment engine or commercial loss Ow...

Страница 19: ... operation for maintenance checks and verification test for functions is required The total operating hours for maintenance and verification test for functions should not exceed 100 hours per year However there is no limitation on the operating hours for emergency use Keep a log of the number of hours the engine is operated for both emergency use and non emergency use Also note the reason for the ...

Страница 20: ...1 GENERAL INFORMATION 1 14 ...

Страница 21: ... that if not avoided could result in death or serious injury CAUTION indicates a hazardous situation that if not avoided could result in minor or moderate injury FAILURE TO FOLLOW DANGER WARNING AND CAUTION MESSAGES COULD RESULT IN DEATH OR SERIOUS INJURY Machine safety NOTICE Notice indicates a situation that if not avoided could result in machine or property damage Throughout this manual you wil...

Страница 22: ...ways close access doors or panels before you operate the machine Dirty or slippery steps ladders walkways and platforms can cause falls Make sure these surfaces remain clean and clear of debris A person or pet within the operating area of a machine can be struck or crushed by the machine or its equipment DO NOT allow anyone to enter the work area Raised equipment and or loads can fall unexpectedly...

Страница 23: ... the machine Unsupported hydraulic cylinders can lose pressure and drop the equipment causing a crushing hazard Do not leave equipment in a raised position while parked or dur ing service unless the equipment is securely supported Jack or lift the machine only at jack or lift points indicated in this manual Incorrect towing procedures can cause accidents When you tow a disabled machine follow the ...

Страница 24: ... may be necessary depending on the operating en vironment and conditions At least once each day remove debris accumulation around moving components such as bearings pulleys belts gears cleaning fans etc More frequent cleaning of your machine may be necessary depending on the operating environment and conditions Inspect the electrical system for loose connections and frayed insulation Repair or rep...

Страница 25: ...eck that bolts are tight on the seat bracket or mount ing If the belt is attached to the seat make sure that the seat or seat brackets are mounted securely Keep seat belts clean and dry Clean belts only with soap solution and warm water Do not use bleach or dye on the belts because this can make the belts weak Operator protective structure Your machine is equipped with an operator protective struc...

Страница 26: ... using ground engaging equipment be aware of buried cables and other services Contact your local utilities or authorities as appropriate to determine the locations of services Make sure that the machine has sufficient clearance to pass in all directions Pay special attention to overhead power lines and hanging obstacles High voltage lines may require significant clearance for safety Contact local ...

Страница 27: ...Never adjust lubricate clean or unplug machine with the engine running Failure to comply could result in death or serious injury W0112A Before you service the machine put a DO NOT OPERATE tag on the instrument panel 321_4614 1 DO NOT OPERATE TAG A 1 Do not operate B 2 Do not remove this C 3 See other side D 4 Signed by E 5 Reason The DO NOT OPERATE tag can be obtained from your NEW HOLLAND dealer ...

Страница 28: ...s with all local legislation and available resources Do not allow coolant mixtures to get into the soil Col lect and dispose of coolant mixtures properly Do not open the air conditioning system yourself It contains gases that should not be released into the at mosphere Your NEW HOLLAND dealer or air condi tioning specialist has a special extractor for this pur pose and can recharge the system prop...

Страница 29: ...r replaces make sure that you or your dealer install the safety sign on the new part See your dealer for replacement safety signs Replace all safety signs that are damaged missing painted over or illegible If a safety sign is on a part you or your dealer replaces make sure that you or your dealer install the safety sign on the new part See your dealer for replacement safety signs Safety signs that...

Страница 30: ...2 1 Location On the front engine frame right hand side NHIL17CT01362AA 3 2 WARNING RUN OVER HAZARD To prevent serious injury or death Start only from seat with transmission and PTO in neutral Do not short across starter terminals to start engine Failure to comply could result in death or serious injury Quantity 1 English Part Number MT40195651 40195651 4 2 Location On the front engine frame right ...

Страница 31: ... 2 English Part Number MT40239638 40239638 6 3 Location On the left hand and right hand sides of the fan shroud NHIL17CT01361AA 7 4 WARNING To prevent serious injury or death High pressure steam and hot water Remove filler cap with extreme care Failure to comply could result in death or serious injury Quantity 1 English Part Number MT40297729 40297729 8 4 Location On the radiator support bracket N...

Страница 32: ...Do not use without instruction Keep vents tight and level ACID POISON causes severe burns Contains sulphuric acid In the event of contact flush with water and see a doctor Keep out of reach of children Failure to comply could result in death or serious injury Quantity 1 English Part Number MT40239639 40239639 10 5 Location On the fender right hand side NHIL17CT01373AA 11 2 12 ...

Страница 33: ... of Good battery 4 Connect other end to engine block of vehicle being started TO PREVENT DAMAGE to other electrical components on vehicle being started make certain that engine is at idle speed before disconnecting jumper cables Failure to comply could result in death or serious injury Quantity 1 English Part Number MT40254070 40254070 12 6 Location On the fender right hand side NHIL17CT01373AA 13...

Страница 34: ...ing adjusting or disconnecting Wear proper hand and eye protection when searching for leaks use wood or cardboard instead of hands If hydraulic fluid or fuel sinks into skin seek medical attention immediately Quantity 1 English Part Number MT40195652 40195652 14 7 Location On the side of the right hand fender NHIL17CT01363AA 15 2 14 ...

Страница 35: ...es or drop off Avoid sharp turns at high speeds Use of ROPS and seat belt reduce the chance of injury or death if rollover or upset occur Do not attach ropes or chains to ROPS for pulling purpose Failure to comply could result in death or serious injury Quantity 2 English Part Number MT40234561 40234561 16 8 Location On the left hand and right hand side of the upper Roll Over Protective Structure ...

Страница 36: ...2 SAFETY INFORMATION 9 Reflective red tape Quantity 2 English Part Number MT40310801 86547781_RED 18 9 Location On both rear sides of the Roll Over Protective Structure ROPS NHIL17CT00192AA 19 2 16 ...

Страница 37: ... other moving parts Disengage PTO and shut off engine before servicing tractor or implements or attaching or detaching implements Keep all safety shields in place for your protection Pull only from approved drawbar or lower links of 3 point hitch at horizontal position or below Lock tractor brake pedals together for travel on roads or highways Always apply parking brake and shift transmission to n...

Страница 38: ...one or both brake pedals to disengage the differential lock Failure to comply could result in death or serious injury Quantity 1 English Part Number MT40360330 10 Location On the right hand side of the lower Roll Over Protective Structure ROPS frame NHIL17CT00523AA 21 11 WARNING Operate control only from tractor seat Failure to comply could result in death or serious injury Quantity 2 English Part...

Страница 39: ...riveline contact may cause serious injury or death Keep all driveline tractor and equipment shields in place during operation Quantity 1 English Part Number MT40195650 40195650 24 12 Location On top of the rear PTO guard NHIL17CT01374AA 25 2 19 ...

Страница 40: ...extreme care Seat belt use is not recommended Do not attempt to fold ROPS when a canopy is fitted ROPS is heavy Always work with an assistant when lowering and raising the ROPS No roll over protection is provided when ROPS is in lowered position Failure to comply could result in death or serious injury Quantity 1 English Part Number MT40234715 40234715 26 13 Location On the side of the left hand f...

Страница 41: ...ional signs clean and legible Clean instructional signs with a soft cloth water and a gentle detergent Do not use solvent gasoline or other harsh chemicals Solvents gasoline and other harsh chemicals may damage or remove instructional signs Replace all instructional signs that are damaged missing painted over or illegible If an instructional sign is on a part that is replaced make sure the instruc...

Страница 42: ...antity 1 English MT40351818 1 Located on the top surface of the right hand side of the dash panel NHIL17CT01228AA 3 2 Mid mount control lever lock out 40376363 00 4 Quantity 1 English MT40376363 2 Located on the mid mount control lever lock out NHIL17CT00475AA 5 2 22 ...

Страница 43: ...y 1 English MT40233965 40233965 01 6 3 Located on the top surface of the right hand side of the dash panel NHIL17CT01370AA 7 4 Key switch Quantity 1 English MT40378901 40378901 00 8 4 Located on the middle of the rear dash panel NHIL17CT01821AA 9 2 23 ...

Страница 44: ... 10 Quantity 1 English MT40372518 5 Located on the right hand side rear fender besides the operator s seat NHIL17CT00450AA 11 6 Position control lever Quantity 1 English MT40345868 40345868 01 12 6 Located on the right hand side rear fender besides the operator s seat NHIL17CT00450AA 13 2 24 ...

Страница 45: ...y 40241059 14 Quantity 1 English MT40241059 7 Located on top of the fuel cap on the rear of the right hand side fender NHIL17CT01369AA 15 8 Drop rate control valve Quantity 1 English MT40008821 40008821 16 8 Located below the operator s seat NHIL17CT01367AA 17 2 25 ...

Страница 46: ...b position indicator 40353609 00 18 Quantity 1 English MT40353609 9 Located below the operator s seat NHIL17CT01366AA 19 10 Differential lock 40008815 20 Quantity 1 English MT40008815 10 Located below the operator s seat NHIL17CT01365AA 21 2 26 ...

Страница 47: ...er 40376364 22 Quantity 1 English MT40345867 11 Located on top of the left hand rear fender NHIL17CT01822AA 23 12 Engine starting position 40376364 00 24 Quantity 1 English MT40376364 12 Located on top of the left hand rear fender NHIL17CT01822AA 25 2 27 ...

Страница 48: ...2 SAFETY INFORMATION 13 Park brake 40236789 00 26 Quantity 1 English MT40236789 13 Located on the middle of the rear dash panel NHIL17CT01371AA 27 2 28 ...

Страница 49: ...s make sure that you or your dealer install the safety sign on the new part See your dealer for replacement safety signs Replace all safety signs that are damaged missing painted over or illegible If a safety sign is on a part you or your dealer replaces make sure that you or your dealer install the safety sign on the new part See your dealer for replacement safety signs Safety signs that display ...

Страница 50: ...2 1 Location On the front engine frame right hand side NHIL17CT01362AA 3 2 WARNING RUN OVER HAZARD To prevent serious injury or death Start only from seat with transmission and PTO in neutral Do not short across starter terminals to start engine Failure to comply could result in death or serious injury Quantity 1 English Part Number MT40195651 40195651 4 2 Location On the front engine frame right ...

Страница 51: ... 2 English Part Number MT40239638 40239638 6 3 Location On the left hand and right hand sides of the fan shroud NHIL17CT01361AA 7 4 WARNING To prevent serious injury or death High pressure steam and hot water Remove filler cap with extreme care Failure to comply could result in death or serious injury Quantity 1 English Part Number MT40297729 40297729 8 4 Location On the radiator support bracket N...

Страница 52: ...ot use without instruction Keep vents tight and level ACID POISON causes severe burns Contains sulphuric acid In the event of contact flush with water and see a doctor Keep out of reach of children Failure to comply could result in death or serious injury Quantity 1 English Part Number MT40448012 40448012 00 10 5 Location On the body panel right hand side NHIL21CT00073AA 11 2 32 ...

Страница 53: ...Good battery 4 Connect other end to engine block of vehicle being started TO PREVENT DAMAGE to other electrical components on vehicle being started make certain that engine is at idle speed before disconnecting jumper cables Failure to comply could result in death or serious injury Quantity 1 English Part Number MT40448013 40448013 00 12 6 Location On the body panel right hand side NHIL21CT00073AA...

Страница 54: ... other moving parts Disengage PTO and shut off engine before servicing tractor or implements or attaching or detaching implements Keep all safety shields in place for your protection Pull only from approved drawbar or lower links of 3 point hitch at horizontal position or below Lock tractor brake pedals together for travel on roads or highways Always apply parking brake and shift transmission to n...

Страница 55: ...g on roads Depress one or both brake pedals to disengage the differential lock Failure to comply could result in death or serious injury Quantity 1 English Part Number MT40360330 7 Location On the door left hand side NHIL21CT00077AA 15 8 WARNING Rotating driveline contact may cause serious injury or death Keep all driveline tractor and equipment shields in place during operation Quantity 1 English...

Страница 56: ...connecting Wear proper hand and eye protection when searching for leaks use wood or cardboard instead of hands If hydraulic fluid or fuel sinks into skin seek medical attention immediately Quantity 1 English Part Number MT40195652 40195652 18 9 Location On the side of the right hand rear fender NHIL17CT01363AA 19 2 36 ...

Страница 57: ...s clean and legible Clean instructional signs with a soft cloth water and a gentle detergent Do not use solvent gasoline or other harsh chemicals Solvents gasoline and other harsh chemicals may damage or remove instructional signs Replace all instructional signs that are damaged missing painted over or illegible If an instructional sign is on a part that is replaced make sure the instructional sig...

Страница 58: ...antity 1 English MT40351818 1 Located on the top surface of the right hand side of the dash panel NHIL17CT01228AA 3 2 Mid mount control lever lock out 40376363 00 4 Quantity 1 English MT40376363 2 Located on the mid mount control lever lock out NHIL17CT00475AA 5 2 38 ...

Страница 59: ...y 1 English MT40233965 40233965 01 6 3 Located on the top surface of the right hand side of the dash panel NHIL17CT01370AA 7 4 Key switch Quantity 1 English MT40448011 40448011 00 8 4 Located on the middle of the rear dash panel NHIL17CT01821AA 9 2 39 ...

Страница 60: ...8 01 10 5 Located on the right hand side rear fender besides the operator s seat NHIL17CT00450AA 11 6 Fuel cap Ultra low sulfur diesel fuel only 40241059 12 Quantity 1 English MT40241059 6 Located on top of the fuel cap on the rear of the right hand side fender NHIL17CT01369AA 13 2 40 ...

Страница 61: ...control valve Quantity 1 English MT40008821 40008821 14 7 Located below the operator s seat NHIL21CT00076AA 15 8 Differential lock 40008815 16 Quantity 1 English MT40008815 8 Located On the left hand lever guide NHIL21CT00076AA 17 2 41 ...

Страница 62: ...2 SAFETY INFORMATION 9 Park brake 40448010 00 18 Quantity 1 English MT40448010 9 Located on the middle of the rear dash panel NHIL17CT01371AA 19 2 42 ...

Страница 63: ... off slowly Maintain a three point contact to avoid falling both hands on the handrails and one foot on the step or one hand on the handrail and both feet on the steps Failure to comply could result in death or serious injury W0141A Entering and exiting the tractor Whenever possible use the left hand side step 1 for entering and exiting the tractor operator s platform When boarding the tractor use...

Страница 64: ...could result in death or serious injury W0160A NOTICE Do not grasp the gear levers when entering the cabin from the right hand side Whenever possible use the left hand side door 1 for entering Release the cabin door locked with the provided key and open the cabin door after pressing the push button 2 When boarding the tractor use the grab handles 3 provided on the cabin frame and doors Do not jump...

Страница 65: ...trols Cab If equipped Rear window To open the rear window Turn the rear window grip 1 clockwise while pulling it Push the grip outside slightly The rear window is supported by gas cylinders It can be used for emergency exit NHIL20CT01091AA 1 3 3 ...

Страница 66: ...le use the left hand side door for ex iting the cabin To open the left right cabin door push the door release lever 1 downward and use the grab handle 2 to push the door open Do not jump up down for your safety Jumping on off the tractor could cause an injury Always face the tractor use the handrails and steps and get on off slowly Maintain a three point contact to avoid falling both hands on the ...

Страница 67: ...e buckle 2 located on right hand side of the seat Make sure belt is securely buckled and belt length is adjusted correctly for size of operator Use soap and water to clean the seat belt if necessary Do not use carbon tetrachloride naphtha etc as these substances will weaken the webbing Additionally do not bleach or dye the webbing as these products will also weaken the webbing Replace the seat bel...

Страница 68: ...the adjust ment lever 1 and move the seat rearward or forward in the seat track After the seat is adjusted release the ad justment lever To adjust the angle of the seat back pull upward on the lever 2 on the left hand side of the seat Place the seat in the desired position and release the lever The seat will lock in this position NHIL17CT00449AA 1 NHIL17CT00171AA 2 3 6 ...

Страница 69: ...plastic and rubber parts use only a mild car washing soap and water as described below First remove any loose dirt by rinsing with clean water Mix a warm mild liquid car washing soap solution 1 part soap and 99 parts water Then using a sponge or soft cloth apply the soap solution to the part Allow the solution to soak for a few minutes to loosen the dirt Finally rinse the part with clean water to ...

Страница 70: ...tifunction light switch The location of the multifunction light switch 1 is on the left hand side of the dash panel This switch controls the external lighting equipment See page 6 1 for external lighting operating instructions NHIL17CT00175AA 1 3 8 ...

Страница 71: ...ght indicates low engine oil pressure only and goes out when sufficient oil pressure is present at the oil sender If the bulb illuminates during operation stop the tractor immediately and investigate the cause 5 Park Brake Indicator Light Illuminates if the park brake is engaged with the key switch rotated to the ON position 6 Battery Charge Warning Light Illuminates when the key switch is in the ...

Страница 72: ...this to operate The key switch has to be in the ON or START positions 13 Temperature Gauge Indicates coolant temperature It activates when you turn the key switch to the ON posi tion The gauge will register cold with the key switch in the OFF position If the needle registers in the white range of the gauge this indicates a normal operating temperature If the needle moves to the red portion of the ...

Страница 73: ...d turn the switch to the ON position A NOTE Only engage the PTO when the engine is at low idle speed This will reduce the shock load on the drive line of the attachment When the PTO is engaged the PTO indicator light 2 will be illuminated on the instrument panel To disengage the PTO push down on the PTO switch and the switch will automatically return to the OFF position B For PTO operating instruc...

Страница 74: ... any posi tion the lever automatically returns to neutral Move the control lever forward to lower the loader re tract cylinder A Move the control lever to the left to curl the bucket re tract cylinder B Move the control lever rearward to raise the loader ex tend cylinder C Move the control lever to the right to dump bucket ex tend cylinder D Move the control lever fully forward to FLOAT position E...

Страница 75: ...secure the equipment or implement Failure to comply could result in death or serious injury W0243A When connecting hydraulic hoses follow the instructions listed below Loader down retract cylinder green coupler 1 Loader up extend cylinder yellow coupler 2 Bucket curl retract cylinder red coupler 3 Bucket dump extend cylinder blue coupler 4 NHIL17CT00180AA 3 3 13 ...

Страница 76: ...TS Hand throttle lever The location of the hand throttle lever 1 is on the right hand side of the dash panel Push the lever forward to increase the engine speed and rearward to decrease the engine speed NHIL17CT00475AA 1 3 14 ...

Страница 77: ...rd travel pedal will return to the neutral position once the forward travel pedal is released NHIL17CT00175AA 1 Reverse travel pedal The reverse travel pedal 1 location is on the right hand side of the operator s platform To travel in the reverse direction simply depress the re verse travel pedal The further the pedal is depressed the faster the tractor will travel in each transmission range The r...

Страница 78: ...h The cruise control maintains a constant forward or reverse speed Once the desired ground speed is met momentarily press the upper portion 1 of the cruise control switch You can now release the travel pedals and maintain a constant speed The cruise control indicator 3 will illuminate on the instru ment panel to remind you the cruise control is engaged To disengage the cruise control momentarily p...

Страница 79: ...d instruments The engine starts when the operator turns the key to the extreme clockwise START position 5 An internal spring returns the key to the ON position when the operator releases the key Turning the key the counterclockwise PREHEAT posi tion 2 will preheat the engine for cold starting Placing the key in the OFF position 3 will shut off the engine and any electrical functions NHIL17CT01821A...

Страница 80: ... Then release the service brake pedal NOTE Always engage the park brake when getting off the tractor If the operator does not engage the brake or the operator leaves the seat without engaging the park brake an alarm will sound The alarm will continue to sound for approximately ten seconds or until the operator engages the park brake The park brake indicator 2 will illuminate on the instru ment pan...

Страница 81: ...vice brake pedal 1 is on the left hand side of the operator s platform Depress the pedal to apply the brakes The brakes will only act on the rear wheels when the tractor is placed in two wheel drive For four wheel braking engage the four wheel drive NHIL17CT00182AA 1 3 19 ...

Страница 82: ...ide controls Auxiliary power outlet The location of the 12 V auxiliary power outlet 1 is in the left hand rear fender forward of the cup holder Verify the auxiliary power equipment uses less than 10 A of current flow NHIL17CT00171AA 1 3 20 ...

Страница 83: ...ake Off PTO shift lever The location of the Power Take Off PTO shift lever 1 is in the left hand fender Three choices of PTO operations are available REAR MID REAR MID For PTO operating instructions see page 6 14 NHIL17CT01822AA 1 3 21 ...

Страница 84: ...d inside the cab on the right hand side control console towards the corner of the cab This outlet will power electrical accessories When using the cigarette lighter jack optional push the cigarette lighter jack into the socket to heat the coil When the coil is heated sufficiently the jack is retracted automatically and it can be used as a substitute for a lighter Electrical power outlet socket 1 N...

Страница 85: ...ROLS AND INSTRUMENTS Audio player Cab If equipped NOTICE To ensure safe operation avoid turning up the player volume too high loud NOTICE Do not use a headset while driving the tractor NHIL20CT01149AA 1 3 23 ...

Страница 86: ...to the electrical har ness at the beacon lamp connectors 2 The beacon connectors 2 are installed on the left hand and the right hand rear side under the cabin roof Press the upper side symbol part of the switch when turning on the beacon lamp 1 Beacon lamp switch See figure 1 Beacon connector See figure 2 NHIL20CT01097AA 1 NHIL20CT01098AB 2 3 24 ...

Страница 87: ... the heater ON OFF switch and turn the blower control switch 2 clockwise one or more positions Blower control switch 2 It is used to control the blower fan speed By turning this blower control switch clockwise one step from the OFF position the blower begins to move air Turning this blower control switch step by step clock wise the blower will turn faster NHIL20CT01099AA 1 3 25 ...

Страница 88: ...d result in death or serious injury W1178A WARNING Escaping fluid Do not connect or disconnect hydraulic quick coupler under pressurized conditions Make sure all hydraulic pressure is removed from the system before connecting or disconnecting hydraulic quick coupler Failure to comply could result in death or serious injury W0095B The remote control levers are used to operate the hydraulic cylinder...

Страница 89: ...3 CONTROLS AND INSTRUMENTS ID Description 1a Lever 1 forward 1b Lever 2 forward 2a Lever 1 backward 2b Lever 2 backward NHIL20CT01102AA 2 3 27 ...

Страница 90: ...e 4WD position A To disengage the 4WD completely stop the tractor Move the 4WD lever rearward into the 2WD position B NOTE Use the 4WD when additional traction is required while operating on loose soil in wet slippery conditions or on slopes For normal operation on firm soil level hard surfaces or when operating the tractor at high speeds disengage the 4WD to maximize tire and drive line life NHIL...

Страница 91: ...lever 1 is in the right hand rear fender There are three transmission range lever positions H high N neutral L low For transmission range operating instructions see page 4 10 NOTE It is good practice to place the transmission range lever in N before starting the engine NHIL17CT00450AA 1 3 29 ...

Страница 92: ...e location of the Hydraulic Power Lift HPL lever 1 is in the right hand rear fender The HPL lever controls the functions of the HPL such as raising or lowering rear and middle mounted implements For HPL operating instructions see page 6 9 NHIL17CT00450AA 1 3 30 ...

Страница 93: ...inks Turn the drop rate control valve clockwise to decrease the rate of drop Turn the valve counterclockwise to increase the rate of drop The drop rate control valve must be opened before the hydraulic lift control will lower If the valve is turned all the way clockwise the lower links raise to maximum height but cannot lower For most operations using a heavy mounted implement the drop rate contro...

Страница 94: ... sets the cutting height of the mid mount mower deck Raise the mower deck to the top of travel before adjusting the mid mount mower deck height adjustment knob For HPL operating instructions see page 6 9 See your mower deck Operator s manual for specific mower deck adjustment instructions NOTE The white stitching 2 in the sound dampening mat corresponds to the mower deck height adjustment knob 1 h...

Страница 95: ...tial lock depress the differential lock pedal This will cause the rear wheels to rotate at the same speed and increase rear wheel traction If your rear wheels begin slipping in conditions such as snow or wet surfaces release the travel pedal and depress the differential lock pedal Then resume travel operations with increased rear wheel traction Once you have made it through the slippery conditions...

Страница 96: ...ctor has the capability of attaching a backhoe The location of the rear remote control valve operating lever 2 is beside the operator s seat on the right hand side The rear remote control valve operating lever is self cen tering Self centering means the control handle will return to the neutral position once the lever is released Pull UP on the lever to extend a hydraulic cylinder Push DOWN on the...

Страница 97: ... in death or serious injury W0211A Front work light switch 1 See Figure 1 This is used to turn on off the front work lights 1 See Figure 2 ON Press the upper side symbol part of the switch OFF Press the lower side of the switch Bulb rated capacity 12 V 37 5 W Rear work light switch 2 if fitted See Figure 1 This is used to turn on off the rear work lights 2 See Figure 2 ON Press the upper side symb...

Страница 98: ...wiper Press the upper side symbol part of the switch to op erate only the front rear wiper If the operator presses and holds the upper side sym bol part of the front window wiper switch 1 rear 2 again the washer liquid will be applied to the windows NOTICE Use CONCENTRATED WINDSCREEN WASH washer liquid for the tractor in the winter time Front window wiper switch 1 Rear window wiper switch 2 if fit...

Страница 99: ... AND INSTRUMENTS Indoor light Cab If equipped Press the lower side of the indoor light 1 to turn on the light Press the lower side again to turn off the light Bulb rated capacity 12 V 10 W NHIL20CT01093AA 1 3 37 ...

Страница 100: ...n with the heater turned on It may cause suffocation NOTICE When operating in the cabin for a long time ventilate the cabin frequently To control the air flow direction adjust the blade angle of the blower outlets 1 When operating the heater always open the blower outlets 1 NHIL20CT01100FA 1 3 38 ...

Страница 101: ...the hood insert a small rounded tool like a screw driver through the hole 1 and push it inside 2 The hood opens in the forward direction and is hinged at the front 3 Grasp the rear of the hood and allow the hood to swing open 4 A gas cylinder is attached inside to support the hood for easy access to the engine 5 To close the hood lay down the hood and push it down slightly to lock position NHIL17C...

Страница 102: ...3 CONTROLS AND INSTRUMENTS 3 40 ...

Страница 103: ...range when pulling heavy loads and avoid continuous operation at high engine speeds with no load Reduce engine speed when maximum power is not required such as transport operations 3 Avoid prolonged operation at either high or low engine speeds without a load on the engine 4 Check the instruments frequently and keep the radiator and oil reservoirs filled to recommended levels Daily checks include ...

Страница 104: ...y cold In most areas diesel fuel is properly blended for summer and winter grades as ambient temperatures change In winter use winter grade diesel fuel only Oth erwise the fuel may cloud and block the fuel system Fuel Usage Safety UNDER NO CIRCUMSTANCES should gasoline alcohol or gasohol be added to diesel fuel These combinations can create an increased fire or explosive hazard Never remove the fu...

Страница 105: ... United States fuel suppliers are allowed to use up to 5 biodiesel fuel B5 to supply the network United States Biodiesel Fuel Specification ASTM D7467 09A provides specifications for diesel and biodiesel blends from B5 to B20 Pure biodiesel B100 specification is covered by the following requirements ASTM D6751 09A Standard specification for biodiesel fuel blend stock B100 for middle distillate fue...

Страница 106: ...here the biodiesel blend stock is supplied to the ASTM D6751 09A standard it is essential that evidence of compliance to the special limits for Group I Metals Group II Metals and the reduced phosphorus content specified above be obtained on every delivery of fuel from the fuel supplier Failure to comply with this requirement can result in damage to the catalyst of the aftertreatment system which w...

Страница 107: ...k while filling The fuel tank capacity is 25 0 L 6 6 US gal There is a strainer located inside the fuel tank neck Clean the strainer periodically Only dispense fuel into the tank with the strainer installed Use an approved diesel fuel container and check the in side of the container periodically for cleanliness If there is no filter on the storage tank or fuel container filter the fuel through a 1...

Страница 108: ...osition See page 3 8 for transmission range lever information 7 Hydrostatic Transmission HST pedals are in the neutral position See page 3 8 for HST pedal information 8 Place the hand throttle lever at 1 4 position See page 3 8 for hand throttle information 9 Turn the key switch to the ON position See page 3 8 for key switch information 10 Verify the oil pressure warning indicator light and batter...

Страница 109: ...times Preheat times Ambient air temperature Time Above 10 0 C 50 0 F 4 s Between 0 0 10 0 C 32 0 50 0 F 8 s Below 0 0 C 32 0 F 15 s NHIL17CT00176FA 2 NOTE A engine block heater is available as a Dealer Installed Accessory DIA This heater allows for easier starting in temperatures below 12 2 C 10 0 F by warming the engine coolant NOTICE When starting the machine after long down periods avoid immedi...

Страница 110: ...or serious injury W0342A If you must use jumper cables to start the tractor 1 Shield your eyes 2 Connect the red end of the jumper cable to the positive battery terminal 1 on the tractor and connect the other red end to the positive battery terminal 2 on the auxiliary battery 3 Connect the black end of the jumper cable to the neg ative battery terminal 3 on the auxiliary battery then connect the o...

Страница 111: ... the operator seat 2 Pull the hand throttle lever rearward to the idle position 3 Place the Power Take Off PTO switch in the OFF position 4 Engage the park brake 5 Place the transmission range shift lever in the neutral position 6 Lower all implements to the ground 7 Turn the key to the STOP position to shut the engine off 4 9 ...

Страница 112: ...re going down an incline or pulling a heavy load it may be necessary to apply the service brake To apply the service brakes press down on the brake pedal on the left hand side of the operator s platform The single brake pedal will apply the brakes to both the left hand and right hand rear wheels See page 3 8 for service brake information If four wheel braking is desired engage the Four Wheel Drive...

Страница 113: ...gency stopping To make a emergency stop carry out the following procedures 1 Release the Hydrostatic Transmission HST pedals 2 Depress the service brake pedal 3 Pull the hand throttle lever rearward to reduce the engine speed 4 11 ...

Страница 114: ...eft or right after the front wheels have reached end of travel for more than 10 seconds This could over heat the steering system and cause damage If an abnormal sound is heard while operating the steering wheel this means that there is some air in the steering components line In this case turn the steering wheel to left and right fully and hold for about 5 seconds The air should bleed out and the ...

Страница 115: ...y depressing the forward or reverse HST pedals The further the forward or reverse pedals are depressed the faster the tractor will travel in that direction The engine has an operating range of 1500 3235 RPM Use the hand throttle and set the engine RPM in that oper ating range Light work will require less engine throttle while heavy or high travel speeds will require full throttle Pick the engine s...

Страница 116: ... oil viscosity increases This increase in oil viscosity restricts the oil s ability to flow and lubricate in the transmission and hydraulic circuits The cold oil can result in abnormal noises and slower operation times due to the increased oil viscosity NOTE A warm up time at 50 rated engine speed is recommended to assure proper vehicle functionality transmis sion lubrication and operation NOTE Do...

Страница 117: ...re to comply could result in minor or moderate injury C0014A Once the unit is stopped apply the park brake to keep the tractor stationary Perform the following operations to apply the park brake 1 Bring the unit to a full stop 2 Depress the brake pedal 3 Pull upward on the park brake lever 4 Remove your foot from the brake pedal 5 Stop the engine See page 4 9 for instructions on stopping the engin...

Страница 118: ...4 OPERATING INSTRUCTIONS 4 16 ...

Страница 119: ...e hitch pin is lost After attaching the safety chain check its adjustment by driving the tractor to the right and to the left for a short distance Readjust to tighten or loosen the chain as necessary Safety chains and suitable hardware are available from your NEW HOLLAND Dealer NOTE Procure attaching hardware locally Check implement assembly or the Operator s Manual for attaching hard ware specifi...

Страница 120: ...ipment or facilities when loading and unloading the tractor Transport the tractor with all four wheels on a flatbed trailer or truck Secure the tractor as follows Secure the front of the tractor at the front of the frame Secure the rear of the tractor at the rear drawbar hitch If the over all height of the tractor exceeds the maximum transport height the Roll Over Protective Structure can be folde...

Страница 121: ...sible from the front and rear of the tractor Hazard lights A Use the hazard lights when traveling on public roads The hazard lights are visible from the front and rear of the tractor Headlights B Use the headlights when traveling on public roads The headights are visible from the front of the tractor Sidelights C Use the sidelights when traveling on public roads The sidelights are visible from the...

Страница 122: ...n Turn the light switch to the hazard position 1 to operate the hazard lights the sidelights and the instrument panel lights Turn the light switch to the work light position 2 to oper ate the headlights the sidelights and the instrument panel lights Turn the light switch to the road light position 3 to oper ate the headlights the sidelights the hazard lights and the instrument panel lights Turn th...

Страница 123: ...terconnecting components are a certified system Any damage reduces protection and weakens the structure Failure to comply could result in death or serious injury W0934A WARNING Avoid injury Always follow the procedure in this manual when you fold or unfold the Roll Over Protective Structure ROPS Failure to comply could result in death or serious injury W1506A CAUTION Heavy parts The Roll Over Prot...

Страница 124: ...ve both the quick pins 3 from the locking pins 2 4 Support the upper ROPS 1 remove the locking pins 5 Raise the upper ROPS up and toward front of the tractor 6 Install the locking pins in upper position to lock the upper ROPS in the upright position 7 Install the quick pins 8 Tighten the anti vibration M6 bolts 9 Secure the anti vibration bolts with the M6 jam nuts NHIL17CT00173AA 2 6 4 ...

Страница 125: ...ity during operation and transport Tractor front end ballast may not always maintain satisfactory stability if the tractor is operated at high speed on rough terrain Reduce tractor speed and exercise caution under these conditions When using front mounted equipment add weight to the rear axle to maintain good traction and stability Front mounted equipment varies in weight Refer to equipment manual...

Страница 126: ...ghts can be installed Mounting Hardware Quantity Description 4 Bolt M12 x 40 4 Flat washer M12 83115237 1 Weight options 1 A maximum of five 27 kg 60 lb weights 1 for a total weight of 136 kg 300 lb NOTE The front extension mounting bracket is not compatible with grille guard 83115213 2 Rear wheel weights Optional NOTE Rear wheel weights are not available Rear counter weight bracket Optional To mo...

Страница 127: ...y 1 three point hitch 227 kg 500 lb capacity ballasting box 1 may be purchased as extra equipment Load with sand gravel or similar loose ballast as needed Weight Empty Weight Loaded Three Point Hitch Ballasting Box 46 kg 101 lb 228 kg 503 lb 83114208 4 6 7 ...

Страница 128: ...In seat Off Forward Reverse pedals depressed Engaged No start In seat Off Forward Reverse pedals in neutral Engaged No start NOTE For starting the engine the PTO switch must be off and the Forward Reverse pedals must be in the neutral position Operator presence system run operation NOTE The following conditions are for when the engine is running and the operator gets out of the seat PTO switch pos...

Страница 129: ... implement will drop when the rear three point hitch lever is in the forward position To increase the speed of a lowering implement turn the rear three point hitch drop rate control valve clockwise as viewed from the rear of the tractor To decrease the speed of a lowering imple ment turn the rear three point hitch drop rate control valve counter clockwise as viewed from the rear of the tractor If ...

Страница 130: ...tillers flail mowers snowblowers etc The three linkage points are the two lower lift arms and the top link The three point linkage has easy to adjust sway bars 1 to control lateral movement of the lift arms The length of the top link 2 and the height of the right hand 3 lift arm can be adjusted to ease the attachment of implements and to level the implement after attaching The left hand lift arm 4...

Страница 131: ...st the right hand lower link to the proper height of the implement and attach the right hand link 5 Lengthen or shorten the top link until the implement mast pin can be inserted through the mast and upper link of the implement To detach the implement the following procedures will make detaching the easier and safer Park the implement and tractor on a level firm surface Support the implement so tha...

Страница 132: ...terfer ence with rear tires To adjust length of stabilizer 1 Remove hairpin cotter pin 2 and rotate the turnbuckle 3 as needed 2 Shorten the length of the stabilizer to reduce lateral movement or lengthen the stabilizer to increase the lateral movement 76114205 3 NOTICE Check for any interference when the three point hitch is cycled If the three point hitch interferes with any thing adjust stabili...

Страница 133: ...ey are above the horizontal position Failure to comply could result in death or serious injury W0417A NOTICE When transporting equipment on highways a safety chain with a tensile strength equal to the gross weight of the implement should be installed between the tractor and implement hitch Your tractor is equipped with a fixed drawbar 1 for towing equipment behind the tractor NHIL17CT01806AA 1 6 1...

Страница 134: ...lowing 1 Sit in the operator s seat with the seat belt latched 2 Push the PTO switch 2 down and turn the switch to the ON position 3 NOTE When the PTO is engaged the PTO indicator light 4 will be illuminated on the instrument panel NOTE Only engage the PTO when the engine is at low idle speed This will reduce the shock load on the driveline of the attachment NHIL17CT00185AA 1 To disengage the PTO ...

Страница 135: ...n NOTICE Never change the position of the PTO shift lever when the PTO switch is ON NHIL17CT01824AA 5 2 Push the PTO switch 2 down and turn the switch to the ON position 3 NOTE When the PTO is engaged the PTO indicator light 4 will be illuminated on the instrument panel NOTE To obtain 2500 RPM mid PTO speed the en gine speed is 2841 RPM 3 To disengage the mid PTO push down on the PTO switch The sw...

Страница 136: ...us injury W0336A NOTE The engine will shut off in approximately two seconds if the operator leaves the seat without the Hydrostatic Transmission HST pedals not in the neutral position and the PTO shift lever not in the REAR PTO position NOTE The Mid PTO cannot be operated without an operator present in the seat Perform the following steps to operate the stationary rear PTO 1 You must sit in the op...

Страница 137: ...that you use only NEW HOLLAND dealers and products that meet given specifi cations Improperly or incorrectly performed maintenance and repair voids the equipment warranty and may affect service intervals NOTICE Always use genuine NEW HOLLAND replacement parts oils and filters to ensure proper operation filtration of engine and hydraulic systems See your NEW HOLLAND dealer for additional oil quanti...

Страница 138: ...rom conventional coolant to OAT coolant or vice versa you should follow the Changing coolant types procedure below to attain the full benefit of the coolant Changing coolant types To change coolant from OAT coolant to conventional coolant or vice versa 1 Empty the engine cooling system by draining the coolant into a suitable container 2 Fill the system with clean water 3 Start the engine and run f...

Страница 139: ...removal of the engine side panels Remove 1 Remove the two M8 bolts with hand knob A NOTE Left hand side shown right hand side hard ware B location is similar NHIL17CT00474AA 1 2 Remove the four bolts A NHIL17CT01297AA 2 3 Disconnect the headlight wiring harness connectors A 4 Remove the four nuts B NOTE The hood will be loose at this point Hold on the hood or have a helper hold the hood before per...

Страница 140: ...t rearward 2 Align the tabs in the cowl A with the slots B in the engine side panel 3 Push the engine side panel fully reward against the cowl 4 Verify the bolt holes C align with slots D in the en gine side panel NHIL17CT00190AA 5 NHIL17CT00189AA 6 5 Install the hood by lowering it on the four mounting studs 6 Install the gas strut E 7 Secure the metal clip C on the gas strut 8 Install the four n...

Страница 141: ...t hand side shown left hand side loca tion is similar NHIL17CT01303AA 8 11 Install the four bolts A and tighten the hardware NHIL17CT01297AA 9 12 Install the two M8 bolts with hand knob A and tighten the hardware NOTE Left hand side shown right hand side hard ware B location is similar NHIL17CT00474AA 10 7 5 ...

Страница 142: ...re service If you need to locate the battery to jump start the tractor or to charge the battery follow the procedure below To access the battery perform the following 1 Remove the four M8 bolts with hand knob 1 NOTE Left hand side shown right hand side hard ware 2 location is similar 2 Slide the screen panel 3 rearward NHIL17CT00474AA 1 3 Disconnect the key switch wiring harness connectors 5 and t...

Страница 143: ...OIL 18 93 l 5 US gal MULTIGRADE 134 SAE 10W 30 18 93 l 5 US gal Transmission Hydraulic Oil MULTI SEASON HYDRAULIC TRANSMISSION OIL SAE 0W 20 18 93 l 5 US gal Front Axle Gear Oil HYPOID GEAR OIL EP SAE 80W 90 9 46 l 2 5 US gal Grease MULTI PURPOSE GREASE EP AW NLGI 2 Tube 14 oz Coolant Ethylene Glycol Coolant Concentrate Optional EXTENDED LIFE OAT COOLANT ANTIFREEZE 3 785 l 1 US gal 9 46 l 2 5 US g...

Страница 144: ...ck x 7 22 Belt Check x 7 23 Tire pressure Check x 7 24 Front axle differential fluid level Check x 7 25 Air cleaner Cleaning x 7 26 Every 250 hours Engine Change fluid x 7 13 Hydraulic oil suction filter Replace x 7 16 Hydrostatic Transmission HST oil filter Replace x 7 17 Roll Over Protective Structure ROPS frame Check x 7 18 Wheel hardware Check x 7 19 Front wheels toe in Check x 7 32 Air cleane...

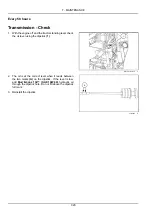
Страница 145: ... the oil level using the dipstick 1 NHIL17CT01296AA 1 2 If the oil level is low remove the filler cap 2 add oil through the filler hole NHIL17CT01298AA 2 3 Add enough oil so the level of oil registers in the cross hatch area 1 on the dipstick Do not overfill NHIL17CT00193AA 3 Ambient Temp F Recommended Oil 12 49 C 10 120 F SAE 15W 40 CI 4 CH 4 ENGINE OIL 23 3 49 C 10 120 F SAE 10W 30 CI 4 ENGINE O...

Страница 146: ...m with a 50 50 solution of IAT COOLANT 11 CLASSIC antifreeze and water NOTE Your tractor was shipped with conventional ethylene glycol coolant If you wish to change to a different coolant type see page 7 2 Checking the coolant level 1 Only check the coolant level when the engine is cold 2 Visually inspect the coolant level in the coolant recov ery tank 1 The coolant level should be at the full mar...

Страница 147: ...evel using the dipstick 1 NHIL17CT01273AA 1 2 The oil is at the correct level when it reads between the two marks A on the dipstick If the level is low add MULTIGRADE 134 SAE 10W 30 hydraulic oil through the dipstick hole Do not fill above the dipstick full mark 3 Reinstall the dipstick 93100904 2 7 11 ...

Страница 148: ...you observe the engine coolant temperature gauge approaching the red or H range while operating the mower deck inspect the condition of the radiator screen Shut off the engine before servicing the radiator screen To clean the radiator screen perform the following 1 Shut off the engine 2 Remove the key 3 Apply the park brake 4 Open the hood 5 Remove the radiator screen A 6 Remove the debris from th...

Страница 149: ...lug 1 3 Install the drain plug after all of the oil has been drained NHIL17CT01275AA 1 4 Place a container below the oil filter 2 to catch the oil contained in the filter 5 Remove the oil filter from the engine 6 Coat the gasket on the new filter with a film of clean oil 7 Install the filter onto the engine until the gasket contacts its mating surface then turn the filter approximately three quart...

Страница 150: ...in the clock wise direction 2 Place a suitable drain pan below the fuel filter bowl 6 3 Loosen the metal ring 7 and remove it from the fuel filter housing 4 Remove the fuel filter bowl 6 5 Remove the fuel filter element 2 6 Install a new fuel filter element 7 Clean any dirt or water found in the bottom of the fuel filter bowl Keep the water indicator ring 4 in the bot tom of the fuel filter bowl 8...

Страница 151: ... pliers close the fuel line 1 before the fuel pre filter 2 NOTE There is no fuel shut off valve at the fuel tank Fuel will drain from the fuel tank if the fuel line is not closed off before removing the pre filter 2 Place a suitable container below the pre filter 3 Loosen the two hose clamps 3 4 Remove the two fuel hoses 4 from the pre filer 5 Remove the pre filter by pulling upward NHIL17CT01295A...

Страница 152: ...ween the rear axle housing and drawbar support To replace the filter 1 1 Unscrew the used oil filter and discard 2 Coat the gasket on the new filter with a film of clean oil Screw the filter into place until the gasket contacts the sealing surface then tighten the filter by hand approxi mately three quarters of a turn Do not overtighten 3 Start the engine and check the filter for leaks 4 Stop the ...

Страница 153: ...lter 1 1 Unscrew the used oil filter and discard 2 Coat the gasket on the new filter with a film of clean oil Screw the filter into place until the gasket con tacts the sealing surface then tighten the filter by hand approximately three quarters of a turn Do not overtighten 3 Start the engine and check the filter for leaks 4 Stop the engine and check the hydraulic system oil level Add oil if neces...

Страница 154: ...ours of operation or every six months whichever comes first 1 Check the torque of the Roll Over Protective Structure ROPS bottom portion mounting bolts 1 Torque the M12 bolts to 76 N m 56 lb ft if necessary NHIL17CT00457AA 1 Seat belt mounting bolts 1 Inspect the operator s seat and the mounting parts for the seat belt 2 2 Tighten the bolts 1 to 61 N m 45 lb ft 3 Replace any parts that show wear o...

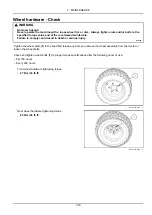
Страница 155: ... in death or serious injury W0346B Tighten the wheel bolts 1 to the specified torque any time you remove the wheel assembly from the tractor or loosen the wheel bolts Check and tighten wheel bolts 1 to proper torque specifications after the following hours of use First 50 hours Every 250 hours Front wheel hardware tightening torque 47 N m 35 lb ft NHIL17CT00199AA 1 Rear wheel hardware tightening t...

Страница 156: ...e oil level using the dipstick 1 NHIL17CT01273AA 1 2 The oil is at the correct level when it reads between the two marks A on the dipstick If the level is low add MULTIGRADE 134 SAE 10W 30 hydraulic oil through the dipstick hole Do not fill above the dipstick full mark 3 Reinstall the dipstick 93100904 2 7 20 ...

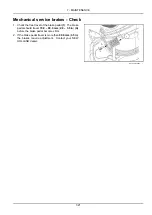
Страница 157: ...e travel of the brake pedal 1 The brake pedal should travel 70 0 90 0 mm 2 8 3 5 in A before the brake pedal becomes firm 2 If the brake pedal travel is more than 90 0 mm 3 5 in the brakes require adjustment Contact your NEW HOLLAND dealer NHIL17CT01269AA 1 7 21 ...

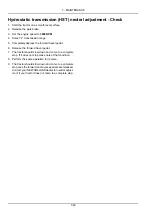
Страница 158: ... the forward travel pedal 6 Release the forward travel pedal 7 The tractor should slow down and come to a complete stop If it does not stop make note of that condition 8 Perform the same operation for reverse 9 The tractor should slow down and come to a complete stop once the forward and reverse pedals are released Contact your NEW HOLLAND dealer for neutral adjust ment if your tractor does not co...

Страница 159: ...7 MAINTENANCE Belt Check 1 Check the condition of fan belt 1 for signs of cracking or fraying 2 If wear is indicated replace belt 3 See page 7 41 for belt adjustment NHIL17CT01298AA 1 7 23 ...

Страница 160: ...gauge This allows the operator to stand clear of the tire while inflating NEVER INFLATE TO OVER 241 kPa 35 psi TO SEAT BEADS If beads have not been seated by the time pressure reaches 241 kPa 35 psi deflate the assembly reposition the tire on the rim relubricate both tire bead and rim flanges and reinflate Inflation beyond 241 kPa 35 psi with unseated beads may break the bead or rim with explosive...

Страница 161: ...il level is correct when the oil is between the upper 2 and lower 3 hash marks on the dipstick NOTE When checking oil level screw the dipstick com pletely into the housing 4 If the oil level is low add HYPOID GEAR OIL EP SAE 80W 90 oil through the dipstick port Do not fill beyond the upper mark of the dipstick 5 Install the dipstick NOTE If the oil level is very low it will take several minutes fo...

Страница 162: ... tain a safe distance between the air nozzle and the filter element when directing air up and down the clean air side of the element pleats NOTICE Place a light inside the element to check for paper leaks or for bonding of the paper to the end plate If any leaks are found replace the element 5 After cleaning the filter element check the inner diam eter seals for damage If damage is present replace...

Страница 163: ...tall the drain plug after all of the oil has been drained NHIL17CT01275AA 1 4 Place a container below the oil filter 2 to catch the oil contained in the filter 5 Remove the oil filter from the engine 6 Coat the gasket on the new filter with a film of clean oil 7 Install the filter onto the engine until the gasket contacts its mating surface then turn the filter approximately three quarters of a tu...

Страница 164: ...rear axle housing and drawbar support To replace the filter 1 1 Unscrew the used oil filter and discard 2 Coat the gasket on the new filter with a film of clean oil Screw the filter into place until the gasket contacts the sealing surface then tighten the filter by hand approxi mately three quarters of a turn Do not overtighten 3 Start the engine and check the filter for leaks 4 Stop the engine an...

Страница 165: ...ew the used oil filter and discard 2 Coat the gasket on the new filter with a film of clean oil Screw the filter into place until the gasket con tacts the sealing surface then tighten the filter by hand approximately three quarters of a turn Do not overtighten 3 Start the engine and check the filter for leaks 4 Stop the engine and check the hydraulic system oil level Add oil if necessary NHIL17CT0...

Страница 166: ...ours of operation or every six months whichever comes first 1 Check the torque of the Roll Over Protective Structure ROPS bottom portion mounting bolts 1 Torque the M12 bolts to 76 N m 56 lb ft if necessary NHIL17CT00457AA 1 Seat belt mounting bolts 1 Inspect the operator s seat and the mounting parts for the seat belt 2 2 Tighten the bolts 1 to 61 N m 45 lb ft 3 Replace any parts that show wear o...

Страница 167: ... in death or serious injury W0346B Tighten the wheel bolts 1 to the specified torque any time you remove the wheel assembly from the tractor or loosen the wheel bolts Check and tighten wheel bolts 1 to proper torque specifications after the following hours of use First 50 hours Every 250 hours Front wheel hardware tightening torque 47 N m 35 lb ft NHIL17CT00199AA 1 Rear wheel hardware tightening t...

Страница 168: ...tance between the front of the wheels at the marks then push the tractor forward or backward until the marks are at wheel hub height on the rear of the wheel 3 Measure and record the distance between the marks at the rear of the wheels B 4 The difference between the dimensions recorded in Step 2 and Step 3 should be 0 8 mm 0 0 31 in toe in The distance between the marks on the wheels should be gre...

Страница 169: ... the filter element 3 from the canister Clean any loose dirt from the canister and inspect the end of the canister for dirt which may prevent the new element from sealing properly NHIL17CT01267AA 2 4 Install the new filter element 4 by inserting it into the canister and pushing on the end of the element until it is seated against the canister NHIL17CT01267AA 3 5 Place the end cap 5 onto the canist...

Страница 170: ...d oil NHIL17CT00201AA 1 5 Remove the dipstick filler plug 2 6 Fill the axle with HYPOID GEAR OIL EP SAE 80W 90 Approximate fluid capacity for the front axle housing is 2 0 L 2 1 US qt NHIL17CT01274AA 2 7 The oil level is correct when the oil is between the upper 2 and lower 3 hash marks on the dipstick 8 Drive the tractor a short distance 9 Recheck oil level at dipstick Add oil if needed until oil...

Страница 171: ...correct level when the oil registers between the two marks A on the dipstick NOTE During cold weather operation the tractor hy draulic oil can be changed to MULTI SEASON HYDRAULIC TRANSMISSION OIL SAE 0W 20 The MULTI SEASON HYDRAULIC TRANSMISSION OIL SAE 0W 20 oil is a multi vis cosity oil which has improved flow characteristics in low temperatures and can be used year round Transmission fluid cap...

Страница 172: ...in the clock wise direction 2 Place a suitable drain pan below the fuel filter bowl 6 3 Loosen the metal ring 7 and remove it from the fuel filter housing 4 Remove the fuel filter bowl 6 5 Remove the fuel filter element 2 6 Install a new fuel filter element 7 Clean any dirt or water found in the bottom of the fuel filter bowl Keep the water indicator ring 4 in the bot tom of the fuel filter bowl 8...

Страница 173: ... pliers close the fuel line 1 before the fuel pre filter 2 NOTE There is no fuel shut off valve at the fuel tank Fuel will drain from the fuel tank if the fuel line is not closed off before removing the pre filter 2 Place a suitable container below the pre filter 3 Loosen the two hose clamps 3 4 Remove the two fuel hoses 4 from the pre filer 5 Remove the pre filter by pulling upward NHIL17CT01295A...

Страница 174: ...e the hose Allow all water to drain from the system through the radiator drain valve NHIL17CT01284AA 1 6 Remove the engine block drain plug 2 on the left hand side of the tractor Allow the engine block to drain 7 Install the engine block drain plug 8 Close the radiator drain valve 9 Slowly refill the system with a 50 50 solution IAT COOLANT 11 CLASSIC and water through the radiator filler neck Fil...

Страница 175: ...ury W1119A Prior operation Remove the engine side panel See page 7 3 Bleed the fuel system if The fuel tank has been drained A new filter element has been installed The tractor has run out of fuel The lines leading to or from the filter have been dis connected To bleed the fuel system 1 Make sure there is adequate fuel in the fuel tank 2 Locate the hand primer lever 1 on the left hand side of the ...

Страница 176: ...tional 20 strokes 6 Start the engine and place throttle to 3 4 position NOTICE Do not operate the starter for more than 30 s at a time Allow the starter to cool for 3 min between starting attempts Failure to allow the starter to cool may result in starter damage 7 Run the engine until the engine operates smoothly 8 If the engine fails to start or shuts off shortly after start up perform the bleedi...

Страница 177: ...could result in death or serious injury W1096A 1 Loosen the alternator mounting bolts 1 2 Pry the alternator away from the engine and tighten the mounting bolts 3 Recheck belt deflection A when 10 kg 22 lb of pres sure is applied midway between the belt pulleys A cor rectly tightened belt will deflect 10 0 14 0 mm 0 4 0 6 in NHIL17CT01279FA 1 7 41 ...

Страница 178: ...e the battery After cleaning wash the battery with clean water then apply a small amount of petroleum jelly to the terminals to prevent corrosion In freezing temperatures a good battery charge must be maintained If the battery becomes discharged or run down the electrolyte becomes weak and may freeze causing damage to the case If you must add water use distilled water Add the water just before usi...

Страница 179: ... the stop sole noid circuit is behind the screen panel Always replace blown fuses with the size specified for that circuit NHIL17CT02190AA 1 The fuse block contains the following fuses top to bottom Fuse Fuse Size Circuit Protected F1 30 A Driver Sol F2 15 A Head Harz F3 10 A Power Soket F4 10 A Sol Inst PTO F5 10 A Work Brake F6 10 A Turn signal 7 43 ...

Страница 180: ...rotects the tractor s entire electrical system To replace the main fuse 1 Remove the old fuse from the fuse holder and replace NOTICE Always replace this fuse with a 40 A fuse do not increase the amperage rating If your tractor continues to blow this fuse see your NEW HOLLAND dealer for assis tance NHIL17CT01298AA 1 7 44 ...

Страница 181: ...on NOTICE Be careful not to touch the bulb with bare fingers Oil from the fingers can shorten the life of bulb Use protective cloth or glove when installing bulb NOTE Replacement bulbs are Bulb size H4 55 60 W Halogen 1 Place bulb into housing matching tabs on bulb with slots in housing 2 Install retaining ring into housing 3 Install rubber boot 1 4 Connect wire harness connector 2 to bulb termina...

Страница 182: ...se in the socket to remove the old bulb 3 Insert the new bulb into the socket and turn the bulb in a clockwise direction until tightened NOTE Replace the turn signal hazard bulb with a 21 W bulb NOTICE The side lights warning lights and brake light bulbs can not be replaced If any of these light functions fail the complete light assembly must be replaced NHIL17CT00184AA 1 7 46 ...

Страница 183: ... in death or serious injury W0346B Tighten the wheel bolts 1 to the specified torque any time you remove the wheel assembly from the tractor or loosen the wheel bolts Check and tighten wheel bolts 1 to proper torque specifications after the following hours of use First 50 hours Every 250 hours Front wheel hardware tightening torque 47 N m 35 lb ft NHIL17CT00199AA 1 Rear wheel hardware tightening t...

Страница 184: ...r 7 Remove the battery and clean it thoroughly Be sure that it is fully charged and that the electrolyte is at the proper level Store the battery in a cool dry place above freezing temperature and charge it periodically during storage 8 Place blocking under the tractor axles to remove the weight from the tires 9 Cover the exhaust pipe opening Storage Check Tractors which have been placed in storag...

Страница 185: ... touch up paint repairs Color Part No Amount New Holland Bright Blue 86109144 DS 86109141 DS 16 oz Spray 1 US qt CNH Dark Gray B96104 B96105 16 oz Spray 1 US qt Bianco White Wheels 9624698 DS 9624699 DS 16 oz Spray 1 US qt Med Gloss Black 94792 DS 9624700 DS 16 oz Spray 1 US qt 7 49 ...

Страница 186: ...7 MAINTENANCE 7 50 ...

Страница 187: ...arter motor The start motor rotates but the engine does not start Low battery charge Charge or replace battery Air in fuel system Bleed out the air Fuel filter clogged Clean or replace the filter Fuel injection pump not operating correctly See your NEW HOLLAND dealer for ser vice Engine speed is irregular Air in fuel system Bleed the fuel system Fuel filter clogged Clean or replace the filter Inje...

Страница 188: ...is ON during operation Bad electrical connection Check battery terminals ground and repair as needed Faulty alternator Repair or replace alternator as needed Faulty battery Replace battery Incorrect fan belt tension or belt broken Adjust belt tension or replace belt Engine overheating Radiator screen covered in grass Clean radiator screen or fins as needed Lack of coolant Add coolant as needed Fan...

Страница 189: ...e Cylinder movement not as smooth as steering wheel Air in steering line if not used for a long time Bleed air in steering system Air in suction tube Check suction tube repair as needed Cylinder piston seal damaged See your NEW HOLLAND dealer for ser vice Oil leakage of steering pump steering unit cylinder Seal damaged See your NEW HOLLAND dealer for ser vice Abnormal noise Lack of oil Add oil as ...

Страница 190: ...LLAND dealer for ser vice Faulty battery Replace battery Headlights will not illuminate Light bulb burnt out Replace bulb as needed Blown Fuse Check the cause and replace fuse with cor rect size Faulty wiring connection Check headlight wiring connection repair as needed Faulty light switch Check switch for proper function and re place if needed Turn signal lights do not work Light bulb burnt out R...

Страница 191: ...specifications and dimensions Cab If equipped Dimension and specification of cabin MT1CA2 Description MT1CA2 Weight 185 kg 408 lb Work lamps 12 V 37 5 W Indoor light 12 V 10 W Front turn signal lights Side lights 12 V 21 W 5 W NHIL20CT01384GA 1 9 1 ...

Страница 192: ...escription ID Description 1 Rear axle center line F 1538 mm 61 in A 479 mm 19 in G 122 mm 5 in B 354 mm 14 in H 1023 mm 40 in C 1384 mm 54 in I 440 mm 17 in D 1586 mm 62 in J 175 mm 7 in E 1560 mm 61 in K 1069 mm 42 in 9 2 ...

Страница 193: ... When applying Front tire 8 5x10 4PR Rear tire 12x12 4PR NHIL20CT01385GA 1 ID Description ID Description A 1153 mm 45 in F 106 mm 4 in B 916 mm 36 in G 340 mm 13 in C 880 mm 35 in H 1425 mm 56 in D 1187 mm 47 in I 311 mm 12 in E 1661 mm 65 in J 2579 mm 102 in 9 3 ...

Страница 194: ... Fuel tank 25 L 6 6 US gal Cooling system capacity 3 3 L 3 49 US qt Engine crankcase With Filter 2 9 L 3 US qt Rear axle transmission Includes hydraulics HST 12 5 L 3 US gal Front axle 2 0 L 0 5 US gal Cooling system Type Pressurized liquid with recirculating bypass Water pump Type Centrifugal Drive V Belt Cooling system capacity 3 3 L 3 49 US qt Belt deflection 10 14 mm 0 39 0 55 in when 10 kgf 2...

Страница 195: ...al Differential lock type Mechanical foot operated Service brake Type Multi disc wet Actuation Mechanical one suspended pedal Number of plates per axle 2 Total number of Plates 4 Disc lining diameter OD 108 mm 4 25 in Disc lining diameter ID 65 mm 2 56 in Disc thickness 3 4 mm 0 1338 in Lining type Material Paper Service brake pedal parking lock Yes Minimum wear thickness 0 4 mm 0 0157 in Stator d...

Страница 196: ...on As viewed from rear of tractor Clockwise Number of splines 15 Shaft size 25 0 mm 0 98 in Engine speed for 2500 RPM mid PTO operation 2841 RPM Hydraulic lift system Category One Type Open center Pump type Gear Pump capacity 25 L min 6 6 US gpm System relief valve setting 12997 13500 kPa 1885 1958 psi Control type Lift hold lower Drop rate control valve Standard Mower cut height control Standard ...

Страница 197: ... Turf 18x 8 50 10 4PR R3 Industrial 18x 8 50 10 4PR R4 Rear Turf 26 x 12 0 12 4PR R3 Industrial 26 x 12 0 12 4PR R4 Wheel bolt torques Front wheel disc to hub FWD 65 N m 48 lb ft Rear wheel disc to axle 65 N m 55 lb ft Roll Over Protective Structure ROPS attaching bolt torques ROPS to rear axle 76 N m 56 lb ft Seat belt 61 N m 45 lb ft 9 7 ...

Страница 198: ...on 2220 mm 87 in Down Position 1626 mm 64 in 4 WIDTH Rear Axle Outside to Outside of tire Tires 26 x 12 0 12 4PR 1187 mm 47 in 5 MINIMUM GROUND CLEARANCE rear axle center line Tires 26 x 12 0 12 4PR 306 mm 12 in Workmaster 25S WHEEL TREAD SETTINGS 6 FRONT Tires 26 x 12 0 12 4PR 916 mm 36 in 7 REAR Tires 26 x 12 0 12 4PR 880 mm 35 in WEIGHT with fluids and without an operator 1175 kg 2590 lb 9 8 ...

Страница 199: ...9 SPECIFICATIONS NHIL17CT01125FA 1 NHIL17CT01124FA 2 9 9 ...

Страница 200: ...9 SPECIFICATIONS 9 10 ...

Страница 201: ... SHIELDS and OPERATOR S PLATFORM Check all the items below to insure they care installed correctly and operating properly Seat Belts Installed PTO shield installed Slow Moving Vehicle SMV emblem installed Safety decals installed Operator presence system safety interlock system for cranking circuit operation Park brake operation Hazard lights tail lights operation All lights operation Operator s Ma...

Страница 202: ...trol drop rate adjustment Four Wheel Drive 4WD operation Operation and adjustment of brakes Hydrostatic transmission HST No fluid or oil leaks 5 OTHER Check for proper installation of the following items Air cleaner element hose connections Engine belts tension adjustment Battery fully charged Top link Draw bar The above pre delivery service was performed and corrective action taken as required De...

Страница 203: ...nstalled correctly and operating properly Seat Belts Installed PTO shield installed Slow Moving Vehicle SMV emblem installed Safety decals installed Operator presence system safety interlock system for cranking circuit operation Park brake operation Hazard lights tail lights operation All lights operation Operator s Manual present 2 FLUID LEVELS and LUBRICATION Check and top off as necessary Engin...

Страница 204: ...on and adjustment of brakes Hydrostatic transmission HST No fluid or oil leaks 5 OTHER Check for proper installation of the following items Air cleaner element hose connections Engine belts tension adjustment Battery fully charged Top link Draw bar The above pre delivery service was performed and corrective action taken as required Dealer Representative s Signature I have been instructed in the op...

Страница 205: ... Cab If equipped 9 3 Do not operate tag 2 7 Drawbar Operation 6 13 E Ecology and the environment 2 8 Electrical power outlet socket Cab If equipped 3 22 Electrical system Troubleshooting 8 4 Electro Magnetic Compatibility EMC 1 6 Emergency stopping 4 11 Engine Change fluid 7 13 7 27 Engine cooling system Basic instructions 7 2 Engine cooling system Check 7 10 Engine cooling system Drain fluid And ...

Страница 206: ... cluster panel 3 9 Intended use 1 2 K Key switch 3 17 M Machine orientation 1 10 Machine specifications and dimensions Cab If equipped 9 1 Main fuse Check 7 44 Maintenance chart 7 8 Mechanical service brakes Check 7 21 Mechanical service brakes Troubleshooting 8 2 Mid mount mower deck height adjustment knob 3 32 Mid mount two spool control valve lever 3 12 Multifunction light switch 3 8 N Note to ...

Страница 207: ...edal 3 19 Starting the engine 4 6 Starting the tractor with jumper cables 4 8 Steering Operation 4 12 Steering Troubleshooting 8 3 Stopping the engine 4 9 Stopping the unit Brakes 4 10 Storage Check 7 48 Storage Storing 7 48 Switches and work lights Cab If equipped 3 35 T Tire pressure Check 7 24 Tractor ballasting weights 6 6 Tractor dimensions Roll Over Protective Structure ROPS 9 8 Tractor gene...

Страница 208: ...roperty of those respective companies CNH Industrial America LLC reserves the right to make improvements in design and changes in specifications at any time without notice and without incurring any obligation to install them on units previously sold Specifications descriptions and illustrative material herein are as accurate as known at time of publication but are subject to change without notice ...

Отзывы: