background image

Wireless-B Broadband Router

35

Network Everywhere

®

Series

34

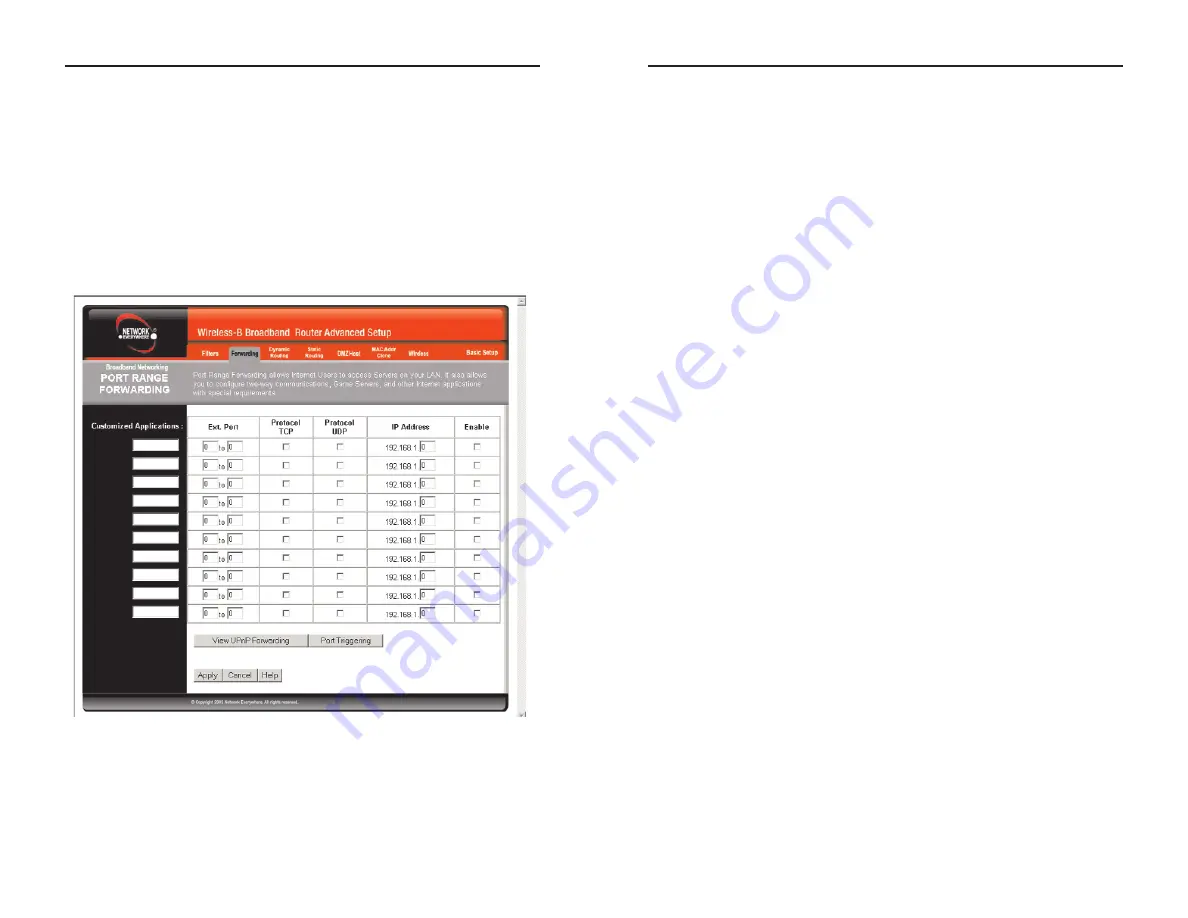
Port Range Forwarding sets up public services on your network, such as web
servers, ftp servers, e-mail servers, or other specialized Internet applications.
(Specialized Internet applications are any applications that use Internet access
to perform functions such as videoconferencing or online gaming. Some
Internet applications may not require any forwarding.) When users send this
type of request to your network via the Internet, the Router will forward those
requests to the appropriate PC.  Before using Forwarding, the Router’s DHCP
function must be disabled under the DHCP tab and the Router must be assigned
a new static LAN IP address because the IP address may change when using
the DHCP server.

If you need to forward all ports to one PC, see the “DMZ” section.

To add a Customized Application using Port Range Forwarding:

1. Enter the 

name

of the application in the appropriate Customized

Application field. 

2.  Next to the name of the application, enter the 

number

of the external port

used by the server in the Ext. Port column. Check with the Internet appli-
cation software documentation for more information.

3.  On the same line, select 

Protocol TCP

or 

Protocol UDP

.  

4. Enter 

the 

IP address

of the server that you want the Internet users to be able

to access. For information about finding the IP address, go to “Appendix D:
Finding the MAC Address and IP Address for Your Ethernet Adapter.”

5. Check the 

Enable

box to enable the services you have defined. Port Range

Forwarding will not function if the 

Enable

button is left unchecked. This is

disabled (unchecked) by default.

6.  Configure as many entries as needed—the Router supports up to 10 ranges

of ports. Click the 

Apply

button.

To apply any of the settings you’ve changed on this page, click the 

Apply

but-

ton.  To cancel any values you’ve entered on this page, click the 

Cancel

button.

If you should need any further information about anything on this screen, click
the 

Help

button.

To apply any of the settings you’ve changed on this page, click the 

Apply

but-

ton..  To cancel any values you’ve entered on this page, click the 

Cancel

but-

ton. If you should need any further information about anything on this screen,
click the 

Help

button.

Port Range Forwarding

Click the 

View Port Range Forwarding

button to access the Port Range

Forwarding screen, shown in Figure 5-13. To return to the UPnP Forwarding
screen, click the 

View UPnP Forwarding

button.

Figure 5-13

Содержание WR214E

Страница 1: ...CyberTAN Technology Inc User s Manual Wireless B Broadband Router WR214E...

Страница 2: ...ise or update its products software or documenta tion without obligation to notify any individual or entity Please direct all inquiries to Network Everywhere P O Box 18558 Irvine CA 92623 FCC STATEMEN...

Страница 3: ...ink the included Setup Wizards walk you through configuring the Router step by step With the Wireless B Broadband Router you re ready to start sharing printers files and your Internet connection the e...

Страница 4: ...de you ll see references to the Internet IP address and the LAN IP address Since the Router has firewall security NAT only the Router s Internet IP address can be seen from the Internet However even t...

Страница 5: ...w seconds will clear all of the Router s data and restore the factory defaults This should be done only if you are experiencing heavy routing problems and only after you have exhausted all of the othe...

Страница 6: ...re less adapter to a wired LAN and doubles the effective wireless transmission range for two PCs equipped with a wireless adapter Infrastructure mode also supports roaming capabilities for mobile user...

Страница 7: ...er than www networkeverywhere com or your e mail server s address is something similar to e mail or pop3 rather than pop mail networkeverywhere com you won t be able to properly configure the Router u...

Страница 8: ...rnet You will need to know which operating system your computer is running such as Windows 98 SE Millennium 2000 or XP You can find out by clicking the Start button and then selecting the Settings opt...

Страница 9: ...les Supply them by pointing to the correct file location e g D win98 D win9x c windows options cabs etc This assumes that D is the letter of your CD ROM drive 6 If Windows asks you to restart your PC...

Страница 10: ...7 Figure 4 8 Network Everywhere Series 14 The following instructions assume you are running Windows XP s default interface If you are using the Classic interface where the icons and menus look like p...

Страница 11: ...d enter admin the default password in lowercase letters in the Password field Then click the OK button To apply any of the settings you change on a page of the Utility click the Apply button To cancel...

Страница 12: ...channel in order to function correctly Verify that the correct channel is selected and click the Apply button to set it WEP Mandatory Disable In order to utilize WEP encryption select Enable If you do...

Страница 13: ...The default Redial Period is 30 seconds To apply any of the settings you ve changed on this page click the Apply but ton To cancel any values you ve entered on this page click the Cancel but ton If yo...

Страница 14: ...r s settings The Password screen shown in Figure 5 6 allows you to set up a password and UPnP Services You can also restore default settings on the Router Router Password Set a password for the Router...

Страница 15: ...The Log tab shown in Figure 5 9 provides you with a log of all incoming and outgoing URLs or IP addresses for your Internet connection Access Log To access activity logs select the Enable option next...

Страница 16: ...the file using archive software such as WinZip 2 Select the Help tab see Figure 5 10 3 Click Upgrade Firmware to display a new window 4 Click the Browse button to find the firmware upgrade file you ex...

Страница 17: ...ter the same value into both fields For instance if you wish to filter the PC with the IP address of 192 168 1 5 enter 5 into both fields on one line 192 168 1 5 192 168 1 5 Click the Apply button whe...

Страница 18: ...e VPN sessions PPTP Pass Through is enabled by default To disable this feature click on Disable next to PPTP Pass Through L2TP Pass Through This feature lets you use L2TP Pass Through L2TP Pass Throug...

Страница 19: ...ternet applications They include the following FTP File Transfer Protocol A protocol used to transfer files over a TCP IP network Internet UNIX etc For example after developing the HTML pages for a we...

Страница 20: ...tware documentation for more information 3 On the same line select Protocol TCP or Protocol UDP 4 Enter the IP address of the server that you want the Internet users to be able to access For informati...

Страница 21: ...h protocol for either transmission TX or reception RX of network data by selecting Enabled Click the Show Routing Table button to open a chart displaying how data is routed through your LAN Dynamic Ro...

Страница 22: ...IP address of the gateway device that allows for contact between the Router and the remote network or host Hop Count This determines the maximum number of steps between net work nodes that data packet...

Страница 23: ...on If you should need any further information about anything on this screen click the Help button MAC Address Clone Figure 5 18 From the DMZ Host screen shown in Figure 5 17 you can expose one local u...

Страница 24: ...it the basic transfer rates of faster adapters TX Rates Select all the rate at which you wish the Router to communicate within your wireless network Preamble Type The preamble defines the length of th...

Страница 25: ...on a PC The Router by default assigns an IP address range of 192 168 1 100 to 192 168 1 149 using the DHCP server on the Router To set a static IP address you can only use the ranges 192 168 1 2 to 1...

Отзывы:

Похожие инструкции для WR214E