manualshive.com logo in svg
background image

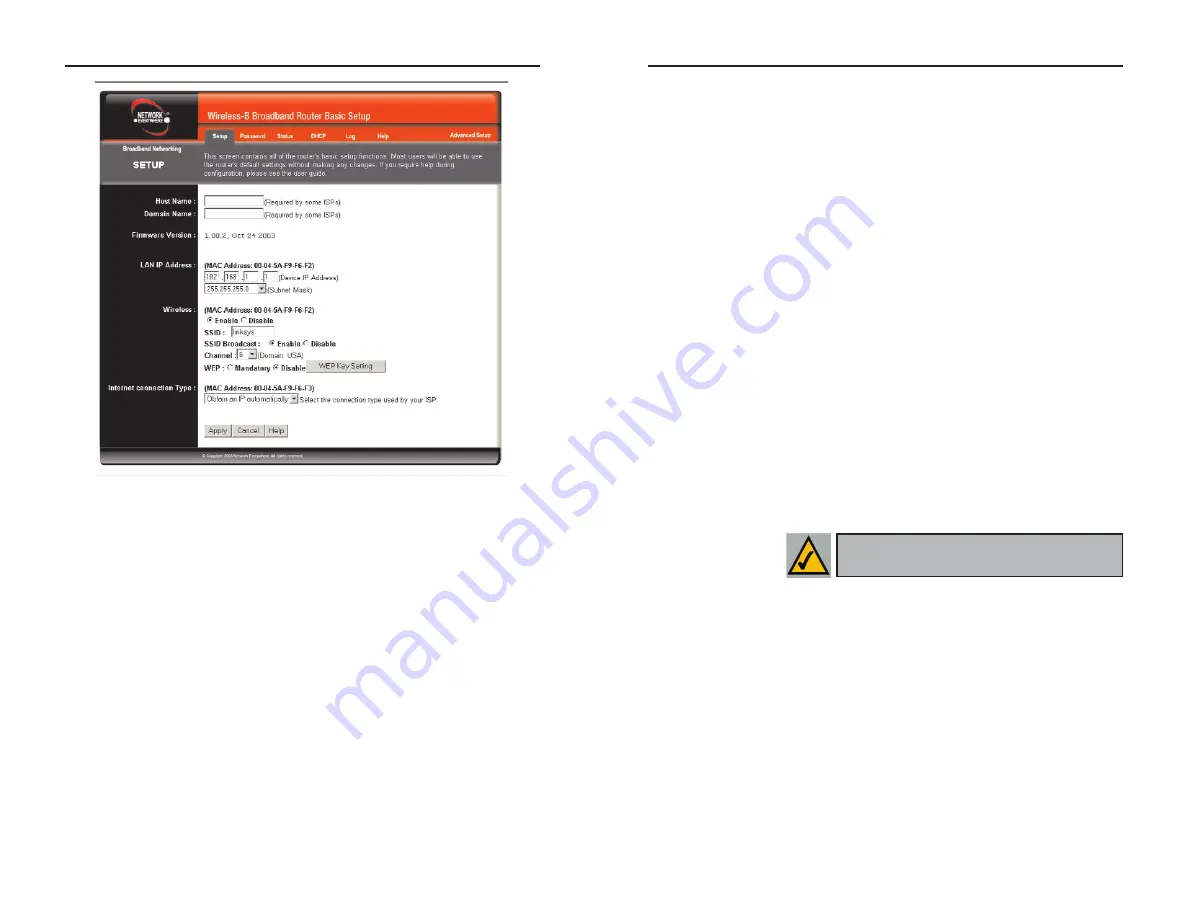
Wireless-B Broadband Router

Wireless (Enable/Disable).

In order to utilize the Router’s wireless functions,

select 

Enable

. If you do not wish to utilize any wireless functions, make sure

Disable

is selected.  

(

Note:

No other wireless functions will be available unless

you enable this setting.)

SSID

: The SSID is a unique name for your wireless network.  It is case sen-

sitive and must not exceed 32 characters.  The default SSID is "wireless "
but you should change this to a personal wireless network name.  All wire-
less points in your network must use the same SSID. Verify that you are
using the correct SSID and click the 

Apply

button to set it.

SSID Broadcast

- Allows the SSID to be broadcast on your network. You

may want to enable this function while configuring the Router, but make
sure that you disable it when you are finished. With this enabled, someone
could easily obtain the SSID information with site survey software and gain
unauthorized access to your network. Click 

Enable

to broadcast. Click

Disable 

to increase network security and prevent the SSID from being seen

on networked PCs

.

Channel 

Select the appropriate channel from the list provided to corre-

spond with your network settings, between 1 and 11.  All points in your
wireless network must use the same channel in order to function correctly.
Verify that the correct channel is selected and click the 

Apply

button to set

it.

WEP (Mandatory/Disable).

In order to utilize WEP encryption, select

Enable

. If you do not wish to utilize WEP encryption, make sure 

Disable

is selected.

Internet Connection Type  

The Router supports three connection types:

DHCP, PPPoE, and Static IP. Each Setup screen and available features will dif-
fer depending on what kind of connection type you select.

Obtain an IP Address Automatically

By default, the Router’s Internet Connection is set to Obtain an IP auto-
matically, as shown in Figure 5-3, and it should be used only if your ISP
supports DHCP.

To apply any of the settings you’ve changed on this page, click the 

Apply

button. To cancel any values you’ve entered on this page, click the 

Cancel

button. If you should need any further information about anything on this
screen, click the 

Help

button.

19

Network Everywhere

®

Series

Firmware Version

This entry shows the version and date of the firmware the

Router is using. Future versions of the Router’s firmware will be posted and
available for download on the Network Everywhere website at

www.NetworkEverywhere.com

.

LAN IP Address

The values for the Router’s IP Address and Subnet Mask are

shown here. The default values are 192.168.1.1 for the Device IP Address and
255.255.255.0 for the Subnet Mask.

18

Note:

To configure WEP encryption, see

Appendix C: Configuring Wireless Security.

Figure 5-3

Содержание WR214E

Страница 1: ...CyberTAN Technology Inc User s Manual Wireless B Broadband Router WR214E...

Страница 2: ...ise or update its products software or documenta tion without obligation to notify any individual or entity Please direct all inquiries to Network Everywhere P O Box 18558 Irvine CA 92623 FCC STATEMEN...

Страница 3: ...ink the included Setup Wizards walk you through configuring the Router step by step With the Wireless B Broadband Router you re ready to start sharing printers files and your Internet connection the e...

Страница 4: ...de you ll see references to the Internet IP address and the LAN IP address Since the Router has firewall security NAT only the Router s Internet IP address can be seen from the Internet However even t...

Страница 5: ...w seconds will clear all of the Router s data and restore the factory defaults This should be done only if you are experiencing heavy routing problems and only after you have exhausted all of the othe...

Страница 6: ...re less adapter to a wired LAN and doubles the effective wireless transmission range for two PCs equipped with a wireless adapter Infrastructure mode also supports roaming capabilities for mobile user...

Страница 7: ...er than www networkeverywhere com or your e mail server s address is something similar to e mail or pop3 rather than pop mail networkeverywhere com you won t be able to properly configure the Router u...

Страница 8: ...rnet You will need to know which operating system your computer is running such as Windows 98 SE Millennium 2000 or XP You can find out by clicking the Start button and then selecting the Settings opt...

Страница 9: ...les Supply them by pointing to the correct file location e g D win98 D win9x c windows options cabs etc This assumes that D is the letter of your CD ROM drive 6 If Windows asks you to restart your PC...

Страница 10: ...7 Figure 4 8 Network Everywhere Series 14 The following instructions assume you are running Windows XP s default interface If you are using the Classic interface where the icons and menus look like p...

Страница 11: ...d enter admin the default password in lowercase letters in the Password field Then click the OK button To apply any of the settings you change on a page of the Utility click the Apply button To cancel...

Страница 12: ...channel in order to function correctly Verify that the correct channel is selected and click the Apply button to set it WEP Mandatory Disable In order to utilize WEP encryption select Enable If you do...

Страница 13: ...The default Redial Period is 30 seconds To apply any of the settings you ve changed on this page click the Apply but ton To cancel any values you ve entered on this page click the Cancel but ton If yo...

Страница 14: ...r s settings The Password screen shown in Figure 5 6 allows you to set up a password and UPnP Services You can also restore default settings on the Router Router Password Set a password for the Router...

Страница 15: ...The Log tab shown in Figure 5 9 provides you with a log of all incoming and outgoing URLs or IP addresses for your Internet connection Access Log To access activity logs select the Enable option next...

Страница 16: ...the file using archive software such as WinZip 2 Select the Help tab see Figure 5 10 3 Click Upgrade Firmware to display a new window 4 Click the Browse button to find the firmware upgrade file you ex...

Страница 17: ...ter the same value into both fields For instance if you wish to filter the PC with the IP address of 192 168 1 5 enter 5 into both fields on one line 192 168 1 5 192 168 1 5 Click the Apply button whe...

Страница 18: ...e VPN sessions PPTP Pass Through is enabled by default To disable this feature click on Disable next to PPTP Pass Through L2TP Pass Through This feature lets you use L2TP Pass Through L2TP Pass Throug...

Страница 19: ...ternet applications They include the following FTP File Transfer Protocol A protocol used to transfer files over a TCP IP network Internet UNIX etc For example after developing the HTML pages for a we...

Страница 20: ...tware documentation for more information 3 On the same line select Protocol TCP or Protocol UDP 4 Enter the IP address of the server that you want the Internet users to be able to access For informati...

Страница 21: ...h protocol for either transmission TX or reception RX of network data by selecting Enabled Click the Show Routing Table button to open a chart displaying how data is routed through your LAN Dynamic Ro...

Страница 22: ...IP address of the gateway device that allows for contact between the Router and the remote network or host Hop Count This determines the maximum number of steps between net work nodes that data packet...

Страница 23: ...on If you should need any further information about anything on this screen click the Help button MAC Address Clone Figure 5 18 From the DMZ Host screen shown in Figure 5 17 you can expose one local u...

Страница 24: ...it the basic transfer rates of faster adapters TX Rates Select all the rate at which you wish the Router to communicate within your wireless network Preamble Type The preamble defines the length of th...

Страница 25: ...on a PC The Router by default assigns an IP address range of 192 168 1 100 to 192 168 1 149 using the DHCP server on the Router To set a static IP address you can only use the ranges 192 168 1 2 to 1...

Отзывы: