


IAC3000
User’s Manual
145
Some major fields are required:
Setting Description
Merchant Login ID
This is the “Login ID” that comes with the Authorize.Net account.
Merchant Transaction
Key
To get a new key, please log in Authorize.Net >> Click
Settings and Profile
>>
Go to the
“Security”
section >> Click
Obtain Transaction Key
>> Enter
“Secret Answer”
>> Click
Submit.
Payment Gateway URL
https://secure.authorize.net/gateway/transact.dll (default gateway address)
MD5 Hash
To enhance the transaction security, merchant owner can choose to enable
this function and enter a value in the text box:
“MD5 Hash Value”
.
Note: For detailed description, please see 4.2.1.6 ONDEMAND Authentication
1.3 Configure the Authorize.Net Merchant Account to Match the Configuration of IAC3000
Settings of the merchant account on Authorize.Net should be matched with the configuration of IAC3000:
Setting Description
MD5 Hash
To configure
“MD5 Hash Value”
, please log in Authorize.Net >> Click
Settings and Profile
>> Go to the
“Security”
section >> Click
MD5 Hash
>>
Enter
“New Hash Value”
&
“Confirm Hash Value”
>> Click
Submit
.
Required Card Code
If the
“Card Code”
is set up as a required field, please log in Authorize.Net >>
Click
Settings and Profile
>> Go to the
“Security”
section >> Click
Card
Code Verification
>> Check the
Does NOT Match (N)
box >> Click
Submit
.
Required Address Fields
After setting up the required address fields on the
“Credit Card Payment
Page Billing Configuration”
section of IAC3000, the same requirements
must be set on Authorize.Net. To do so, please log in Authorize.Net >> Click
Settings and Profile
>> Go to the
“Security”
section >> Click
Address
Verification System (AVS)
>> Check the boxes accordingly >> Click
Submit
.
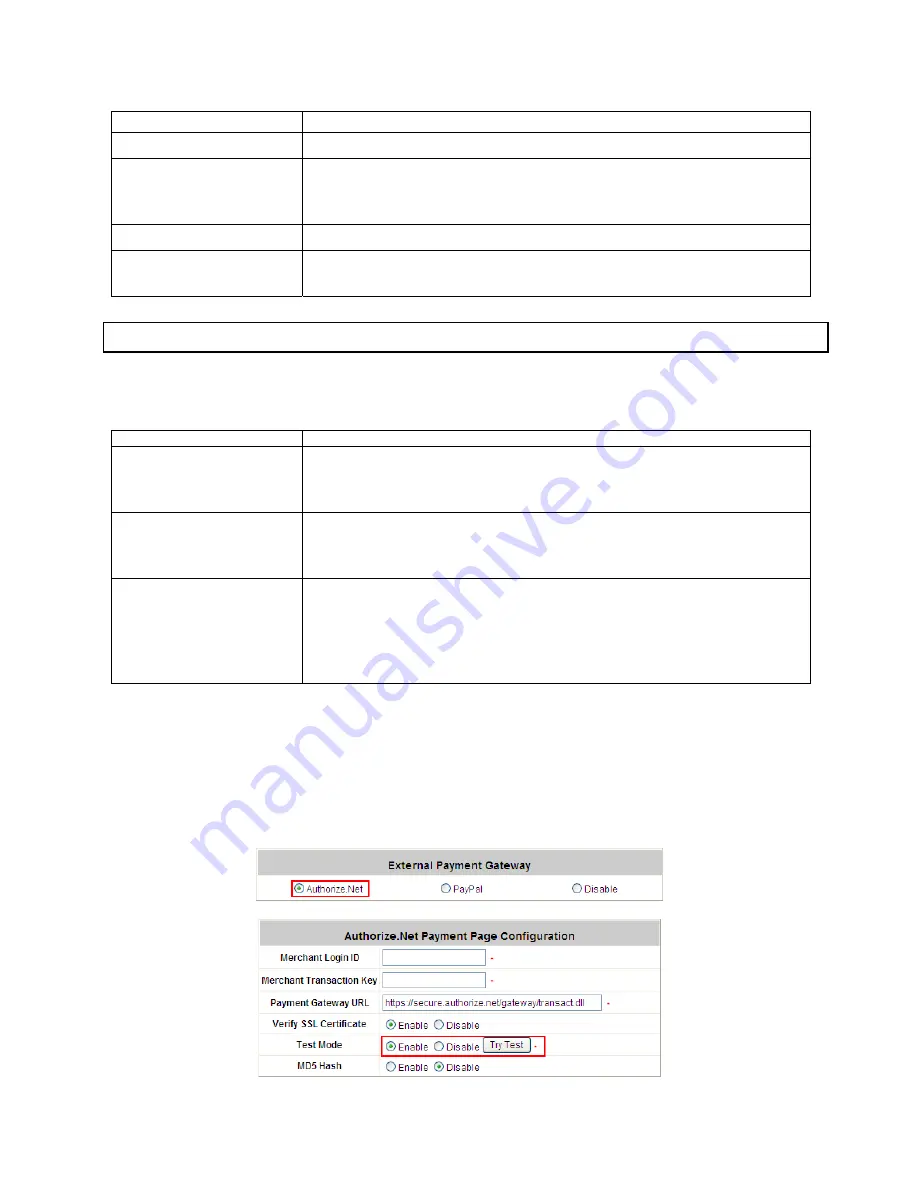
1.4 Test The Credit Card Payment via Authorize.Net
To test the connection between IAC3000 and Authorize.Net, please log in IAC3000.
User Authentication
>>
Authentication Configuration
>> Click the server
On-demand User
>>
External Payment Gateway
>>
Click
Configure
>>
External Payment Gateway
>>
Select
Authorize.Net
>> Go to “
Authorize.Net Payment Page
Configuration
” section >>
Enable
the
“Test Mode”
>> Click
Try Test
and follow the instructions
Содержание IAC3000
Страница 1: ...User Guide IAC3000 User Guide www netcomm com au IAC3000 Internet Access Controller...
Страница 23: ...IAC3000 User Manual 19...
Страница 46: ...IAC3000 User Manual 42 All managed APs that belong to this service zone are listed here...
Страница 124: ...IAC3000 User s Manual 120 Click NEW to enter the screen of Remote VPN Gateway...
Страница 132: ...IAC3000 User s Manual 128 4 6 1 System Status This section provides an overview of the system for the administrator...
Страница 145: ...IAC3000 User s Manual 141...
Страница 147: ...IAC3000 User s Manual 143...
Страница 153: ...IAC3000 User s Manual 149...
Страница 155: ...IAC3000 User s Manual 151...
Страница 165: ...IAC3000 User s Manual 161 Step 4 You will be redirected to PayPal website to complete the payment process...
Страница 166: ...IAC3000 User s Manual 162...
Страница 206: ...IAC3000 User s Manual 202...
Страница 216: ...IAC3000 User s Manual 212 y Custom Pages Login Page Uploaded Page Choose Uploaded Page and upload a login page...


