background image

HSPA WiFi Router with Voice-User Guide 

YML10WVR

www.netcommlimited.com

Preface

The purpose of this manual is to provide you with detailed information on the installation, operation and application of your HSPA WiFi 
Router with Voice.

Important Notice and Safety Precaution

Before servicing or disassembling this equipment, always disconnect all power or telephone lines from the device.

Use an appropriate power supply, preferably the supplied power adapter, with an output of DC 12V 1.5A

                
chemical plant/depot. Operation of such equipment in potentially explosive atmospheres can represent a safety hazard.

The device and antenna shall be used only with a minimum of 20cm from human body.

The operation of this device may affect medical electronic devices, such as hearing aids and peacemakers

The Antennas must be connected to this product prior to connecting the telephone cord.

The telephone cord must be disconnected prior to disconnecting the Antennas.

Содержание 3G10WVR

Страница 1: ...YML10WVR HSPA WiFi Router with Voice User Guide www netcommlimited com 1 NETCOMM LIBERTY SERIES HSPA WiFi Router with Voice User Guide 3G10WVR ...

Страница 2: ... the device Use an appropriate power supply preferably the supplied power adapter with an output of DC 12V 1 5A chemical plant depot Operation of such equipment in potentially explosive atmospheres can represent a safety hazard The device and antenna shall be used only with a minimum of 20cm from human body The operation of this device may affect medical electronic devices such as hearing aids and...

Страница 3: ...4 MAC Filter 24 5 6 Station Info 25 Management 27 6 1 Device Settings 27 8 29 6 3 Simple Network Time Protocol SNTP 30 6 4 Access Control 30 6 5 Save and Reboot 32 Advanced Setup 34 7 2 Network Address Translation NAT 36 7 3 Security 38 7 4 Routing 40 7 5 Domain Name Servers DNS 41 Voice 43 Status 45 8 1 Diagnostics 45 8 2 System Log 46 8 4 Statistics 50 8 5 Route 51 8 6 ARP 51 J K Q X Q Z 52 8 8 ...

Страница 4: ...verage through triple band HSUPA HSDPA UMTS 850 1900 2100MHz quad band EDGE GSM 850 900 1800 1900 MHz Embedded multi mode HSUPA HSDPA UMTS EDGE GPRS GSM module 1 x RJ11 port for voice calling over the 3G network via a connected standard Analogue Telephone not included Integrated 802 11g 54Mbps AP backward compatible with 802 11b WiFi Protected Access WPA WiFi Protected Access 2 WPA2 and 802 1x wir...

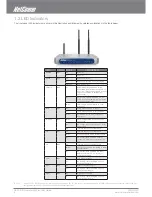
Страница 5: ... Blue Blink Data is transmitted through Internet connection Off No connection to the internet or router powered off On Internet connection established 3G Blue On Internet connection established Blink Connecting with UMTS cellular station Off No connection with UMTS cellular station no activity or router powered off 2G Blue On Internet connection established Blink Connecting to an EDGE GPRS or GSM ...

Страница 6: ...ar panel contains the ports for data and power connections Main 3G Antenna removable SMA connection Power jack for DC power input 12VDC 1 5A Power button USIM card slot Aux 3G Antenna removable SMA connection USB Port For connecting a USB Printer or USB Storage Device Reset button Phone Port for Circuit Switched Voice Call 2 RJ 45 Ethernet Ports ...

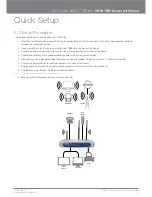
Страница 7: ...he back of the Router 3 Connect the yellow networking cable to one of the yellow ports found at the back of the Router 4 Connect the other end of the yellow networking cable to the port on your computer 5 If required connect a standard Analogue Telephone to the port labeled Phone using an RJ 11 Cable not included 6 Connect the power adapter to the Power socket on the back of the Router 7 Plug the ...

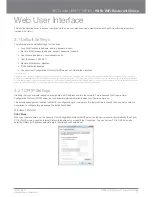
Страница 8: ...rname admin password admin Remote WAN access username support password support User access username user password user LAN IP address 192 168 1 1 Remote WAN access disabled Q X Q Z Technical Note _ _ 3 2 TCP IP Settings It is likely that your computer will automatically obtain an IP Address and join the network This is because the Dynamic Host X Q Z X Z Q _ Windows XP Vista 7 DHCP Mode Q Q X Z PC ...

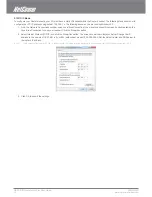
Страница 9: ...een by double clicking the Local Area Connection icon on your taskbar Click the Properties button 2 Select Internet Protocol TCP IP and click the Properties button The screen should now display as below Change the IP address to the domain of 192 168 1 x 1 x 254 with subnet mask of 255 255 255 0 Set the default router and DNS server to 8 8 J 8 8 X Z 8 8 J 8 3 Click OK to submit the settings ...

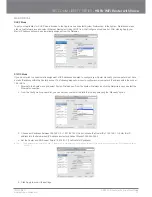
Страница 10: ...stem Preferences In the System Preferences menu _ _ Q _ STATIC Mode 192 168 1 x 1 Browse to the Apple menu and select System Preferences From the System Preferences click the Network icon and select the Ethernet connection 2 3 Choose an IP address between 192 168 1 2 192 168 1 254 Do not choose the Router IP of 192 168 1 1 Enter this IP _ _ 4 8 8 J 8 8 X Z 8 8 J 8 8 X Z as 192 168 1 2 5 Click Appl...

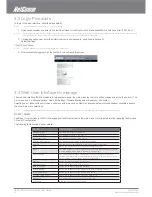
Страница 11: ...ME Q The following table provides further details FIELDS DESCRIPTION Software version The software version of the device Hardware version The Hardware version of the device Bootloader version The bootloader version of the device Wireless driver version The wireless driver version of the wireless module Network The name of or other reference to the mobile network operator Link Shows the connection ...

Страница 12: ...ession to be ON or Off By default they are set to off 4 Click the Save button to save the new settings 5 Press the Connect button to reboot the router and to connect to Internet After reboot the Device Info for 3G network box in the WUI Basic screen should indicate an active connection as shown below The 3G and Internet LEDs on the front panel of the Router should also be blinking _ _ either case ...

Страница 13: ...rized persons To use the 3G internet service with this router however the PIN code protection must be disabled If the SIM card inserted into the Router is locked with a PIN code the web user interface will display the following screen after login PIN Lock Off _ _ _ _ shows how many attempts left Contact Your 3G Carrieryour 3G Carrier if you require assistance You can select Remember PIN Code when ...

Страница 14: ... your PIN code for greater security enable the PIN Code protection Go to the previous section and follow the procedure listed under PIN Lock On _ _ Carrier if you require assistance Afterwards click Apply to activate the change _ NOTE If your PIN Code change request was successful the following dialog box will display ...

Страница 15: ...tart Menu and select View Available Network Connections If the access point is hidden it will not be listed there To connect a client to a hidden access point the station must add the access point manually to its wireless configuration SSID 1 32 characters Sets the wireless network name SSID stands for Service Set Identifier All stations must be configured with the correct SSID to access the WLAN ...

Страница 16: ...ty includes WEP WPA WPA2 data encryption SPI Firewall VPN Pass Through Authentication protocols PAP CHAP You can authenticate or encrypt your service on the WiFi Protected Access WPA which provides protection against unauthorized access such as eavesdropping wireless LAN interface You can set the network authentication method select data encryption specify whether a network key is required to auth...

Страница 17: ...suitable for enterprise applications It must be used in conjunction with an authentication server such as RADIUS to provide centralized access control and management It provides a stronger encryption and authentication solution WPA PSK WPA2 PSK A newer type of security is WPA PSK TKIP and WPA2 PSK AES This type of security gives a more secure network compare to WEP Use TKIP Encryption Type for WPA...

Страница 18: ...d A threshold in bytes determines whether packets will be fragmented and at what size Packets that exceed the fragmentation threshold of an 802 11 WLAN will be split into smaller units suitable for the circuit size Packets smaller than the specified fragmentation threshold value however are not fragmented Values between 256 and 2346 can be entered but should remain at a default setting of 2346 Set...

Страница 19: ... with legacy equipment Long preamble works with the current 1 and 2 Mbit s DSSS specification as described in IEEE Std 802 11 1999 Transmit Power Set the power output by percentage as desired 5 4 MAC Filter This screen appears when Media Access Control MAC Filter is selected This option allows access to be restricted based upon the unique 48 bit MAC address _ _ OPTION DESCRIPTION MAC Restrict Mode...

Страница 20: ...wireless bridge restriction Only those bridges selected in Remote Bridges will be granted access Click Refresh to update the station list when Bridge Restrict is enabled 5 6 Station Info The following screen appears when you select Station Info and shows authenticated wireless stations and their status Click the Refresh button to update the list of stations in the WLAN OPTION DESCRIPTION BSSID The...

Страница 21: ...ork Management Protocol SNMP 6 3 Simple Network Time Protocol SNTP 6 4 Access Control 6 5 Save and Reboot 6 1 Device Settings The Device Settings screens allow you to backup retrieve and restore the default settings of your Router It also provides a function for 6 1 1 Backup Settings _ _ _ _ 6 1 2 Update Settings The following screen appears when selecting Update from the submenu By clicking on th...

Страница 22: ... the window and wait 2 minutes X Settings for details After a successful reboot the browser will return to the Device Info screen If the browser does not refresh to the default screen close and restart the browser NOTE The Restore Default function has the same effect as the reset button The device board hardware and the boot loader support the reset to default button If the X 8 Z memory 6 1 4 Upda...

Страница 23: ...devices To do this the administrator typically runs an SNMP management station program such as MIB browser on 8 X Z and managers By default SNMP agent is enabled on the router Setting up SNMP agent 1 X Z X 8 8 J 8 8 Z to log into the web interface 2 The login username and password by default is admin admin 3 Go to Management SNMP for 3G10WVR Enable 4 SNMP agent and set up all options according to ...

Страница 24: ...below First NTP timeserver Select the required server Second NTP timeserver Select second timeserver if required Time zone offset Select the local time zone _ NOTE SNTP must be activated to use Parental Control section 7 3 2 6 4 Access Control in the following three areas Services IP Addresses Passwords Access Control is used to control local and remote management settings for your Router ...

Страница 25: ...checkbox as illustrated below These access services are available FTP HTTP ICMP SSH TELNET and TFTP Click Save Apply to continue 6 4 2 IP Address The IP Address option limits local access by IP address When the Access Control Mode is enabled only the IP addresses listed here can access the device Before enabling Access Control Mode add IP addresses with the Add button On this screen enter the IP a...

Страница 26: ...icted access control support is to be used for remote maintenance of the device 8 spaces Click Save Apply to continue 6 5 Save and Reboot 8 Q DHCP server you will need to apply Static IP settings NOTE2 If you lose all access to your web user interface simply press the reset button on the rear panel for 5 7 seconds to restore default settings ...

Страница 27: ...HSPA WiFi Router with Voice User Guide YML10WVR 34 www netcommlimited com Advanced Setup This chapter explains advanced setup for your Router 7 1 Local Area Network LAN _ X Z ...

Страница 28: ...ecify the IP address assigned through DHCP according to the MAC address of the hosts connected to HSPA WiFi Router Enable DHCP Server Relay To relay DHCP requests from the subnet with no DHCP server on it to a DHCP server on other subnets DHCP Server Relay is disabled by default To access enable DHCP relay please un tick NAT enable first that means to disable NAT first and then press save button T...

Страница 29: ...ess Enter the IP address for the server External Port Start Enter the starting external port number when you select Custom Server When a service is selected the port ranges are automatically configured External Port End Enter the ending external port number when you select Custom Server When a service is selected the port ranges are automatically configured Protocol User can select from TCP TCP UD...

Страница 30: ...ected the port ranges are automatically configured Trigger Port End Enter the ending trigger port number when you select custom application When an application is selected the port ranges are automatically configured Trigger Protocol TCP TCP UDP or UDP Open Port Start Enter the starting open port number when you select custom application When an application is selected the port ranges are automati...

Страница 31: ...BEL Protocol TCP TCP UDP UDP or ICMP Source IP address Source IP address Enter source IP address Source Subnet Mask Destination IP address Enter source subnet mask Source Port port or port port Enter source port number or port range Destination IP address Enter destination IP address Destination Subnet Mask Enter destination subnet mask Destination port port or port port Enter destination port num...

Страница 32: ...ternet Time server synchronization as described in section 6 3 SNTP so that the scheduled times match your local time Click Add to display the following screen See instructions below and click Save Apply to apply the settings OPTION DESCRIPTION User Name A user defined label for this restriction MAC address of the PC running the browser Other MAC Address MAC address of another LAN device Days of t...

Страница 33: ...ault Gateway checkbox is selected this device will accept a default Gateway assignment If the _ _ Save Apply NOTE After enabling the Automatic Assigned Default Gateway you must re boot the Router to activate the assigned default Gateway 7 4 2 Static Route _ Click the Add button to display the following screen Enter Destination Network Address Subnet Mask Gateway IP Address and or WAN Interface The...

Страница 34: ...ased to a static hostname in any of a selection of domains allowing the router to be more easily accessed from various locations on the internet Note The Add Remove buttons will be displayed only if the router has been assigned an IP address from the remote server To add a dynamic DNS service click the Add button and this screen will display OPTION DESCRIPTION D DNS provider Select a dynamic DNS p...

Страница 35: ...hone to the socket labeled Voice on the back of your Router Calling Features The 3G10WVR router allows you to experience the calling features provided by your service provider Please refer to the table below for more details CALLING FEATURE USAGE ACT CODE DE ACT CODE Access Voice Mail Access Voice Mail Standard wireless 98 Call Display Blocking per call 31 Call Forwarding All Calls 21 Ten digit ph...

Страница 36: ...ect the Ethernet interface on your computer Wireless connection Pass Indicates that the wireless card is ON Down Indicates that the wireless card is OFF DATA APN assigned IP Address Pass Indicates that the Router can communicate with the first entry point to the _ Fail Indicates that the Router was unable to communicate with the first entry point on the network and it may not have an effect on you...

Страница 37: ...re defined as follows Emergency is the most serious event level whereas Debugging is the least important For instance if the log level is set to Debugging all the events from the lowest Debugging level to the most critical level Emergency level will be recorded If the log level is set to Error only Error and the level above will be logged Display Level Allows you to select the logged events and di...

Страница 38: ...YML10WVR HSPA WiFi Router with Voice User Guide www netcommlimited com 47 NETCOMM LIBERTY SERIES HSPA WiFi Router with Voice 3 Click View System Log The results are displayed as follows ...

Страница 39: ...ue 15 digit number used to identify an individual user on a GSM or UMTS network HW Rev The hardware version of the 3G module Temperature The temperature of the 3G module in degrees Celsius System Mode WCDMA Europe CDMA 2000 America WCDMA band The 3G radio frequency band which supports tri band UTMS HSDPA HSUPA frequencies 850 1900 2100 MHz IMT2000 is 2100 MHz WCDMA800 is 850 MHz WCDMA1900 is 1900 ...

Страница 40: ...vice Provider Country Network Codes Each country and network has a unique code Cell ID The network information for the serving cell ID Primary Scrambling Code PSC The PSC of the reference WCDMA cell Data Session Status Connected or Disconnected HSUPA HSDPA Categories The HSUPA HSDPA categories correspond to different data transmission rates with higher numbers generally indicating faster rates Rec...

Страница 41: ...nsmit packet in bytes Pkts Rx TX receive transmit packets Errs Rx TX receive transmit packets with errors Drops Rx TX receive transmit packets dropped 8 4 2 3G Statistics Click 3G network in the Statistics submenu to display the screen below Inbound Octets Number of received octets over the interface Packets Number of received packets over the interface Drops Received packets which are dropped Err...

Страница 42: ...t route G use gateway H target is a host R reinstate route for dynamic routing D dynamically installed by daemon or redirect M modified from routing daemon or redirect Metric X Z kernels but may be needed by routing daemons Service Shows the name for WAN connection Interface Shows connection interfaces 8 6 ARP Click ARP to display the ARP information FIELD DESCRIPTION IP address Shows IP address o...

Страница 43: ...k name MAC Address Shows the Ethernet MAC address of the device host PC IP address Shows IP address of device host PC Expires In Shows how much time is left for each DHCP Lease 8 8 PING The PING menu provides feedback of connection test to an IP address or a host name Input an IP address or a host name e g www google com and press Submit The connection test result will be shown as below ...

Страница 44: ...he procedure for enabling the Printer Server for Windows Vista or Windows 7 1 Enable Print Server from Web User Interface Select Enable on board print server checkbox and enter Printer name and Make and model NOTE The Printer name can be any text string up to 40 characters The Make and model can be any text string up to 128 characters 2 _ ...

Страница 45: ...ww netcommlimited com 55 NETCOMM LIBERTY SERIES HSPA WiFi Router with Voice 3 _ 4 _ 8 8 J 8 8 8 _ NOTE The PrinterName must be the same as the printer name entered into the Printer section of 3G10WVR 5 _ Q _ have your printer driver installation media ...

Страница 46: ...HSPA WiFi Router with Voice User Guide YML10WVR 56 www netcommlimited com 6 _ 7 _ ...

Страница 47: ...rd print server checkbox and enter Printer name Make and model NOTE The Printer name can be any text string up to 40 characters The Make and model can be any text string up to 128 characters To set up your printer check the Apple menu select System Preferences In the System Preference menu click on the Print Fax With your Printer driver installed please add your printer from the Print Fax menu Mou...

Страница 48: ...www netcommlimited com 8 8 J 8 8 8 NOTE The PrinterName must be the same as the printer name entered into the Printer section of 3G10WVR From Print Using drop down list and select your corresponding printer driver Click Add and check the printer status ...

Страница 49: ...uter with Voice Appendix B Samba Server For Windows Vista 7 Open a web browser such as internet Explorer Firefox or Safari Type in the address NetbiosName DirectoryName eg ntc cpe ntc cpe For MAC OSX _ _ Choose Connect to Server from the Go menu eg smb ntc cpe ntc cpe Select Connect to connect your USB driver ...

Страница 50: ...nd found to comply with the Standards for C Tick and or A Tick as set by the ACA These standards are designed to provide reasonable protection against harmful interference in a residential installation This equipment generates uses and can radiate radio noise and if not installed and used in accordance with the instructions detailed within this manual may cause interference to radio communications...

Страница 51: ...re limits human proximity to the antenna shall not be less than 20cm 8 inches during normal operation Operation is subject to the following two conditions 1 this device may not cause interference and 2 this device must accept any interference including interference that may cause undesired operation of the device IC Important Note IC Radiation Exposure Statement This equipment complies with IC RSS...

Отзывы: