


82
NetApp AltaVault Cloud Integrated Storage Installation and Service Guide for Physical Appliances
Beta Draft
System maintenance
Replacing system DIMMs
5.
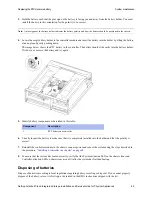
Identify DIMM components as described in this table
6.
Remove the replacement DIMM from the anti-static shipping bag, hold the DIMM by the corners, and align it over
the slot. The notch among the pins on the DIMM should line up with the tab in the socket.
Important:
Carefully hold the DIMM by the edges to avoid pressure on the components on the DIMM circuit board.
7.
Insert the DIMM squarely into the slot. The DIMM fits tightly into the slot, but should go in easily. If not, realign
the DIMM with the slot and reinsert it.
Important:
Visually inspect the DIMM to verify that it is evenly aligned and fully inserted into the slot.
8.
Push carefully, but firmly, on the top edge of the DIMM until the latches snap into place over the notches at the
ends of the DIMM, displayed below. An audible click sound indicates the DIMM is securely installed in the slot.
9.
Repeat the preceding steps to install additional DIMMs as needed.
10.
Close the CPU cover and close and lock the side panel.
11.
Reinstall the controller module in the chassis, connect power and boot up the system using the steps described in
the procedure,
“Installing a controller in a chassis” on page 64
12.
To ensure that the system has booted correctly, verify that the System attention LED on the chassis front and
Controller attention LED on chassis rear are not lit after the system has finished booting.
Component
Description
1
CPU cover
2
DIMM 6, DIMM 5, DIMM 1, DIMM 2 (left to right)
3
DIMM 4, DIMM 3 (left to right)
4
DIMM 7, DIMM 8 (left to right)
Содержание AltaVault Cloud Integrated Storage 4.1
Страница 2: ......