background image

SECTION 4 
MAINTENANCE 


Inkjet Cartridge Storage 

Short-term Cartridge Storage 

(Less than 8 hours or less than 2 hours in hot/dry environments.)


The cartridge can be left in the Printer, for short periods of time. 


The next time that the Printer is used, the cartridge nozzles may have to be cleaned and purged 


Long-term Cartridge Storage 

(More than 8 hours or more than 2 hours in hot/dry environments.)


Clean the cartridge and place the cartridges in a re-sealable container (i.e. Tupperware) with a 
damp sponge or towel to maintain humidity and prevent the cartridge from drying out.  
Note: Do not allow the nozzle plate to make contact with the sponge/towel, or the ink will be 
wicked from the cartridge. 


When the cartridges are ready to be used again, the cartridge body and contact area will need 
to be dried and the nozzles will need to be cleaned and purged. 

CAUTION!

 Be sure the contact area of the cartridge is dry, before installing it into the printer or 

damage to printer’s electronics will result. 

Note

: Decap Time (time it takes for unsealed cartridge nozzles to become clogged) will vary greatly. 

Ink type, environment, prior cartridge maintenance, and cartridge condition can affect decap time. 

Cartridge Disposal  

The cartridge may be disposed of in a normal manner. 
If there should be an ink spill, use soap and water to clean up any problem areas.  Abrasive soap works 
well to get the ink off of hands.


Cleaning the Inkjet Cartridge (Printhead) 

To maintain good print quality it is important that the printheads are kept clean.  During the printing 
process ink spray, paper fibers, and dust can cause a build-up on the cartridge nozzle plate (printhead).  
This build-up will eventually degrade the print quality.  If you begin to notice problems with the quality of 
the print; or to prevent a build-up from occurring; the nozzle plate of the cartridge should be cleaned with a 
damp, lint-free, non-abrasive, cloth. 

Cloth should be: 

Cloth should not be: 

D

 Soft 

D

 Fiberless 

D

 Moist with Water (Distilled is best) 

U

 Abrasive 

U

 Made of small fibers 

U

 Dry or containing chemical additives 


ƒ


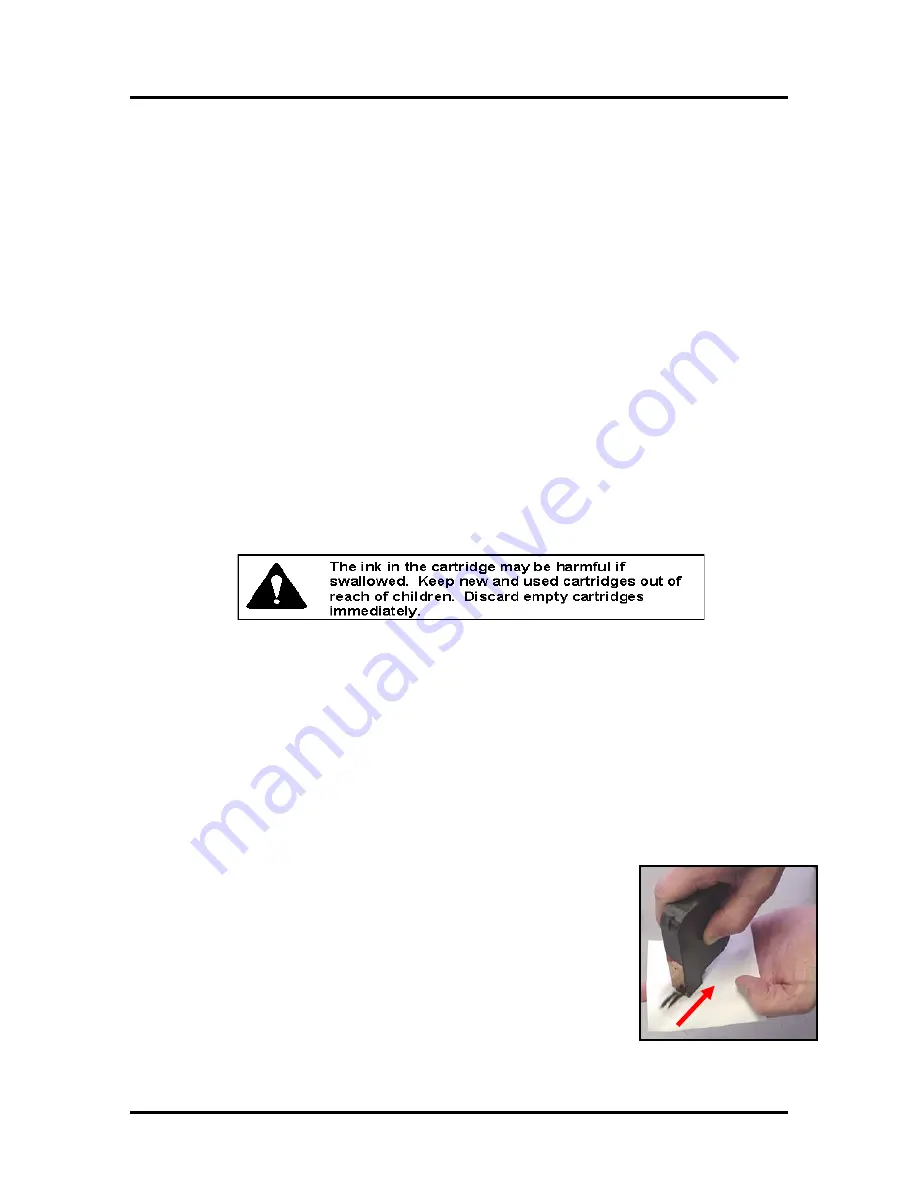
Place a drop of distilled water near the edge of the 

Cartridge Wipe

 cloth.  

ƒ


Start by placing the cartridge onto the damp area of the cloth.  

ƒ


Using a small amount of downward force, slowly pull the cartridge from 
the damp area, across to the dry area of the 

Cartridge Wipe

, while 

slowly decreasing the amount of downward force.  

ƒ


Repeat this procedure a few times. Make sure you only clean the 
cartridge in one direction. Either from the front of the head to the back 
of the head, or from back to front.  
Note: Do not shake the cartridge; as this will cause air bubbles to form, 
which will negatively affect the performance of the cartridge. 

ƒ


It is recommended that you perform a purge, before starting to print 
again. 

Figure 29 

© 2009 Neopost USA Inc. All rights reserved.

38

Содержание AS-940

Страница 1: ...AS 940 Addressing Solution Operating Guide...

Страница 2: ...Guide Adjustments______________________________________________________ 16 Loading Media___________________________________________________________________ 17 Media Thickness Adjustment _____________...

Страница 3: ..._____________________41 SECTION 5 TROUBLESHOOTING GUIDE ___________________________________________43 HP INKJET PRINT CARTRIDGES ________________________________________________________43 THE PRINTER...

Страница 4: ...chine for the power supply 9 DO NOT use an adapter plug on the line cord or wall outlet 9 DO NOT remove the ground pin from the line cord 9 DO NOT route the power cord over sharp edges or trapped betw...

Страница 5: ...l be required if you ever need to ship the printer Contents The following items are included with your printer 1 Print Carriage Cover including mounting hardware 1 Power Cord 2 Media Side Guides mount...

Страница 6: ...over to the printer WARNING Be careful not to over tighten the screws or you will damage the cover Attach the Media Side Guides Using the 4 flat head Philips screws supplied attach the Media Side Guid...

Страница 7: ...upport behind the two loosened screws Using the two small Philips head screws supplied attach the upper portion of the rear paper support to the deck of the printer Secure the two lower Philips head s...

Страница 8: ...r desired locations 3 MEDIA SIDE GUIDES Used to center the media in the printer and provide straight feeding of media 4 REAR PAPER SUPPORT Provides the proper angle to enhance media feeding and separa...

Страница 9: ...sed to set the printheads at the proper height for printing on the media 11 SHEET SEPARATOR LOCKING LEVER Is used to lock the separators in place after they are adjusted 12 SHEET SEPARATORS four Use t...

Страница 10: ...GE LATCH LEVERS Used to secure the inkjet cartridge in to the Pen Stall 20 PEN STALL The area where the inkjet cartridge is inserted 21 PRINT UNIT SECURING KNOBS Used to secure the print unit position...

Страница 11: ...ding down this key until all LED s light momentarily will reset the printer to its normal ready state 6 key In the menu mode this key will scroll to the next selection 7 MENU key This key causes the p...

Страница 12: ...SECTION 1 GETTING ACQUAINTED Notes 2009 Neopost USA Inc All rights reserved 12...

Страница 13: ...recommended 3 Connect one end of the power cord to the rear of the Printer in the corresponding receptacle 4 Plug the other end into a 115 Volt AC 50 60 Hz Grounded outlet CAUTION Do not use an adapt...

Страница 14: ...stop and display Head Low Press Enter After you press Enter you can choose to ignore the warning or you can check the cartridge If the cartridge is almost empty you should replace the cartridge and r...

Страница 15: ...re 16 4 Place a single piece of media under the separators as shown in It is best to place the media so it is in the center position on the table Figure 17 5 Unlock the separators that have media bene...

Страница 16: ...dimes width 1 32 inch from the sides of the media as shown in Figure 21 5 Tighten the Media Side Guide Securing Knobs to secure the side guide positions Figure 20 Rear Media Guide Adjustments 1 Place...

Страница 17: ...stack of material so the bottom pieces are closest to the separation point as shown in Then carefully place the stack between the side guides so the leading edge of the stack is against the sheet sep...

Страница 18: ...ly adjusted the Media B will be securely captured between the printhead carriage rollers and the lower transport belts It should require a moderate amount of force to pull the Media B from under the p...

Страница 19: ...s The red lines at the exit end of the print unit can be used to approximate the print position on the media as shown in Figure 27 1 Loosen the Print Unit Securing Knobs See 2 Slide the Print Units to...

Страница 20: ...e used to print a TEST image The TEST image can be used to Check the vertical print position Demonstrate the printer Check the condition or the ink cartridges Check the function of the printer Note Ho...

Страница 21: ...he Service Menu where the various functions of the printer can be tested To exit the Service Menu turn the printer OFF then ON again The service menu is primarily used by service technicians to diagno...

Страница 22: ...the Setup Menu press and hold the MENU key until the Setup Menu appears Step through the Setup Menu items using the or key Total Count The total count displayed is the total number of prints that hav...

Страница 23: ...s the ENTER key and the following display will appear Enter Recover 1 piece 3 Use the key to select the number of pieces you wish to recover up to 9 NOTE Count the number of pieces you wish to recover...

Страница 24: ...r can install the driver 1 Insert the Product CD The installation program should start automatically if not browse the CD and open the file named Install_Menu 2 Select Driver Installation from the men...

Страница 25: ...the driver install is complete please see the section USB Port Selection and Verification Process before you attempt to print 6 Choose your printer model from the menu Click Next 7 Select whether or...

Страница 26: ...st page Click Next USB Users Do NOT print a test page until you have verified and tested proper port selection See section titled USB Port Selection and Verification Process 10 Verify all of your info...

Страница 27: ...plete the installation Installation is now complete USB Users Do NOT attempt to print to the printer until you have reviewed the next section USB Port Selection and Verification Process SECTION 3 OPER...

Страница 28: ...r off on Start from Step 2 below 1 After the printer driver has been successfully installed on your computer connect the printer to the computer using a USB cable and turn the printer on If the printe...

Страница 29: ...ce for the system to recognize the printer and to see the status change 5 If the printer status does NOT change when you power the printer off and on click on the Ports tab then locate and select the...

Страница 30: ...three printheads cartridges when printing graphics or type that extends beyond the height of one printhead Each head can be moved 0 048 inch in 0 001 inch increments To adjust the printhead alignment...

Страница 31: ...ds available see below Belt speed The Belt speed IPS automatically changed to the optimum speed for the resolution selected You can however change the speeds to a lower speed as follows Text DPI Belt...

Страница 32: ...oice 2 Use the Bulk Mailer 5 Wizards to setup your job This newer version of Bulk Mailer is driven by Wizards which will guide you through the envelope design and layout process Your envelope design l...

Страница 33: ...nt quality and or orientation Use the features under Print Range to select the range of addresses you want to send to the printer 5 Print When ready to print make sure the printer is on line then clic...

Страница 34: ...orientation of the piece is always Portrait The effective printing area of the AS 940 is 2 5 inches by 15 inches When you have completed this step click OK The next step is to create a text box so tha...

Страница 35: ...n the Merge to menu there are several choices for where how the data is exported The two that concerns us is New Document and Printer If you choose New Document the merge will be created in your word...

Страница 36: ...SECTION 3 OPERATING THE PRINTER Notes 2009 Neopost USA Inc All rights reserved 36...

Страница 37: ...ackaging taking care not to touch the copper contacts or the nozzle plate Remove the protective tape from the printhead The cartridges are held in place by a lever mounted on the pen stall Release the...

Страница 38: ...ter to clean up any problem areas Abrasive soap works well to get the ink off of hands Cleaning the Inkjet Cartridge Printhead To maintain good print quality it is important that the printheads are ke...

Страница 39: ...that is not stiff enough may not be usable Media that meets Postal stiffness requirements for automated feeding is acceptable for use in the printer 4 Envelopes that are caught under the flap of anoth...

Страница 40: ...brasive and does not contain plastic harming solvents CAUTION NEVER SPRAY OR POUR CLEANERS DIRECTLY ON OR INTO THE PRINTER LIQUIDS CAN HARM ELECTRONIC PARTS ALWAYS DAMPEN A RAG WITH THE CLEANER AND AP...

Страница 41: ...it securing knobs and sliding the print unit toward the outside of the machine The sensor should be clean and free of accumulated paper dust Use a vacuum with a soft brush attachment or dry compressed...

Страница 42: ...Notes 2009 Neopost USA Inc All rights reserved 42...

Страница 43: ...nt free cloth moistened with distilled water Raise head height Cartridge will not print even if TEST or Purge is used Sheet is blank even after it has gone underneath cartridge s Check to make sure th...

Страница 44: ...e Not printing or counting Paper not passing over media sensor Media sensor is dirty damaged Readjust media side guide positions Clean media sensor Printing light missing parts of characters or dots C...

Страница 45: ...ected a paper jam while in Paper Feed or Test Print mode Clear Paper Jam Check separation adjustment Use a media length that matches size of currently set paper length length previously set via softwa...

Страница 46: ...in Download Font Encountered a wrong font Format Only font format 0 supported Clear job and try again If problem persists contact software vendor and or test from a different software program Error i...

Страница 47: ...ogos and barcodes MATERIAL SIZE Length 5 to 15 Width 3 to 13 5 MATERIAL THICKNESS Up to 1 4 FEEDER CAPACITY Up to 500 10 envelopes MEMORY 12 MB PRINT CARTRIDGES HP 45A Style Black Versatile Black Fast...

Страница 48: ...03 Ink Cartridge Red Part 745563 04 Ink Cartridge Yellow Part 745563 05 Optional Hardware Conveyor Stacker Available Obtaining Supplies Service and Support Please contact your local Neopost dealer to...

Страница 49: ...9 Maintenance 37 Media Sensor 41 Media Side Guide Securing Knobs 8 Media Side Guides 5 8 Media Thickness Adjustment Dial 9 11 Media Transport Belts 10 MENU key 11 21 Microsoft Word 34 Minus key 11 22...

Страница 50: ...ecautions 4 sensor 41 Service and Support 48 Service Menu 21 Setup Menu 22 Sheet Separator Locking Lever 9 Sheet Separators 9 39 speeds 31 Supplies 48 Systems Requirements 7 T TEST key 11 20 21 test p...

Отзывы: